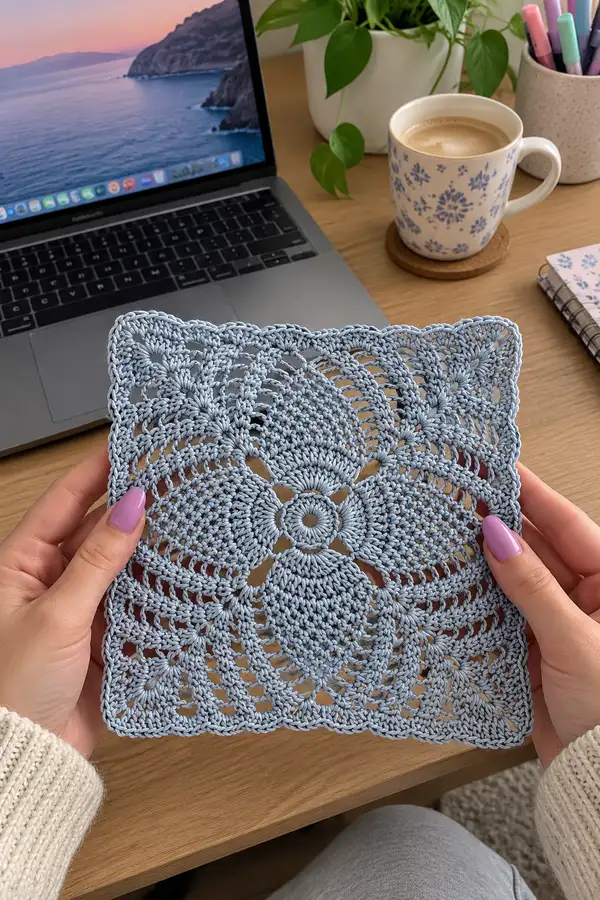
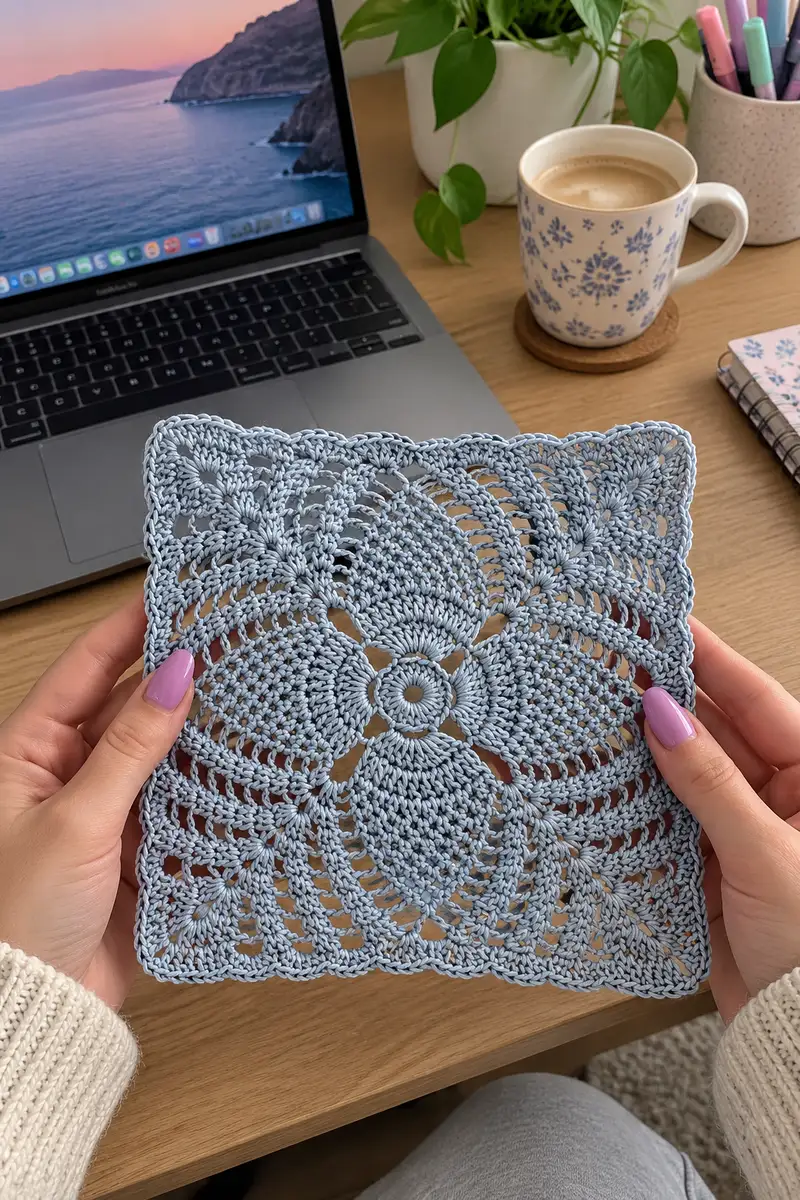
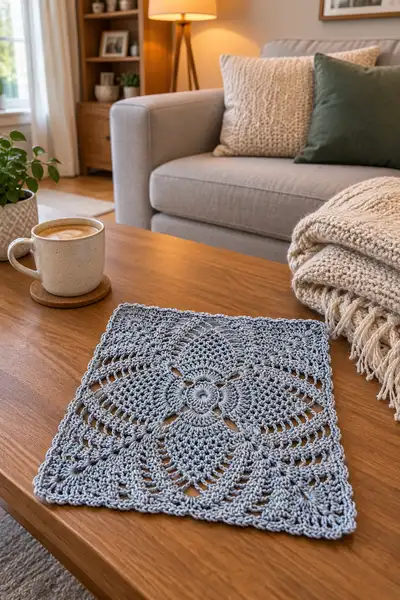
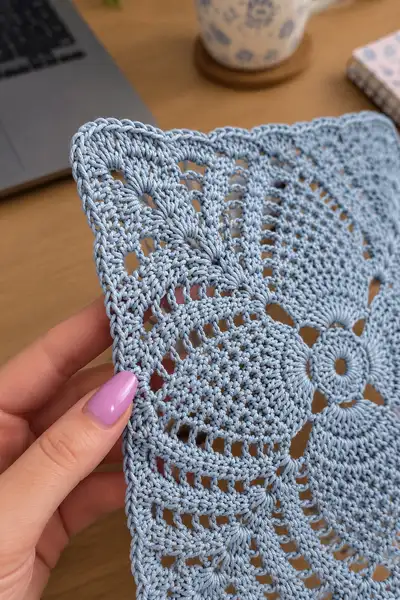
Wrap your bedroom in delicate floral lace with this Misty Blue Floral Bedspread pattern. The design is built from large lacy floral square motifs that join into a soft, vintage-inspired bedspread with scalloped edging and matching pillow shams. Detailed round-by-round instructions guide you through each motif, joining technique, and finishing touch so you can create a full-size coverlet in a serene misty blue tone.
Progress Tracker
0% Complete
— Gauge & Finished Size :
Info :
Gauge: One completed motif (before blocking) measures approximately 6.5–7.5 in (16.5–19 cm) square using sport/DK cotton and a 3.5mm hook. Blocked motif measures 8–10 in (20–25 cm) square depending on tension and blocking methods. Finished queen bedspread pictured is made from 6 x 8 motifs (48 motifs) with a scalloped border; finished size approximately 90 x 94 in after blocking. Adjust motif count to change final bedspread size.
— Stitch Notes & Techniques :
Info :
This pattern uses a combination of sc, dc, treble arches, puff clusters and chain spaces. Work tightly on rounds that form the central ring and petals but allow a bit more drape on outer lacy rounds. For crisp corners, use a smaller hook for the last 2 rounds of each motif if desired. Block each finished motif square before joining to achieve even edges.
— Motif (Make many) :
Round 1 :
Make a magic ring. Ch1, 6 sc in magic ring. Pull tight. (6)
Round 2 :
Inc in each st around (2 sc in each st) (12)
Round 3 :
(1 sc, inc) x 6 (18)
Round 4 :
(2 sc, inc) x 6 (24)
Round 5 :
(3 sc, inc) x 6 (30)
Info :
These rounds form a firm central medallion. Work these tight to make the flower center raised. You can substitute puff stitches on R5 for a pronounced center; see alternate notes below.
Round 6 :
(4 sc, inc) x 6 (36)
Round 7 :
(5 sc, inc) x 6 (42)
Round 8 :
(6 sc, inc) x 6 (48)
Round 9 :
Ch3 (counts as dc), dc in same st, *dc in next 7 sts; 2 dc in next st; rep from * around. (60)
Info :
Round 9 transitions the medallion into the first concentric ring of doubled stitches for petal base. Keep stitch counts even; you should have 12 increases across the round (48+12=60)
Round 10 :
Ch3, (dc) in next 2 sts, *ch3, skip 3 sts, 5 dc in next st (petal base), ch3, skip 3 sts, dc in next 3 sts; rep from * around, ending with dc to join. Note: This round creates 6 petal-base placements distributed around the circle. (60)
Round 11 :
Work petals: In each 5-dc petal base from previous round work (ch2, 3 tr, ch2, 3 tr, ch2) all into same base st to create a raised petal cluster; sl st to next petal base and repeat. After last petal, sl st to join. (6 petals, overall stitch count remains 60)
Info :
If you prefer a denser raised petal, substitute (ch2, puff x3, ch2) with puff stitches worked as follows: yarn over, insert hook, pull up loop five times, yarn over and pull through all loops, ch1 to close puff. Work three puffs in each petal base separated by ch2 spaces.
Round 12 :
Ch1, sc around petals to stabilize: Work 1 sc in each st and 3 sc into the base of each petal where needed to fill gaps. Maintain a count of 60 sts after finishing this stabilizing round (60)
Round 13 :
Ch3, dc in same st, *ch4, sk 3 sts, (dc, ch1, dc) in next st (creates chain arch), ch4, sk 3 sts, dc in next 2 sts; rep from * around. This begins the fan-lace shaping that will be squared later. (60)
Round 14 :
Ch3, dc in next st, *in ch4 sp work (2 dc, ch2, 2 dc) to enlarge arches, dc in next 2 sts; rep from * around. Count remains 60 structural stitch positions though clusters create open spaces (60)
Info :
Rounds 13–16 build lacy fans. Maintain the 60 reference points so subsequent corner shaping lines up. These rounds create the petal-to-corner transition that will be squared by the outer arches.
Round 15 :
Ch3, dc in next 3 sts, *(3 tr in next ch2 sp, ch3, 3 tr in same sp) fan, dc in next 4 sts; rep from * around. The fan clusters will push outward into an oval shape — we will square this next.
Round 16 :
Ch1, sc in same st and in each dc across until you reach first fan; in fan top ch3 space work (sc, hdc, 3 dc, hdc, sc) to create a pointed petal top, continue sc across to next fan and repeat. This makes 6 pointed petals. (60)
Round 17 :
Ch4 (counts as tr), tr in next 6 sts, *ch5, sk 5 sts, tr in next 7 sts; rep from * around. You will have created extended arches between petals and small chain loops that will be used to square the motif. Approx total tr count 72–84 depending on placement but position around 60 reference points.
Info :
At this stage the motif is more circular; we will create the four square corners by forming corner shells at four evenly spaced positions (every 3 petals). Use stitch markers to note the corner start points — mark them at the end of 3 petals to get even quadrants.
Round 18 :
Working into chain loops and spaces create corner chains: *At marker work (2 dc, ch3, 2 dc) in the chain loop to form corner shell; between corners work 10 dc evenly across chains and tr spaces to form a straight side; rep from * to make 4 corner shells. After this round the motif begins to square out. Total stitch count will be 4 corner shells of 4 sts each plus side stitches = approx 80 sts arranged in 4 sides.
Round 19 :
Ch1, sc across each dc and inside each corner shell work (sc, hdc, 3 dc, hdc, sc) to bulk the corner and secure shape. Aim for an even 88 sts after finishing this stabilizing round (88)
Round 20 :
Ch3, dc in next 3 sts, *ch2, skip 2 sts, (5 dc cluster in next st) to create 4 side fan clusters per side separated by ch2 arches; rep from * around ensuring 4 cluster groups between corner shells. Count is maintained at 88 structure points (88)
Info :
From R18 onward you are shaping the motif into a square by strategically placing corner shells and side clusters. Blocking after finishing motifs will help these corners sit squarely.
Round 21 :
In each 5-dc cluster work a layered shell: (ch2, 5 tr, ch2, 5 tr) to create tall lacy fans that reach toward the final outer boundary. Place 4 of these per side. After completing all sides, sl st to join. The motif now has tall arches that will be squared by the next rounds. (88)
Round 22 :
Ch1, sc evenly around entire motif placing 3 sc into each corner shell to define corners clearly. Total sc count should be 92–96 depending on exactly how many filler sts you needed to keep edges even (aim for 96)
Round 23 :
Ch3, dc in each st around but work (dc, ch1, dc) into corner shells to make square corners. After this round check that the motif measures your target blocked size – slight differences can be balanced by blocking. Approx (96)
Round 24 :
Working in FLO only: ch1, sc in each st FLO to create a textured ridge on the face of the motif; work 3 sc into each corner to emphasize square shape. (96)
Info :
Working in the FLO helps motifs sit flatter on the bedspread surface and gives an attractive haired ridge that shows up after blocking. If you prefer a smooth finish, skip FLO and work regular sc in both loops.
Round 25 :
Ch3, *dc in next 4 sts, (ch3, sk 2, dc in next st) repeat across the side to create small chain arches; in corners work (2 dc, ch3, 2 dc). Rep around. Count remains 96 structural positions (96)
Round 26 :
Ch1, sc around to stabilize. If you want a picot edge at the motif edge, in this round replace every 12th sc with (3 sc, picot: ch3, sl st in top of last sc). Aim for 96 sts (96)
Round 27 :
Edging round for join-as-you-go: ch1, sc 2, ch3, sk 1, *sc in next 10 sts, [sc, ch3, sc] in corner ch3 space to form corner, rep from * around ending with sc to join. This prepares the motif to be joined to neighbors using ch3 loop joining. (96)
Round 28 :
Final finishing round: Work a decorative scalloped edge along each side: *(sk 2, 5 dc in next st, sk 2, sl st) across edge stretches; in corners work 7 dc shell into corner to make rounded corners. Fasten off, weave in ends. Block to exact square dimensions. (visual effect; stitch counts vary by shell but corners will be even)
Info :
Blocking: wet-block each motif to target size and pin precisely to a square template. Allow to dry completely. Accurate blocking makes joining easier and gives crisp corners for an even bedspread.
— Joining Motifs (Join-As-You-Go Method) :
Info :
We recommend join-as-you-go (JAYG) on Round 27 or 28 so edges join invisibly. Work the final edging of a new motif, and when you reach the side where it will meet an already-blocked motif, replace the sl st or ch3 join with sl st through the corresponding sc or ch space on the adjacent motif. Work evenly across each side to form a flat seam. Use the same color yarn for the join for a seamless look.
Round 29 :
Start first motif edging fully. For second motif: when you reach a corner, align with the adjacent motif corner and sl st into the adjacent motif corner st instead of normal corner stitch; continue to work sc and sl st into adjoining motif edge sc across the side. This securely locks motifs together without a bulky seam. Repeat for all sides.
Info :
When joining, keep tension slightly looser than body motifs so joined seam lays flat. Place pins every 2–3 inches to hold alignment. For a decorative join, use contrasting slip stitches across joins to create a fine lattice line.
Round 30 :
For inner seams (motifs surrounded by motifs on all 4 sides) join two adjacent sides first, then rotate the motif and join the other sides. When motifs meet at a corner where four motifs converge, make sure the corner shells nest neatly; you may need to remove or add one sc to make corners lie flat — adjust symmetrically across the bedspread.
— Bedspread Layout & Assembly :
Info :
Calculate how many motifs you need based on desired finished size. Sample layout for queen shown uses 6 motifs across by 8 motifs down = 48 motifs. Layout on the floor or on a large table before joining. Arrange motifs with their faces up so floral centers line up visually across the spread.
Round 31 :
Begin joining the first row of motifs left to right. Join motifs row by row using JAYG method described. Once a full row is joined, join subsequent rows to the row above, matching seams. Work methodically to keep grid square.
Info :
Tip: When joining large bedspreads, work in sections — for example, join a 3x4 block at a time and then seam blocks together to reduce handling of a heavy single piece before the border is added.
Round 32 :
After all motifs are joined into the main rectangle, inspect the whole piece: are corners aligned and rows straight? If not, unpick a problematic seam and rejoin. Press lightly with steam if using cotton yarn to even the surface before border rounds.
— Main Border (Begin on the whole joined blanket) :
Round 33 :
With RS facing, pick up yarn at an interior corner. Ch1, work 1 sc in each edge stitch around entire bedspread; in motif corner ch3 spaces work (sc, ch3, sc) to create corner points. Join with sl st to first sc. This evens the raw edges and creates a uniform base for larger scallops. (work count varies by bedspread dimensions)
Round 34 :
Ch3, *dc in next 5 sts, (sk 2, 5 dc in next st) shell across long edges; in corners work (7 dc shell) to enlarge corners. The shells will give the scalloped texture that ties the whole layout together. Rep around. (visual; total sts depend on perimeter)
Info :
Use stitch counts and repeat spacing to ensure shells align evenly across each side. Measure the number of repeats per side to ensure symmetry on opposite sides of the bedspread.
Round 35 :
Ch1, sc around placing 3 sc into each shell to anchor and define shape. Work evenly so the border lies flat; adjust by adding or skipping 1 sc per several shells if slight ripple forms. Join with sl st. (visual)
Round 36 :
Decorative scallop round: *Sk next st, 7 dc in next st, sk next st, sl st in next st; rep across each shell segment. Add extra 2 dc in corner shells to round corners. This produces deep scallops reminiscent of vintage lace edging.
Info :
If you want a layered scallop look like the sample bedspread, repeat R34–R36 once more or add a picot trim along the outermost scallops using ch3 picots between shells.
Round 37 :
Work final stitch tidy round: sc in BLO in each st across perimeter; this gives a subtle raised rope around the edge. Fasten off and weave ends securely. Block the entire bedspread again to set the scallops and openwork.
— Optional Central Panel Rows for Extra Width/Length :
Info :
If your layout requires extra columns or rows to achieve the exact bed size, make partial motifs (half-motifs or edge-motifs) by stopping motif rounds at R22 and shaping a straight outer edge toward the bedspread border using even dc rows. Alternatively add a band of continuous mesh stitches between motif rows (ch3, sk2, dc bands) to increase size.
— Pillow Shams (Make 2 or 3 to match) :
Round 38 :
Make two full motifs for each sham front and join them side-by-side (for a 20x20 in sham use a single large motif blocked to 20 in or join 4 motifs into a square). For a single-motif sham: block motif to 20 in and work additional stabilization rounds as needed (ch1, sc in each st around x2).
Round 39 :
For a two-motif sham front: join two motifs across one entire side using the JAYG method on one long side so the seam appears on the inside. Add a sc border of 2 rounds to create a neat edge. Back the sham with fabric or a crocheted panel of matching sc rows: Work sc rows across a rectangle of size to match sham and seam together with mattress stitch.
Round 40 :
Sham closure: Work a 3-button overlap or invisible zip: for overlap leave 5 in of unjoined edge on the back panel to insert pillow form. Edge the opening with 1 round of hdc and finish with neat topstitching. Fasten off and weave ends. (visual)
Info :
Backing the shams with fabric gives a crisp look and hides the seams; alternatively work full crocheted backs and seam them closed with an envelope closure. Insert a pillow form slightly larger than the sham for a plump finish.
— Alternate Edgings & Decorative Options :
Round 41 :
Add a delicate ladder lace insertion round between motif rows before border: With RS facing, join yarn at seam intersections and work (ch5, sl st into seam 3 sts over) across seams to create an additional lace band. This adds visual separation and a linen-like effect.
Round 42 :
To highlight floral centers, use a contrasting silver thread and work two rounds of reverse sc into the central petal ring before blocking. This creates subtle metallic highlights on the center flowers. Fasten off and weave in ends carefully.
Info :
Any decorative additions should be worked before final full-blocking so they set correctly with the whole piece.
— Finishing & Care :
Round 43 :
Weave in all ends with yarn needle using tidy invisible methods; duplicate knot at the beginning of stubborn tails if desired then weave at least 2 in into the fabric. Trim close. Steam-press lightly (for cotton yarn) to set border; do not overheat synthetic fibers.
Info :
Care: Machine wash gentle cold cycle for cotton or hand wash with mild detergent; reshape while damp and dry flat. Avoid tumble drying if possible to protect delicate scallops.
Round 44 :
Storage: Fold gently and store in breathable cotton bag. Avoid heavy stacking to preserve scalloped edges. Use acid-free tissue between folds if storing long-term.
Info :
Congratulations — your Misty Blue Floral Bedspread is complete! Enjoy the soft drape and floral texture on your bed or gift as a treasured handmade heirloom. For different sizes see sizing notes below.
This Misty Blue Floral Bedspread transforms a bedroom into a calm, cozy haven with soft lacy motifs and a scalloped border. Each motif becomes a tiny medallion of floral texture that, when joined together, creates a romantic and timeless statement piece. The join-as-you-go method keeps the assembly manageable and yields a beautiful seamless finish. Whether you make it for your own bed or as a heartfelt gift, every stitch will be a labor of love. 🧶💙