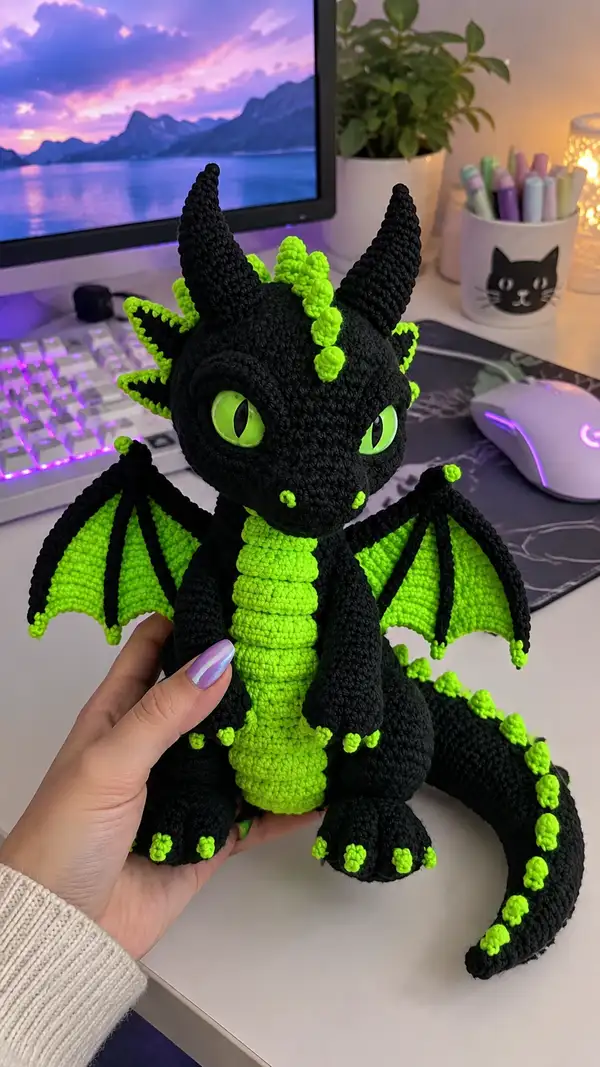
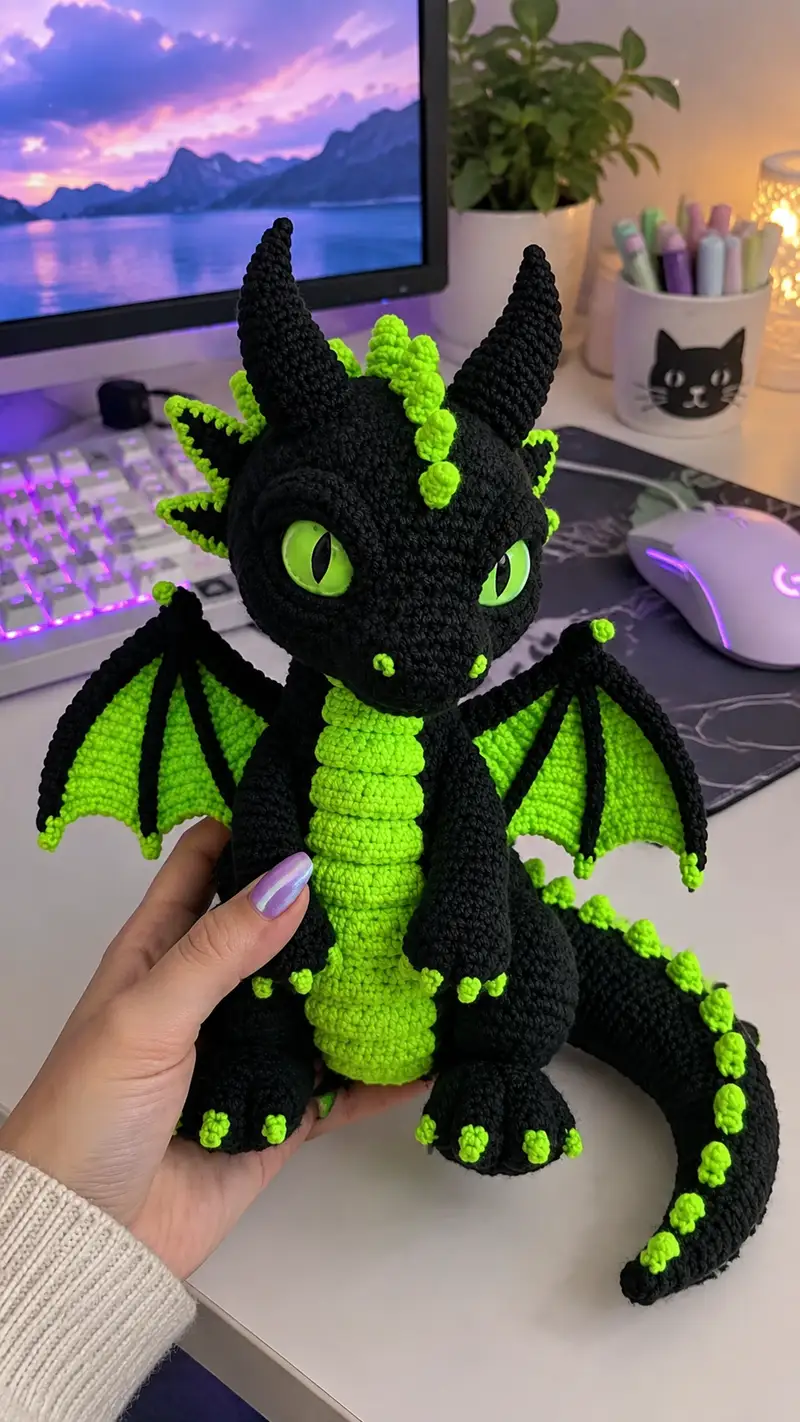
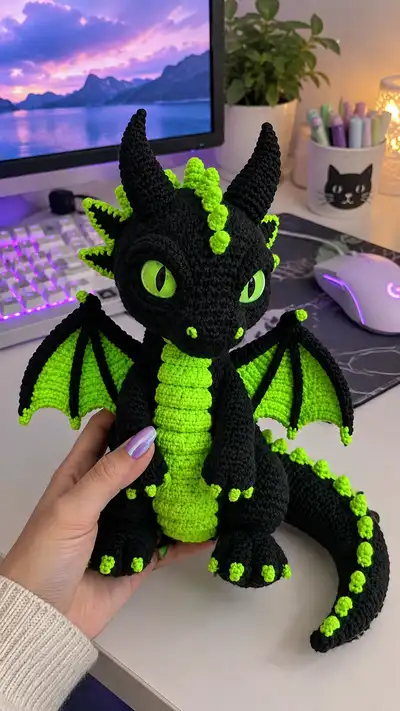
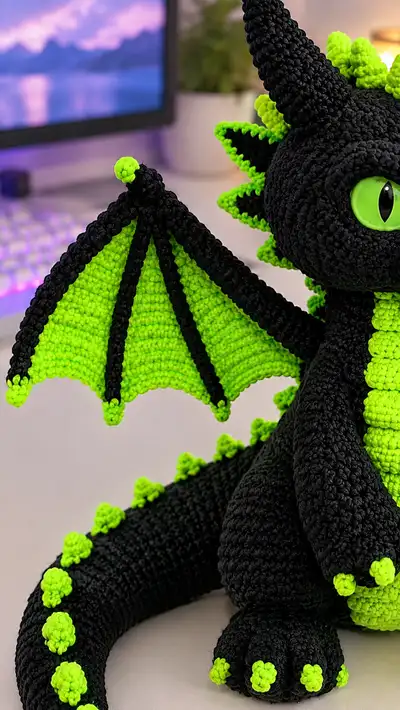
Create a striking black-and-neon-green dragon plush with sculpted head, articulated wings, curled tail and bright spike accents. This pattern includes detailed round-by-round instructions, multiple Info tips for stuffing and shaping, and clear assembly guidance. The finished dragon has big expressive safety eyes, layered belly scales, and decorative claws and spikes—perfect for a bold handmade gift or desktop companion.
Progress Tracker
0% Complete
— Head :
Round 1 :
6 sc in magic ring (6)
Round 3 :
(1 sc, inc) x 6 (18)
Round 4 :
(2 sc, inc) x 6 (24)
Round 5 :
(3 sc, inc) x 6 (30)
Round 6 :
(4 sc, inc) x 6 (36)
Round 7 :
(5 sc, inc) x 6 (42)
Round 8 :
(6 sc, inc) x 6 (48)
Round 9 :
1 sc in each st (48)
Round 10-12 :
1 sc in each st (48)
Info :
Work tightly; these rounds build the forehead. Place stitch marker at start of each round. Use black yarn.
Round 13 :
1 sc in each st (48)
Round 14 :
1 sc in each st (48)
Info :
Eye placement: place safety eyes between Rounds 13-14, approximately 12 sts apart (measured across front). Mark center line of face and count 6 sts to each eye from center for symmetrical placement. Use 20mm green safety eyes; secure washers before stuffing.
Round 15 :
1 sc in each st (48)
Round 16 :
(6 sc, dec) x 6 (42)
Round 17 :
(5 sc, dec) x 6 (36)
Info :
Begin stuffing head firmly but not rock hard. Push fiberfill into forehead and around eye sockets so the eyes sit flush and shaped. Add less stuffing near neck area for later joining.
Round 18 :
(4 sc, dec) x 6 (30)
Round 19 :
(3 sc, dec) x 6 (24)
Round 20 :
(2 sc, dec) x 6 (18)
Round 21 :
(1 sc, dec) x 6 (12)
Info :
Create the muzzle shaping: After Round 21, add 6 additional short rounds in front-only shaping to form a slightly elongated snout. We will make a separate muzzle flap to sew on that helps sculpt the nose and nostrils.
Round 22 :
Mark front center (directly between eyes). Starting at that marked front 6 sts, work 6 sc across those front-facing stitches to create a short muzzle flange (do not join with the main round; you will later sew). Fasten off leaving 20 cm tail for sewing.
Info :
To sculpt nostrils and subtle lip, make two tiny 3-sc bobbles (use neon yarn) and sew onto muzzle tip later. The muzzle flange will be sewn across rounds 17-20 to create a projected snout.
Round 23 :
6 sc in magic ring (for separate muzzle snout piece) then continue: Round 24: 6 inc (12); Round 25: (1 sc, inc) x6 (18); Round 26: (2 sc, inc) x6 (24). Fasten off leaving a long tail. Sew this muzzle piece centered over the front flange created in Round 22. Stuff very lightly to maintain shape.
Round 27 :
Resume head: (6 sc, inc) x 6 (54) working one round around to flare slightly for jaw shape (optional, ensures the lower jaw lines up). If you prefer a smoother jaw, skip this increase and continue even rounds (48).
Round 28 :
1 sc in each st (54)
Round 29 :
1 sc in each st (54)
Info :
If adding cheek ridges (slightly raised rounds) use BLO for one round now to create a seam that will receive small spike bases later. Otherwise continue even rounds.
Round 30 :
(7 sc, dec) x 6 (48)
Round 31 :
(6 sc, dec) x 6 (42)
Info :
Continue stuffing as you decrease: fill the face and forehead good, but keep neck area slightly underfilled to fit smoothly to body. Smooth stuffing with chopstick or stuffing tool.
Round 32 :
(5 sc, dec) x 6 (36)
Round 33 :
(4 sc, dec) x 6 (30)
Round 34 :
(3 sc, dec) x 6 (24)
Round 35 :
(2 sc, dec) x 6 (18)
Round 36 :
(1 sc, dec) x 6 (12)
Round 37 :
6 dec (6). Fasten off leaving long tail for sewing. Finish stuffing head and close opening by sewing through front loops to form neat seam.
Info :
Sew head to body after body is made. Keep long tail for secure attachment and use mattress stitch for a nearly invisible join. Add small embroidered eyebrow ridges if desired with black or darker green yarn.
— Horns (Make 2) :
Round 1 :
6 sc in magic ring (6) with black
Round 3 :
(1 sc, inc) x6 (18)
Round 4-6 :
1 sc in each st (18)
Round 7 :
(2 sc, dec) x6 (12)
Info :
Horns are tapered cones worked in continuous rounds. Use stuffing only in the base; horns should be firm at base and tapered empty toward tip for a natural look.
Round 8 :
1 sc in each st (12)
Round 9 :
(1 sc, dec) x4, 4 sc (8)
Round 10 :
1 sc in each st (8)
Round 11 :
6 dec (3). Fasten off leaving long tail for sewing. Make two matching horns. Sew horns to head top symmetrically between rounds 6-9, slightly angled back.
Info :
For a spiral texture work alternating FLO and BLO rounds; if preferred add 1 sc decrease in slightly different positions to create a twisted horn effect.
— Spikes (Make 12-16 small spikes) :
Round 1 :
4 sc in magic ring (4) with neon
Round 2 :
sl st in next st, sc in next, hdc in next, sl st in next (creates a small cone) Fasten off leaving long tail
Info :
Sew spikes along neck and tail at even intervals. For larger dorsal spikes use 6 sc start and 1 round inc to produce a fuller bobble spike.
— Body :
Round 1 :
6 sc in magic ring (6) with black
Round 3 :
(1 sc, inc) x6 (18)
Round 4 :
(2 sc, inc) x6 (24)
Round 5 :
(3 sc, inc) x6 (30)
Round 6 :
(4 sc, inc) x6 (36)
Round 7-9 :
1 sc in each st (36)
Info :
If you want the body slightly longer change to 1 sc in each st for Rounds 7-12 before continuing. Keep body base slightly wider to support seated pose.
Round 10 :
(4 sc, inc) x6 (42)
Round 11-14 :
1 sc in each st (42)
Round 15 :
(5 sc, inc) x6 (48)
Info :
Change to neon yarn for belly ridge at Round 15 if you want a visible contrasting belly from lower chest down. Here we'll make belly as a separate panel sewn to body for crisp ridge effect—so continue body in black and make belly panel separately.
Round 16-20 :
1 sc in each st (48)
Round 21 :
(7 sc, dec) x6 (42)
Round 22 :
(6 sc, dec) x6 (36)
Info :
Begin stuffing body moderately from the bottom up. Stuff firmly but leave the top opening slightly underfilled to join head smoothly. Use small amounts of stuffing frequently to avoid lumps.
Round 23 :
(5 sc, dec) x6 (30)
Round 24 :
(4 sc, dec) x6 (24)
Round 25 :
(3 sc, dec) x6 (18)
Round 26 :
(2 sc, dec) x6 (12)
Info :
Stop decreasing when the opening is approx the same diameter as the neck base of the head (measure before fastening off). Fasten off leaving long tail for sewing head to body. Keep opening slightly stretched while sewing to ease fitting.
Round 27 :
Fasten off leaving 40 cm tail for sewing. Stuff final section firmly and set aside for assembly.
— Belly Panel (Neon) :
Round 1 :
8 sc in magic ring with neon (8)
Round 3 :
(1 sc, inc) x8 (24)
Round 4 :
(2 sc, inc) x8 (32)
Round 5 :
1 sc in each st (32)
Round 6 :
1 sc in each st (32)
Info :
This panel will be seamed to the front of the body from chest to belly. After Round 6, work alternating rows (not joined rounds) back and forth to create a long belly strip of ridges that will be sewn into the body front. Make 12-16 rows depending on desired length.
Rows 7-22 :
Ch1, turn, sc across 32 sts (32) — repeat to reach desired length (approx 12-16 rows). Fasten off leaving long tail for sewing. Create vertical ridges by working these rows in BLO for a crisp edge if desired.
Info :
To make the segmented belly like the picture, add narrow rounds of neon bobbles between each row: at every 2nd row, add a short bobble row (see 'bobble technique' Info below) before continuing. Sew belly panel centered along body front matching row counts to body height.
— Arms (Make 2) :
Round 1 :
6 sc in magic ring (6) with black
Round 3 :
(1 sc, inc) x6 (18)
Round 4-5 :
1 sc in each st (18)
Info :
Hand/paw shaping: the first 5 rounds create a rounded paw. You will add neon claws later as small bobbles. Stuff the paw firmly so it keeps its rounded shape and allows claws to sit proud.
Round 6 :
(2 sc, inc) x6 (24)
Round 7-10 :
1 sc in each st (24)
Info :
For a tapered upper arm, begin 1 decrease round after Round 10. If you want a thicker arm, add 2-4 even rounds before decreases.
Round 11 :
(3 sc, dec) x6 (18)
Round 12-15 :
1 sc in each st (18)
Info :
Insert light stuffing into arm: stuff paw firmly, lower arm lightly so the arm remains flexible at joint. If you want poseable arms, insert thin wire now and wrap with a little stuffing around it.
Round 16 :
(2 sc, dec) x6 (12)
Round 17 :
1 sc in each st (12)
Round 18 :
6 dec (6). Fasten off leaving long tail for sewing. Make a second matching arm.
Info :
Sew arms to body on sides aligning top of arm with body Rounds 12-15 for a natural seated look (see Assembly). Add neon bobble claws to the three front paw tips by sewing small 3-5 loop bobbles using neon yarn.
— Legs (Make 2) :
Round 1 :
7 sc in magic ring (7) with black
Round 3 :
(1 sc, inc) x7 (21)
Round 4 :
(2 sc, inc) x7 (28)
Round 5 :
(3 sc, inc) x7 (35)
Round 6-9 :
1 sc in each st (35)
Info :
Foot shaping: these rounds create the foot circumference. Stuff the foot firmly to create a flat base for sitting. To make toes, you will create three small neon bobbles on the front of each foot after stuffing.
Round 10 :
(4 sc, inc) x7 (42)
Round 11-13 :
1 sc in each st (42)
Round 14 :
(6 sc, dec) x6 = 36 (see Info)
Info :
Note math for Round 14: to reduce from 42 to about 36, use a pattern (6 sc, dec) x6 = 7 repeats actually; for a perfect 42-to-36 reduce, use (5 sc, dec) x6 = 36. Use (5 sc, dec) x6 (36) for consistent math. Correction: Round 14 should be (5 sc, dec) x6 (36).
Round 15-17 :
1 sc in each st (36)
Round 18 :
(4 sc, dec) x6 (30)
Round 19 :
(3 sc, dec) x6 (24)
Info :
Stuff foot well now. Add a small disc of cardboard or firm stuffing at base if you want extra stability for display. Finish stuffing leg tube firmly but flexible for hip seam.
Round 20 :
(2 sc, dec) x6 (18)
Round 21 :
1 sc in each st (18)
Round 22 :
(1 sc, dec) x6 (12). Fasten off leaving long tail for sewing. Make matching second leg.
Info :
Place legs at bottom of body opening so the feet align; sew securely using the long tail and mattress stitch for strong attachment. Add 3 neon bobble toes to the front of each foot: make small 5-loop bobbles and sew in place equidistantly.
— Tail :
Round 1 :
6 sc in magic ring (6) with black
Round 3 :
(1 sc, inc) x6 (18)
Round 4-7 :
1 sc in each st (18)
Info :
Tail is worked in continuous rounds with gradual tapering. Begin adding neon bobble spikes spaced evenly from Round 7 onward. To make bobble spikes, use neon yarn and sc-bobble technique described in Info below.
Round 8 :
(2 sc, dec) x6 (12)
Round 9-12 :
1 sc in each st (12)
Round 13 :
(1 sc, dec) x4, 2 sc (8)
Round 14-18 :
1 sc in each st (8)
Round 19 :
(1 sc, inc) x8 (12) — optional small bulb at tip
Round 20 :
1 sc in each st (12)
Round 21 :
(2 sc, inc) x4 (16)
Round 22-24 :
1 sc in each st (16)
Info :
Insert light stuffing as you work keeping the tail flexible but firm at the base. For a curled tail shape, lightly bend tail around a soft padded noodle or shape by hand before final closure. Sew bobble spikes along the top center at intervals of 4-6 rounds depending on tail length; use neon bobbles about 10-15 mm high for striking contrast.
Round 25 :
(4 sc, dec) x3 (12)
Round 26 :
(3 sc, dec) x3 (9)
Round 27 :
(2 sc, dec) x3 (6)
Round 28 :
6 dec (3). Fasten off leaving long tail for sewing. Attach tail to back lower body opening and sew securely with hidden stitches. Curve tail to sit along side or around body as in photos.
— Wing Structure (Make 2) :
Round 1 :
Ch 31 with black, join to work in rounds or work back and forth for membrane base (or begin with 30+ ch for wider wings). For the pictured wings we will create a top black border and neon membrane in rows.
Info :
Wings are built as a sandwich: inner neon membrane (worked in rows), three black rib 'fingers' in sc tubes, and a black outer border. Alternatively you can crochet the membrane, then crochet three narrow tubes for ribs and sew them on top as raised strips.
Membrane Row 1 :
With neon: ch 31, sc in 2nd ch from hook and across (30). Turn. (30)
Membrane Row 2-12 :
Ch1, turn, sc across 30 (30) — work until membrane height reaches desired size (approx 11 rows). Fasten off leaving tail for joining.
Info :
To create curved scalloped outer edge, decrease at both ends on alternating rows (e.g. ch1, sc2tog at start, sc across, sc2tog before turning on selected rows). Keep center full to create bell shape.
Wing Rib Tubes (Make 3 per wing) - Round 1 :
6 sc in magic ring with black (6)
Wing Rib Tubes - Round 2-20 :
1 sc in each st (6) working continuous rounds to desired rib length (approx equal to membrane height). Fasten off leaving long tail for sewing.
Info :
Sew three tubes onto membrane spaced evenly—one at leading edge (near top), one mid, and one near trailing edge. Sew firmly through membrane so ribs are slightly raised. For extra stiffness, insert a thin piece of floral wire inside each tube before closing and sewing onto membrane.
Outer Border :
Join black yarn around membrane edge and work 1 sc in each st around, adding 3 sc in each corner to keep edge flat. Work 2-3 rounds to form a firm border. On final round add small neon picot points along outer edge by (sl st, ch3, sl st into same st) spaced evenly to mimic scalloped points in picture.
Info :
Make two matching wings. Attach to upper back/sides of body between rounds 8-14 using long tails and whip stitch. Position so wing base aligns with top of shoulder for natural look. If using wire ribs, bend slightly to pose wings open as shown.
— Eye Surround / Face Details :
Round 1 :
With black yarn work 12 sc in magic ring to make eye cup (12)
Round 3 :
1 sc in each st (24)
Round 4 :
Fasten off leaving tail. Sew cups concentrically around safety eyes to create the inset look. Stitches around the eye should be pulled gently so the eye sits partially recessed without distorting the round.
Info :
For eyelids or half-lids use a short oval piece in black and sew it along the top of the eye to create a sleepy or fierce expression. Small embroidered triangular pupils can be added with black yarn or felt if your safety eyes are plain discs.
— Small Decorative Spines & Claws (Make many) :
Small Bobble Spike (sc-bobble) :
Insert hook, yarn over, pull up loop, yarn over pull through 2 (incomplete sc) — repeat 4 more times into same st (total 5 incompletes on hook), yarn over and pull through all loops, ch1 to close bobble. Secure with sl st. This creates a tight 5-loop bobble. Fasten off leaving tail to sew.
Info :
Use small bobbles for claws on paws, larger 6-8 loop bobbles for dorsal spikes. Sew bobbles with long tails at marked positions along toes, front of muzzle and tail ridge. Use neon yarn for a bright contrast.
— Assembly & Final Sculpting :
Info :
Before assembling, block and lightly shape wings and ribs. Pin all pieces in place on body to check proportions. Use pictures as a guide: head should join body so eyes are forward-facing and centered above belly ridge; legs should be placed so the dragon can sit with tail curled beside; wings should be leveled from shoulder height for balanced posture.
Step :
Sew belly panel to front of body aligning top of panel between Rounds 12-15 of body and bottom reaching near base of body. Use long tail and mattress stitch for neat join, folding panel edges in slightly for crisp seam.
Step :
Attach head to body opening aligning neck seam with body top. Use gathering stitch if neck opening is larger to ease fit; weave long tail through neck stitches and pull to match sizes, then sew firmly to body. Reinforce with additional passes through neck base for stability.
Step :
Sew legs symmetrically onto lower body; use pins to match placement. Sew arms onto sides slightly forward of body center to allow paws to rest on belly. Sew horns onto head top between rounds 5 and 9. Sew dorsal spikes down the centerline of head/neck/tail; attach larger spikes near base and smaller ones toward tip for natural tapering.
Step :
Sew eye cups and set eyes during head assembly. Use felt washers or extra stitches behind eyes for extra security. Add tiny neon stitches for nostrils and eyebrow dots for expression.
Info :
Weave in all tails carefully, tucking ends into stuffing and trimming. Use a few hidden stitches to anchor any loose bobble tails. If you used wire in wings, fold ends back and cover wire tips with small stuffing blobs before final sewing to avoid pokes.
Finishing :
Brush lightly with a soft brush to remove fuzz, or steam-block from a distance if yarn permits. Add optional small blush to cheeks using fabric-safe paint or pastel chalk sealed with fabric medium. Secure all safety eyes and re-check seams before gifting or sale.
Final Info :
This pattern relies on moderate shaping and many small sewn-on details. Keep consistent counts and mark beginning of rounds. When in doubt, compare left and right pieces frequently to maintain symmetry. Enjoy the sculpting and colorwork—this neon dragon is a showstopper!
Completing this neon spike dragon is a rewarding blend of shaping and playful colorwork that gives you a bold, display-ready plush friend! Each rounded section and bobble spike builds its character, and the neon accents create an eye-catching contrast against the black body. The detailed assembly ensures a stable, poseable toy you'll be proud to show off or gift. 🧶✨ When you're finished, take a moment to admire how the stitches and details come together—then share your creation to inspire others! 🐉