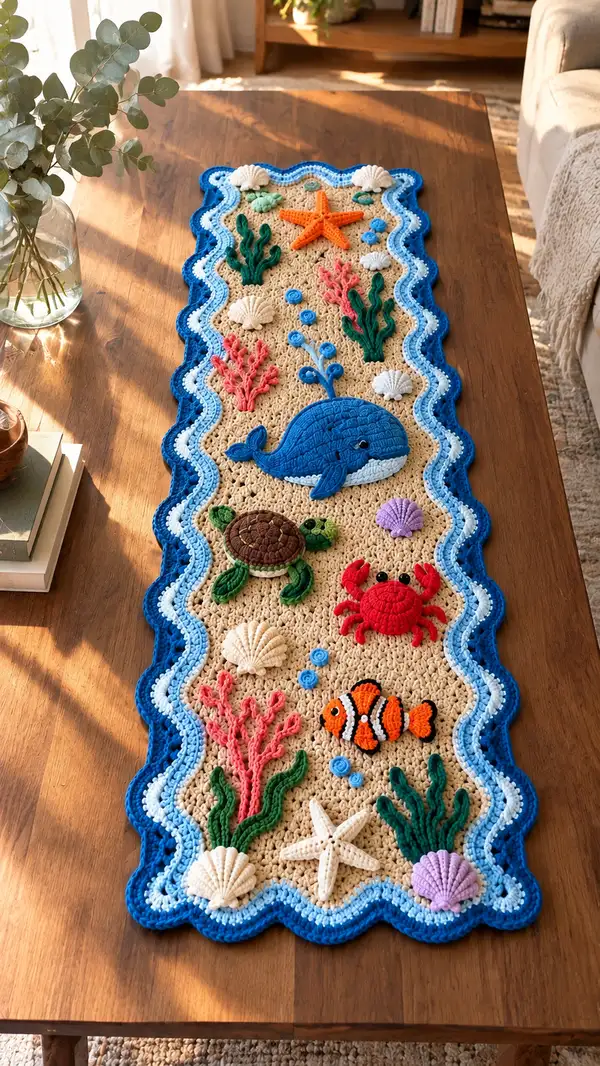
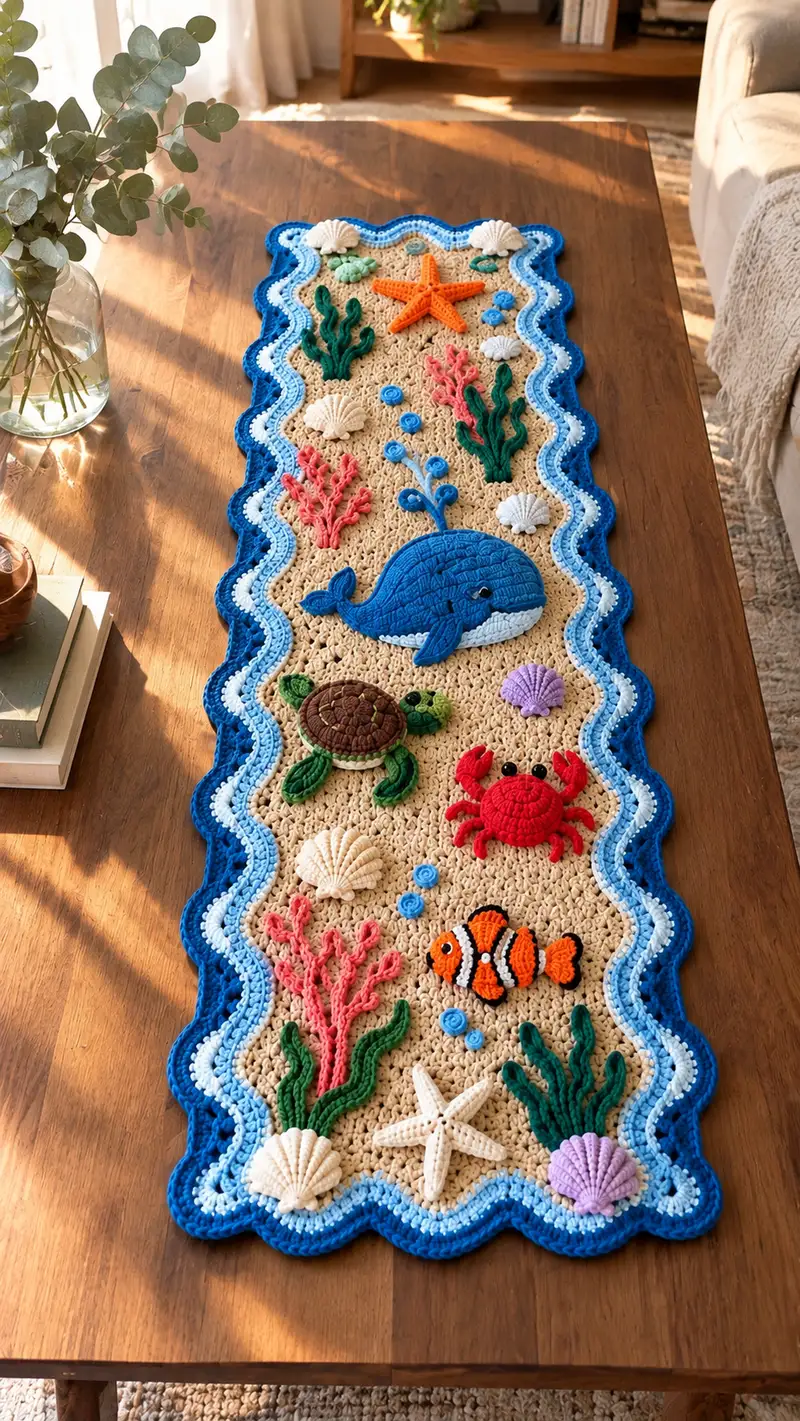
Bring the charm of a sandy seabed to your table with this whimsical Ocean Friends Table Runner. Detailed textured sand mesh, layered wavy blue borders, and a collection of 3D appliqued sea creatures (whale, turtle, crab, clownfish) and shells create a playful coastal vignette. Perfect for adding color and handmade warmth to a dining table, console, or sideboard. The pattern includes full step-by-step instructions for the base, border, and every applique.
Progress Tracker
0% Complete
— Materials & Gauge :
Info :
Gauge is not critical for a runner, but for scale: 16 sc and 18 rows = 10 cm/4 in using 4.0 mm hook in worsted cotton. The sample runner measures approximately 36-40 inches long by 9-10 inches wide. Adjust chain foundation length to scale up or down proportionally, keeping stitch multiples listed for the lace pattern.
— Base Panel (Sandy Lace) :
Info :
We will build the base in joined rounds working an oval-rectangle around a foundation chain so edges are even and the piece reads as one unit. Foundation chain is a multiple of 6; sample uses ch 96. If you want a wider runner, increase by multiples of 6.
Foundation :
Ch 96, join with sl st to first ch to form a loop taking care not to twist (96)
Round 1 :
Ch 3 (counts as dc), 1 dc in same st, 1 dc in each ch around, join with sl st to top of beginning ch-3 (96 dc)
Info :
Round 1 creates a solid base round to support the lace pattern; keep tension steady. Mark the beginning stitch of each round with a stitch marker to avoid losing track.
Round 2 :
Ch 1, 1 sc in same st, *ch 2, sk 2 dc, (dc, ch 1, dc) all in next st (V-stitch), ch 2, sk 2 dc, 1 sc in next st*; rep from * to * around, join (96 'anchor points' remain by count)
Round 3 :
Ch 3, 1 dc in same st, *1 dc in ch-1 sp of V, ch 1, 1 dc in same sp, 1 dc in next sc*; rep to end, join (96)
Round 4 :
Ch 1, 1 sc in same st, *ch 2, (dc, ch 1, dc) in next dc (V), ch 2, 1 sc in next dc*; rep to end, join (96)
Round 5-8 :
Repeat Rounds 3-4 twice more to build 4 rows of sand lace (96)
Info :
These four rounds create the sand lace texture. Keep joins tidy and always slip stitch into the top of the beginning ch-3 or ch-1 to keep edges neat.
Round 9 :
Ch 3, 1 dc in same st, *1 dc in next dc, 1 dc in ch-1 sp, 1 dc in next dc; rep to end, join (96)
Round 10 :
Ch 1, 1 sc in same st, *ch 2, (dc, ch 1, dc) in next dc, ch 2, 1 sc in next dc*; rep to end, join (96)
Round 11-16 :
Repeat Rounds 9-10 three more times to add height and openwork (96)
Info :
At this point the base is establishing height. If you prefer a denser sand, substitute hdc for dc in the even rounds. Keep your stitch counts consistent; each repeat pair maintains 96 anchor points.
Round 17 :
Ch 3, 1 dc in same st, *1 dc in next 3 dc, 1 dc in ch-1 sp, 1 dc in next 3 dc; rep to end, join (96)
Round 18 :
Ch 1, 1 sc in same st, *ch 2, (dc, ch 1, dc) in ch-1 sp, ch 2, 1 sc in 3rd dc of next group*; rep to end, join (96)
Round 19-24 :
Repeat Rounds 17-18 three more times (96)
Info :
Measure your base now. For the sample runner, after Round 24 the piece measures roughly two-thirds of the final height; this is a good time to plan applique placement. Use removable markers or safety pins to mark centers for whale, turtle, crab, and other appliques.
Round 25 :
Ch 3, 1 dc in same st, *(ch 1, sk next dc, 1 dc in next dc, ch 1, dc in next dc), 1 dc in next dc; rep to end, join (96)
Round 26 :
Ch 1, 1 sc in same st, *ch 3, 1 sc in next ch-1 sp of shell, ch 3, 1 sc in next dc; rep to end, join (96)
Round 27-32 :
Repeat Rounds 25-26 three more times to reach desired base height (96)
Info :
By Round 32 your sand base should be the desired length/height for the runner; the sample used 32 rounds for proportion. If you want a taller runner, continue the pattern in multiples of two rounds to keep repeats consistent.
Round 33 :
Ch 1, 1 sc in same st, 1 sc in each st around to create a stable edge, join (96)
Round 34 :
Ch 2 (counts as hdc), 1 hdc in each st around, join (96)
Info :
Finish the base with two rounds of solid stitches to prepare for border attachment. Fasten off and weave ends if you prefer to add border later; sample continues without breaking yarn for smoother join.
— Border: Triple Wave Edge (worked in rounds)
Info :
The wavy border is worked in three color bands: pale blue (inner highlight), medium blue (mid band), and royal/dark blue (outer wave). We will work rounds of shells that create an undulating ripple. Attach pale blue at base edge.
Round 1 (Inner pale blue) :
With pale blue, join with sl st to any edge st. Ch 1, sc in same st, *sk 2 sts, (3 dc, ch 1, 3 dc) in next st (shell), sk 2 sts, sc in next st*; rep around, join. (Each repeat uses 6 sts; maintain 96 anchor points)
Round 2 (Inner pale blue) :
Ch 1, sc in same st, *ch 2, sc in center of shell (ch-1 sp), ch 2, sc in next sc*; rep around, join (96)
Info :
This inner band will form the white foamy line just above the medium blue. Keep shells centered on every 6th stitch for even waves along straights and smooth around corners.
Round 3 (Medium blue) :
Join medium blue in center of each shell. Ch 3, (2 dc, ch 1, 3 dc) in same sp (big shell), sk next sc, sc in next sc; rep around, join (96 big shells).
Round 4 (Medium blue) :
Ch 1, sc in same st, *ch 3, sc in center of big shell, ch 3, sc in next sc*; rep around, join (96)
Round 5 (Dark blue outer wave) :
Join dark blue in center of each big shell. Ch 3, 4 dc in same sp, ch 2, 5 dc in next center, sk next sc between, sc in next sc; rep around to create large scallops; join (anchors preserved)
Round 6 :
Ch 1, sc in each st and st around scallop ridges to ensure a smooth finished edge, join. Fasten off and weave ends.
Info :
When working the border around corners, place shells with extra stitches in corner anchors to keep wave symmetry. Pin the border and block lightly to shape waves if needed.
— Appliques Overview & Placement :
Info :
All appliques are made separately and sewn to the base. Place them loosely on the base after blocking and pin in position. The sample layout from one end to the other: starfish, clownfish, crab, turtle, whale, starfish near opposite end. Also add several shells and coral clusters and tall seaweed blades spaced evenly.
— Whale Applique :
Info :
Whale is worked in rounds using concentric increases to create a flattened oval/rounded fish body. Use bright blue yarn. Work tightly and use smaller 3.5 mm hook if needed. Stuff lightly to give a raised, padded look.
Round 1 :
With bright blue, mr, 6 sc in mr (6)
Round 3 :
(1 sc, inc) x 6 (18)
Round 4 :
(2 sc, inc) x 6 (24)
Round 5 :
(3 sc, inc) x 6 (30)
Round 6 :
(4 sc, inc) x 6 (36)
Info :
At Round 6 you have a round disk. To form an oval body we will add increases at two opposite points only for several rounds to elongate the oval.
Round 7 :
Work in continuous rounds: 6 sc, inc, 12 sc, inc, 6 sc, inc, 12 sc (39) — perform increases spaced to stretch into oval
Round 8 :
6 sc, inc, 14 sc, inc, 6 sc, inc, 14 sc (42)
Round 9 :
6 sc, inc, 16 sc, inc, 6 sc, inc, 16 sc (45)
Round 10 :
Work even 1 sc in each st around for 6 rounds to build body height (45)
Info :
Place safety eye or embroidered eye at Round 12 approximately 8-10 sts to the side of center, depending on how cartoonish you want the whale face. Begin very light stuffing now to shape the belly and upper arc.
Round 11 :
(6 sc, 1 dec, 16 sc, 1 dec, 6 sc, 1 dec, 16 sc) (42)
Round 12 :
(6 sc, 1 dec, 14 sc, 1 dec, 6 sc, 1 dec, 14 sc) (39)
Round 13 :
(6 sc, 1 dec, 12 sc, 1 dec, 6 sc, 1 dec, 12 sc) (36)
Round 14 :
1 sc in each st for 2 rounds (36)
Round 15 :
Shape belly: switch to pale blue and in BLO work 2 rounds of sc to make a lighter belly ridge. Round 15: Join pale blue, 1 sc in each st BLO (36)
Round 16 :
1 sc in each st BLO (36). Fasten off pale blue and rejoin bright blue.
Info :
At this stage add more stuffing so the whale is puffy but still flat enough to sit on the runner. Use small amounts and shape with your fingers to smooth lumps.
Round 17 :
Begin tail shaping: sc in next 8, dec, sc in next 10, dec, sc to end (34)
Round 18 :
Sc 6, dec, sc 8, dec, sc remainder (32)
Round 19 :
Continue 1 sc around (32)
Round 20 :
Fasten off leaving long tail for sewing. With remaining yarn form a small flat flipper: mr, 6 sc, inc, 1 sc around to shape, fasten off leaving tail. Make 2 flippers and sew to underside of whale near midsection.
Info :
Embroider a small smile with black yarn or insert a small safety eye. Use surface slip stitch to add whale skin texture by creating horizontal ridges across the back if desired.
— Turtle Applique :
Info :
Turtle consists of a rounded body (shell) worked in concentric rounds with a separate circular shell top, then limbs made and sewn in. Use brown for shell top, green for limbs and head.
Round 1 (Shell base) :
With brown, mr, 6 sc (6)
Round 3 :
(1 sc, inc) x 6 (18)
Round 4 :
(2 sc, inc) x 6 (24)
Round 5 :
(3 sc, inc) x 6 (30)
Round 6 :
(4 sc, inc) x 6 (36)
Info :
Work two rounds even to thicken the shell base: Rounds 7-8: 1 sc in each st (36). Fasten off leaving tail for sewing to runner. For shell top, work separate rounds to create a textured hexagon pattern using front post and back post stitches in brown.
Shell Top Round 1 :
With dark brown, mr, 6 sc (6)
Shell Top Round 2 :
Inc around (12)
Shell Top Round 3 :
(1 sc, inc) x 6 (18)
Shell Top Round 4 :
(2 sc, inc) x 6 (24)
Shell Top Round 5 :
Work texture rows: *1 sc in next st, fpdc around next st, 1 sc in next st, bpdc around next st*; repeat to create waffle panels around the dome. Fasten off and sew onto brown shell base.
Limbs (Make 4) :
With green, mr, 6 sc, inc, 1 sc around for 3 rounds, then flatten, sc across to form a paddle; stuff lightly and sew to under shell. Make a small head: mr, 6 sc, inc, sc around for 3 rounds, embroider eyes and sew at the front of shell.
Info :
Position the turtle near the lower half of the runner in the sample, with head pointing toward center. Use slightly tighter tension for the limbs to keep them firm when sewn to the base.
— Crab Applique :
Info :
Crab body is circular with multiple puff-stitch legs and claws. Use red yarn and small black safety eyes. Make body slightly domed and sew legs to rim so they radiate.
Round 1 :
With red, mr, 6 sc (6)
Round 3 :
(1 sc, inc) x 6 (18)
Round 4 :
(2 sc, inc) x 6 (24)
Round 5 :
1 sc around for 2 rounds to thicken (24)
Round 6 :
Create dome: (2 sc, dec) x 6 (18)
Round 7 :
(1 sc, dec) x 6 (12) - Stuff lightly
Round 8 :
6 dec (6) - Fasten off leaving long tail for sewing
Legs & Claws (Make 8 legs and 2 claws) :
Leg: ch 6, start in 2nd ch from hook: sc 5, join at base to body with sl st, repeat to create 8 legs. Claw: ch 4, (hdc, 2 dc) in last ch, sl st back across chain and attach to front two leg positions to form claws. Use surface sc and blanket stitch to secure legs to body.
Info :
Splay the legs slightly and sew with hidden whipstitch so the crab sits with legs flattened on the sand. Add two small black beads or embroidered eyes on short stalks using black yarn.
— Clownfish Applique :
Info :
Clownfish is small and worked as a flattened oval. Use orange, white and black for stripes. Work in rounds and change colors following stripe placements. Use tight tension (3.5 mm hook okay).
Round 1 :
With orange, mr, 6 sc (6)
Round 3 :
(1 sc, inc) x 6 (18)
Round 4 :
Work even in orange for 2 rounds (18)
Info :
Change to white yarn to create first stripe: surface crochet a white stripe across the belly area by working surface sl sts across two rounds. Then switch back to orange and repeat. Outline stripes with black thread in a tight chain stitch for cartoon effect.
Fins :
Make small fins: ch 6, sc 5, fasten off leaving tail to sew. Make top and side fins and sew to body.
Round 5 :
Fasten off leaving tail for sewing. Add eye with small black bead or embroidered French knot.
— Starfish (Make 2) :
Info :
Starfish are five-armed flat appliques using puff stitches for texture. Use orange or cream as pictured. Work in rounds with short increases to form five arms.
Round 1 :
With orange, mr, 5 sc (5)
Round 3 :
*Ch 6, sl st in 2nd ch from hook, hdc in next ch, dc in next ch, tr in next ch, sl st back into st on center ring to form one arm; rep for all 5 arms* Fasten off and weave ends.
Info :
Add small puff stitches or popcorns along each arm to mimic bumps. Press flat and sew to base so arms splay naturally.
— Shells (Make multiple) :
Info :
Shells are worked as small fans and shells in rounds for a 3D scallop effect. Use cream, lilac, and pale pink for variety.
Round 1 :
With cream, ch 2, 6 sc in 2nd ch from hook, turn to work flat fan (6)
Round 2 :
Turn, ch 1, sc across, then in last st work (3 dc, ch 1, 3 dc) to make a fan. Work three fans across to form shell. Fasten off leaving tail for sewing.
Round 3 :
For scallop ridges, work surface loops with slip stitches in a concentric half-circle across shell face to give ribbed texture. Make 6 shells and scatter along base.
Info :
For deeper scallop shells, sew two shells together offset slightly and stuff a tiny bit between layers to create height.
— Coral Branches (Make several clusters) :
Info :
Coral clusters are created using chain-and-slip techniques to create curly branches, or by using small puff stitch branches attached to a foundation stem. Use coral pink and light coral colors.
Coral Stem :
Ch 12, sc in 2nd ch from hook to end to form a braid-like stem. At intervals, attach small puff branch: join yarn, (yo, insert, yo, pull through 3 times) puff st, fasten off and continue stem. Make 6 clusters of varying lengths and sew in place.
Info :
Splay the branches outward when sewing to give a natural coral silhouette. Use different lengths and colors to create depth.
— Seaweed & Tall Blades (Make 6-8) :
Info :
Seaweed blades are worked as long strips with a wavy ridge using hdc and fp sc to give fold. Use dark and medium green. Make several sizes for layering.
Round 1 :
Ch 20, sc in 2nd ch and across to create flat strip. Turn and sl st in end and continue back working in rows to desired height. At edge, work alternating fp sc and bp sc to create texture. Fasten off and lightly curve while sewing to base.
Info :
Stiffen seaweed slightly with a little starch spray if you want them to stand up. Sew only at the base to allow upper portions to lift off the sand.
— Small Bubbles & Accent Foam (Make many) :
Round 1 :
With bright blue, mr, 6 sc (6). Fasten off leaving a tail for sewing. Make 12 small round bubbles to scatter and place near fish and whale.
Round 2 :
For foam dots use pale blue and do a surface cluster: ch 2, 6 sc in 2nd ch, sl st into base of running stitch to attach across the surface sparingly.
Info :
These small rounds add motion and help tie color palette into the base. Sew them on with small invisible stitches so they sit flush or use tiny dots of glue for secure placement if runner will be laundered carefully.
— Assembly & Final Surface Details :
Info :
Block the base flat and pin while wet to keep waves even. Position appliques and pin in place. Use a yarn needle and matching yarn to sew appliques down with small, hidden whipstitches around the rim of each applique, catching several base stitches so pieces are secure.
Step :
Place whale centered across the base between Rounds 10-16 (count from one end) in the sample. Pin firmly and sew using long tail from whale body. Use a second loop of stitching across the belly to ensure even attachment.
Step :
Attach turtle lower than whale near bottom third, crab slightly above center, clownfish near opposite end to create visual balance. Sew shells and corals to fill negative spaces. Add surface slip-stitch lines in pale blue around some shells to mimic foam and movement.
Info :
Weave all tails through at least 10-12 stitches inside the surface of base and tie off on the back. Trim closely and glue tiny knots with fabric glue for extra security if gift will be handled often.
Round :
Final check: steam block or spritz and pin waves to keep them from flattening. Let dry completely before use.
Info :
Label and store the runner flat or rolled to avoid compressing 3D appliques. For washing, gentle hand wash cold and reshape while damp; lay flat to dry to preserve shape.
Finishing this Ocean Friends Table Runner is so rewarding—each applique brings its own playful character and the layered waves frame them beautifully. The tactile shells, curving seaweed, and puffy whale create a charming coastal centerpiece. 🐋🧜♀️ Take your time blocking and assembling and you'll have a runner that sparks smiles and conversation. Enjoy every stitch and don't forget to show off your creation! 🧶