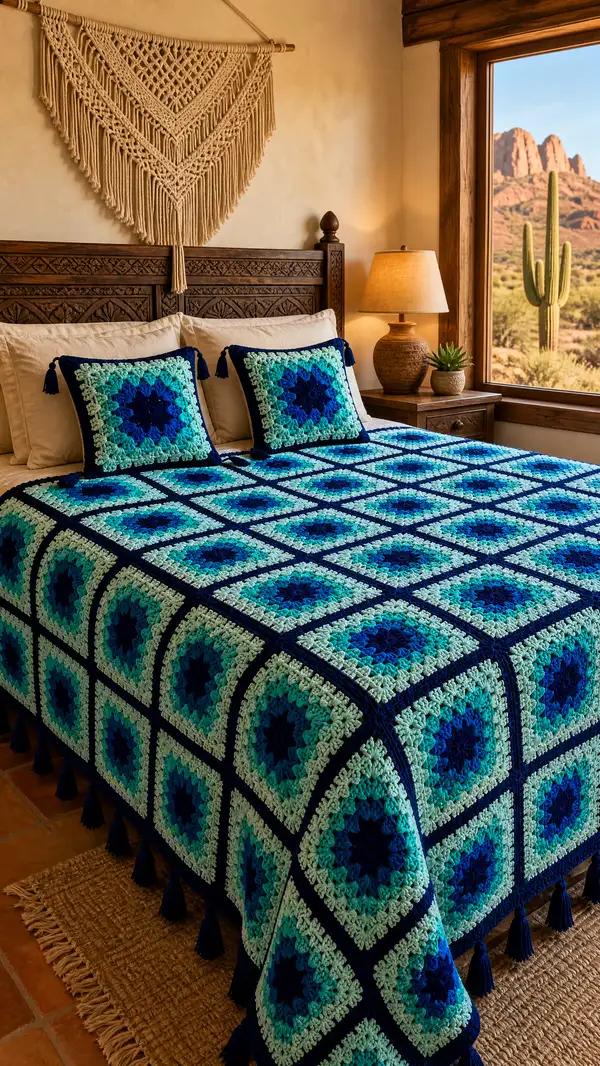
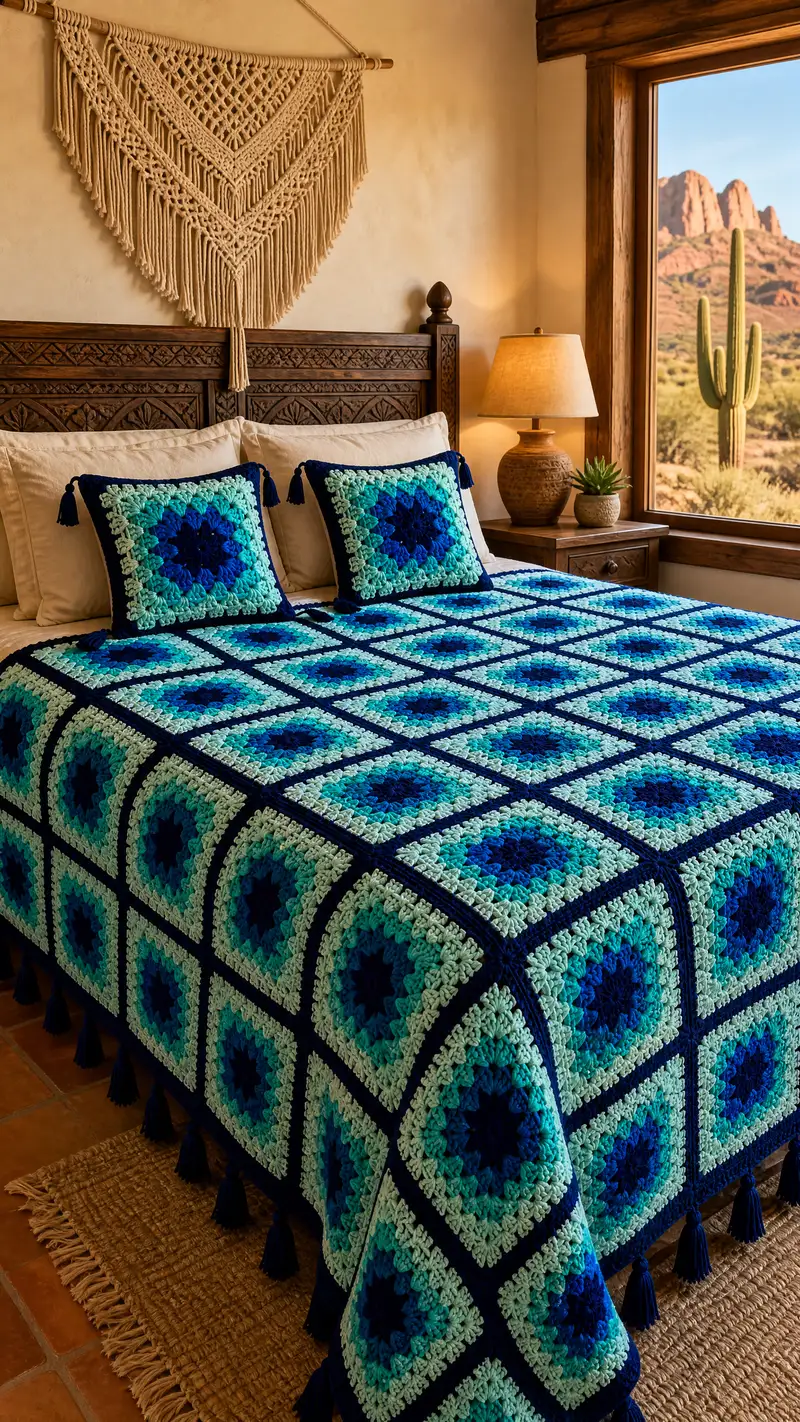
Create a bold, coastal-inspired bedspread made from richly textured granny squares in deep navy, teal, aqua and mint. This pattern breaks the project into an easy-to-follow square motif, joining and layered border sections. Includes detailed instructions for coordinated pillow covers and navy tassels for a polished, hotel-style finish.
Progress Tracker
0% Complete
— Finished Size & Gauge :
Info :
Finished size shown: Queen-style bedspread approximately 90in x 90in (230cm x 230cm) assembled as a 6 x 6 grid of 36 squares at approximately 15in (38cm) per finished square. Gauge: one finished motif measures approx 15in/38cm when blocked using worsted weight yarn and 5.5 mm hook. Adjust number of squares to fit smaller or larger beds.
— Notes & Techniques :
Info :
This pattern uses a textured granny/sunburst hybrid motif worked in rounds from a center circle to a squared edge. I use the term 'cluster' to mean 3 dc worked into the same space unless otherwise noted. 'Puff' stitches are formed by YO, insert hook, pull up loop 3 times (5 loops on hook), YO and pull through all loops, ch1 to close. Always join rounds with sl st to top of ch3 unless indicated otherwise. Block squares lightly before joining for best results.
— Square Motif (Make 36 for queen layout) :
Round 1 :
Make a magic ring, ch3 (counts as dc), work 11 dc into ring, pull ring tight and join with sl st to top of ch3 (12 dc total)
Round 2 :
Ch3 (counts as dc), 1 dc in same st, *ch1, 2 dc in next st; rep from * around to create 12 groups of 2 dc with ch1 between. Join with sl st to top of ch3. (24 dc, 12 ch1 spaces)
Round 3 :
Ch3, dc in same st, *2 dc in next dc, ch1; rep from * around into each ch1 space from previous round (work 2 dc into the stitch before each ch1 space), join with sl st to top of ch3. (48 dc worked in 24 groups, 24 ch1 spaces)
Info :
At this point you have a dense circular foundation with small ch1 spaces around; these ch-spaces will be used as working spaces for puff and cluster rounds—count them to ensure consistency (you should have 24 ch1 spaces).
Round 4 :
Change to Color B (darker teal). Ch2 (counts as hdc), *puff into each ch1 space: (YO, insert hook in ch1 space, pull up loop) 3 times, YO and pull through all loops to close puff, ch1, hdc in top of next dc; rep from * around into each ch1 space. Join with sl st to initial ch2. You will have 24 puffs separated by hdc rounds. (24 puffs + 24 hdc)
Info :
Puff stitch tension matters: pull loops gently to keep puffs even. If your puffs are too large, reduce to 2 pulls to make smaller puffs consistently.
Round 5 :
Ch3 (counts as dc), *2 dc in next puff base, ch1, 2 dc in next puff base, ch1, dc in top of hdc between puffs; rep from * around to expand and round out the motif. Join with sl st to top of ch3. (Approximate count: 72 dc distributed across puff bases and connectors; spacing will form more rounded circle.)
Round 6 :
Change to Color C (lighter aqua). Ch3, 2 dc in same stitch, ch1, (3 dc, ch1) in every 3rd stitch around to begin forming corners—work strategically to create four wider ch2 corner spaces. Place corner groups at equidistant points to start the square shaping. Join with sl st. (Count: 4 corner clusters of 3 dc; total stitch count will approximate 84 dc plus corner ch-spaces)
Info :
To form a square, you will increase in four points (corners) on this round — place them roughly at quarter marks. Use a marker at each corner to maintain alignment in future rounds.
Round 7 :
Ch3, (2 dc, ch2, 2 dc) in first corner ch-space, *skip across next group of stitches and work (2 dc, ch2, 2 dc) in the next corner ch-space; between corners work (3 dc, ch1) clusters across edges to build the straight sides. Join with sl st to top of ch3. (Each corner increases the work and the sides will have even clusters; approximate 100–112 dc depending on spacing)
Round 8 :
Change to Color D (mint/pale aqua). Work in the pattern: corners are (2 dc, ch2, 2 dc) into each corner space. Along each side: (3 dc in next ch1 space, ch1) repeated to keep a neat straight edge. Join with sl st. By the end of this round the motif should look square with four clear corner spaces. (Approximate stitch count per side: 8 clusters; total clusters ~ 32)
Info :
Check square dimensions now — measure across the diagonal and sides. If your square is slightly rounded, add one more round of even clusters working into ch1 side spaces to flatten it.
Round 9 :
Ch2, work 1 hdc in same st, *hdc in next 3 stitches, (2 hdc, ch2, 2 hdc) in corner ch2 space, repeat across the side: hdc in next 3 sts; rep from * for all corners. Join with sl st to first hdc. This round smooths and evens the square's flat surface. (Count will vary; hdc count approximately 120)
Round 10 :
Change to Color A (deep navy). Work in BLO for one round to create a defined frame: ch1, 1 sc in each st BLO around, placing 3 sc in each corner ch2. Join with sl st. (This creates a narrow navy frame; stitch count equals number of stitches around which will be approx 120 sc)
Info :
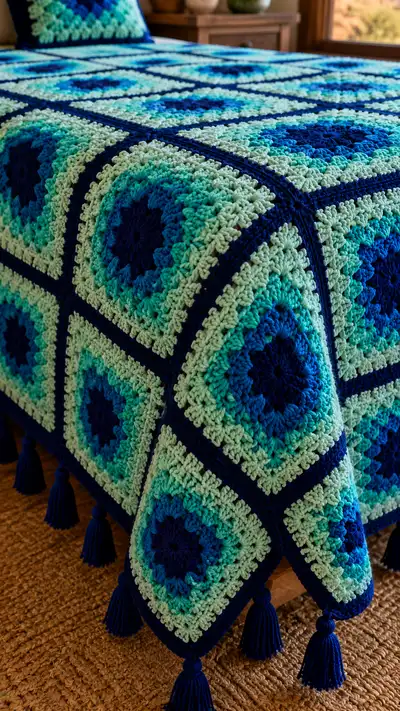
Working in BLO produces a subtle ridge for a framed look. This is the reason the bedspread has crisp navy separating lines between squares in the photo.
Round 11 :
Ch2, working in Color A, work 1 hdc in each st around (through both loops now), placing (2 hdc, ch2, 2 hdc) in each corner to retain square shape. Join with sl st. (Approximate count: ~124-132 hdc)
Round 12 :
Final motif round: Ch1, sc in each st around in Color A to create a neat edge for joining. Fasten off leaving long tail (~18in/45cm) for seaming if not joining immediately using join-as-you-go. Block lightly to 15in/38cm square and allow to dry. (Final count will match previous sc count — approx 124-132 sc)
Info :
Make 36 motifs for the queen layout pictured (6 across x 6 down). If you are making a different size, calculate needed motifs by multiplying rows x columns to fit bed width and length. Keep motifs numbered and stacked in assembly order to make joining faster.
— Assembly: Layout & Join-as-You-Go Method :
Info :
Decide on a layout and block all motifs flat and square so they are consistent in size. The example bedspread is a 6 x 6 grid with motifs joined in rows left to right, then rows joined top to bottom. We use a navy join that becomes the seam line in the picture. I recommend join-as-you-go (JAYG) for speed and a flat finish; instructions for both JAYG and mattress stitch are provided.
Join Round 1 (JAYG - attach second motif to first) :
Place two motifs with right sides up, working into the sc round of the new motif and the sc edge of the already-blocked motif. With Color A (navy) join with sl st at a corner, ch1, sc in next stitch of joining motif, then sl st through corresponding sc on attached motif; continue across side alternately (sc in new motif, sl st through attached motif) until corner, work corner: (sc, ch2, sc) joining corner ch2 on attached motif. Fasten off or continue across next side. This results in a single navy seam that looks continuous. Repeat to join squares into strips of 6.
Info :
Maintain consistent tension while seaming — too tight will pull squares together making the seam ripple; too loose will leave gaps. Aim for a firm but relaxed join.
Join Round 2 (Joining rows together) :
With right sides up, join the next strip by aligning edge stitches and using the same JAYG method: sc in new motif, sl st through exposed sc of adjacent strip. At intersections where four squares meet, ensure the sl st sits cleanly to form a navy cross intersection. Fasten off and weave tails in on the wrong side as you go. Ensure all seams are neat before proceeding to the main border.
Info :
If you prefer mattress stitch: use the long tails left from Round 12 to whipstitch edges together through the backs of the sc rounds for an invisible seam. Whichever method you choose, check flatness frequently.
— Post-Joining Stabilizing Rounds (Around Whole Bedspread) :
Round 1 :
With Color A (navy) and right side up, attach yarn anywhere along the exterior sc border. Ch1, sc evenly around entire perimeter working 1 sc in each sc and 1 sc in each corner ch2. Join with sl st. (Perimeter sc count depends on finished dimensions; expect ~520–640 sc for queen layout)
Round 2 :
Ch2, hdc in same st, hdc in each st around; in each corner work (2 hdc, ch2, 2 hdc) to keep square perimeter. Join with sl st. This creates an even base for the layered borders. (Approximate count: perimeter hdc ~ 520–640)
Info :
Work evenly; if you notice slight pulling at corners, add an extra hdc or ch1 in corner area to compensate. The goal is a flat, non-wavy perimeter.
— Layered Main Border (Deep navy frame & textured band) :
Round 1 :
Change to Color C (mint) for a soft contrast. Ch3, (2 dc, ch1, 3 dc) in each corner ch2 space; along sides work (3 dc, ch1) clusters across the body spaced evenly. Join with sl st. This first decorative border begins to add texture and echo the granny-square clusters on a larger scale. (Approx counts vary)
Round 2 :
Ch2, work 1 hdc in each st around but begin placing hdc clusters into ch1 side spaces to add density. Hold tension consistent. Join with sl st at the end.
Info :
These two rounds provide a color contrast band that complements the squares. Take time to weave any color-change tails under adjacent stitches as you work.
Round 3 :
Change to Color A (navy). Work 2 rounds in navy to create a strong frame: Round A1: Ch1, sc in each st BLO around; join. Round A2: Ch2, hdc in each st around; join. These two navy rounds create the deep, crisp frame seen between the motif grid and the outer border.
Info :
Working the first navy round in BLO produces a defined ridge where the grid meets the frame, making the motif squares read separately while still being part of the whole bedspread.
Round 4 :
Change to Color B (bright aqua). Work a textured band: *ch3, skip 1 st, shell (3 dc) in next st* repeat around, placing shells into even spaces and corners: (3 dc, ch2, 3 dc) in corners. Join with sl st. This gives a large-scale granny texture echoing the internal motif design.
Round 5 :
Ch1, sc in each stitch around to neaten the shell round and reduce waviness. Join with sl st. This neatening round prepares the bedspread for the final deep navy outer frame.
Info :
Measure final border width as you go; if you want a deeper/wider border as in picture, repeat the shell + neaten sequence alternating Color B and Color A until desired width. The pictured spread uses repeated shells then a double navy wrap for a bold finish.
Round 6 :
Change to Color A: Ch1, sc in each st for two rounds working tightly to create a clean edge. Join after each round. (This gives the deep navy outer frame visible in the photo.)
Round 7 :
Final edging - decorative picot fringe in navy: Ch1, *sc in next 3 sts, picot (ch3, sl st to first ch), sc in next 3 sts; rep around. Alternatively work small tassels at intervals instead of picot as shown in the photo. Fasten off and weave ends thoroughly.
Info :
If adding tassels (see separate tassel section), attach them at picot points or at the four corners and every square corner around the perimeter for the look in the photo.
— Pillow Covers (Make 2 matching square covers) :
Round 1 :
Make motif as per motif Rounds 1-9 to the flattened square stage, ending on Round 9 where the square is the same size as a single bedspread motif. Work Round 10 and 11 in navy as for the main motif to frame the pillow. Fasten off leaving long tail for closing or seaming onto a pillow form.
Round 2 :
For a closed cushion cover, make a second identical motif for the back, or adapt with a solid sc back piece: ch32, sc across to make a square back, or assemble three motifs into a back panel matching front dimensions. Place right sides together and join with sc around, leaving 6-8 in for inserting cushion; optionally add invisible zipper along one side.
Info :
The pillow in the photo uses a deep navy fabric trim and navy corner tassels. When placing tassels, tie them through the last round of sc at the 4 corners of the motif.
Round 3 :
Edging for pillow: With Color A, work 2 rounds of hdc around the assembled pillow cover leaving a neat sc finish. Pin to a cushion insert and close the opening by slip stitch or seam. Add four tassels at each corner if desired.
— Tassels (Make 28–36 as desired) :
Round 1 :
Using Color A, wind yarn around a 4.5in/11cm wide book or tassel template approximately 40-60 times depending on desired fullness. Tie a 6in/15cm piece of yarn around one end to form the head; fold in half and secure tightly. Trim ends to even length approximately 4-5in/10-12cm. Wrap another small length of yarn around the top to form the neck and stitch securely to the bedspread's outer edge or the pillow corners.
Info :
Secure tassels well with additional stitches through the neck to the underlying navy border. If the bedspread will be washed often, stitch the tassel neck to a reinforced loop of yarn and backstitch several times.
— Alternative Join & Reinforcement Rounds :
Round 1 :
If you opted not to JAYG: after all motifs are blocked, use the long tails from Round 12 to sew motifs together on the wrong side using mattress stitch. Once all seams are closed, cover the seams with two rounds of sc in navy on the right side to create the framed seam look.
Round 2 :
For added strength, work one round of slip stitch through both layers at the seam intersection on the wrong side to reduce bulk and stabilize joins before adding the right-side navy sc frame.
Info :
These reinforcement rounds are advisable for blankets that will be used daily or likely to be moved/washed often. They keep joins flat and durable.
— Final Blocking & Finishing :
Info :
Once all motifs are joined and borders/tassels are attached, gently wet-block the entire bedspread on a large blocking surface. Pin into square shape to correct any distortion. Allow to dry fully before removing pins. Weave in all ends on the wrong side. Trim stray fibers and tidy tassel ends.
Round 1 :
Final inspection: Check seam intersections and corner stability. Add a few anchor stitches through tassel tops and into the border to prevent shifting. Fold and store or style on the bed with matching pillows.
Info :
Label any leftover yarn and store with the bedspread for future repairs or color-matched projects; this allows you to replace tassels or patch small areas years later.
This Oceanic Navy Granny Square Bedspread brings an instant coastal, curated look to any bedroom with deep navy framing and layered aqua shades. Each square is a little meditative project you can make anywhere, then the final joining and border sessions are incredibly satisfying. Add tassels for a playful finish and enjoy the cozy texture and weight this piece adds to your bed. 🧶🌊 Make one for yourself or as a luxurious handmade gift — happy stitching! ✨