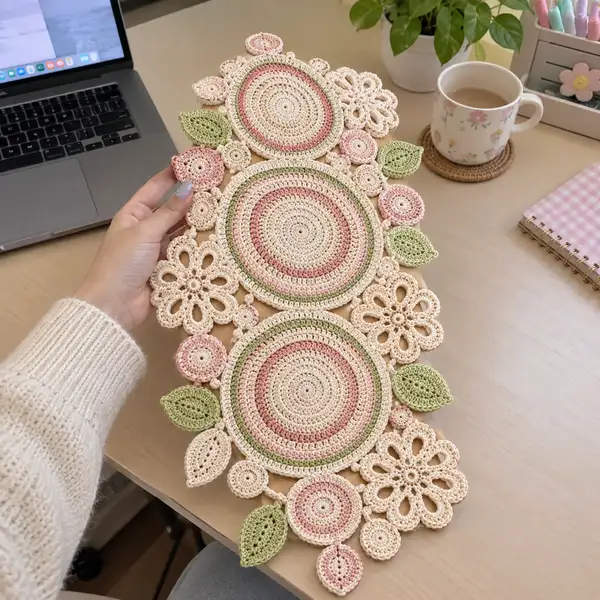
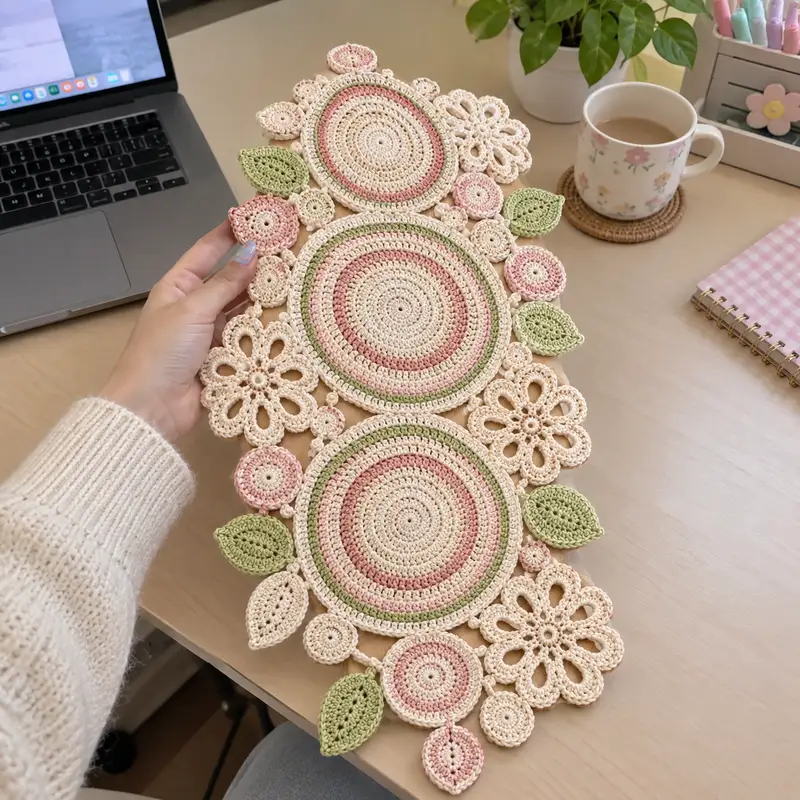
Create a charming pastel floral table runner made from joined crochet motifs — three concentric round medallions framed with lacy daisy motifs, tiny spirals, and delicate leaves. Soft cream, blush pink, and sage green yarns create a calm vintage palette. This pattern uses join-as-you-go techniques so the final piece lies flat and looks professionally finished. A decorative accent perfect for desks, consoles, or as a lovely handmade gift.
Progress Tracker
0% Complete
— Large Concentric Round Motif (Make 3) :
Round 1 :
Make a magic ring. 6 sc in magic ring (6)
Round 3 :
(1 sc, inc) x 6 (18)
Round 4 :
(2 sc, inc) x 6 (24)
Round 5 :
(3 sc, inc) x 6 (30)
Info :
At this stage keep tension firm for a closed center. Use a smaller hook (2.5mm) for rounds 1-5 if your center still looks holey; switch back to 3.0mm for later rounds if desired.
Round 6 :
(4 sc, inc) x 6 (36)
Round 7 :
(5 sc, inc) x 6 (42)
Round 8 :
(6 sc, inc) x 6 (48)
Round 9 :
(7 sc, inc) x 6 (54)
Round 10 :
(8 sc, inc) x 6 (60)
Info :
Switch to your accent color (blush pink) now for the first decorative ring. Join accent at any st with sl st and continue in rounds. Carry the previous yarn inside or weave tails later.
Round 11 :
1 sc in each st (60)
Round 12 :
1 sc in each st (60)
Round 13 :
Switch to cream again or alternate color as pictured. 1 sc in each st (60)
Round 14 :
Change to sage green for a thin accent ring. (Work 1 sc in each of next 2 sts, ch1, skip nothing) Essentially 1 sc in each st across (60) but use color change to create a visible ring
Info :
To create neat color changes, finish the last sc of the previous round with the new color loop on hook (i.e., complete last sc until two loops remain, yarn over with new color and pull through to finish).
Round 15 :
1 sc in each st (60)
Round 16 :
Work 1 sc in BLO in each st (60) — this creates a subtle ridge and sets the main flat body of the medallion
Round 17 :
Switch back to cream. 1 sc in each st (60)
Round 18 :
(4 sc, inc) x 10 (70)
Round 19 :
1 sc in each st (70)
Info :
Round 18 creates a gentle outward growth to allow for decorative edging. Keep counts exact — (4 sc, inc) x 10 expands from 60 to 70 evenly.
Round 20 :
Change to blush pink. 1 sc in each st (70)
Round 21 :
Work shell-row: *skip 2 sts, 5 dc in next st (shell), skip 2 sts, sl st in next st* repeat around to create a subtle scalloped texture. Work placement so you complete 14 shells evenly (70 sts supports 14 shells).
Round 22 :
Switch to cream. In each shell from previous round work: sl st to center of shell, ch3, 3 dc, ch3, sl st to same center to make raised petal cluster. Repeat in each shell (14 petal clusters).
Info :
Shell architecture here gives the circular medallion a floral outer texture. Work clusters tightly so the edges don't ripple; if rippling occurs, check gauge or decrease shell count by 1 pair if necessary and redistribute evenly.
Round 23 :
Switch to cream: sc evenly around the motif into both shell and ch spaces to create a tidy round: 1 sc in each available space, aiming for 84 sts (14 shells x 6 spaces). If your count differs, adjust with evenly spaced increases to reach 84.
Round 24 :
1 sc in each st (84)
Round 25 :
Work decorative picot loop ring: *ch4, sl st into 2nd ch from hook to form picot, sc into next 4 sts* repeat around creating 14 small loops (count approx matches 84/6 = 14 repeats).
Round 26 :
Switch to cream. 1 sc in each st (84) to stabilize the picots
Round 27 :
Edge shaping: *(1 sc, ch2, skip 1) x 6 across each shell segment then sl st in next join* repeat to form small loop chains that will be used later for join-as-you-go attachment. Aim for 84 loops to match stitch count.
Round 28 :
Fasten off and weave in ends or leave a 20cm tail if you plan to join motifs by sewing in places later. Block motif flat, pinning shells and picots into a smooth circle.
Info :
Make 3 of these large medallions. Block each firmly and set aside. When you make subsequent motifs, keep stitch markers at the beginning of rounds that align: rounds 11 and 21 are good reference points for matching rings during assembly.
— Medium Round Motif (Small Full Circles, Make 6-8) :
Round 1 :
mr, 6 sc in magic ring (6)
Round 3 :
(1 sc, inc) x 6 (18)
Round 4 :
(2 sc, inc) x 6 (24)
Round 5 :
1 sc in each st (24)
Round 6 :
Change to blush pink. 1 sc in each st (24)
Round 7 :
Work a decorative outer edge: *ch3, sl st into same st, sc into next 2 sts* repeat around for 8 tiny loops (24 sts used)
Round 8 :
Fasten off leaving long tail for sewing or join-as-you-go. Block small circle slightly domed for a neat appearance.
Info :
Make a variety of these in cream and blush to scatter between large medallions. These act as visual connectors and should be made in multiples (6-10) depending on your layout.
— Tiny Spiral / Bubble Motif (Make 8-12) :
Round 1 :
ch4, join with sl st to form small loop. Work 8 sc into this small ring (8)
Round 2 :
(1 sc, inc) x 4 (12)
Round 3 :
1 sc in each st (12)
Round 4 :
Edge: *ch3, sl st in base to make tiny loop* repeat around making 6-8 picot loops, fasten off (12)
Info :
These little spirals are used to fill gaps and soften joins between larger shapes. Make several in both cream and pink for the scattered look.
— Lacy Daisy Flower Motif (Make 6) :
Round 1 :
mr, 8 sc in ring (8)
Round 2 :
6 inc, 2 sc (work as (inc) x 6 then 2 sc) to reach 14 sts total (14) — alternatively do (1 sc, inc) x7 (14)
Round 3 :
1 sc in each st (14)
Round 4 :
*ch6, sl st in next st* around to make 7 long loops (14 loops)
Round 5 :
In each loop make petal: (sl st to center of loop, ch2, 5 dc, ch2, sl st to center) repeat into each loop to create 7 pronounced petals (7 petals)
Round 6 :
Switch to cream and sc evenly around petal bases to tidy: aim for 28 sc anchored around petal joins (28)
Info :
Petal shaping benefits from blocking: after finishing, wet-block each daisy with petals fanned and pinned to set the open lacy look which resembles the daisies in the photo.
Round 7 :
Fasten off leaving tail for sewing. Make 6 daisies to place along both sides of the runner as pictured.
— Leaf Motif (Make 10-12) :
Round 1 :
ch8, in 2nd ch from hook: sc, hdc, dc, hdc, sc, sl st into last chain to form leaf tip, then work along opposite chain: sc, hdc, dc, hdc, sc into base. Join with sl st at base to make pointed leaf (12 sts counted as shaping)
Round 2 :
Work 1 sc around entire leaf edge to thicken and stabilize (approximately 18 sc depending on exact placement)
Round 3 :
Work a central rib: sl st in center vein (or make surface slip stitch down middle) to create center fold. Fasten off leaving tail for joining.
Info :
Make leaves in sage green. Block leaves flat and slightly cupped by pinning edges downward so they hold a natural curved shape when sewn onto the runner.
— Tiny Teardrop Motif (Make 6-8) :
Round 1 :
ch5, sc in 2nd ch from hook, hdc, dc, sl st in next to make a small teardrop. Fasten off (3-4 sts effectively).
Info :
These teardrops appear in the design beneath large motif edges. Make a few and block them slightly to a flat oval for neat joins.
— Join-as-you-go & Layout Planning :
Info :
Lay out your three large medallions in a vertical column with equal spacing (approx 6-8 cm between medallion edges before blocking). Arrange daisies, small circles, leaves and tiny spirals around medallions so the composition feels organic. Photograph your layout from above for reference before joining.
Step 1 :
Choose a junction point on the outermost round of a large medallion where a small circle will sit. Starting with the medallion (the main piece), insert hook at that spot and join your next small motif by slip stitching into its rnd 1 or into the tail loop, then work sl sts or sc across to attach at 4-6 evenly spaced anchor points. Use the ch loops created in Round 27 (loop chains) as convenient attachment points.
Info :
Join-as-you-go technique: when attaching a motif to another, you typically align the edge loops and work sc or sl st through both layers simultaneously to create a seamless connection. Work slowly and check the alignment frequently so motifs do not twist.
Step 2 :
For attaching medium rounds: Position a medium round between two large medallions where it fills the negative space. From the medium motif, join into the large motif's picot loop or sc round by making sl st through both layers, then work *ch3, sl st in next picot* to create tiny decorative bridges. Repeat 3-4 times around to secure.
Step 3 :
Attach daisies to the sides of medallions: place daisy petal bases aligned with the medallion shell centers. Using a matching cream yarn, whip stitch base to medallion through the sc round underneath the shells at 6 evenly spaced stitches around the daisy center. After sewing, secure and weave in ends.
Info :
When sewing daisies, thread your yarn needle with a length about 50cm. Use small, nearly invisible stitches through petals base and medallion sc rounds. Keep tension snug but not tight to avoid puckering.
Step 4 :
Sew leaves onto outer edges at natural seams between medallions and daisies. Use the long tails left when fastening off leaves to anchor with a few ladder stitches through the medallion back and front to make them appear to sprout naturally from under petals.
Step 5 :
Fill gaps with tiny spirals and teardrops. Tuck their edges under the surrounding motifs and secure with a couple of stitches. Aim to keep the runner flat: if a motif lifts up, apply an extra anchor stitch at the outer edge to flatten it.
Info :
Take frequent breaks to step back and view the runner from a distance. This helps you maintain a balanced composition and prevents clustering too many small motifs on one side.
— Final Edging & Stabilizing Round (Worked After All Motifs are Joined) :
Round 1 :
With cream yarn, join at any visible outer edge and sc evenly around the entire runner over both motif edges and seam joins. Work 1 sc in each outer edge stitch or space, aiming to unify the shape. Count approximately 300-420 sc depending on layout.
Round 2 :
In order to create decorative scalloped edge: *skip 3 sts, 7 dc in next st, skip 3 sts, sl st in next st* repeat around. Adjust number of skips and dc cluster count to fit the actual edge length. Expect about 20-28 shells around entire runner.
Round 3 :
Sc around shell bases: 1 sc in each st across to tidy the edge and secure shells (use approx 300 sc as reference), complete final join with sl st and fasten off.
Round 4 :
Add finishing picots at regular intervals: *ch3, sl st in base* at the outermost tip of every second shell to add the tiny points seen in the photo. Weave in ends and trim.
Info :
If your runner has longer straight edges between clusters, add small 3-4 st loops worked into the edge as you go to preserve overall rectangular proportion.
— Blocking & Final Finishing :
Info :
Blocking is essential. Pin the runner to a flat blocking board with the three medallions centered. Stretch slightly to create a smooth, flat profile. Use steam or water-blocking depending on yarn label. Allow to dry fully (overnight) before unpinning. This sets the shells and petals so the runner lays flat on the table.
Info :
Weave in all ends by threading tails into a yarn needle and running them under 4-6 nearby stitches, then trimming close. If any motifs feel wobbly after joining, reinforce by sewing a couple more unobtrusive stitches through back loops only.
This pastel floral motif runner is a joyful little project that brings handmade charm to any tabletop. Each medallion and daisy you crochet adds personality and a touch of vintage-inspired elegance. The join-as-you-go assembly makes finishing satisfying and tidy — it all comes together like arranging a bouquet of tiny crocheted blooms. Enjoy the calming rhythm of the rounds and the delightful moment when your runner lays flat and complete. 🧶🌸