🧢 Beautiful ✨ Detailed πŸ’ Adorable

Pastel Purple Spiral Halloween Garland with Baby Phantoms and Pumpkins Amigurumi Pattern

Pastel Purple Spiral Halloween Garland with Baby Phantoms and Pumpkins Amigurumi Pattern
4.0β˜… Rating
5-7 Hours Time Needed
2.9K Made This
βœ‚οΈ

Intermediate Level

Ideal for those with basic crochet experience, featuring slightly more advanced stitches and techniques to expand your skills.

⏱️

Weekend Treat

Takes 5-7 hours, making it an enjoyable project to finish over a couple of days.

πŸŽ„

Holiday Cheer πŸŽ„

Festive fun for the season, bringing handmade magic to celebrations and creating new family traditions.

🧢 Jump to Pattern ↓

About This Pastel Purple Spiral Halloween Garland with Baby Phantoms and Pumpkins Amigurumi Pattern

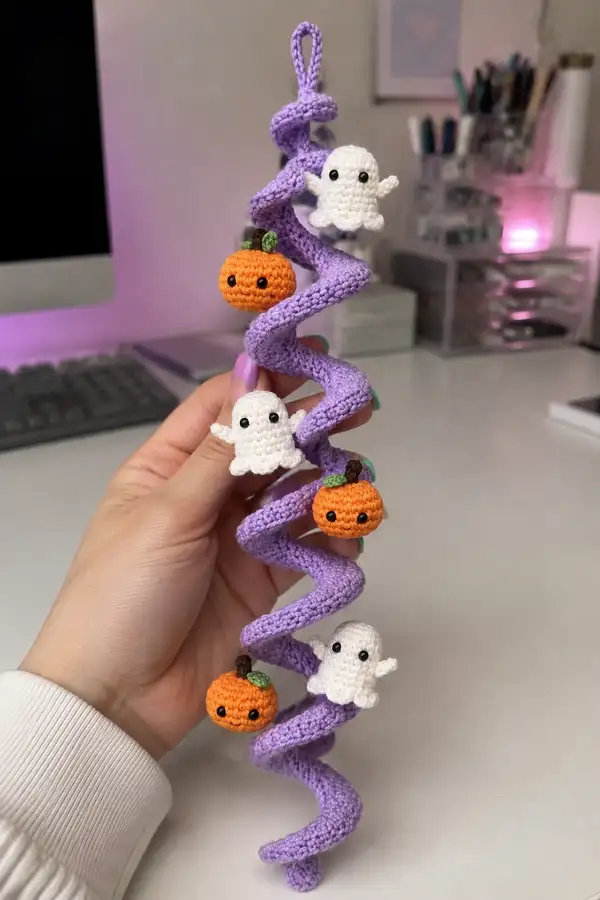
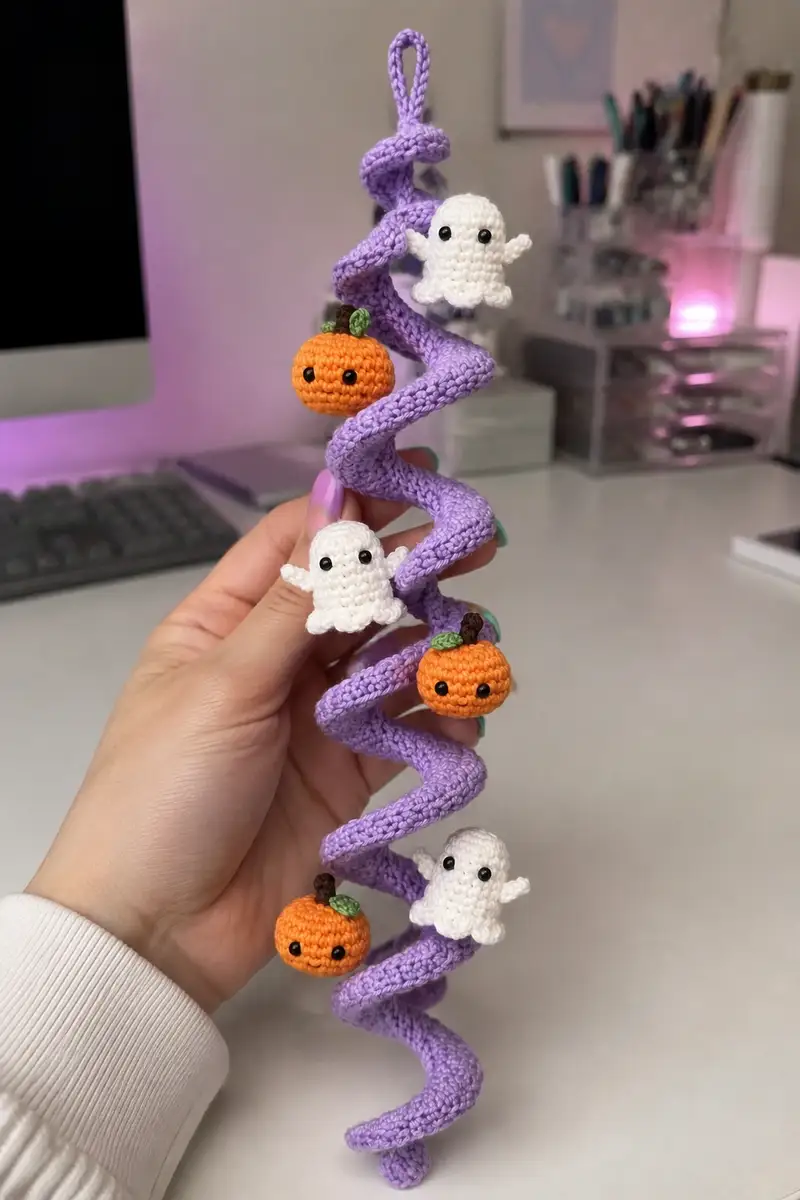
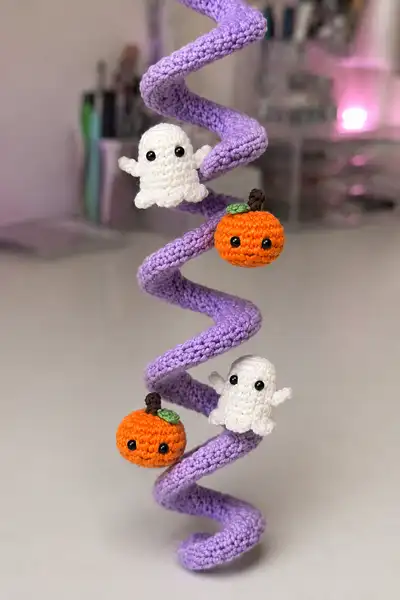
This pattern recreates a pastel purple spiral garland with tiny amigurumi baby ghosts and smiling pumpkins suspended along the coil. The spiral is an elongated crocheted tube worked in continuous rounds, fitted over a flexible wire core and shaped into a spiral. Each ghost has a flared scalloped bottom and tiny arms, while the pumpkins have little stems and leaves and are lightly segmented for a classic pumpkin look.

Pastel Purple Spiral Halloween Garland with Baby Phantoms and Pumpkins Amigurumi Pattern crochet pattern - detailed view of completed project

The pattern uses small-scale amigurumi techniques, clear round-by-round shaping, and assembly notes for secure attachment. Finished size is compact and portableβ€”perfect as a seasonal ornament or cute room accent.

Why You'll Love This Pastel Purple Spiral Halloween Garland with Baby Phantoms and Pumpkins Amigurumi Pattern

I love this pattern because it marries simple amigurumi shapes with a fun structural element β€” the spiral coil β€” making a charming hanging mobile. I love the pastel purple body and the tiny dangling faces; the little scalloped ghost edges and pumpkin leaves give it personality. It feels playful, seasonal, and quick to personalise with different colours.

Pastel Purple Spiral Halloween Garland with Baby Phantoms and Pumpkins Amigurumi Pattern step 1 - construction progress Pastel Purple Spiral Halloween Garland with Baby Phantoms and Pumpkins Amigurumi Pattern step 2 - assembly progress Pastel Purple Spiral Halloween Garland with Baby Phantoms and Pumpkins Amigurumi Pattern step 3 - details and accessories Pastel Purple Spiral Halloween Garland with Baby Phantoms and Pumpkins Amigurumi Pattern step 4 - final assembly and finishing

Switch Things Up

I absolutely loved designing this pastel spiral garland because it combines structural crochet with tiny amigurumi details that are instantly charming. The long crochet tube is surprisingly fun to make and gives you lots of creative freedom when placing ornaments. I especially like how the scalloped ghost edges contrast with the smooth little pumpkins.

I recommend experimenting with colors β€” try a mint spiral with pink pumpkins for a spring vibe, or classic orange-and-black for a more traditional Halloween look. You can change ornament spacing, use embroidered faces for toddlers, or swap the internal wire for a soft cord for a floppy garland.

I also enjoy adding tiny embellishments like metallic thread for sparkle, or small beads at the base of pumpkins. This pattern is very forgiving: slightly changing the circumference or length of the tube or the size of the ornaments will still give great results, so have fun and make it your own!

Common Mistakes & How to Fix Them

βœ— Skipping stitch markers at round starts can cause misaligned features and uneven shaping; always mark your first stitch of each round. βœ— Inconsistent tension between rounds creates lumpy or uneven surfaces; practice maintaining steady, even tension throughout the entire project. βœ— Not stuffing gradually as you work causes difficulty reaching inside later; stuff sections as you complete them for best results. βœ— Forgetting to insert and secure the wire core before final stuffing can prevent the spiral from holding shape; fit the wire early and test shaping. βœ— Placing safety eyes after stuffing and closing makes repositioning impossible; attach eyes when head is slightly open and before full stuffing. βœ— Not tightening the magic ring can make the bottom of the piece look sloppy; close the ring firmly and weave the tail neatly.

Pastel Purple Spiral Halloween Garland with Baby Phantoms and Pumpkins Amigurumi Pattern

Make a whimsical pastel purple spiral garland decorated with tiny amigurumi ghosts and smiling pumpkins. This hanging decoration features a soft crocheted spiral coil with dangling mini ghosts and pumpkins, perfect for Halloween or year-round kawaii decor. The project uses worsted-weight yarn, small hookwork, and a flexible wire core to keep the spiral shape. A sweet accent for desks, doorways, or gifts.

Intermediate 5-7 Hours

Materials Needed for Pastel Purple Spiral Halloween Garland with Baby Phantoms and Pumpkins Amigurumi Pattern

β€” Main Fabric

  • 01
    Worsted weight yarn (#4), approximately 120g in Main Color: Pastel Purple (garland coil)
  • 02
    50-60g in Accent Color A: White (ghosts - enough for 4 small ghosts)
  • 03
    60-80g in Accent Color B: Orange (pumpkins - enough for 3 small pumpkins)
  • 04
    Small amounts (10-15g each) in Detail Colors: Brown (stems), Leaf Green (pumpkin leaves), Black (embroidery or small eye details)

β€” Tools Required

  • 01
    3.25mm (D) crochet hook for main work
  • 02
    2.75mm (C) hook for smaller details (optional)
  • 03
    Flexible floral wire or pipe cleaner (about 30-35 cm / 12-14 in)
  • 04
    Safety eyes 6mm or 8mm (6 pairs total) or size 6mm for tiny pumpkins and 6-8mm for ghosts
  • 05
    Polyester fiberfill stuffing
  • 06
    Yarn needle for sewing
  • 07
    Stitch markers (at least 4)
  • 08
    Scissors
  • 09
    Pins for assembly
  • 10
    Optional: craft glue or Fray Check for securing knots

Progress Tracker

0% Complete

β€” Materials & Notes :

Info :

This pattern is written in US terms. Work in continuous rounds unless instructed otherwise. Use a stitch marker to mark first stitch of each round. Gauge isn't critical, but tight stitches prevent stuffing from showing. Insert floral wire early to help shape the spiral.

β€” Spiral (Garland Coil) :

Info :

This long tube is worked in rounds to create a crochet rope that will be fitted over flexible floral wire and shaped into the spiral. Use main color (Pastel Purple). For a thicker rope, work to 24 sts circumference as written. You will work 88 rounds for a medium-length garland (~28-32 cm long once spiral is formed). Adjust rounds to desired length.

Round 1 :

6 sc in mr (6)

Round 2 :

6 inc (12)

Round 3 :

(1 sc, 1 inc) x 6 (18)

Round 4 :

(2 sc, 1 inc) x 6 (24)

Info :

At this point you have a 24 stitch circumference tube. This gives a comfortable thickness similar to the sample. If you want a thinner cord, stop at 12 or 18 sts and continue even rounds instead.

Round 5-14 :

1 sc in each st (24)

Info :

Work even rounds in spiral β€” maintain consistent tension. Use a stitch marker and move it each round. For texture you can work 2-3 rounds in BLO to create a subtle ridge later used to mount characters.

Round 15-24 :

1 sc in each st (24)

Info :

Periodically check length against your floral wire. The wire will be inserted into this tube later; leave an extra 2-3 cm at top and bottom to fold wire ends securely.

Round 25-34 :

1 sc in each st (24)

Info :

If you prefer heavier structure, insert a second wire inside later. For a softer look, stuff the tube lightly before inserting wire. Do not overstuff; the tube needs flexibility to twist.

Round 35-44 :

1 sc in each st (24)

Info :

Mark approximate positions where ornaments will attach β€” you will want 5-6 attachment points spaced evenly. In the sample, ornaments are spaced about every 14-16 rounds of the tube.

Round 45-54 :

1 sc in each st (24)

Round 55-64 :

1 sc in each st (24)

Info :

At halfway, you can make a small hanging loop by chaining 12-20 and slip stitching it to the topmost stitch. Alternatively make the loop after inserting wire. If making now, leave a long tail for sewing later.

Round 65-74 :

1 sc in each st (24)

Round 75-84 :

1 sc in each st (24)

Round 85-88 :

1 sc in each st (24)

Info :

Fasten off leaving a long tail for closing the ends and for sewing the hanging loop if you didn't make it earlier. Insert floral wire: trim to just shorter than tube length leaving about 2 cm extra to fold. Fold each end of wire over to blunt it and slide wire into the tube; you may need to stretch a little to ease it in. If wire insertion is tight, use a blunt knitting needle to push it through then pull wire along.

Round 89 :

Fold in the open tube end and sl st around edge to close neatly; use tail to whip stitch closed (24)

Info :

Once wire is in, shape the tube into a spiral by wrapping around a cylindrical object (like a rolling pin) or by bending freehand. Adjust loop spacing and coil diameter to match images β€” larger coils at top and bottom with consistent spacing.

β€” Ghost (Make 4) :

Info :

Each ghost is a small dome with scalloped bottom and tiny arms. Work with White yarn. Use 6mm safety eyes positioned between rounds 12 and 14 about 6 stitches apart. Place eyes early but do not lock until position is right.

Round 1 :

6 sc in mr (6)

Round 2 :

6 inc (12)

Round 3 :

(1 sc, 1 inc) x 6 (18)

Round 4 :

(2 sc, 1 inc) x 6 (24)

Round 5 :

(3 sc, 1 inc) x 6 (30)

Round 6 :

(4 sc, 1 inc) x 6 (36)

Info :

At the end of Round 6 you should have a rounded dome. Insert stitch marker to indicate front center for eye placement. Eyes typically look best set between Rounds 10-13 for this scale.

Round 7 :

1 sc in each st (36)

Round 8 :

1 sc in each st (36)

Round 9 :

1 sc in each st (36)

Round 10 :

1 sc in each st (36)

Info :

Position safety eyes between Rounds 10 and 11 approx 6 stitches apart (count across front of dome). Attach eyes now before further stuffing. Place them slightly above center line for a cute expression.

Round 11 :

1 sc in each st (36)

Round 12 :

1 sc in each st (36)

Round 13 :

Begin shaping bottom: (4 sc, 1 dec) x 6 (30)

Round 14 :

(3 sc, 1 dec) x 6 (24)

Info :

Start stuffing lightly now with fiberfill; dome should be soft but firm enough to keep shape. Continue stuffing gradually in small amounts as you form scallops.

Round 15 :

(2 sc, 1 dec) x 6 (18)

Round 16 :

(1 sc, 1 dec) x 6 (12)

Round 17 :

6 dec (6)

Info :

At this small opening, fasten off leaving long tail. Finish stuffing and close opening using tail. Now you will crochet a scalloped ruffle as the ghost base by working slip-stitched scallops around the bottom edge β€” we rejoin along the bottom edge stumps.

Scallop Round 1 :

Join with sl st at a bottom stitch, *ch1, 3 dc in next st, sl st in next st*; rep around bottom edge to create six small scallops. End with sl st and fasten off. (6 scallops)

Info :

Fluff scallops gently and shape. If scallops are too large, use 2 dc instead of 3 dc. You can also add a second scallop round for a fuller frill.

Arm (Make 2 per ghost) Round 1 :

Ch 6, sc in 2nd ch from hook and each across (5). (5)

Arm Round 2-4 :

Turn and work 1 sc across each row for 3 rows to create a small flap. Fasten off leaving tail for sewing. Slightly stuff with a tiny bit of fiberfill then sew arms onto sides of ghost body between rounds 9 and 12. Position them slightly forward to appear as little waving arms.

Info :

Weave tails through body and secure with multiple passes to ensure arms are stable. Use small stitches to make seam nearly invisible.

β€” Pumpkin (Make 3) :

Info :

Each pumpkin is a small round. Work in Orange yarn; add a stem (brown) and leaf (green). We'll shape the pumpkin as a sphere then create segmentation by sewing vertical ribs with yarn or surface slip stitch. Safety eyes 6mm placed on Round 6-7 look cute.

Round 1 :

6 sc in mr (6)

Round 2 :

6 inc (12)

Round 3 :

(1 sc, 1 inc) x 6 (18)

Round 4 :

(2 sc, 1 inc) x 6 (24)

Round 5 :

(3 sc, 1 inc) x 6 (30)

Round 6-9 :

1 sc in each st (30)

Info :

Place safety eyes between rounds 6 and 7 spaced about 4 stitches apart depending on desired expression. You may embroider a tiny smile later with black embroidery yarn.

Round 10 :

(3 sc, 1 dec) x 6 (24)

Round 11 :

(2 sc, 1 dec) x 6 (18)

Round 12 :

(1 sc, 1 dec) x 6 (12)

Info :

Stuff pumpkin firmly but not hard. Use a chopstick to push fiberfill into small cavity to ensure roundness. Leave enough opening to anchor the stem securely.

Round 13 :

6 dec (6)

Info :

Fasten off leaving a long tail. Close opening and ensure the pumpkin is nicely rounded. To create the pumpkin ribs, thread a length of orange yarn onto a needle and run it vertically over the pumpkin surface in 6-8 evenly spaced lines, pulling slightly to create segments. Knot securely inside and hide end.

Stem (Brown) Round 1 :

4 sc in mr (4)

Stem Round 2-3 :

1 sc in each st (4). Fasten off leaving tail for sewing. Roll or slightly fold the stem and stitch into top center of pumpkin firmly.

Leaf (Make 1 per pumpkin) :

Ch 5, sl st into 2nd ch from hook, hdc in next, dc in next, hdc in next, sl st to base. Fasten off leaving tail for sewing. Attach next to stem.

Info :

If you prefer embroidered facial features, use black yarn and simple straight stitches for eyes and mouth. For the sample look, use safety eyes and embroider a tiny smile beneath them with black yarn (6-7 mm width).

β€” Assembly Prep & Mounting Loops :

Info :

Make small hanging loops for each ornament (ghosts and pumpkins) by creating a short chain (ch 8-12) leaving a long tail for sewing. You can also use invisible thread or thin fishing line for less visible mounts. Attach loops to top of each ornament and secure inside by sewing several times.

Attachment Loop Option :

Ch 10, sl st to join into small loop, fasten off leaving long tail. Use tail to sew loop securely into top of ornament with yarn needle, burying thread inside stuffing.

Info :

Position ornaments along the spiral before permanently sewing. Hold the spiral in coil shape and test placements so faces are visible and balanced. In sample: alternate ghost and pumpkin with roughly equal spacing (about every 10-16 rounds along tube).

β€” Final Decorative Details :

Info :

Embroider small details such as cheeks on ghosts with a touch of pale pink using a tiny dab of fabric paint or a couple of satin stitches. For pumpkins, stitch tiny smile under eyes with black yarn for extra cuteness.

Optional Surface Stitching :

For extra texture on the spiral, add a running surface slip stitch line in a contrasting color along one side using a thin yarn and tapestry needle. Keep stitches small to avoid distorting coil.

β€” Finishing Touches :

Info :

Check all knots and weave in ends inside the ornaments to hide them. Use a small dab of craft glue on critical knots for extra security if gifting to small children (avoid gluing safety eyes).

Round :

Final assembling & shaping β€” shape spiral to desired look, trim any stray threads, and add a hanging loop at the very top of the coil (if not added earlier). For a neat top, fold the top 4 stitches together and whip stitch closed while embedding the hanging loop base.

Info :

Once all ornaments are sewn, hang the garland upright and make final adjustments in shaping. Gentle steam-blocking (from a distance) can help the yarn relax and the spiral settle into shape, but do not apply steam directly to glued or safety-eyed sections.

Assembly Instructions

  • Attach head of each ghost to a small loop placed inside the top center of the scalloped edge. Sew through the top round (between rounds 8-12) securing loop firmly with invisible stitches. Position ghosts to face outward and tie off with hidden knots.
  • Attach pumpkins to the spiral using the sewn-in hanging loop: place loop around one spiral coil (or stitch loop to the tube at chosen round). For a neat look, position pumpkin loops so pumpkins hang from the outer edge of the spiral, sewing through a couple stitches of the spiral using a yarn needle through the loop tail to secure.
  • Arrange ornaments evenly: mark approx rounds 10, 22, 34, 46, 58 along the tube for 5 ornaments (sample uses 6 ornaments including top loop). Pin ornaments in place, step back and adjust spacing before final sewing.
  • Sew arms of ghosts onto side of body between rounds 9-12, matching left and right sides. Use small blind stitches and weave tail into body to hide ends.
  • To finish the top, fold the tube top, insert the hanging loop or chain, then whip stitch the top closed burying the loop tail in the tube so it is secure and tidy.
  • After all pieces are sewn, shape spiral by bending the wire core into even coils. Tuck and hide all tail ends inside the spiral or inside ornaments. Trim any visible threads and apply a tiny dab of glue to secure stubborn knots (optional).
  • If using surface embroidery for facial details, do that last so stitches are not hidden during attachment. Test placement on a scrap first.
  • Test the finished garland for balance by holding from hanging loop; if it tilts, move one or two ornaments slightly to counterbalance.

Important Notes

  • πŸ’‘Use stitch markers consistently at the beginning of each round to avoid counting errors and maintain proper shaping.
  • πŸ’‘Stuff body parts gradually as you work rather than waiting until the end, especially for narrow openings like arms and legs.
  • πŸ’‘For safety eyes, position and secure before stuffing head fully - they cannot be repositioned once locked in place.
  • πŸ’‘Maintain consistent tension throughout the project; too tight creates stiff, small pieces, too loose creates floppy, holey fabric.
  • πŸ’‘When sewing pieces together, use yarn slightly thinner than working yarn for neater, less visible seams.
  • πŸ’‘Pin all pieces in position before final sewing to ensure proper placement and symmetry.
  • πŸ’‘For amigurumi, work tightly enough that stuffing doesn't show through stitches.
  • πŸ’‘Keep a row counter or notepad to track rounds, especially in long even-stitch sections.

This pastel spiral garland is a delightful mix of structure and whimsy β€” a cheerful Halloween accent with kawaii ghosts and pumpkins. Each tiny amigurumi is packed with personality, and the coiled purple tube gives a unique, eye-catching silhouette. I hope you enjoy assembling and arranging the characters as much as I did designing them β€” every stitch brings the garland to life! πŸŽƒπŸ‘»πŸ§Ά

You ask,

we answer.

FAQs

What is the finished size of this amigurumi?

Based on the specified materials and hook size, the finished garland is approximately 28-32 cm (11-12.5 in) long when shaped as a spiral. Ornament sizes: ghosts ~3.5-4 cm tall, pumpkins ~3-3.5 cm diameter. Using different yarn weights will proportionally change final size.

Can I use different yarn weights for this pattern?

Yes! You can use any yarn weight, but adjust your hook size accordingly (generally 1-2 sizes smaller than yarn recommendation for tight amigurumi fabric). Different weights will change the final length and diameter of the spiral and ornaments.

Do I need to use safety eyes or can I embroider them?

Both options work. Safety eyes give a shiny professional look and are secure; embroidered eyes are ideal for toys for small children and give a softer, custom expression.

How much stuffing will I need?

For this size project, approximately 50-80 grams of polyester fiberfill should be sufficient. Stuff ornaments firmly but not so much that seams stretch or the spiral cannot bend around wire.

Can I make the spiral poseable?

Absolutely! Use a flexible floral wire or pipe cleaner inside the tube and shape it into the spiral. Insert the wire before fully closing tube ends. You can add a second internal wire for extra rigidity.

What if my stitch count is off?

If you notice a counting error, unravel back to where the count was correct. Trying to compensate later often creates visible distortions. Using a stitch marker at round starts helps prevent counting mistakes.

How do I prevent holes when stuffing?

Work with tight, consistent tension and use a hook slightly smaller than yarn recommendation. When stuffing, add small amounts at a time and use a stuffing tool or chopstick to distribute fiberfill evenly.

Can I customize colors and details?

Definitely! Try pastel greens, blues, or classic Halloween orange and black. You can also vary facial expressions, add glitter yarn accents, or change the number and spacing of ornaments.