— Ears :
Make 2 - Round 1 :
6 sc in magic ring (6)
Round 3 :
(1 sc, 1 inc) x 6 (18)
Round 4-6 :
1 sc in each st (18)
Round 7 :
(2 sc, 1 dec) x 4, 2 sc (14)
Round 8 :
1 sc in each st (14)
Round 9 :
Fasten off leaving long tail for sewing. Slightly fold and sew ear base to top-sides of head aligning with spikes; ears should tilt slightly forward for a playful look.
Info :
Pin ears roughly at equal distance from the central head seam; attach them between rounds 7-9 of the head for a natural placement near the top side.
— Body :
Round 1 :
6 sc in magic ring (6)
Round 3 :
(1 sc, 1 inc) x 6 (18)
Round 4 :
(2 sc, 1 inc) x 6 (24)
Round 5 :
(3 sc, 1 inc) x 6 (30)
Round 6 :
(4 sc, 1 inc) x 6 (36)
Round 7-10 :
1 sc in each st (36)
Info :
Change to cream/pale blush yarn for the belly panel starting on Round 11 to create a visible front. Carry unused yarn inside or fasten off and rejoin for a clean color block. Work belly in rounds along the front center later; here we start a color change to mark the belly area.
Round 11-16 :
1 sc in each st (36) - work in cream for the center rounds and switch back to main pink at round 17
Info :
When you switch back to main color, use a slip stitch join at the back center so the belly remains a neat vertically oriented panel. Keep the front rows slightly tighter to make the belly stand out.
Round 17 :
(5 sc, 1 inc) x 6 (42)
Round 18-22 :
1 sc in each st (42)
Info :
Check the girth now: the body should be noticeably wider than the head base to allow the head to sit naturally. Place stitch marker at front center to help line up belly panel later when sewing head.
Round 23 :
(5 sc, 1 dec) x 6 (36)
Round 24 :
(4 sc, 1 dec) x 6 (30)
Round 25 :
(3 sc, 1 dec) x 6 (24)
Info :
Begin stuffing body firmly but leave the top center unstuffed until you join the head. Stuff the lower belly and hips more firmly so the dragon can sit upright. Use small pieces of stuffing and shape with your fingers.
Round 26 :
(2 sc, 1 dec) x 6 (18)
Round 27 :
(1 sc, 1 dec) x 6 (12)
Round 28 :
6 dec (6) - leave a long tail for sewing
Info :
Do not completely close this bottom opening if you prefer to sew legs in later; however, for a solid base sew closed after stuffing and attaching legs separately for a sturdy seated posture.
— Belly Panel (worked flat then sewn) :
Round 1 :
Ch 8, sc in 2nd ch from hook and across (7)
Round 2 :
Ch 1, turn, sc in each st across (7)
Round 3 :
Ch 1, turn, (inc, 5 sc, inc) (9)
Round 4 :
Ch 1, turn, 1 sc in each st (9)
Round 5 :
(inc, 7 sc, inc) (11)
Round 6-10 :
1 sc in each st (11) - fasten off and leave tail for sewing down the center front of body
Info :
Sew this panel to the front center of the body from the throat area to the lower tummy. Use invisible whip stitch for neat attachment. Slightly stuff under the top of the panel if you want a raised tummy look.
— Arms (Make 2) :
Round 1 :
6 sc in magic ring (6)
Round 3 :
(1 sc, 1 inc) x 6 (18)
Round 4-6 :
1 sc in each st (18)
Info :
Switch to darker pink for small claw accents starting on round 7 if you prefer. Alternatively, make tiny claws separately and sew on later to keep the arm construction uniform.
Round 7 :
(2 sc, 1 dec) x 4, 2 sc (14)
Round 8-10 :
1 sc in each st (14)
Round 11 :
(3 sc, 1 inc) x 3, 5 sc (17)
Round 12-14 :
1 sc in each st (17)
Round 15 :
(3 sc, 1 dec) x 3, 5 sc (14)
Round 16 :
1 sc in each st (14)
Round 17 :
Stuff hand end firmly and shape where the small claws will sit. Fasten off leaving long tail for sewing.
Info :
Sew arms to the sides of the upper body roughly centered at rounds 16-18 of the body for a natural look. Attach using ladder stitch and sew through the arm opening to secure tightly so arms can rest against the belly.
— Tiny Claws (Make 6 small pieces for two arms and toes) :
Round 1 :
6 sc in magic ring (6)
Round 3 :
Sl st into next st, leave long tail for sewing; sew claws to finger tips and toe pads
Info :
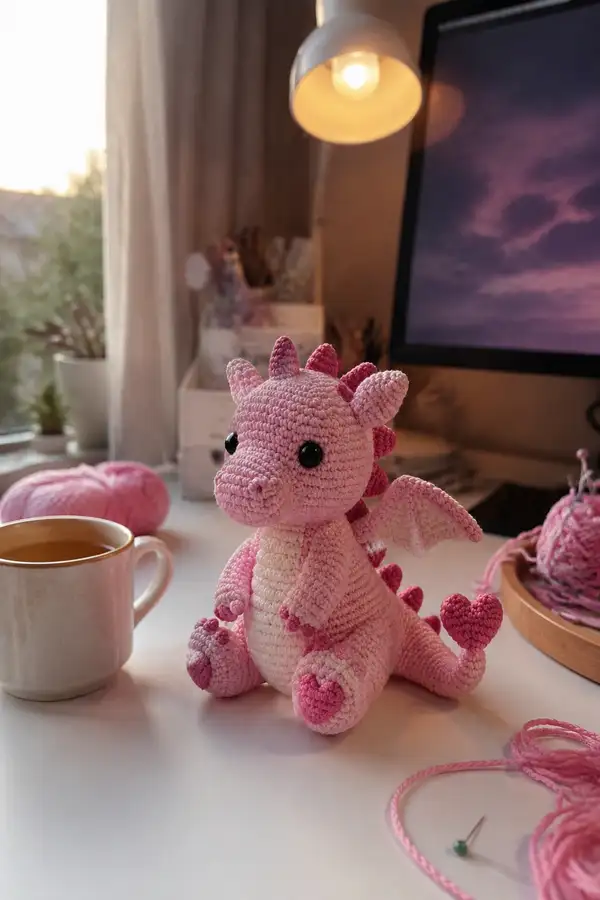
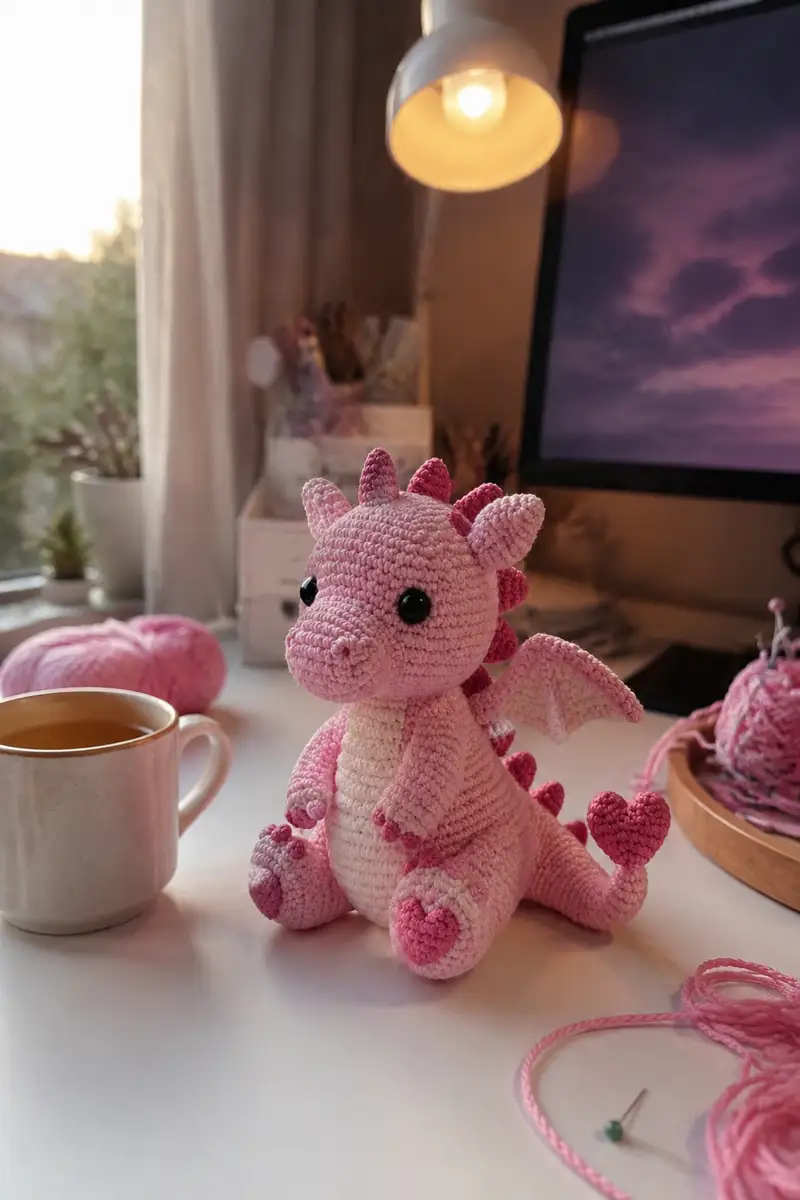
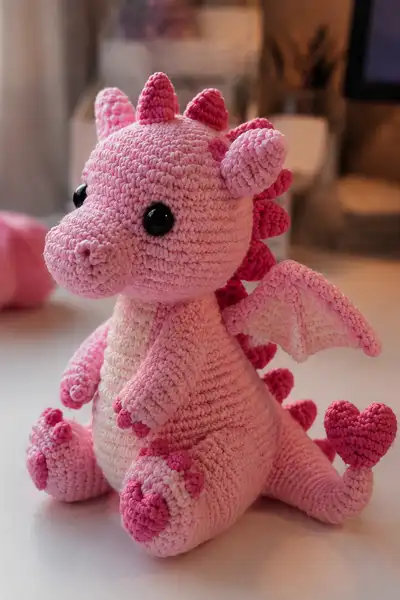
Use dark pink for claws and place three small claws on the front of each hand, and three to four claws on each foot as shown in the photos.
— Legs (Make 2) :
Round 1 :
6 sc in magic ring (6)
Round 3 :
(1 sc, 1 inc) x 6 (18)
Round 4 :
(2 sc, 1 inc) x 6 (24)
Round 5 :
(3 sc, 1 inc) x 6 (30)
Round 6-8 :
1 sc in each st (30)
Round 9 :
(3 sc, 1 dec) x 6 (24)
Round 10-12 :
1 sc in each st (24)
Round 13 :
(2 sc, 1 dec) x 6 (18)
Round 14-16 :
1 sc in each st (18)
Info :
Stuff foot firmly to ensure the dragon can sit. Add extra stuffing to the toe area to create round, plush feet. For the heart-shaped sole patch, crochet small heart motifs (instructions below) and sew them to the bottom before final stuffing.
Round 17 :
(1 sc, 1 dec) x 6 (12)
Round 18 :
6 sc (12) - leave opening for sewing to body, do not fasten off yet
Info :
Pin legs to the lower body so that the dragon sits balanced. Position legs so they are angled slightly outward, then sew through the body and leg base with strong yarn to secure. Reinforce with several passes if the toy will be handled frequently.
— Foot Heart Sole (Make 2) :
Round 1 :
Ch 5, sc in 2nd ch from hook, sc across (4)
Round 2 :
Ch 1, turn, (inc, 2 sc, inc) (6)
Round 3 :
Ch 1, turn, 1 sc in each st (6)
Round 4 :
(inc, 4 sc, inc) (8)
Round 5 :
1 sc in each st (8), shape into small heart by cinching center slightly and sewing onto foot sole
Info :
Use darker pink for heart sole and place near front tip of foot. Sew firmly and secure with extra passes so it will not detach with play.
— Spikes (Make 9 total - sequence from head to tail) :
Spike - Round 1 :
4 sc in magic ring (4)
Round 3 :
(1 sc, 1 inc) x 4 (12)
Round 4 :
1 sc in each st (12)
Round 5 :
(2 sc, 1 dec) x 3, 6 sc (9)
Round 6 :
1 sc in each st (9) - fasten off and leave long tail for sewing
Info :
Make 9 spikes in darker pink. Vary the sizes slightly (some can be two rounds longer) for a more natural ridge. Sew these centered down the head and back aligning the largest spikes over the center of the back and smaller ones near head and tail.
— Tail :
Round 1 :
6 sc in magic ring (6)
Round 3 :
(1 sc, 1 inc) x 6 (18)
Round 4-6 :
1 sc in each st (18)
Round 7 :
(2 sc, 1 dec) x 6 (12)
Round 8-10 :
1 sc in each st (12)
Round 11 :
(1 sc, 1 dec) x 4 (8)
Round 12 :
1 sc in each st (8)
Info :
Do not stuff the tail fully; leave it lightly filled so it can curve. If you want a poseable tail insert a narrow wire before final stuffing and ensure ends are folded and cushioned by extra fiberfill. Sew the heart tip to the end of tail after making the heart motif.
— Heart Tip for Tail :
Round 1 :
Ch 5, sc in 2nd ch from hook, sc in next, 3 sc in last ch, turn and sc in next 2 ch, 2 sc in first ch to form small heart base (8)
Round 2 :
Sc around heart shape to fill, (inc where needed) - finish with stuffed tiny heart, leave tail for sewing
Info :
Sew heart to tail tip. Use a few securing stitches between tail center and heart base to keep it upright as shown in the photos.
— Wings (Make 2) :
Wing - Round 1 :
Ch 8, sc in 2nd ch from hook and across (7)
Round 2 :
Ch 1, turn, sc across (7)
Round 3 :
(inc, 5 sc, inc) (9)
Round 4 :
1 sc in each st (9)
Round 5 :
(inc, 7 sc, inc) (11)
Round 6-8 :
1 sc in each st (11)
Info :
Make the inner membrane in cream/pale blush. Make two identical inner pieces then crochet a darker pink ridge around the wing by joining the darker yarn and working one round of sc around the perimeter. Leave a tail to sew into the back seam and create a slightly cupped shape by using a short row on the inner edge.
Round 9 :
Work 1 sc in each st FLO across the inner edge to create a ridge if desired (11)
Round 10 :
Fasten off leaving long tail for sewing. Sew wings to sides of the back between rounds 14-18 of the body, positioning the base of each wing so the tips angle slightly upward.
Info :
To get the slightly folded wing pictured, sew only the base of the inner membrane to the body and tack the outer ridge in 2-3 places to hold the wing out and up. Reinforce with small stitches inside the wing.
— Assembly & Final Touches :
Info :
Before sewing the head to the body, stuff the body fully but keep the top neck area slightly less filled to make closing easier. Attach head to body by sewing the head base round (leave tail from head) to the top opening of the body (round 26-28 of body depending on your exact counting). Use ladder stitch or whip stitch and ensure head is centered on the belly panel seam. Pull tightly to create a smooth neck join.
Step :
Sew spikes down the center seam from head crown to tail. Pin each spike in place first to check spacing, then secure with a few tight stitches at the base of each spike. Alternate the largest spikes toward the mid-back of the dragon.
Step :
Sew arms at body rounds 16-18 on each side using the long tail. Stitch through the body and the top rows of the arm for a stable attachment. Add a few stitches around the side of the body to make arms appear embedded into the chest.
Step :
Position legs on the lower front of the body. Pin them symmetrically so that when sitting, the feet rest flat and the belly sits between them. Sew through the leg base and around the body a few times for stability. Add heart sole motifs to the bottom of each foot before final sewing for ease.
Step :
Sew the tail to the back lower center of the body. Once attached, position the heart tip so it rests slightly to one side like a playful curl. Secure with extra stitches to keep the heart upright.
Step :
Embroider nostrils and a small smile using short satin stitch or surface slip stitch with the same main or darker pink yarn. Add small blush highlights to cheeks with soft pastels or fabric paint if desired.
Info :
Weave in all ends securely inside the stuffed areas and trim close. If using safety eyes, ensure the washers are fully locked and extra glue can be added inside the head for gifts to small children (though embroidered eyes are recommended for baby-safe toys).
Final :
Inspect all joins and reinforce any loose attachments. Shape the dragon by adjusting stuffing distribution and placing small tucks under the neck or base to make it sit as pictured. Enjoy your pink heart dragon!
This adorable pink dragon combines classic amigurumi construction with delightful heart-themed details for a truly special handmade buddy. Each carefully crocheted piece — from the scalloped spikes to the heart-tipped tail — adds personality and charm to the finished toy. The patternical approach and assembly tips make it enjoyable to sew together and display. 🧶💕 Making this dragon is a sweet way to practice shaping and small piece assembly — enjoy every stitch! ✨