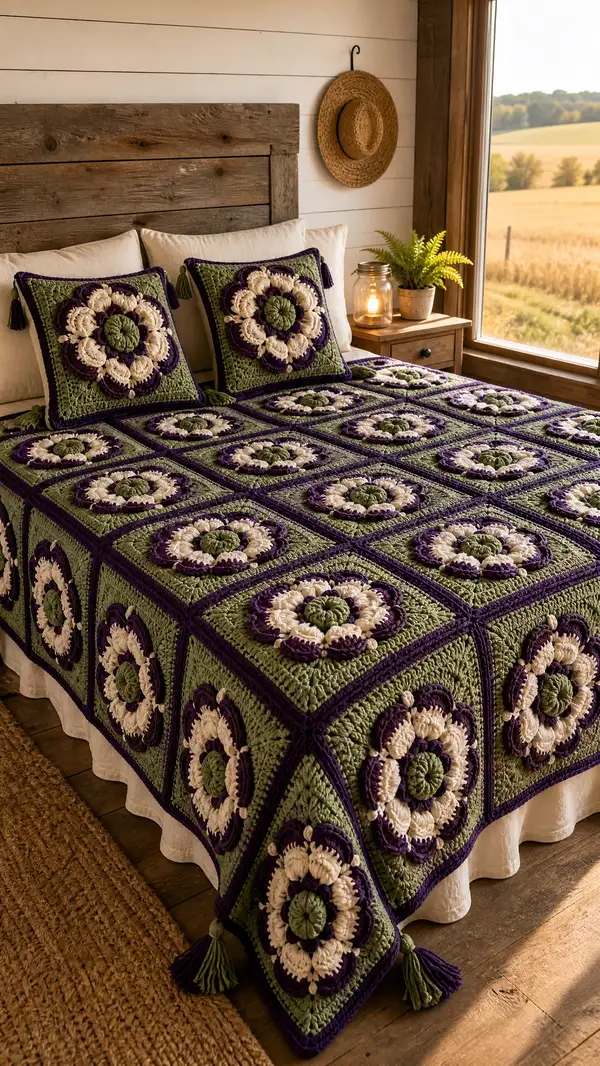
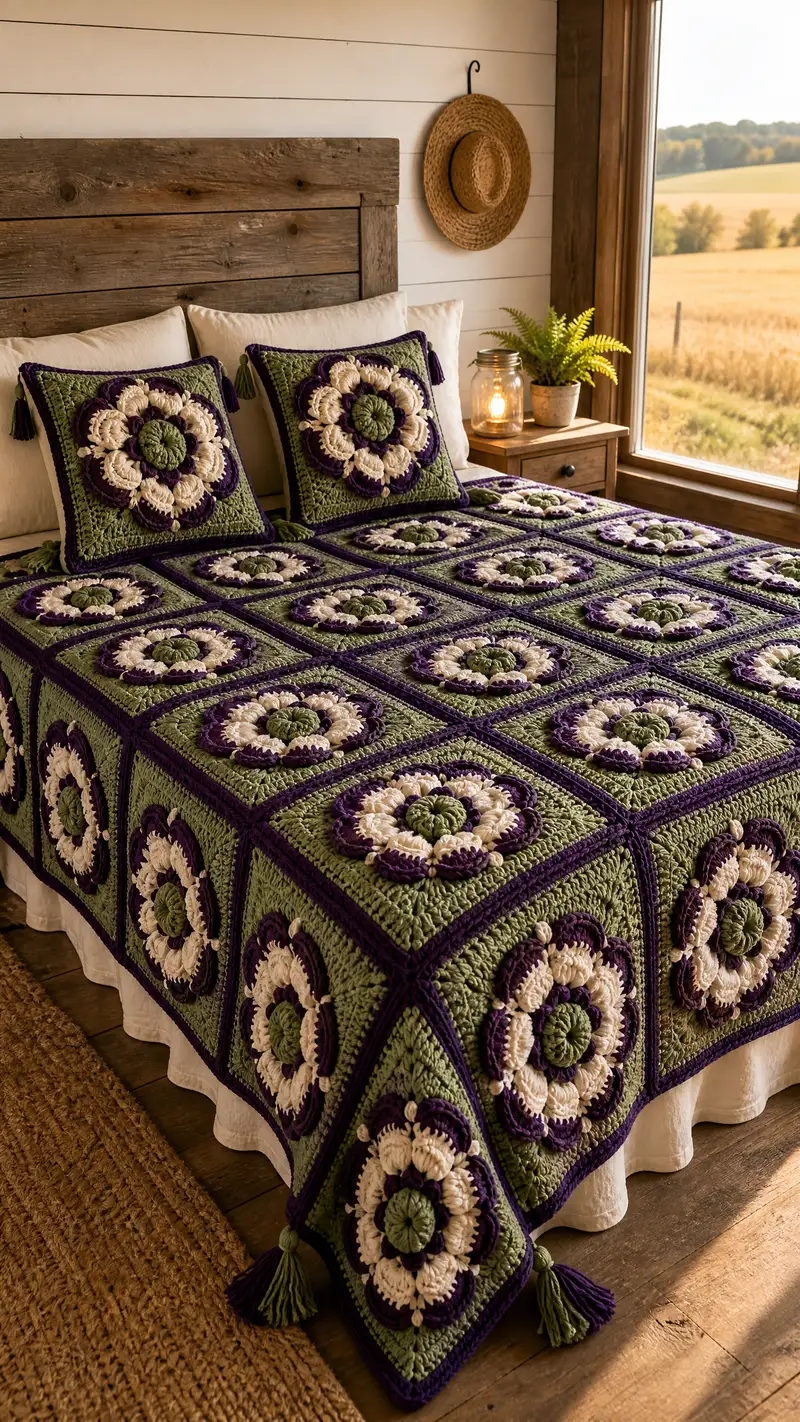
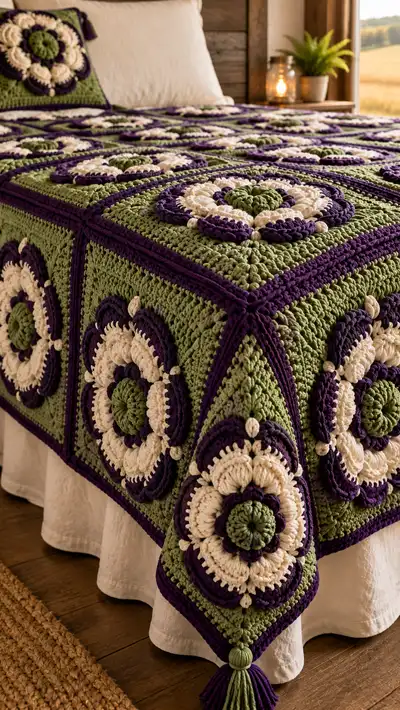
Create a stunning, textured bedspread made from large floral granny squares in meadow green, cream and deep plum. Each square features a raised layered blossom with puff and popcorn petals for a 3D look. This pattern includes square construction, joining, borders, pillow shams and tassel finishing so you can make a full bedspread just like the photo.
Progress Tracker
0% Complete
— Materials & Gauge :
Info :
Gauge: One completed framed square = 16" (40.5 cm) after blocking when worked with bulky (#5) yarn and 6.5 mm hook. Gauge is measured after completing rounds through the square body but before border. Adjust hook size to match gauge. Each large square is worked flat in joined rounds then squared into a 16" motif.
— Motif — Center Bloom (Rounds 1-30) :
Round 1 :
With Leaf/Center Green: 6 sc in magic ring (6)
Round 2 :
Inc in each st around (12)
Round 3 :
(1 sc, inc) x 6 (18)
Round 4 :
(2 sc, inc) x 6 (24)
Info :
Make sure the center is tight and even; pull the magic ring closed and weave the tail to the back. This forms the small domed central button of the flower which will be surrounded by petals.
Round 5 :
Change to Meadow Green. Ch1, 1 sc in same st, 1 sc in each st around (24)
Round 6 :
(1 sc, ch2, sk next st) x 12 placing 12 small ch-2 loops to anchor first petal round (24 loop anchors)
Info :
These ch-2 loops will be the base for the first petal shell round. Keep tension even on chains so shell spacing is regular.
Round 7 :
Change to Cream. Working into each ch-2 sp around: (sl st, ch3, 7 dc puff group* worked as 7 partial puff loops drawn together into one puff—see puff instruction below, ch3, sl st) in each ch-2 sp to create 12 raised petals (24 anchor points). After completing petals, sl st to join. (12 puff petals anchored)
Info :
Puff stitch: yarn over, insert hook into space, pull up loop, yarn over and pull up loop 4-5 times (5 loops on hook), yarn over and pull through all loops, ch1 to close puff. Each puff counts as one petal here — for consistency make all puffs with same number of yarn overs (5) for chunky petals.
Round 8 :
Change to Plum. Ch1, 1 sc in same st, then 2 sc between each petal (24 + extra sc anchors) — work 2 sc in the base between petals to create a defined outline: (2 sc in sp between petals) x 12 (36)
Round 9 :
1 sc in each st around (36)
Round 10 :
Change to Cream. *Ch2, sk 1, (5 dc cluster into next st base of petal) ch2, sl st into next sc* repeat around to create cream scallops that sit between plum anchors — after working across repeat you should have 12 cream scallops positioned between petals (36 anchor points)
Info :
Keep track of repeats: the earlier puff petals established anchor points; this scallop round sits slightly behind petals creating depth. Use stitch markers to mark every third repeat if needed.
Round 11 :
Change to Meadow Green. Ch1, 1 sc in each st around (36)
Round 12 :
BLO Round: 1 sc in each st BLO (36). This creates a subtle ridge behind the petals that helps them lift forward visually.
Round 13 :
Change to Plum. Working around petal bases: (ch1, sc around the base of each petal cluster across 3 sts, ch1) to create a narrow plum ring hugging the petals — maintain total stitch count by working sc in each st around (36)
Info :
If petals feel loose, work a second sl st round in Plum into the base of petals to anchor them more securely before moving on.
Round 14 :
Change to Cream. Create a puff/pop contrast row: *Into the center of the previous cream scallop, work 1 puff, ch1, sl st into next sc* repeat across to create 12 smaller puffs that sit between the larger petals (36 anchor points)
Round 15 :
Meadow Green: ch1, 1 sc in each st around (36)
Round 16 :
Meadow Green: (2 sc, inc) x 12 (48) — expand the circle to provide a square foundation later
Info :
Increasing to 48 sts gives a stable round to begin transitioning the motif into a square. Count stitches carefully; this is critical for even square corners later.
Round 17 :
FLO Round: 1 sc in each st FLO (48) — this will create a subtle front loop ridge that reads like texture behind the flower
Round 18 :
Change to Plum. *Ch3, sk 3, (7 dc shell into next st), ch3, sk 3, sl st into next st* Repeat across to create 12 deep plum shells spaced around (48 anchor groups)
Info :
When making shells, place shells so their centers align with petals below, but maintain even spacing. The shell stitch here is a visual ring that will contrast the cream petals with deep plum.
Round 19 :
Meadow Green: Join Meadow Green at any sc between shells: ch1, 1 sc in each st around (48)
Round 20 :
Meadow Green: (3 sc, inc) x 12 (60) — begin gentle expansion for square conversion
Info :
We are adding rounds to flatten the motif and create enough stitches for square shaping. Work evenly and block if a sample square begins to cup.
Round 21 :
FLO: 1 sc in each st FLO (60)
Round 22 :
Change to Plum. Work a decorative ridge: 1 sc in each st (60) to provide a frame for next square rounds
Round 23 :
Meadow Green: (4 sc, inc) x 12 (72) — increase evenly to prepare for square corner placement
Info :
From here we will begin to create the square sides: count out 72 stitches across the round. We'll use groups of stitches to mark four corners later by working corners every 18 stitches.
Round 24 :
1 sc in each st around (72)
Round 25 :
Meadow Green: (5 sc, inc) x 12 (84)
Round 26 :
Change to Plum. 1 sc in each st around (84)
Round 27 :
Meadow Green: Begin square shaping: Work in groups to form corner clusters. We will create 4 corners spaced evenly: Work 20 sc, (ch2, 2 dc, ch2) in next st to form corner, work 20 sc, corner shell, 20 sc, corner shell, 20 sc, corner shell finishing with sc to end — after full round you will still have 84 active stitches but added ch-2 corners for square formation.
Info :
Corner formation: chain-spaces (ch2) create the corner angle when we work square rounds. Keep the four corner places evenly spaced by dividing total stitch count by four and placing the ch-2 corner in the center of each quarter.
Round 28 :
Meadow Green: Round across: 1 sc in each st and work (2 dc, ch2, 2 dc) into each ch-2 corner from previous round to reinforce corner (84 + corner expansion remains visually framed by corners)
Round 29 :
Meadow Green: 1 sc in each st around (84)
Round 30 :
Change to Plum. Work 1 sc in each st around (84) to provide a plum frame that sits over the green base and gives a sharp square visual.
Info :
At this point you have a completed large floral motif that sits on a squared meadow-green foundation. Block this motif to 16" square, adjusting corner chains as necessary to get a true square. Make as many motifs as needed for your bed size (see assembly section for counts).
— Square Body: Framing Rounds & Texture (Rounds 31-58) :
Round 31 :
Meadow Green: Ch1, 1 sc in each st around working evenly and placing (2 sc, ch1, 2 sc) into each corner ch-2 to keep corners square (count remains based on existing sts; work evenly to maintain edge)
Round 32 :
FLO: 1 sc in each st FLO around to create a faint ridge that will help the join look neat (edge remains same count)
Info :
If you prefer a firmer framed edge, switch to a smaller hook (5.5 mm) for the next two rounds to tighten the edge and get crisp corners.
Round 33 :
Plum: 1 sc in each st around (use same count) — this creates a thin plum piping that will be visible after joining
Round 34 :
Plum: 1 sc in each st BLO to create a framed ridge (edge unchanged).
Round 35 :
Meadow Green: (6 sc, inc) x 12 (96) — expand evenly to allow extra body fabric between square centers
Info :
We increased to 96 stitches to broaden the square and to later allow a wider groove for joining. Blocking again here helps maintain final gauge.
Round 36 :
1 sc each st around (96)
Round 37 :
Meadow Green: (7 sc, inc) x 12 (108)
Round 38 :
FLO: 1 sc in each st FLO (108)
Round 39 :
Plum: Work a raised ridge: 1 hdc in each st around (108) — the hdc row gives a soft ridge for a framed look
Info :
The body rounds should be worked evenly so that when motifs are joined the frames align. If your squares measure slightly over 16", reduce hook size for next rounds; if under, consider an extra meadows green round to reach measurement.
Round 40 :
Meadow Green: 1 sc in each st around (108)
Round 41 :
Meadow Green: (8 sc, inc) x 12 (120)
Round 42 :
Plum: 1 sc in each st around (120)
Round 43 :
Meadow Green: 1 sc in each st around (120)
Round 44 :
Meadow Green: 1 sc in each st BLO (120) — subtle interior ridge
Round 45 :
Plum: Work a decorative raised (popcorn) accent around the center field: *sc in 5 sts, pop into next st* repeat around (approx 20 popcorn accents depending on final counts)
Info :
Popcorn accent: work 5 dc in same st, remove hook, reinsert into first dc and pull loop through to form a raised popcorn; ch1 to secure. Place accents evenly by marking positions with stitch markers if needed.
Round 46 :
Meadow Green: 1 sc each st around (120)
Round 47 :
Meadow Green: (9 sc, inc) x 12 (132)
Round 48 :
Plum: 1 sc in each st around (132)
Round 49 :
Meadow Green: 1 sc in each st around (132)
Round 50 :
Meadow Green: 1 sc BLO around (132) — creates a boxed texture that looks like subtle cord lines in the square body
Info :
Complete body/frame rounds until the square measures 16" across from side to side after blocking. This pattern lists through Round 50 as a default; you may add or subtract rounds to match your gauge and preferred square size.
— Join Options & Join-As-You-Go (Rounds 51-80 across join technique and seam reinforcement) :
Info :
Decide whether you will: A) join squares with whip stitch after blocking, B) join using single crochet seam, or C) join-as-you-go (JAYG) while working final round. Below are explicit join-as-you-go instructions for a neat visible plum ridge join, plus whip stitch finish instructions.
Round 51 :
If using JAYG: With plum, join at a corner point: ch1, sc into each st across the first side until you reach the corner; instead of making a ch-2 corner, align the next side of an adjacent blocked square and sl st through the corresponding stitch on attached square, then ch1 and continue across. Repeat for each side to attach square to neighbor. Final count equals same as single square edge but integrated with neighbor.
Info :
When joining, ensure motifs are blocked to same size and orientation. For bedspread pictured, join squares in a 5 x 4 layout for queen (see assembly counts). Use stitch markers to align corner stitches before making slip-stitch joins.
Round 52 :
If using whip stitch after blocking: Leave a 4-6" tail of plum yarn; place two squares right sides up facing same direction. Using yarn needle and running whip stitch through back loops only of both frames, sew neatly along the inner border so that plum edging becomes a raised seam. Repeat for all seams.
Round 53 :
Edge reinforcement: After joining entire bedspread, work one round of sc in Plum along outer edges to create a unified plum line around perimeter. Work (1 sc, ch1) in each seam space where necessary for even edge.
Round 54 :
Meadow Green: 1 round of sc in each st around the entire bedspread perimeter to soften plum outer ridge (counts variable based on assembled size)
Info :
Check join tension often: too tight will pucker seams, too loose will show gaps. Aim for moderate tension and use blocking pins to keep edges square during final border rounds.
Round 55 :
Plum: Work 1 hdc in each st around the assembled spread perimeter for a visible ridge (use a slightly smaller hook if you want sharper ridge)
Round 56 :
Meadow Green: 1 sc in each st around (perimeter) for final soft frame
Round 57 :
Plum: Decorative corner crispen: into each corner space: (2 dc, ch2, 2 dc) to sharpen corners and create a neat tassel anchor point. Work 1 sc in each st along sides between corners.
Info :
At this stage, measure the assembled bedspread and double-check the number of squares required and that the outer border sits even. If necessary add extra sc rounds in Meadow Green to reach desired drop length.
— Pillow Sham (Make 2) — Large Floral Square Pillow (Rounds 1-40) :
Round 1 :
Follow motif center Rounds 1-30 exactly to create one full large floral square for pillow front. Use same yarn and hook to match bedspread.
Round 2 :
For pillow back: Work a matching 16" square in Meadow Green starting from a MR, increase rounds to reach same measurement — simpler option: make two plain meadow green squares of same size and seam to front.
Round 3 :
Assembly for sham: Place front and back squares right sides together and seam with whip stitch leaving one side open for inserting pillow form. Turn right side out and insert 16" pillow form, then seam closed. For envelope back option: make back in two overlapping rectangles and sew edge seams only to create an envelope pocket.
Info :
Add tassels to corners of pillow to match bedspread corner tassels. Use 6-8 small tassels or a single large center tassel depending on your taste.
— Tassels & Corner Finishing (Rounds 1-10) :
Round 1 :
Make tassel core: Wind Meadow Green yarn around a 3" wide cardboard 40 times for large tassel. Tie a short piece of plum yarn tightly at top; slide tassel loop off cardboard and fold in half.
Round 2 :
Secure with plum yarn wrap about 3/4" down from top to create a neck. Trim ends evenly for fullness. Braid or wrap a small length of plum and meadow green and attach to bedspread corner using knot through ch-2 corner and sewn securely.
Round 3 :
For ball-style tassel as in photo: create a small wrapped ball using plum yarn wrapped heavy over a small core of meadow green around 1" diameter; attach fringe below for layered tassel look.
Info :
Attach tassels just after final perimeter rounds when corner (2 dc, ch2, 2 dc) spaces are present. Secure with multiple passes and a few stitches through tassel neck to prevent pulling out.
— Alternate Join & Border Variations (Rounds 81-100) :
Round 81 :
Optional Lace Border A (Plum): Ch4, (tr1, ch1) in same st, sk1, sl st in next st repeat around corners: (tr, ch2, tr) in corners — work 4-6 rounds total to build a delicate lace edge for a dressier look.
Round 82 :
Optional Ribbed Border B (Meadow): Using BLO, 3 rounds of sc in BLO to form a ribbed edge before final plum edge. This gives a substantial boxed edge that helps bedspread drape on bed sides.
Round 83 :
Finishing Plum Round: Work 2 rounds sc in Plum around entire spread for cohesive framing. On final round slip stitch and weave tail securely.
Info :
Decide on border style early — lace will reduce drape and make edges lighter, ribbed will weight the edge and help spread hang. Use additional border rounds to adjust final dimensions evenly on all sides.
— Finishing Tips & Blocking (Info rounds) :
Info :
Block each square individually: dampen lightly, pin to 16" square measured on blocking mat, and let dry. Blocking evens motifs, smooths corners and opens petals slightly for the 3D effect. After joining, block the entire spread flat on a large surface if possible, pinning corners and edges to final desired dimensions and steam or spray evenly then allow to dry thoroughly.
Info :
Weave in ends securely using a yarn needle, running tails through a few internal stitches and trimming close. For colors that rub, add a small dab of fabric glue inside knot area for extra security (test on scrap first).
Info :
Care: Handwash or gentle machine wash in cool water on delicate bag; reshape and dry flat. Avoid tumble drying to keep 3D petals from crushing. Store folded with tissue between layers if long-term to preserve texture.
Finishing this Plum Meadow bedspread is so satisfying — the layered petals and plush frames come together into a cozy, dramatic statement piece. The tassels and deep plum borders add a handcrafted, homey touch you'll want on your bed every season. I loved seeing each square transform as I blocked and joined them; the texture really pops in soft light. 🧶💕 Add it to your home for instant farmhouse charm and stitched comfort. 😊