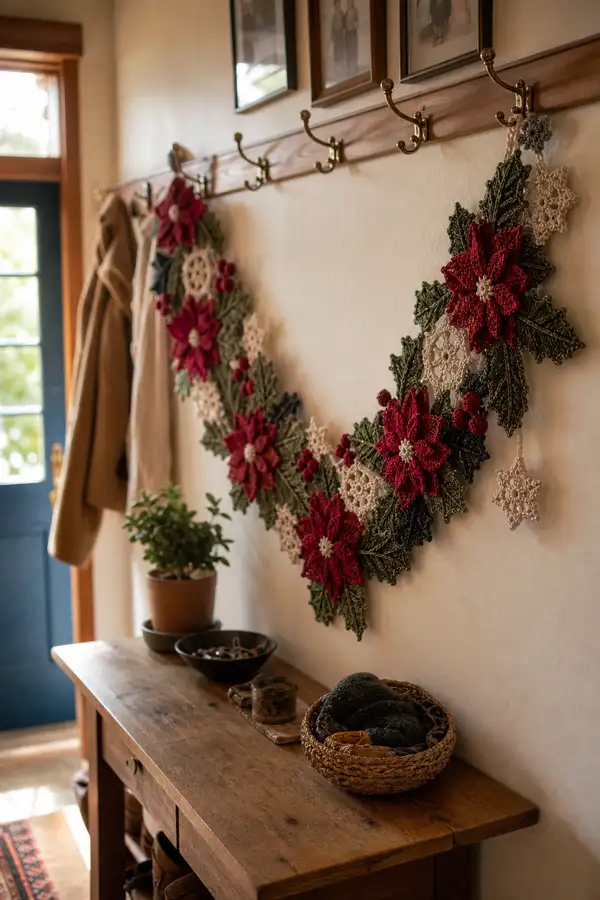
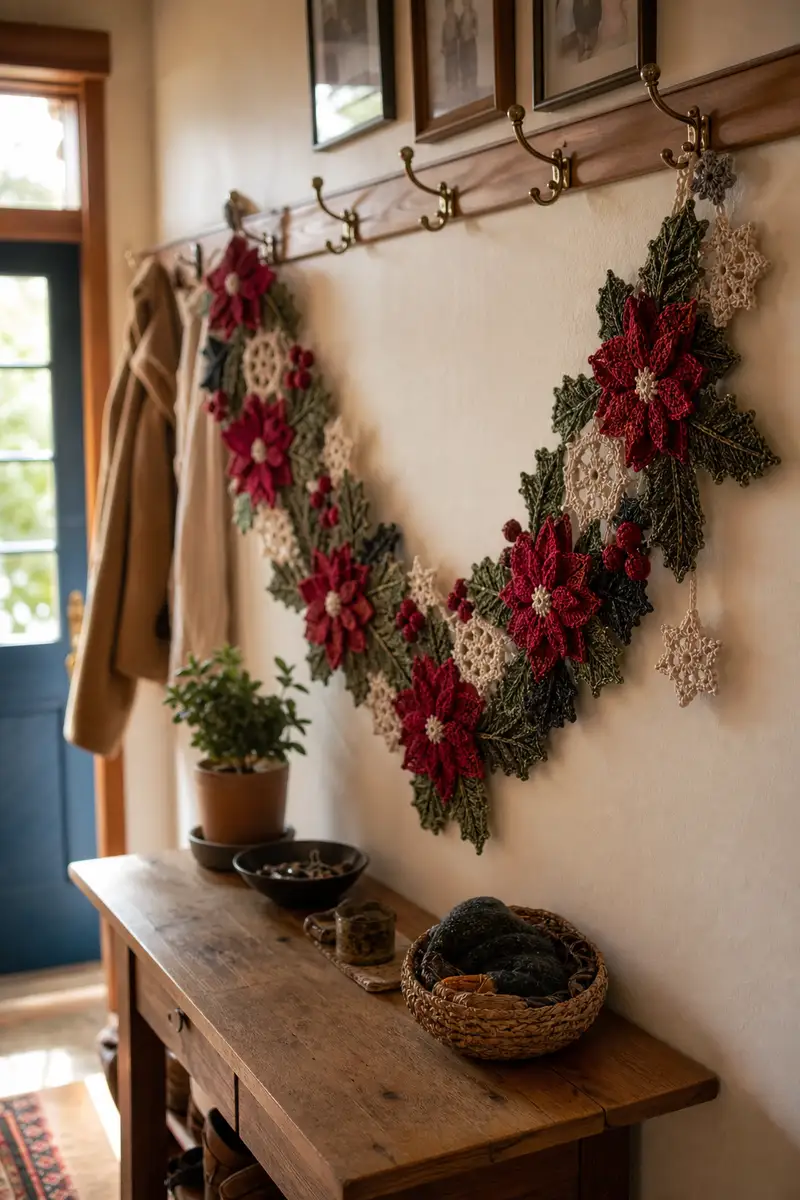
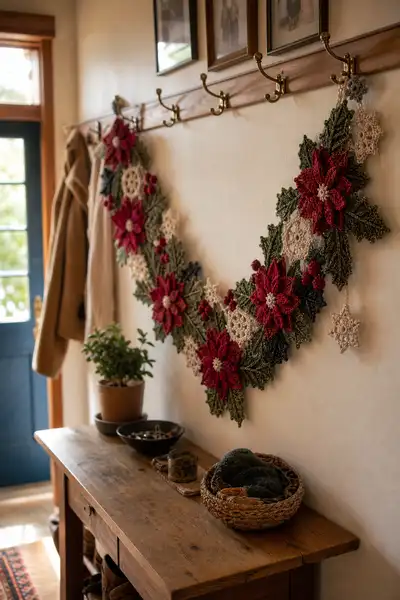
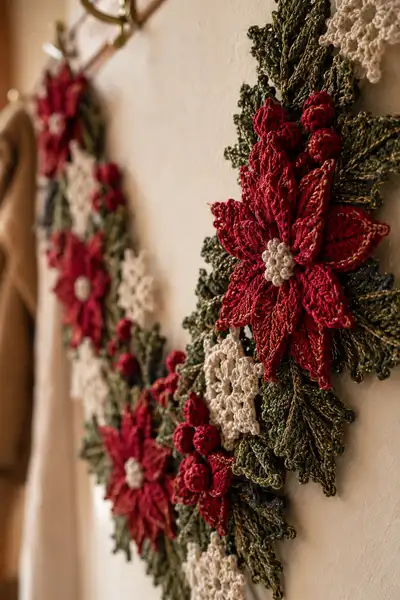
Create an elegant, vintage-inspired poinsettia motif table runner/garland perfect for holiday décor. This layered design features richly textured red poinsettia flowers, leafy green motifs with metallic accents, cream snowflake medallions and clustered red berries for dimension. The motifs are crocheted separately and joined into a graceful runner that can be displayed on a table, mantel, or hung on a wall. Detailed stitch-by-stitch instructions provide shaping, texture, and assembly tips for a beautiful finished piece.
Progress Tracker
0% Complete
— Notes & Gauge :
Info :
This project is worked in separate motifs which are stitched and blocked, then joined into a runner of desired length. Gauge is not critical but using fingering/sport cotton and 2.25 mm hook gives crisp detail similar to photos. One completed large poinsettia motif (flower with center and backing leaves) measures approximately 18-20 cm across; leaves ~12-14 cm long; snowflake medallions ~8-9 cm across. Adjust hook/yarn to change scale.
Info :
Use stitch markers liberally. Work tensions slightly firm so motifs hold shape; metallic thread is used as an accent strand held together with green yarn for leaves — do not treat it as the sole working strand.
— Poinsettia Large Petal Module (make 8 outer petals per flower; repeat rounds for inner smaller petals with a size reduction) :
Round 1 :
6 sc in magic ring (6)
Round 3 :
(1 sc, 1 inc) x 6 (18)
Round 4 :
(2 sc, 1 inc) x 6 (24)
Round 5 :
1 sc in each st (24)
Info :
From this small circular base we will extend the petal length by working a short oval shaping. Mark the start of the next round to track the top of the petal.
Round 6 :
Ch 2 (counts as 1 hdc), 1 hdc in same st, 1 hdc in next 6 sts, 3 hdc in next st (turning point), continue on opposite side of ring: 1 hdc in next 6 sts, 2 hdc in last st, sl st to first hdc to close oval (20 stitches around the oval including ch-2) (20)
Round 7 :
Now work along the oval edge: ch 2 (counts), 1 dc in same st, (1 dc in next 2 sts) x 3, (2 dc in next st, dc in next 3 sts) across the tip cluster, then mirror back down the opposite side: (1 dc in next 2 sts) x 3, 1 dc in next 2 sts, sl st to join (approx 22-24 sts depending on increases at tip)
Round 8 :
BLO: ch 1, 1 sc in each st BLO around to create a ridge backing for petal (24)
Round 9 :
Ch 3, *sk 1 st, (3 dc, ch 1, 3 dc) in next st (makes a decorative picot cluster), sk 1 st, 1 dc in next 2 sts*; rep from * to * across the tip (this creates a scalloped pointed edge) (approx 24-28 dc and cluster spaces)
Round 10 :
Ch 1, 1 sc in each st and in each ch-1 space around to tidy and flatten petal (24-28)
Info :
For inner (smaller) petals use same sequence but stop at Round 7 (omit rounds 8-10) and work fewer tip clusters (reduce tip cluster from (3 dc,ch1,3 dc) to (2 dc,ch1,2 dc)). Make 8 outer petals and 8 inner petals per full flower. Keep all petal pieces flat by slight blocking.
Round 11 :
Optional edging: join contrasting lighter thread at base and work 1 sc in each st for a narrow rim to add definition (24)
Round 12 :
Fasten off leaving a 30-40 cm tail for sewing petals to center. Weave tail inside petal's back to hide and secure before assembly.
— Poinsettia Flower Centre (make 1 per flower) :
Round 1 :
mr, ch 1, 8 sc into ring (8)
Round 2 :
Inc in each st around (16)
Round 3 :
(1 sc, 1 inc) x 8 (24)
Round 4 :
Ch 1, 1 sc in each st for one round (24)
Round 5 :
Bobbles and texture: *ch 1, (tr3tog cluster over next 3 sts) - work cluster by YO, insert, pull through 3 loops, YO pull through all loops, sl st to anchor*; rep around into every 2nd stitch to create raised bumps (12 clusters)
Info :
Use cream yarn for a bright star-like center. Work the clusters firmly but not so tight they pucker. After finishing, pull the center small, add a tiny bit of fiberfill underneath to push clusters outward for 3D look.
Round 6 :
Fasten off leaving a long tail for sewing to petal base. Weave tail through the back of center and cinch slightly to make a small button-like center (24)
Round 7 :
Optional: embroider tiny French knots with matching cream thread on top of clusters for extra detail (use embroidery needle and short yarn length)
Round 8 :
Secure center to petal assembly by sewing through the back loops of the petal bases, centering the cluster, and anchoring evenly around; secure and hide ends.
— Poinsettia Full Flower Assembly (one full flower uses 8 outer petals + 8 inner petals + center) :
Info :
Layout petals first: place 8 outer petals in a circular arrangement, overlapping slightly at their bases. Pin each petal in place on a blocking surface. Layer the 8 smaller inner petals on top, rotated so inner petals sit between outer petal gaps.
Round 1 :
Sew petals by threading the long tails through a tapestry needle and stitching through the petal bases and small circular back from Round 1 of petal until snug. Use about 6 evenly spaced stitches per petal base. Repeat for all outer petals (no numeric stitch count).
Round 2 :
After outer petals are secured, position inner petals and sew in place similarly. Ensure inner petals are slightly raised to create depth by catching only the base edge stitches on inner petals.
Info :
Light blocking after sewing helps shape petals. Use pins to open petals and steam lightly if using cotton-blend yarn (avoid high heat on metallic strands).
Round 3 :
Sew center to top by inserting the center's long tail through the center of assembled petals, anchoring from the underside, and stitching around to secure. Tie off and weave ends into back of flower.
— Small Berry (make clusters of 5-7 per cluster; make multiple clusters per flower) :
Round 1 :
mr, 6 sc in ring (6)
Round 2 :
Inc in each st (12)
Round 3 :
1 sc in each st (12)
Round 4 :
BLO: ch 1, 1 sc in each st BLO to create a neat seam (12)
Round 5 :
Work 3 rounds of micro-bobble: *ch 1, (5 dc in same st, sl st to same st) - creates a tight bobble*; rep into 3-4 adjacent sts to give a clustered texture (work gently so bobble is rounded)
Round 6 :
Fasten off leaving 25-35 cm tail for sewing berries into small clusters. Stuff each berry very lightly with tiny tufts of fiber (optional); avoid overfilling to keep roundness.
Info :
Make clusters of 5-7 berries, sewing them together first, then attach the cluster to the flower backing or leaf junction. Position clusters to look natural next to petals.
— Leaf Motif (make 10-14 leaves; leaves used for backing and to create greenery around flowers) :
Round 1 :
ch 10, sl st to form a small ring, ch 1 (foundation loop) or mr with 8 sc (8) if you prefer starting round; this leaf uses worked shaping from chain base
Round 2 :
Work along chain on one side: 1 sc in 2nd ch from hook, 1 hdc in next, 1 dc in next, 1 tr in next 2 sts (tip shaping), then mirror back: 1 dc, 1 hdc, 1 sc in last chain; sl st to base to close (approx 10 sts)
Round 3 :
Turn and work along leaf: ch 1, 1 sc in each st across the leaf edge to add width and depth (approx 10-12 sc)
Round 4 :
BLO along the base only: *ch 1, (1 sc, 1 hdc, 2 dc, 1 hdc, 1 sc) across the tip, sl st* to create the central ridge and slight cupping (12)
Round 5 :
Switch to FLO for textured veins: ch 1, 1 sc in each st FLO across (12)
Round 6 :
Surface slip stitch veins: with a separate strand of darker green or metallic held, surface sl st in a chain of 'v' veins: *sl st down center, ch 2, sl st back to edge* to draw veins across the leaf. Work 2-3 veins per leaf tip.
Round 7 :
Edge trim: join metallic strand at base and work a narrow picot edge: *sc, ch 3, sl st in 3rd ch, sk 1* across the outer edge to catch light on points (approx 12 picots)
Info :
Hold the metallic strand together with the base green yarn when crocheting leaf outer rounds for highlight. Keep metallic strand loose to avoid breakage. Block flat slightly to emphasize veins.
Round 8 :
Fasten off leaving a 30-40 cm tail for sewing. For larger, layered leaves repeat rounds adding additional increases into the tip to reach 14-16 sts across for fuller leaves.
Round 9 :
Optional: make a double-leaf backing by stitching two leaf shapes together along their bases, leaving tip edges free for a fuller silhouette.
— Snowflake Medallion (make multiple between flowers) :
Round 1 :
mr, ch 3 (counts as dc), 11 dc into ring, sl st to top of ch-3 (12) (creates a 12-point base)
Round 2 :
Ch 1, *sc in next st, ch 3* x 12, sl st to first sc (12 sc, 12 ch-3 loops)
Round 3 :
Into each ch-3 loop: (1 sc, ch 3, 3 dc, ch 3, 1 sc) to form star arms. Fasten off (12 arms)
Round 4 :
Rejoin at base of any arm, ch 1, 1 sc into sc below, ch 2, (1 hdc in tip of arm, ch 2, sl st into next arm base) repeat to create delicate connecting arches between arms for lacy look (12 arches)
Info :
Use cream cotton and small hook (2.0-2.25 mm) for lacy filigree. Block generously with starch or spray to make crisp snowflakes. These will be sewn in between poinsettia clusters.
Round 5 :
Optional additional edge: join a contrasting thin metallic thread and work tiny picots evenly around the arms for sparkle (12-18 small picots)
Round 6 :
Fasten off and leave long tail for sewing to runner. Block to exact shape and allow to dry thoroughly before assembly.
— Decorative Joining Chain (creates the base runner and connecting lace) :
Round 1 :
With cream or neutral yarn, ch 250 (or desired length of runner; ch in multiples of 10 for spacing) - this creates the decorative hanger/chain backbone. Fasten off.
Round 2 :
Rejoin at even points along chain (every 25 ch or as desired) and work small medallion connectors: (1 sc, ch 4, 1 sc) in chain to create loops for sewing motifs (repeat across chain so motifs can be placed neatly)
Round 3 :
Edge: work 1 sc in each ch along both sides of chain for a sturdier band. This creates a stable backbone to pin motifs to and allows hanging on hooks or inserting wire.
Info :
Count and mark positions for each main flower, leaf cluster and snowflake prior to attaching — typical layout: flower, leaf cluster, snowflake, flower, leaf cluster, flower, snowflake, flower (adjust to length). Use pins to check symmetry.
Round 4 :
Optional: insert 18-22 gauge wire along the chain by crocheting over it or stitching it into the chain allowance to create a malleable runner that holds sweeping shape when hung.
Round 5 :
Fasten off and secure both ends of chain with neat stitches and a few drops of glue if wire used to prevent slippage.
— Backing Triangles & Small Connector Motifs :
Round 1 :
To help join flowers, make small triangular backing motif: mr, ch1, 6 sc in ring (6)
Round 2 :
1 sc in next 2 sts, inc, 1 sc in next 2 sts, inc (8)
Round 3 :
Ch 1, 1 sc in each st, sl st to first sc (8)
Round 4 :
Fold triangle and stitch sides together slightly to create a small wedge that sits under flower base and offers anchoring points (no numeric count)
Info :
Make 2-3 of these per flower to give multiple anchoring points for petals and leaves and allow for stable sewing to the chain.
— Assembly & Joining (extensive step-by-step) :
Info :
Arrange motifs on a flat surface in the planned sequence. Pin large flowers first, then tuck leaves and berry clusters into spaces, and finally insert snowflakes in gaps for visual balance. Step-by-step sewing follows.
Round 1 :
Attach backing triangle(s) to the chain at planned flower position using mattress or whip stitch through chain and backing base. Use long tails from triangle to anchor securely (no numeric count)
Round 2 :
Center the flower over its backing triangle(s) and use the 30-40 cm tails from petals and center to sew through the triangle and chain. Make 8-12 secure passes through the petal bases and backing to hold flower firmly. Tie and weave ends into triangle underside.
Round 3 :
Attach leaves around the flower: layer leaves at natural intervals (3-6 leaves per flower grouping) and sew only through the leaf bases so tips stay lifted. Use a couching stitch under leaf base to hide securing yarn.
Round 4 :
Sew berry clusters at 2-3 positions around each flower using berry tails. Stitch cluster base to backing triangle and weave ends into chain to lock in place. Arrange for asymmetry for a natural look.
Info :
Keep sewing stitches small and tight on the underside; avoid visible top stitches. If using metallic thread, sew ends down with matching plain yarn to avoid metallic chafe and slippage.
Round 5 :
Attach snowflakes in preplanned spaces using long tails and fine whip stitches through chain loops. Keep snowflakes slightly offset so they appear suspended between flowers. Weave ends securely.
Round 6 :
Reinforce any points where multiple motifs meet by passing the needle through chain, triangle, and motif bases multiple times for stability. Tie and weave all ends neatly behind runner.
Round 7 :
Final check: gently block assembled runner on foam board, pinning tips of petals and leaves to create a graceful drape. Lightly steam or mist if using cotton-blend; leave to dry fully.
Round 8 :
Optional edging: along the full length of the chain and around the outermost leaf tips, join a narrow picot border (sc, ch3, sl st) to give a finished, delicate edge and to hide any small joining stitches.
Info :
If adding wire inside the chain, test flexibility and cover any exposed wire with floral tape on ends to prevent yarn abrasion. For a permanent display, secure wire ends with glue into chain pockets and weave down tails.
— Extra Decorative Techniques & Variations :
Round 1 :
For raised petal veins: before blocking, use a contrasting fine strand to chain-stitch veins down the center of each petal and along the inner edge for more pronounced texture.
Round 2 :
To make smaller accent flowers, repeat petal rounds but stop at Round 7, use 6 petals instead of 8, and use a smaller center. These can be used as filler between large poinsettias.
Round 3 :
To make a table runner instead of a hanging garland, join chain backbone motifs side-by-side into a flat band and sew motifs along the top edge only so petals lay flat on the tabletop.
Info :
Play with color: deep burgundy and cranberry tones give a vintage mood; bright red and emerald green feel modern. Metallic accents may be gold, bronze or silver depending on desired warmth.
Round 4 :
Final finishing: weave in all ends through several motifs so the runner can be laundered gently by hand. For extra durability, add a backing strip of lightweight fabric stitched to the underside in discrete spots only.
Completing this poinsettia runner is such a satisfying holiday accomplishment! Each layered petal, textured leaf, and tiny berry cluster adds handcrafted charm and cozy warmth to your entryway or table. The metallic accents and lacy snowflakes add festive sparkle and vintage elegance. 🎄 I hope this pattern brings joy to your holidays and becomes a cherished seasonal heirloom. Happy stitching and enjoy the glow of handmade holiday decor! ✨🧶