🧶 Beautiful ✨ Detailed 💝 Adorable

Purple Spiral Halloween Garland with Skulls and Pumpkins Pattern

Purple Spiral Halloween Garland with Skulls and Pumpkins Pattern
4.8★ Rating
5-7 Hours Time Needed
2.6K Made This
✂️

Intermediate Level

Ideal for those with basic crochet experience, featuring slightly more advanced stitches and techniques to expand your skills.

⏱️

Weekend Treat

Takes 5-7 hours, making it an enjoyable project to finish over a couple of days.

🍂

Autumn Vibes

Earthy seasonal charm with playful Halloween details — a perfect handmade accent for fall decorating.

🧶 Jump to Pattern ↓

About This Purple Spiral Halloween Garland with Skulls and Pumpkins Pattern

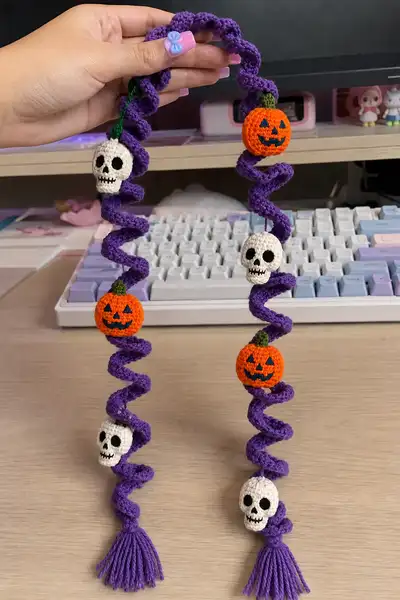
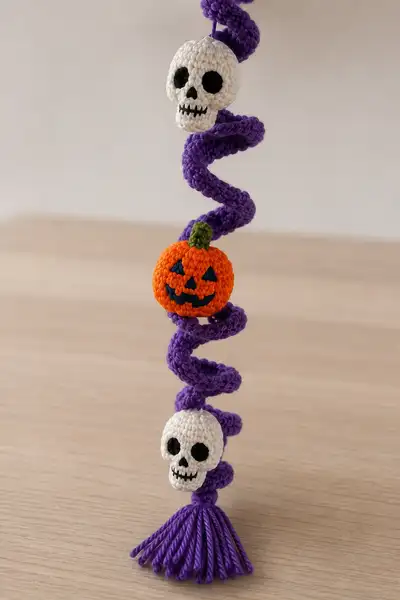
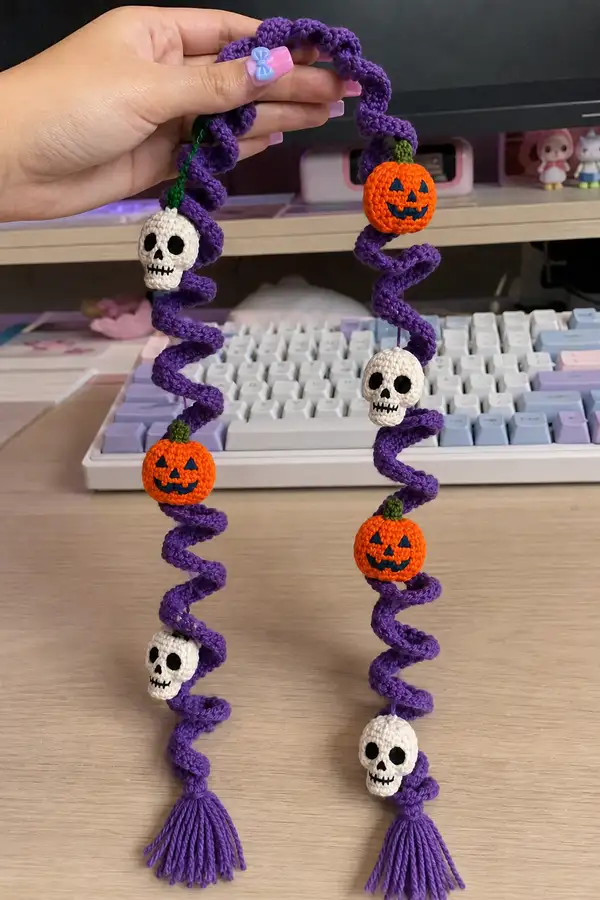
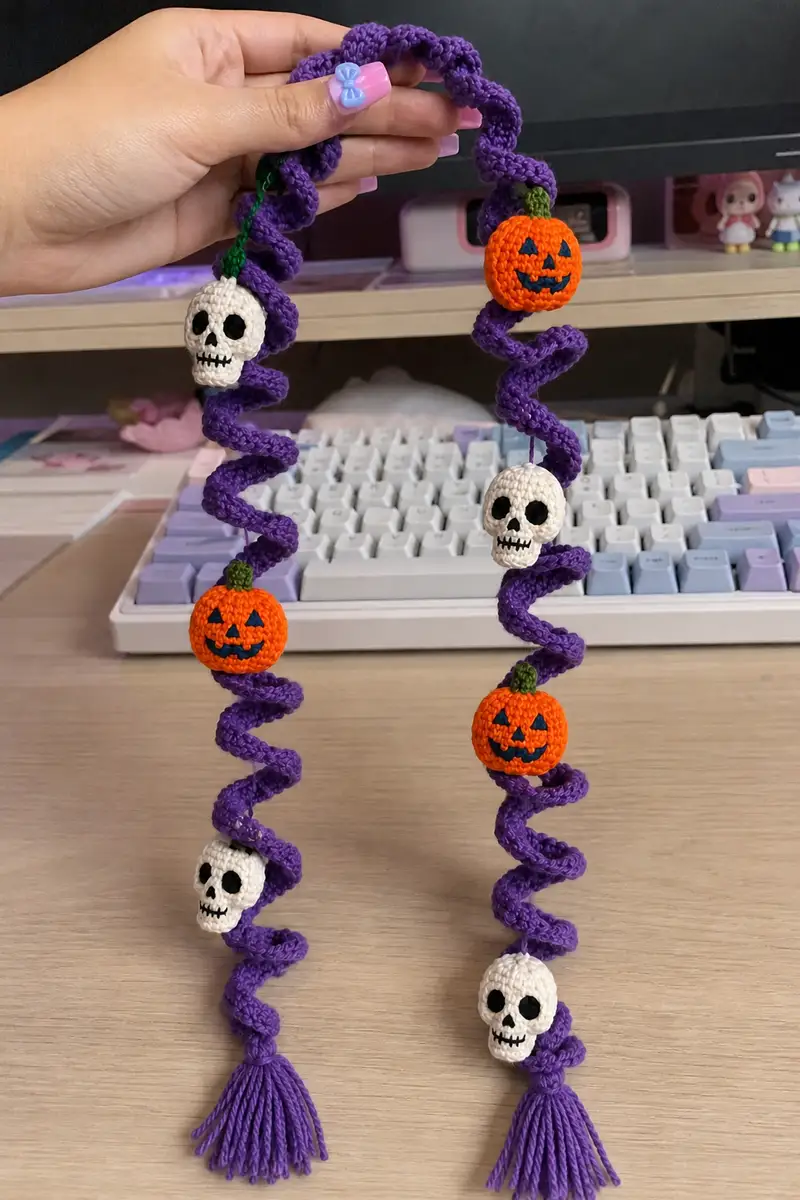
This pattern teaches you to crochet a spiral cord garland in vibrant purple, then string tiny amigurumi pumpkins and skulls between the coils. Each pumpkin has a cheerful jack-o\'lantern face in deep navy/black stitching and a little green stem. The skulls are soft ivory with embroidered eye sockets and teeth for a charming spooky look. Tassel ends complete the garland for a polished hanging finish.

Purple Spiral Halloween Garland with Skulls and Pumpkins Pattern crochet pattern - detailed view of completed project

The design uses small amigurumi techniques—magic rings, even rounds, and careful stuffing—combined with a spiral cord trick to create the bouncy, coiled look. Pieces are sewn securely into place so the garland hangs and spirals consistently.

Why You'll Love This Purple Spiral Halloween Garland with Skulls and Pumpkins Pattern

I love this pattern because it balances cute and spooky in a tiny, portable decoration that really packs personality. The bright orange pumpkins pop against the dramatic purple spirals, and the little embroidered skull faces add unexpected charm. I enjoy that you can make multiple variations quickly and the spiral technique is fast, satisfying, and very forgiving.

Purple Spiral Halloween Garland with Skulls and Pumpkins Pattern step 1 - construction progress Purple Spiral Halloween Garland with Skulls and Pumpkins Pattern step 2 - assembly progress Purple Spiral Halloween Garland with Skulls and Pumpkins Pattern step 3 - details and accessories Purple Spiral Halloween Garland with Skulls and Pumpkins Pattern step 4 - final assembly and finishing

Switch Things Up

I absolutely love how easy it is to customize this garland. I would try swapping the purple spiral for black and orange stripes to create an even more classic Halloween look. You could also alternate colors on the pumpkins — make one pale cream and another bright orange for contrast.

I often change facial expressions: try sleepy pumpkin eyes or surprised skull faces for personality. For a softer look, use acrylic yarn instead of cotton; for crisp stitches and bright color, cotton DK is my go-to. Finally, shorten or lengthen the foundation chain to create a shorter swag or a long drape — I like making a few different lengths to layer over a doorway.

Common Mistakes & How to Fix Them

✗ Skipping stitch markers at round starts can cause spiral or amigurumi pieces to twist or end up lopsided; always mark the first stitch of each round. ✗ Inconsistent tension between rounds creates uneven faces or holes where stuffing shows; aim for steady tension throughout. ✗ Not stuffing skulls and pumpkins gradually will make it hard to shape features later; add stuffing a little at a time as you work. ✗ Using the recommended hook size is important — a hook too large will show stuffing through stitches and one too small will make parts too stiff. ✗ Failing to secure embroidery knots on skull faces can lead to loose details; weave ends back through several stitches before trimming. ✗ Not testing placement of beads or sewn pieces before fastening leads to mismatched spacing; pin pieces and check hanging balance first. ✗ Cutting tassels too short or unevenly makes the final look unbalanced; measure and trim tassel strands carefully for symmetry.

Purple Spiral Halloween Garland with Skulls and Pumpkins Pattern

Make a playful purple spiral garland strung with tiny crochet jack-o\'lanterns and skulls. This festive Halloween decor features deep purple spirals, bright orange pumpkins with stitched faces, ivory skulls with embroidered features, and tassel ends. The finished garland hangs beautifully from doors, desks, or as a party decoration. Suitable for makers who enjoy small amigurumi components and decorative assembly.

Intermediate 5-7 Hours

Materials Needed for Purple Spiral Halloween Garland with Skulls and Pumpkins Pattern

— Main Fabric

  • 01
    DK to light worsted weight yarn (#3-4), approximately 120-150g in purple (main spiral color)
  • 02
    30-40g in orange for 3 small pumpkins
  • 03
    20-30g in ivory/cream for 4 small skulls
  • 04
    Small amounts (10-15g) of dark navy or black for facial embroidery and pumpkin faces
  • 05
    Small amount (10g) of green for pumpkin stems

— Tools Required

  • 01
    2.5mm - 3.5mm crochet hook (adjust to get a tight amigurumi fabric; I used 3.0mm for DK cotton-style yarn)
  • 02
    Yarn needle for sewing pieces and weaving in ends
  • 03
    Polyester fiberfill stuffing
  • 04
    Stitch markers (recommended: at least 4)
  • 05
    Scissors
  • 06
    Pins for positioning pieces before sewing
  • 07
    Optional: thin floral wire or pipe cleaners for a slight poseable effect in the spiral (fully wrapped inside cord)
  • 08
    Optional: small locking stitch markers for marking eye placement
  • 09
    Optional: fabric glue for extra-secure embroidered knots

Progress Tracker

0% Complete

— Project Overview :

Info :

This garland features two identical purple spiral cords, three small pumpkins, four small skulls, stems, and tassel ends. Work the amigurumi pieces tightly so stuffing does not show through; adjust hook size if necessary. The pattern gives complete, round-by-round instructions for each piece and clear assembly directions.

Gauge :

1 pumpkin (approx) = 3.5cm / 1.4in diameter when using 3.0mm hook and DK yarn; adjust hook to match your yarn and tension. Spiral cord length is adjustable; sample used ch80 then 3sc in each ch to create tight coil.

— Materials & Notes :

Info :

Use cotton or cotton-blend DK for crisp stitches and good definition on pumpkin ridges. Acrylic works fine for a softer finish. Make 2 spiral cords (left and right) each approx 60–80cm finished depending on chain length. You can change the chain length to shorten/lengthen spirals.

— Skull (Make 4) :

Round 1 :

6 sc in magic ring (6)

Round 2 :

6 inc (12)

Round 3 :

(1 sc, 1 inc) x 6 (18)

Round 4 :

(2 sc, 1 inc) x 6 (24)

Round 5 :

(3 sc, 1 inc) x 6 (30)

Round 6 :

(4 sc, 1 inc) x 6 (36)

Round 7 :

(5 sc, 1 inc) x 6 (42)

Round 8 :

(6 sc, 1 inc) x 6 (48)

Round 9-13 :

1 sc in each st (48)

Info :

Place eye placement markers between Rounds 11-12 about 7-9 sts apart depending on how wide you want the eye spacing. For embroidered eyes, leave spacing slightly wider; for sewn eyes (not recommended for small kids), use 8mm max.

Round 14 :

(6 sc, 1 dec) x 6 (42)

Round 15 :

(5 sc, 1 dec) x 6 (36)

Info :

Begin stuffing the skull lightly but firmly from here; fill the cranium so it keeps round shape but not rock-hard. Add more stuffing as you shape the jaw in later rounds.

Round 16 :

(4 sc, 1 dec) x 6 (30)

Round 17 :

(3 sc, 1 dec) x 6 (24)

Round 18 :

(2 sc, 1 dec) x 6 (18)

Round 19 :

1 sc in each st (18)

Round 20 :

(1 sc, 1 inc) x 6 (24)

Round 21 :

1 sc in each st (24)

Info :

These rounds begin to form a short jaw protrusion. Keep stuffing so the jaw holds a gentle curve. You want the jaw to be smaller than the cranium so the skull sits and hangs naturally in the spiral.

Round 22 :

(3 sc, 1 inc) x 6 (30)

Round 23 :

1 sc in each st (30)

Round 24 :

(4 sc, 1 inc) x 6 (36)

Round 25 :

1 sc in each st (36)

Info :

If you prefer a slightly longer jaw use one extra even round here (1 sc each st) before the next decreases. Keep checking the proportion against your pumpkins and spiral to match visual effect.

Round 26 :

(5 sc, 1 dec) x 6 (30)

Round 27 :

(4 sc, 1 dec) x 6 (24)

Round 28 :

1 sc in each st (24)

Round 29 :

(1 sc, 1 dec) x 6 (12)

Round 30 :

6 dec (6)

Info :

Fasten off leaving a long tail for sewing to the spiral cord. Pull the tail through the remaining 6 stitches and close tightly. Weave tail several rounds internally for security. Make 4 skulls following the same rounds and stuffing instructions.

— Skull Facial Embroidery :

Info :

Use thin black or navy yarn for eyes and mouth embroidery. Embroider two round eye sockets (or sew tiny black felt circles) centered roughly between Rounds 11-12. Use satin or small circular stitch to fill the eyes for bold black circles. For nostrils, use a small triangular satin stitch between the eyes at the lower middle of Round 13.

Info :

For teeth: run a short black running stitch across the lower front of the jaw (Rounds 20-23), then add 4-6 small vertical stitches to mark teeth lines. Secure and weave ends inside skull before trimming tails.

— Pumpkin (Make 3) :

Round 1 :

6 sc in magic ring (6)

Round 2 :

6 inc (12)

Round 3 :

(1 sc, 1 inc) x 6 (18)

Round 4 :

(2 sc, 1 inc) x 6 (24)

Round 5 :

(3 sc, 1 inc) x 6 (30)

Round 6 :

(4 sc, 1 inc) x 6 (36)

Round 7 :

(5 sc, 1 inc) x 6 (42)

Round 8-12 :

1 sc in each st (42)

Info :

To make distinct pumpkin ribs: optionally place 6 stitch markers at even intervals around Round 8 to mark rib locations. You will later use surface slip stitches or embroidery to deepen ribs between these markers.

Round 13 :

(5 sc, 1 dec) x 6 (36)

Round 14 :

1 sc in each st (36)

Round 15 :

(4 sc, 1 dec) x 6 (30)

Round 16 :

1 sc in each st (30)

Round 17 :

(3 sc, 1 dec) x 6 (24)

Round 18 :

1 sc in each st (24)

Round 19 :

(2 sc, 1 dec) x 6 (18)

Info :

Begin stuffing firmly but evenly to shape pumpkin. Add more stuffing at the equator to help create the round bulge typical of a pumpkin.

Round 20 :

(1 sc, 1 dec) x 6 (12)

Round 21 :

6 dec (6)

Info :

Close, fasten off and leave a long tail. After closing, use the tail to sew a low gather through the center (running stitch pulled tight) to emphasize vertical ridges. Pull the tail through the center of the top and secure; you will attach the green stem over this point.

— Pumpkin Stem (Make 3) :

Round 1 :

mr, 4 sc in mr, do not close (4)

Round 2 :

1 sc in each st (4)

Round 3 :

(1 sc, inc) x 2 (6)

Round 4-5 :

1 sc in each st (6)

Round 6 :

sl st around top for a neat finish; fasten off leaving a long tail for sewing (6)

Info :

Sew stem onto the top center where you pulled the gather string. Hide tails inside the pumpkin when sewing and knot securely. Optionally embroider a tiny green vine with embroidery thread next to the stem for extra detail.

— Spiral Cord (Make 2) :

Info :

This spiral is created by making a foundation chain of desired length and working multiple sc into each chain to create a tight twist. The sample cords are approx 60cm each finished; use ch80 as a starting length and adjust to taste. Working tightly produces a compact spiral that holds its shape.

Round 1 :

Ch 80 (or desired length). Do not turn; you will work across the chain to create the tube that will curl.

Round 2 :

Starting in 2nd ch from hook, work 3 sc in each ch across (80 x 3 = 240). Work tightly and evenly (240)

Info :

When you work 3 sc into each foundation chain, the strip will naturally spiral. If you prefer a thicker spiral, after finishing Round 2, join ends to form a loose tube and work 1-3 rounds of 1 sc in each st around (240) to build height. Be careful: joining will make a continuous tube; otherwise leave it as a single-row spiral and seam edges together.

Round 3 :

Optional: join with sl st and work 1 sc in each st around (240) to create a thicker tube. Work 2 rounds for more body (240)

Round 4-6 :

Optional even rounds 1 sc in each st around (240). Add rounds until spiral feels firm and thick enough to hold coils

Info :

Fasten off leaving a long tail for sewing. You can gently steam-block or pin the spiral in a spiral shape to set it. To create the coiled effect: wrap the strip around a dowel or pencil and secure with thread while sewing the amigurumi pieces in place.

— Tassel (Make 2) :

Round 1 :

Cut 20-30 strands of purple yarn approx 10cm longer than desired tassel length. Fold in half and attach strands to the end of the spiral by lark's head knot, grouping them evenly.

Round 2 :

Wrap a short length of yarn tightly around the tassel head near the top to form the neck; secure with a knot and weave in ends (forms tidy tassel neck)

Info :

Trim tassel ends evenly. You can make longer or shorter tassels based on taste; more strands give a fuller tassel. Add a dab of fabric glue to the wrap if you want extra security.

— Additional Decorative Ridges on Pumpkins :

Info :

Use a contrasting/ darker orange or navy yarn and surface slip stitch vertically from top to bottom aligning with the 6 rib markers you placed earlier. Make 6 evenly-spaced surface slip stitch lines; pull gently while stitching to create indented ribs.

— Optional Inner Cord Reinforcement :

Info :

If you want the spirals to hold a more rigid twist, insert a thin length of floral wire inside the tube before finishing the end. Wrap wire ends with tape and embed in tassel or secure by sewing into the top knot of the tassel so ends are not exposed. This also helps the garland maintain coil shape over time.

— Final Finishing Touches :

Info :

Weave in all yarn tails securely inside each amigurumi piece. If you used embroidery for facial features, double-check knots are inside. Lightly steam press (do not touch directly with iron) cotton yarn components if you want to round or set shapes — be cautious with acrylic fibers.

Info :

Make all pumpkins and skulls in a single session to maintain consistent tension and size. Compare pieces as you go; if one is slightly smaller, add an extra even round to that piece to keep it proportional.

Assembly Instructions

  • Lay both spiral cords flat and decide which will be left and right; pin them lightly to your work surface in a spiral shape. Position pumpkins and skulls evenly along the spiral at visually pleasing intervals (sample alternation is skull-pumpkin-skull-pumpkin-skull on each strand).
  • Attach each amigurumi to the spiral cord by sewing through the long tail left when you fastened off (for skulls and pumpkins). Thread tail through the center of the spiral so the piece hangs in the dip of the spiral and sew a secure whipstitch around several spiral stitches to lock in place.
  • When attaching, ensure pieces are oriented so facial features face outward. For skulls, sew the topmost point into the spiral above Round 10-12 region of the skull; jaw should hang freely below the coil.
  • After sewing pieces, add a few additional stitches around the body of the amigurumi into the spiral so they do not slide. Knot securely and weave tails into the amigurumi interior.
  • Attach tassels to the bottom ends of each spiral cord by sewing the gathered tassel neck to the spiral tip. Weave the sewing tail into the cord and hide inside the tassel wrap.
  • If using reinforcement wire, fold the wire ends and hide them inside the tassel or a stitched-on felt patch to prevent injury. Check all seams and tug gently to ensure pieces are held tightly.
  • If desired, add a small loop at the top of each spiral for hanging: use a short ch loop sewn to the top tail and reinforced with extra stitching.
  • Finally, trim tassel ends evenly and lightly shape the coiled spirals by wrapping them around a pencil or dowel to deepen the curl if necessary.

Important Notes

  • 💡Use stitch markers consistently at the beginning of each round to avoid counting errors and maintain proper shaping.
  • 💡Stuff body parts gradually as you work rather than waiting until the end, especially for narrow openings like skull jaws — this prevents lumps and allows even shaping.
  • 💡For embroidered eye sockets and mouths, secure knots inside with several weaves before trimming to prevent loosening during handling.
  • 💡Maintain consistent tension throughout the project; too tight creates small, stiff pieces, too loose creates floppy, holey fabric where stuffing shows.
  • 💡When sewing pieces together, use a yarn needle and slightly thinner yarn for neater, less visible seams, and make sure to sew through spiral layers for a secure hold.
  • 💡Pin pieces in position before final sewing to ensure proper placement, symmetry, and balanced hanging weight.
  • 💡For amigurumi, work tightly enough that stuffing does not show through stitches; use a smaller hook if necessary.
  • 💡Keep a row counter or notepad to track rounds, especially during long even-stitch sections, so you can reproduce consistent pieces.

This sweetly spooky garland is a tiny labor of love that adds instant Halloween personality to any room. Each crochet pumpkin and skull is handcrafted with care, and the purple spirals make them dance as they hang. I can picture several color variations for different parties and porches—so fun to customize! 🧶🎃💀
You ask,

we answer.

FAQs

What is the finished size of this garland?

Using the suggested yarn and hook, each spiral cord finishes around 50-70 cm depending on foundation chain length and whether you add thickness rounds; overall hanging length varies by how you coil it. Pumpkins are roughly 3.5 cm diameter; skulls are approximately 3.5-4 cm tall.

Can I use different yarn weights for this pattern?

Yes. Thicker yarn will produce bigger pumpkins and skulls and a chunkier spiral; use a correspondingly larger hook. For tight amigurumi fabric, use a hook 1-2 sizes smaller than the yarn label suggests.

Do I need to use safety eyes or can I embroider them?

Embroidered eyes are recommended for this size and for safety, especially if the garland will be used around children. Safety eyes can be used but require larger pieces and are harder to reposition once the piece is stuffed.

How much stuffing will I need?

Approximately 50-100 grams of polyester fiberfill should be sufficient for all pumpkins and skulls combined—add more if you like a very firm finish.

Can I make the spirals more rigid?

Yes. Insert thin floral wire or pipe cleaners into the spiral tube before closing and secure wire ends inside the tassel. Alternatively, add extra rounds of single crochet around the tube to make it thicker and hold shape better.

What if my stitch count is off?

If you notice a counting error, it is best to unravel back to the last correct round and redo from there. Using a stitch marker and a row counter helps prevent errors. Small discrepancies can change final sizes noticeably at this tiny scale.

How do I prevent the stuffing from showing through?

Work with a slightly smaller hook than recommended for your yarn to create a tight fabric. Stuff in small amounts and distribute the stuffing evenly to avoid lumps.

Can I customize colors and details?

Absolutely! Try pastel colors for a cute non-scary theme or mix orange, black, and purple for classic Halloween. Swap the embroidered faces for felt cutouts or add tiny hats for a holiday twist.