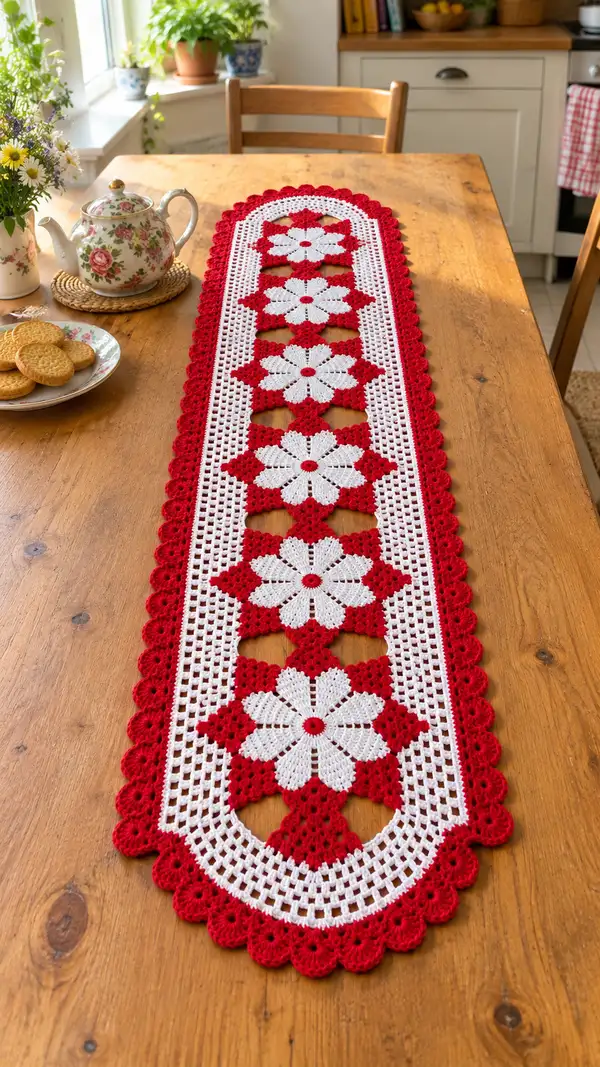
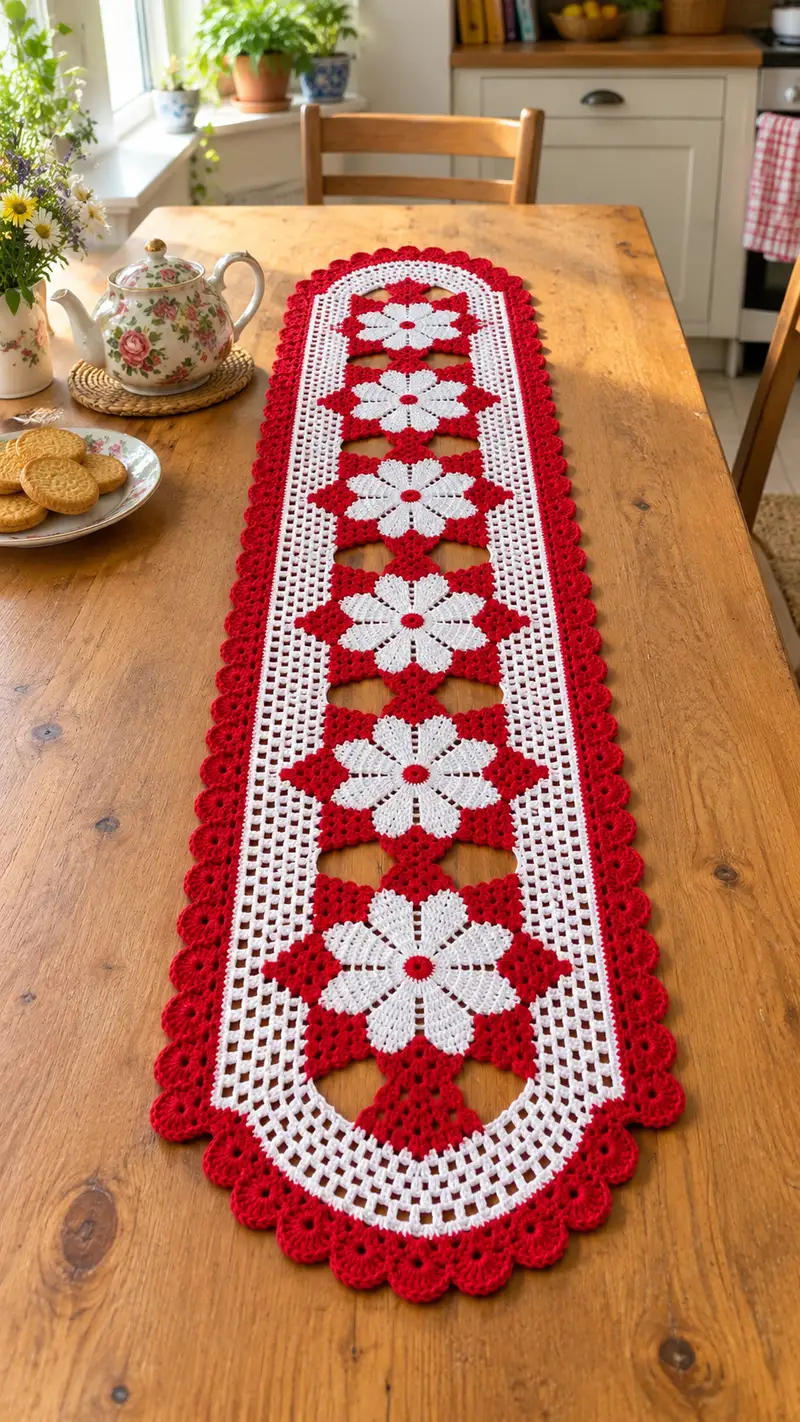
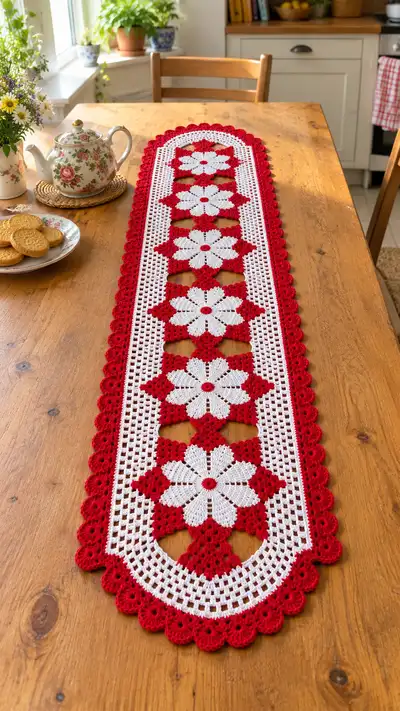
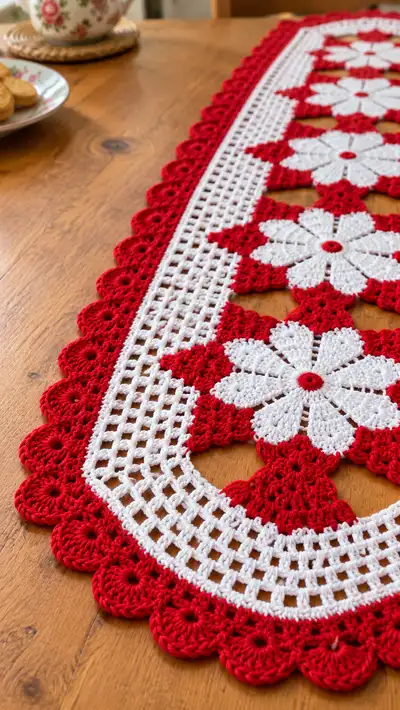
A long, elegant table runner featuring five bold red diamond connectors and white eight-petal floral motifs, finished with a scalloped red border. This classic filet-inspired design uses crisp color changes and open mesh to create a lightweight, decorative centerpiece. The pattern includes step-by-step rounds for motifs, connectors, mesh panels and scalloped edging to recreate the exact look shown.
Progress Tracker
0% Complete
— Overview :
Info :
This pattern is constructed from five identical eight-petal floral motifs (make 5) worked in white then joined vertically with red diamond connectors. A surrounding white filet mesh panel is worked around the row of motifs to create the interior rectangle, then both rounded ends are built and finished with layered red scallop edging. Work motifs flat in the round (not joined in spiral) and fasten off at the end of each motif. Use 3.5mm hook and worsted weight yarn. Gauge is flexible — focus on stitch counts.
— Flower Motif (Make 5) :
Round 1 :
Using white yarn, make a magic ring. Ch 3 (counts as dc). Work 11 dc into ring. Join with sl st to top of ch-3. (12)
Round 2 :
Ch 1. 1 sc in same st, *ch 3, sk next dc, sc in next dc; rep from * around to create 6 ch-3 petals spaces. Join with sl st to first sc. (6 ch-3 sp, 6 sc)
Round 3 :
Work petals: *Into next ch-3 sp: (2 dc, ch 2, 2 dc) shell; sl st into next sc to secure petal; rep from * around to make 6 petal shells. Join with sl st to base. (6 shells)
Info :
Petals are worked as shells of 4 dc separated by ch-2 loops. Maintain even tension so petals sit flat; do not pull yarn too tight when joining between petals.
Round 4 :
Ch 1. 1 sc in same st, *ch 5, sk shell, sc between next shell; rep around to create 6 ch-5 arches. Join with sl st. (6 ch-5 sp, 6 sc)
Round 5 :
Into each ch-5 arch: sl st, ch 3, (2 dc, ch 2, 2 dc), sl st in base (repeat to form small diamond points between petals). Join. (6 larger petal clusters)
Info :
Round 5 builds extra height so petals become more defined and overlap slightly with adjacent motifs when joined. Keep petals symmetrical by counting the same number of stitches per petal cluster.
Round 6 :
Ch 2 (counts as hdc). 3 hdc into each ch-2 space of the shell below (12 hdc total), ch 2 between petal groups where indicated to form a small ridge of hdc. Join with sl st. (approx 12-18 hdc and 6 ch-2 spaces)
Round 7 :
Ch 1. Work 1 sc in each hdc and in each ch-2 space around to create an even base round. Join. (24 sc – adjust to match your exact stitch counts from previous row)
Round 8 :
Switch to red for small centre ring: Sl st to centre between shells, ch 1, work 6 sc into centre hole (work through opposite side of previous rounds so centre is covered). Join and fasten off red. (6)
Info :
Change to red yarn for a small decorative centre. Fasten off and weave in ends before continuing white rounds to keep centre tidy.
Round 9 :
Rejoin white to a stitch at petal base. Ch 3 (counts as dc). Into each petal shell: work 9 dc evenly distributed across the petal to create a broad, slightly raised petal — insert hook under both loops of the stitch base for stability. Sl st between petals. (6 petals, 9 dc each ~54 dc)
Round 10 :
Ch 1. Sc in each dc across petal surface and sl st in the join between petals. This flattens petals and evens the edge. (approx 54 sc)
Info :
Use this round to regularize petal edges so each motif has the same outer circumference. Count stitches carefully; if needed, adjust by 1-2 stitches per petal to maintain symmetry.
Round 11 :
Ch 4 (counts as tr), *sk 3 sc across petal, 1 tr in next st; rep around to form tall evenly spaced tr arches around the motif (aim for 24 tr). Join with sl st. (24)
Round 12 :
Ch 1. In each tr: work (1 sc, ch 3, 1 sc) to create small mesh anchors around the motif. Join. (24 ch-3 sp)
Round 13 :
Switch to red. Into each ch-3 sp: slip stitch to red, ch 2, (3 dc, ch 2, 3 dc) shell to create small pointed diamonds that will become the diamond connector corners. Join and fasten off red if not continuing. (24 shells)
Info :
Round 13 forms the red pointed connectors that will visually become diamond corners when motifs are joined vertically. Fasten off and weave ends neatly on each motif. Make 5 identical motifs.
Round 14 :
Optional tidy round in white: Rejoin white at top of any petal shell, ch 1, sc evenly around to create a flat uniform edge ready for joining. Join and fasten off. (approx 90 sc total circumference)
Info :
Blocking each motif lightly helps petals settle and makes joining easier. Pin motifs to a circular template if needed before blocking.
— Diamond Connector (Make 6 - join motifs vertically) :
Round 1 :
Using red yarn, ch 6, join with sl st to form a ring or use mr and 6 sc. Here we will start with ch-6 ring: sl st to first ch to form a loop. (6)
Round 2 :
Ch 3 (counts as dc), work 11 dc into ring or loop edge to make 12 dc total. Join with sl st. (12)
Round 3 :
Ch 4 (counts as tr), *ch 1, sk 1 dc, tr in next dc; rep around to make 6 tr clusters separated by ch-1. Join. (6 tr)
Round 4 :
Into each tr cluster: (1 sc, ch 3, 1 sc) to make 6 small arches. Join. (6 ch-3 sp)
Round 5 :
Ch 1, sc in same st, ch 3, (3 dc, ch 3, 3 dc) into each ch-3 arch to make diamond points. Join. (6 diamond points)
Info :
Each connector is a small diamond medallion with three-pointed tips; these will be overlapped and slip-stitched to the red shells created on the motif in Round 13 to form the vertical join.
Round 6 :
Ch 1. Sc around to stabilize the diamond; add ch-1 spaces at the inner corners to keep fabric flexible. Join and fasten off, leaving a long tail for sewing. (approx 30 sc)
Round 7 :
Using tail, position connector between two motifs aligning diamond points with red shells on each motif. Whip stitch or slip stitch join through outer loops to connect motifs into a vertical chain. Repeat to make a chain of 5 motifs connected by 4 diamonds (make 6 diamonds to fill both ends where needed). Join ends as shown in assembly steps. (Assembly)
Info :
Sew from the back so visible joins on the front are minimal. Use the same red yarn to make whip stitch joins around the small red shell points catching 2-3 loops in each stitch for a secure join.
— Central Assembly and Stabilizing Round :
Round 1 :
Lay the vertical chain of motifs flat and decide on spacing (photo shows minimal spacing – motifs just touch at red diamond points). Using white yarn, join at a petal base at the outer edge of the motifs where you want the mesh to start. Sl st into that stitch to join and prepare for filet rounds around the entire length. (Joining point)
Info :
Place the completed motif column centered on a blocked rectangle template if you have one. Use pins to hold motifs in place before starting the filet mesh so the mesh will frame the motifs evenly.
Round 2 :
Ch 3 (counts as dc). Work 2 dc into same st, *ch 3, sk 3 sts of motif edge, 3 dc into next outer stitch around motif edge; rep across long sides keeping 3-dc groups at corners and between motifs to anchor the mesh. This round provides an evenly spaced anchor row for the filet grid. Join with sl st. (Work approx 3 dc groups per motif side and 3 dc at each short side)
Info :
This round is flexible because motif edge stitch numbers can vary slightly. Aim to create evenly spaced 3-dc groups to act as posts for the filet rows. Count the total number of ch-3 spaces you have created, as the next rounds will convert these into mesh squares.
— Filet Mesh Panel (Work evenly around motifs) :
Round 1 :
Change to white yarn if not already using it. Ch 4 (counts as dc + ch1). *Sk 1 dc, dc in next dc, ch 1; rep around to form a grid of dc separated by ch-1. Keep dc groups over the 3-dc anchors and ch-1 over open edges. Join with sl st. (Mesh grid established)
Round 2 :
Ch 4 (counts as dc + ch1). *Dc in next dc, ch 1; rep around working evenly in grid spaces to widen mesh. Join. (Maintain same count as previous round — each dc where there was a dc; each ch-1 becomes ch-1 space)
Info :
We will convert to classical filet: 1 filled square = 3 dc; 1 open square = dc, ch2, dc (or dc + ch1 depending on preference). In this pattern we use dc, ch 2, dc for open squares to create clear square holes. Keep consistent method throughout.
Round 3 :
Ch 3 (counts as dc). *Work 2 dc in next 2 stitches to create solid posts at intervals matching motif anchors; then ch 2, sk 2, dc in next stitch to form an open square; rep pattern across long sides. Make sure to create open squares above each connector area to show the red diamonds beneath. Join. (variable — ensure symmetry left to right)
Round 4-12 :
Continue filet pattern around the long rectangle: Each round work: ch 3 (counts as dc), then alternate between (2 dc, ch 2) for filled areas and (dc, ch 2, dc) for open squares following established spacing so that open squares run in columns between motif panels. Keep stitch counts consistent across rounds; count the number of open squares across width and maintain same on each row. Repeat for 9 rounds to create approximately 10-12 rows of mesh depending on desired height. (Repeat to create a uniform mesh band)
Info :
Measure as you go; the photo shows about 8-12 rows of filet between the motif edges and the border. Keep the mesh tight enough to frame motifs but not so tight it puckers. Use blocking pins to keep the rectangular shape while working the next rounds.
— Rounded Ends Construction :
Round 1 :
At one short end of the mesh, we will form a semicircular cap. Working in the same white yarn, from the corner work (2 dc, ch 2, 2 dc) into the corner to start a rounded curve. Then along the short side, work a sequence of shells and dc groups expanding each round to create a smooth curve. (corner starter)
Round 2 :
Ch 3, work 2 dc into ch-2 corner, *ch 1, sk 1 mesh cell, 3 dc into next anchor; rep across short side, at opposite corner work 2 dc into corner. Join. (beginning curve)
Round 3 :
Increase round: Ch 3, work (3 dc) in each anchor along short edge, but add an increase cluster (3 dc in same st) at approximately every third anchor to gradually curve the straight edge. Join. (increased dc count creating semicircle)
Round 4-6 :
Repeat increasing rounds, adding 3-4 additional dc clusters evenly spaced each round to form a smooth semicircle. Once the curved shape reaches desired width matching the opposite end, work one final round of sc around the entire end to tidy the curve. Fasten off white. (semicircle formed)
Info :
Work slowly through these rounds and place pins frequently to check the smoothness of the curve. The number of increases depends on your mesh width — distribute increases evenly for a round look.
— Transition Round (Prepare for Scallop Edge) :
Round 1 :
Rejoin red yarn at any point along the outer edge. Ch 1. Work 1 sc evenly around entire outer edge of the runner (including curved ends), working about 1 sc per dc or per mesh cell edge. At curves, place 3 sc in one stitch to avoid ruffling. Join and fasten off. (est. 320-380 sc depending on runner size)
Info :
This red stabilizing round acts as an anchor for the scallop edge and provides the bold red frame visible in the photo. Accurate placement keeps the scallops even.
— Scallop Border (Layered, worked in red) :
Round 1 :
Rejoin red at first sc. Ch 3 (counts as dc). *In the next sc work (2 dc, ch 2, 2 dc) to create a shell. Skip 2 sc, sc in next sc; rep from * across. This first scallop row sets scallop spacing. Join. (approx 40-48 scallops)
Round 2 :
Ch 1. Sc into the ch-2 space of each scallop, ch 3, (5 dc) into the same ch-2 space to build a puffed scallop, sl st to center of scallop; rep across. Join. (puffed shells formed)
Round 3 :
For a layered scallop: *Into the top of the previous shell: (sl st, ch 3, 1 dc, ch 3, sl st) to create a small picot-like finish; rep across to set a neat outer picot ridge. Join and fasten off. (decorative ridge)
Info :
Work these rounds loosely enough for scallops to lay flat without curling. If shells fan out too much, reduce dc cluster size to 4 dc instead of 5 dc for a subtler scallop.
Round 4 (Optional decorative ring) :
To make outermost circular eyelets seen in the photo (small circle within each scallop), rejoin red to the center of each scallop and work: ch 6, sl st to form a small loop, then 6 sc into loop; sl st back to base. Repeat for each scallop. This produces the small ring visible at each scallop center. Fasten off and weave ends. (eyelet rings in scallops)
Info :
This extra decorative step gives the scallop a buttonhole-like center that echoes the flower centres. It is optional but recommended for an authentic match to the photo.
— Final Finishing Rounds :
Round 1 :
Weave in all yarn ends on the back of the work using a tapestry needle. Use matching red and white yarn tails to make them invisible on the front. Trim close to the fabric. (finishing)
Round 2 :
Blocking: Soak runner lightly in lukewarm water with a gentle wool wash, squeeze out excess water (do not wring). Lay flat on blocking mat, pin outer scallops evenly spaced, and shape rounded ends to match photo proportions. Allow to dry completely. (blocking)
Info :
Blocking is essential to even out filet mesh and to coax scallops into their correct rounded shape. Use rust-proof pins and measure from center to ensure symmetry of scallops on both long edges.
Round 3 :
Final press: After dry, steam gently if needed and re-pin any scallops that need slight adjustment. Your runner is now ready to use and display. (complete)
Info :
For extra stability (if runner will be used frequently), consider sewing a lightweight interfacing fabric to the back with fine hand stitches, keeping stitching invisible on the front. This is optional and not visible in the pictured sample.
Completing this red and white floral runner is such a satisfying project — the bold contrast and delicate mesh work together beautifully. Each motif and scallop adds charm and handcrafted character, perfect for a special table display. Whether for daily use or holiday gatherings, this runner brings warmth and handmade elegance to your home. 🧶🌸 Blocking and careful finishing make the final result truly shine. Enjoy every stitch and share your finished piece with friends! 🎉