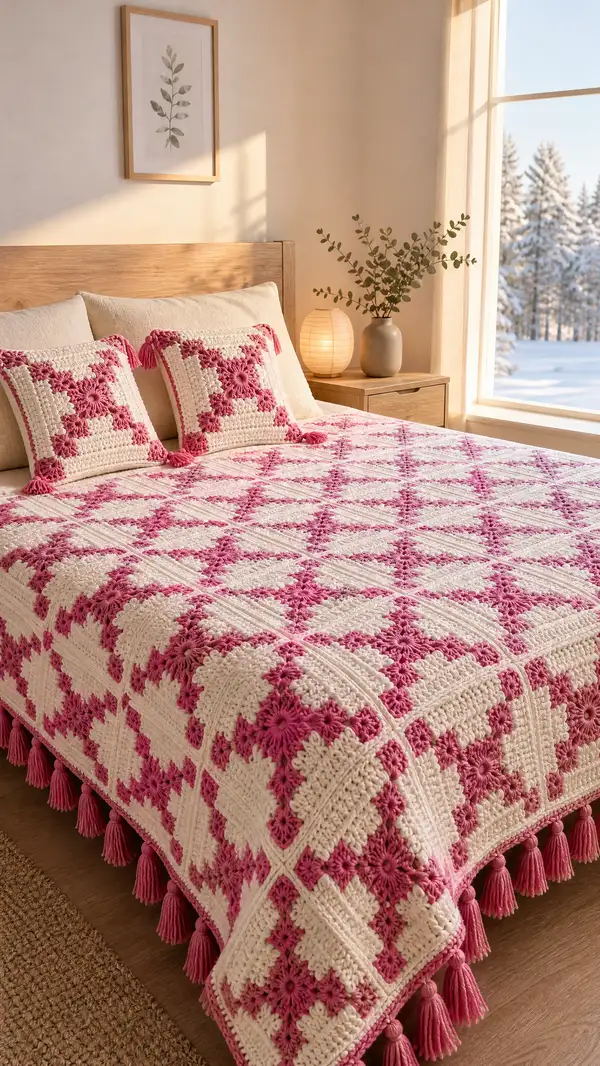
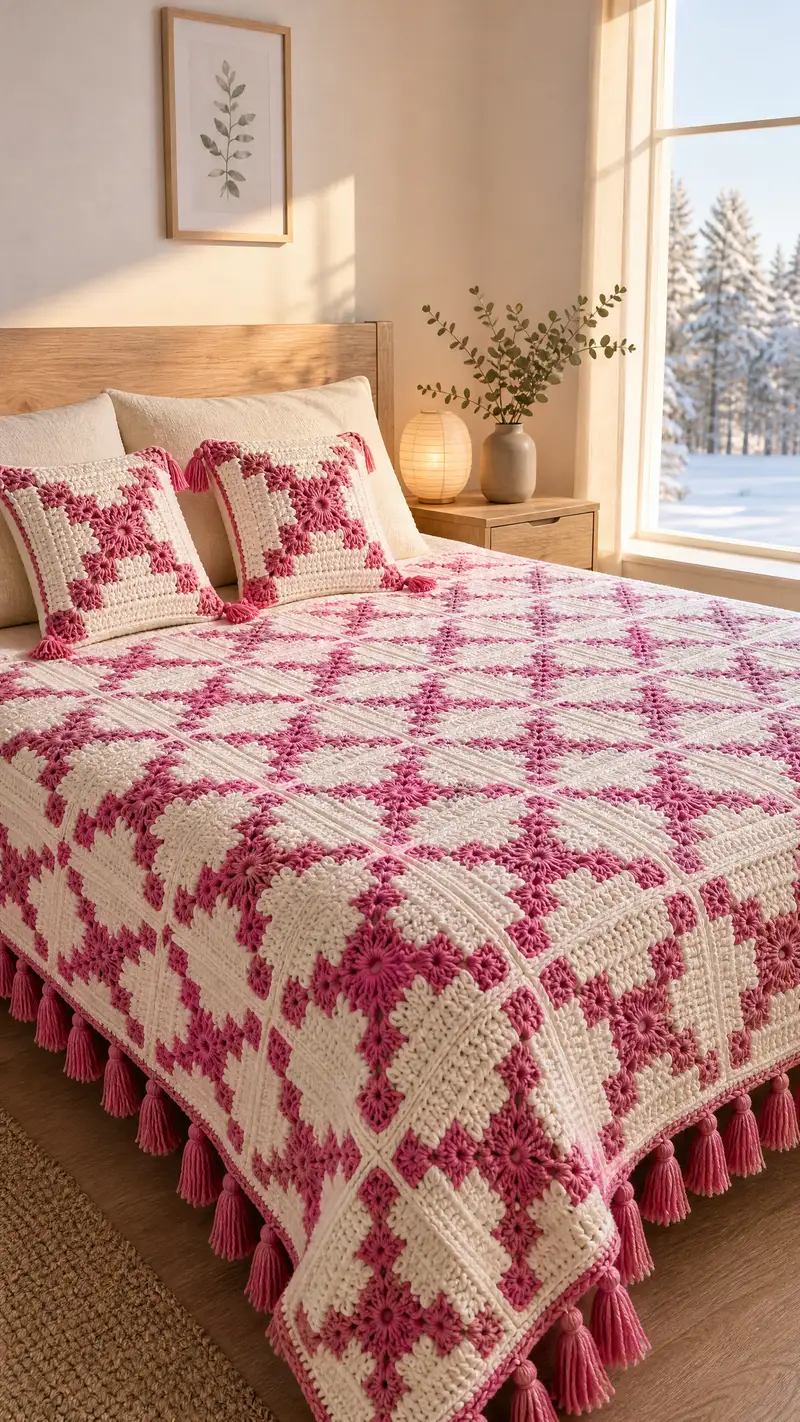
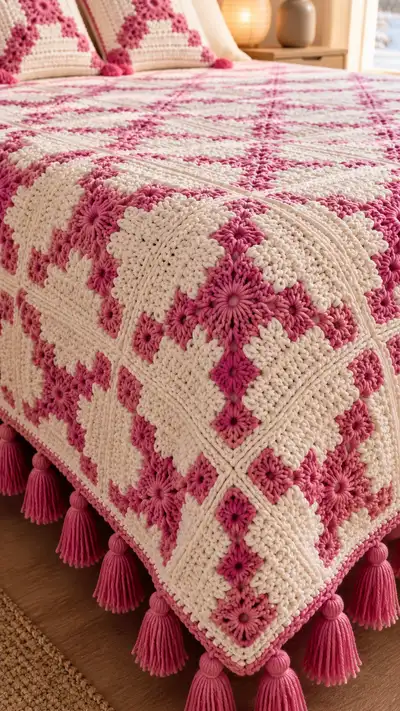
A warm, textured bedspread made from modular rose-and-cream granny squares joined and edged with a raised ridge border and tasseled fringe. The design features a starburst/puff center in rose, surrounded by creamy rounds and finished with chunky raised seams for a sculpted look. This pattern includes instructions for the blanket and matching pillow covers, plus step-by-step tassel and assembly directions.
Progress Tracker
0% Complete
— Notes & Gauge :
Info :
This pattern is written for a bulky weight yarn and a 6.5mm hook to achieve the textured, sculpted look seen in the photos. Gauge for one finished motif (after blocking) is approximately 8.5" / 21.5 cm square when worked as written. Adjust hook size to match gauge. Make a gauge square before committing to the full spread.
Info :
Puff stitch technique: yo, insert hook into designated stitch, yo pull up loop to same height, repeat 3 more times (you will have 9 loops on hook if working 4-loop puff); yo and pull through all loops, ch1 to close puff unless instructed otherwise. Counts below assume a 4-loop puff unless noted.
— Rose-White Granny Motif (Make many) :
Round 1 :
With rose yarn, make a magic ring. Ch2 (counts as hdc), work 11 hdc into ring. Pull ring closed. Join with sl st to top of ch2. (12 hdc)
Round 2 :
Ch2, hdc in same st, 2 hdc in each st around. Join with sl st to top of ch2. (24 hdc)
Round 3 :
Ch2, (hdc in next st, 2 hdc in next st) rep around. Join. (36 hdc)
Info :
The first three rounds create a dense, round disc that will be the base for the starburst/petal puff round. Keep tension even and avoid pulling too tightly in the magic ring so the center lies flat.
Round 4 :
Switch to rose (if not already). Ch1, *puff in next st, ch1, sk 1 st, sc in next st, ch1, sk 1 st*; rep from * to * around placing 12 puff clusters evenly. Join with sl st to first puff cluster. (12 puffs, 12 sc)
Round 5 :
Ch2, hdc in each st and ch-space around working 1 hdc in each ch1 space and 2 hdc around each puff base when indicated to open the round evenly. You should end with 48 hdc. (48 hdc)
Info :
Even out the round by working hdc into puff bases with two hdc where a slight extra height is needed. The goal is to maintain a smooth circle before the square shaping rounds.
Round 6 :
Ch2, (2 hdc in next st, 1 hdc in next 3 sts) x 12. Join. (60 hdc)
Round 7 :
Ch2, (2 hdc in next st, 1 hdc in next 4 sts) x 12. Join. (72 hdc)
Round 8 :
Ch2, (2 hdc in next st, 1 hdc in next 5 sts) x 12. Join. (84 hdc)
Info :
Rounds 6–8 expand evenly in radial fashion. At the end of Round 8 the motif is still rounded; we will begin to form square corners on the next rounds so count carefully and keep the increases regular.
Round 9 :
Change to cream yarn. Ch3 (counts as dc), dc in next 7 sts, (dc, ch2, dc) in same st to form first corner, dc in next 15 sts, (dc, ch2, dc) in next st for second corner, dc in next 15 sts, (dc, ch2, dc) in next st for third corner, dc in next 15 sts, (dc, ch2, dc) in next st for fourth corner, dc in remaining sts to join to top of ch3. Count should be 104 dc plus 4 ch-2 corner spaces. (approx. 104 dc + 4 corner spaces)
Round 10 :
Ch3, dc in each dc across to next ch-2 sp, (dc, ch2, dc) in ch-2 sp, repeat around. Join. (Approximately 120 dc + 4 ch2 corners; square is starting to form)
Info :
When converting a round motif to a square, you create corner clusters (dc,ch2,dc). This adds stitch count. The numbers above are approximate; adjust by evenly spacing additional dc between corners if your placement looks uneven. Aim for a square shape with four defined corners.
Round 11 :
Ch2, hdc in each st around working 2 hdc into corner dc stitches (one in each dc of (dc,ch2,dc) and 1 hdc into the ch-2 space). Join. (work to maintain even tension and a square edge - approximately 124 hdc)
Round 12 :
Ch2, (hdc in next 8 sts, 2 hdc in next st) x around to add slight outward shaping. Join. (roughly 136 hdc)
Info :
Rounds 11–12 build the square and create a broader flat area for the cream rounds that give the motif the finished, blocky look. Block one motif to the intended measurement to check your square before producing many more; small tension changes multiply across the blanket.
Round 13 :
Ch1, sc in each st around working 3 sc into each corner ch-2 space (sc, ch1, sc, ch1, sc) to keep corners square. Join. (approx. 148 sc)
Round 14 :
Ch2, hdc in each st around in cream working 1 hdc into each sc and 3 hdc across each corner to maintain square shape. Join. (approx. 160 hdc)
Round 15 :
Change to rose yarn. Ch1, *(puff in next st, ch1, sc in next st, ch1, sk next st)* rep around so that small rose diamond shapes read along the diagonal leading toward the corners. Join. (12–16 puffs depending on spacing)
Info :
Round 15 re-introduces rose to create the tonal diamond seen in the finished photo. The pattern uses puff clusters placed strategically along diagonals. If your square is larger or smaller, increase or decrease puff frequency across the row keeping placements symmetric.
Round 16 :
Ch2, hdc in each st and ch-space around, working extra hdc at corners to square up. Join. (Even stitch count; approx. 160–168 hdc depending on puff count)
Round 17 :
Ch1, sc in each st around working BLO on this round only to create a subtle ridge that later becomes the joining ridge visual. Join. (same st count)
Round 18 :
Ch3, dc in each st around working (dc,ch2,dc) in each corner space. Join. This final outer dc round gives a defined outer edge for seaming. (same st count plus 4 corner spaces)
Info :
Fasten off and weave in ends now or leave long tails for seaming. Block squares lightly to compress and flatten petals and corners. Make the required number of motifs to achieve desired blanket size — the sample layout is 6 x 8 motifs for a queen-size bed; adjust as needed.
— Joining Squares (Raised Ridge Join) :
Info :
Squares are joined with a raised ridge seam that reads as diagonal lattice lines. We will use a join-as-you-go (JAYG) method with an outer ridge created by working posts and chains across join seams, or alternatively whip-stitch and then crochet up ridges. Below are both options; choose one.
Round 19 :
With cream yarn and RS of square facing you, attach yarn at any midpoint along one side of a completed square. Ch1, sc evenly across edge to corner (count to match attached square edge), sl st to corresponding corner of adjoining square (if JAYG) and continue sc along next side to join. Repeat around joining two squares. (this is the initial attachment pass)
Round 20 :
Info : If joining-as-you-go, on the final sc of each side, insert hook through corresponding sc of adjacent finished square and complete sc to lock pieces together. If joining later, use mattress or whip stitch to seam squares together invisibly, then proceed to the ridge build.
Round 21 :
With cream, ch2, hdc across seam into both layers (if seamed) or in continuous join stitches, working 1 hdc in each st across to create a flush seam line. Join with sl st. (st count varies by motif size)
Round 22 :
Change to rose. Ch3, front post dc (fpdc) around each hdc of the seam row to create a raised ridge; work 3–4 fpdc in corner clusters to maintain corner shape. Join. This creates the pink diagonal ribs visible in the photo. (counts vary)
Info :
Work the front post dc across the seam row to form a raised ridge. The number of fpdc determines the thickness of the ridge — use two or three fpdc per base stitch if you want a thicker rope. Ensure you consistently work fpdc in the same direction across the blanket so the ridges read uniformly.
Round 23 :
Ch1, sc in each stitch around the motif including around fpdc ridge to tidy edges. Join. (this secures the ridge and tidies the motif edge)
Info :
Continue joining squares row by row using the same method. After each joined square row, work the ridge fpdc round to ensure each seam is raised consistently. This is time-consuming but creates the distinctive lattice effect.
— Assembling the Bedspread Layout :
Round 24 :
Lay out your motifs on the floor or blocking mat in the chosen assembly (sample: 6 across x 8 down for queen). Ensure motifs are oriented the same way with rose diagonals aligned to create the diamond lattice. Count motifs and mark rows with pins.
Round 25 :
Starting with the first row of motifs, join motifs side to side using the JAYG method described in Round 19–23. After completing a horizontal row, join that row to the previous row by working the seam and then the ridge round for the vertical joins as well.
Info :
Assembly tip: work a small test panel of 2x2 joined motifs before committing to joining a full blanket to test tension and seam thickness. If seams pull motifs in, try larger hook for joining rounds or fewer fpdc per seam.
Round 26 :
After all motifs are joined, you should have a single large panel. Inspect the blanket for any gaps or loose joins; reinforce with additional sc or mattress stitch as needed. Block the assembled blanket lightly to even out joins and compress the puff centers.
Info :
Blocking: use a steam iron held above the surface or spray lightly with water and pin squares to exact measured dimensions; allow to dry thoroughly. Bulky yarns level differently than fine yarns so blocking evens the look and helps seams sit flat.
— Border: Raised Ribbed Border & Corner Treatment :
Round 27 :
With RS facing, attach cream at a corner. Ch2, work 2 hdc in same corner space, hdc evenly along side (work 1 hdc per 2–3 dc depending on counts) until next corner, work (2 hdc, ch2, 2 hdc) in corner, repeat around. Join. (creates first border round; counts vary by overall width)
Round 28 :
Ch1, sc in each st around working 3 sc into each corner ch-2. Join. (tidies border edge)
Round 29 :
Ch3, fpdc around each sc of the last round working consistently so the posts form a vertical rib when viewed from the side. Work 3 fpdc in each corner area for strength. Join. (this is the primary ribbed round)
Info :
To create the wide ribbed border visible in the photos, we will build up multiple rounds of post stitches and front loops working alternately with cream and rose to echo the motif colors and create a sculpted edge.
Round 30 :
Change to rose. Ch1, sc around working 1 sc into the tops of the fpdc and 2 sc across corner clusters. Join. (this provides a rose accent line)
Round 31 :
Change to cream. Ch3, hdc around into both loops working extra hdc into corners to round them. Join. (builds border width)
Round 32 :
Ch1, sc in each st BLO around to create a neat raised outer ridge, join. (same stitch count)
Round 33 :
Ch3, dc in each st around working (dc,ch2,dc) in corners. Join. This final outer dc round frames the blanket neatly. (same count)
Info :
Adjust number of border rounds for desired drape and overhang. The sample blanket has a relatively deep border to match scale of motifs; reduce rounds if you want a lighter edge.
— Tassel Fringe (Make many) :
Round 34 :
Make tassels in rose to attach along the border. For each tassel: wind yarn around a 3.5" cardboard 40 times for a medium-thick tassel. Cut across one edge and knot top tightly with a short strand of yarn, wrap the top with a 3" yarn length several times to form a neck and secure with knot. Trim ends evenly.
Round 35 :
Attach tassels: Place a tassel at every corner and along the border between every two motifs seam (in sample, one tassel per motif corner and one between joins) by threading small loop through border and slipping top knot through loop and tightening, or sew tightly with yarn needle through tassel neck and border stitches.
Info :
Tassel spacing: the photo shows large tassels spaced regularly at each motif corner; plan tassel placement according to motif size and desired fullness. Lighter tassels look airy, heavier tassels give a more boho chunky finish.
Round 36 :
Optional: add small wooden or yarn-wrapped beads to the tassel top by sliding each bead onto the tassel neck before sewing or knotting the top closed. This gives a beaded bobble effect like the photo's rounded tops.
— Matching Pillow Covers (Make 2) :
Round 37 :
Make 4 matching motifs per pillow (for a 2x2 motif square) using the same motif rounds as above (Rounds 1–18). Block motifs and join them as a 2x2 square using the raised ridge join in Rounds 19–23.
Round 38 :
After joining the 2x2 panel, work a narrow border similar to the blanket border: 1 round cream hdc, 1 round sc, 1 round fpdc ridge in rose, 1 round sc. Fasten off. (counts small, adjusted to pillow square)
Round 39 :
For back: make a second identical 2x2 panel, or make a single cream panel big enough to overlap 2" on each side for an envelope closure. Join front and back by slip stitching three sides and leaving the fourth side open for the pillow insert, or make an overlap closure by sewing a hemmed edge.
Info :
Add a single tassel at each corner of the finished pillow front by following Tassel instructions. For a neat finish, place a small felt circle under the tassel neck on the inside to prevent pull-through.
Round 40 :
Insert pillow form and close opening with mattress stitch or whip stitch using matching cream yarn. Weave in all ends. Trim tassels to equal length (approx. 4–5" hanging length shown).
Info :
Pillow sizing: the 2x2 motif pillow will finish roughly the size of one motif x two (sample approx 16"–18" square). Adjust motif count for larger or smaller dimensions.
— Finishing & Care :
Round 41 :
Weave in all ends securely by threading tails through the wrong side of stitches for a few inches and trimming. Tie knots inside tassel necks if needed and secure with a drop of craft glue for extra durability on heavy-use items.
Round 42 :
Lightly steam block the entire bedspread if desired and reshape border and tassels. For washing, machine wash gentle on cold in a large front-loading machine inside a mesh bag or hand-wash; reshape and dry flat to maintain tassel shape.
Info :
Storage tip: store folded with acid-free tissue between tassels to preserve shape, and avoid hanging which can stretch the border and pulls on tassel necks.
Round 43 :
Optional adjustment: scale the entire project by using worsted weight yarn (#4) and 5.5mm hook to produce slightly smaller, tighter motifs, increasing number of motifs for same bed size. Use bulky (#5) and 6.5mm hook as written for the sample effect.
Info :
If you prefer a flatter look, substitute puff rounds with cluster or bobble stitches of smaller height and reduce the number of fpdc in the ridge rounds to tone down the three-dimensional ribbing.
Completing this rose-and-cream granny bedspread is such a joy — every motif you finish brings the blanket closer to its cozy, decorative finish. The raised ridge joins and tassel fringe add that special handmade character that makes it a true heirloom. Enjoy the relaxing rhythm of making squares, then feel proud when they all join into a lovely statement piece for your bedroom. 🧶💕 Place it on the bed, add the matching pillows, and bask in handmade warmth! ✨