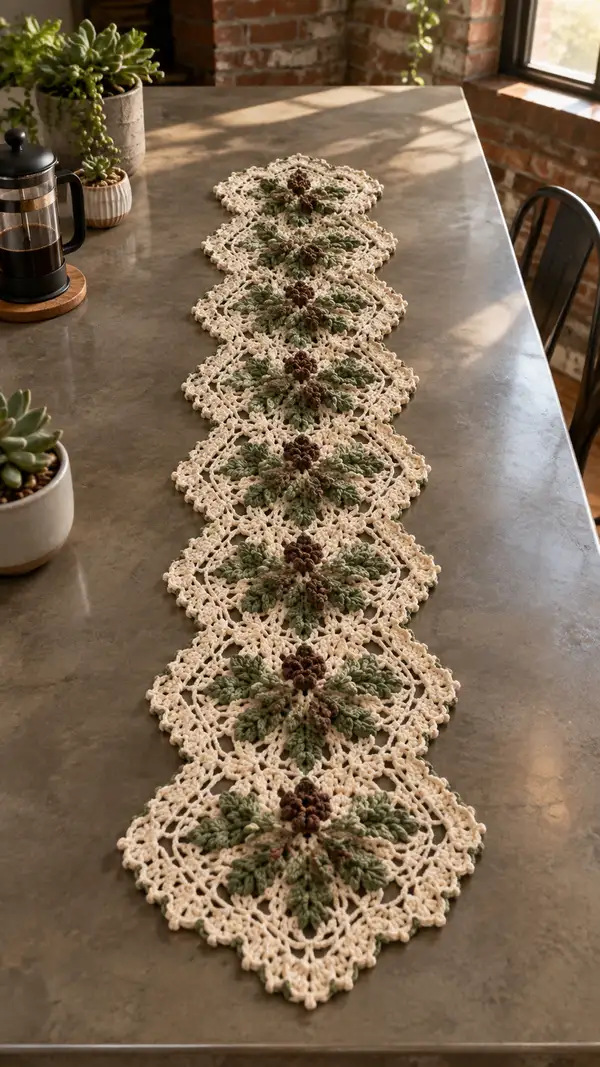
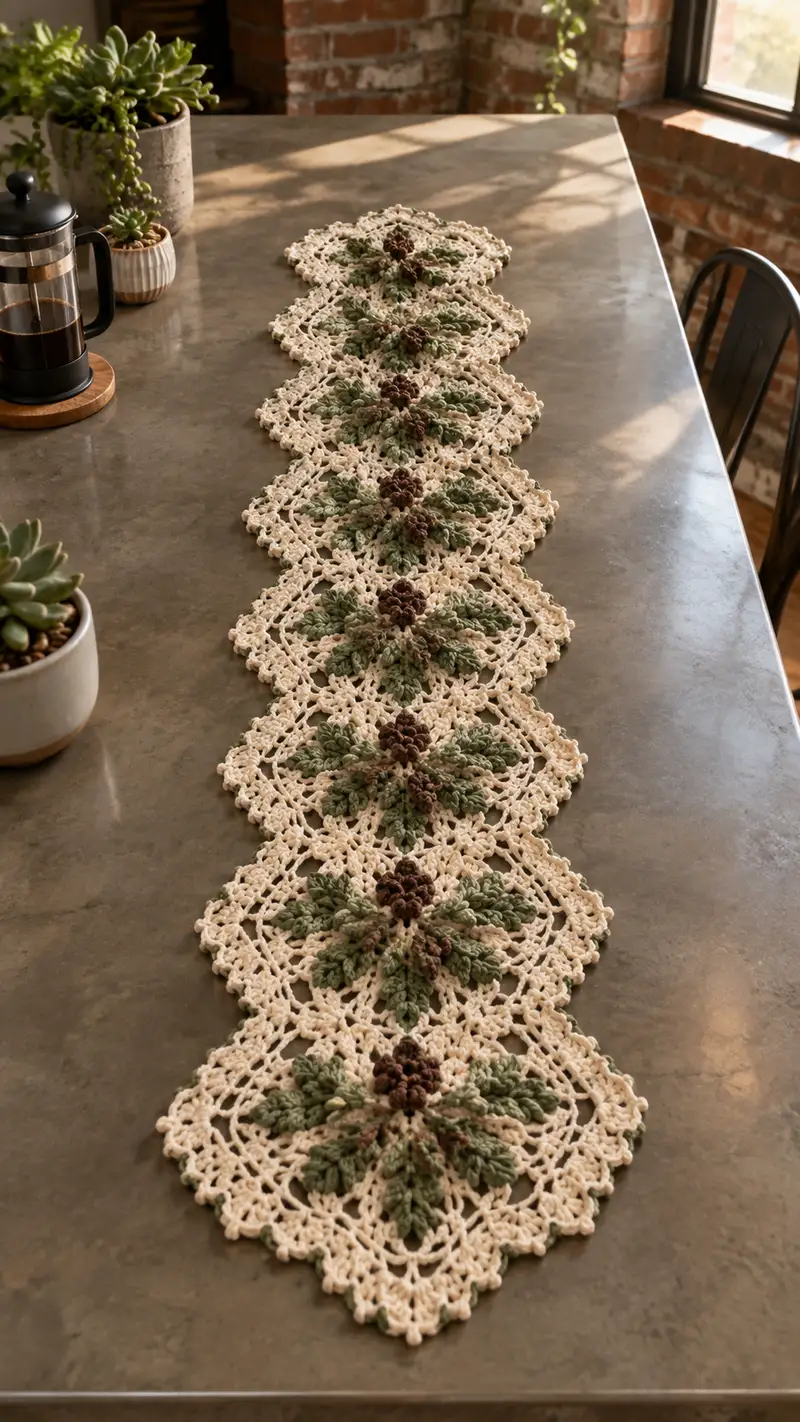
This elegant table runner features a string of lacy square motifs, each with a raised cocoa-brown textured flower center and sage-green layered leaves set into a warm cream lacy square. The motifs are joined-as-you-go and finished with a delicate scalloped cream border for a vintage-inspired farmhouse look. The runner lays flat and looks beautiful on narrow tables, consoles, or as a centerpiece under a vase. The stitch texture and layered petals give a rich dimensional look while staying approachable for crocheters comfortable with clusters and puff stitches.
Progress Tracker
0% Complete
— Overview :
Info :
This pattern is written in rounds and worked flat-to-join to create individual lacy square motifs which are joined-as-you-go to form a runner. The motif uses three colors: cocoa for the raised center, sage for the layered leaf clusters, and cream for the lacy square and border. Make a gauge sample motif to check tension and adjust hook size if needed. The instructions provide stitch totals for each round so you can confirm your counts as you go.
Info :
Abbreviations used include puff = pull up loop 5 times into same stitch, yarn over and pull through all loops (counts as puff and closed stitch), and cluster = defined in round where used. Take time to practice puff stitches before starting motifs so your centers are consistent.
— Motif Center and Brown Textured Core (Make 8) :
Round 1 :
With cocoa yarn, make a magic ring. Ch1, 6 sc into ring. Pull ring closed. (6)
Round 2 :
Inc in each st around (work 2 sc in each st). (12)
Round 3 :
(1 sc, inc) x6 — place one sc in next st, then 2 sc in next. (18)
Round 4 :
(2 sc, inc) x6 (24)
Info :
Center is worked tightly to form a base for the puff clusters. Keep tension slightly firmer here so the brown center sits proud and does not flatten when leaf clusters are added.
Round 5 :
Join round with sl st if needed to reposition—ch1, *sc in next 2 sts, puff in next st; rep from * around, ending with sc in last st. Join with sl st to first sc. (24 sts including puffs counted as single sts)
Round 6 :
Ch1, sc in same st as join, *sc in next st, puff in next st; rep from * around. End with sl st to join. (24)
Info :
Puff stitch technique: yo, insert hook into indicated st, yo and pull up loop (repeat yo/insert 4 more times total 5 loops on hook), yo and pull through all loops, ch1 to close puff. Treat puff + ch1 as one stitch. Keep puffs uniform height.
Round 7 :
Ch1, sc in each sc and puff around treating each puff as a single stitch (24). Join.
Round 8 :
Ch1, *sc in next 2 sts, (sc, ch1, sc) into top of each puff to create tiny cluster definition; rep from * around. (24 small groups)
Info :
After round 8, the cocoa center should be well defined and slightly raised. We will anchor leaf clusters to the round 7/8 edge so ensure puffs are evenly spaced. Fasten off cocoa leaving a 10-12" tail for weaving under if you prefer, or fasten off and weave ends later.
— First Sage Leaf Layer (Forming 8 Leaves) :
Round 9 :
Join sage to any spacer ch or sc between puffs. Ch2 (counts as first hdc), *hdc in next st, ch3, skip next st, slip to base of next puff and make 5-loop puff anchored into that base (see puff notes) to form leaf base; then ch2 and hdc in next st; rep from * around to make 8 leaf foundations. End with sl st to first hdc. (Sequence repeated 8 times)
Round 10 :
Ch1, work into each leaf foundation: (sc, hdc, 3 dc, hdc, sc) all in same ch3 loop to form a petal/leaf. Work this leaf shell into each of the 8 leaf foundations around. Join with sl st. (8 leaves)
Info :
Leaf shaping: place more dc stitches in the center of the leaf to create a pointed petal. Adjust stitch counts slightly for your gauge keeping symmetry across all 8 petals. Use stitch markers at the base of each leaf if you want to check spacing.
Round 11 :
Ch1, *sc in leaf tip (topmost dc), sc in next st at base between leaves; rep around to tidy edges and create defined leaf points. (approx 48 sc total depending on spacing)
Info :
After round 11, the sage leaves will be visibly raised around the cocoa center. If any leaf lacks height, consider a light blocking or steam shaping to open the leaf profile.
— Second Sage Layer and Layered Petal Detail :
Round 12 :
Ch3 (counts as dc). Working behind the first leaf row (insert hook between base stitches), *5 dc in the gap behind each leaf to create a second staggered layer; rep 8 times. Join with sl st to top of ch3. (40 dc approx)
Round 13 :
Ch1, sc in each dc around to tidy second layer (40 sc). Join.
Round 14 :
Switch to cream yarn with a standing dc in top of any chosen sc. Ch4, *skip 3 sc, (3 dc, ch3, 3 dc) in next sc to start corner picot cluster for future square shaping; ch4, skip 3 sc, sc in next st to form side; rep sequence to form eight corner points; join. (This establishes points for square corners)
Info :
Round 14 positions the motif into an octagon that will be squared by following lacy rounds. Keep stitch counts by using markers at the start of each side if needed. The (3 dc, ch3, 3 dc) clusters will be the corners as the motif grows.
— Transition Into Cream Lacy Square (Begin Square Framework) :
Round 15 :
Ch3 (counts as dc), (2 dc, ch2, 3 dc) into each corner ch3-sp from previous round to open corners larger; between corners, work 5 dc evenly spaced into side arches (adjust spacing to keep four sides). Join with sl st. (Corner cluster counts increase square circumference)
Round 16 :
Ch1, sc into join, *ch5, skip 3 dc, sc into center dc of next side; rep around to create lacy chain arcs along sides. Join (approx 8 ch-5 loops across motif).
Info :
Keep the motif sitting flat; if puckering occurs, increase the number of dc along sides slightly or loosen tension in this round. Conversely, if the motif flares, reduce ch loops or use one fewer dc in side arcs.
Round 17 :
Ch3, dc in same st, *dc in each of next 3 dc, (2 dc, ch3, 2 dc) in next ch5 loop center to make a corner shell, dc in each of next 3 dc, rep around. Join. (This forms an established lacy shell corner and wider side shells)
Round 18 :
Ch1, sc in same st, *ch4, skip a pair of dc, sc in next dc; rep around to create a stronger lacy grid. Join with sl st. (count should equal 32 sc across loops but will vary by gauge)
Info :
If your ch4 spaces look too open, you can work ch3 in later motifs to tighten spacing. At this stage, clip and weave in sage ends or carry them inside if you plan to sew motifs later; the pattern uses a join-as-you-go in round 20-22 to connect motifs seamlessly.
— Lacy Square Expansion Rounds :
Round 19 :
Ch3 (counts as dc), dc in next 5 sts, *(2 dc, ch3, 2 dc) in corner ch4, dc in each dc along next side (approx 6), rep around. Join. (Increases stitch total to square frame)
Round 20 :
Ch1, sc in same st, *ch6, skip 3 dc, sc in next dc, rep around. Join. (This creates larger openwork loops used for joining motifs later)
Info :
If you plan to join-as-you-go laterally, mark the side loops where later motifs will connect. For a runner, you will join motifs on two opposite sides forming a linear strip; the pattern uses the long side arcs for connecting motifs end-to-end.
Round 21 :
Ch3, dc into each dc and into spaces around; in corner ch6 work (3 dc, ch4, 3 dc) to square-up corners. Join. (Square size will grow slightly - aim for approx 6-7" square gauge depending on yarn)
Round 22 :
Ch1, sc in each dc and ch space around but in each corner ch4 work (sc, ch3, sc) to maintain corner shape. Join. (sc counts will equal previous dc total)
Info :
At the end of round 22 your motif should appear square with four defined corners and an openwork lattice along sides. Block each motif lightly to square edges before joining for best result. I recommend wet blocking motifs flat and pinning to a square template if you want precise alignment.
— Decorative Lacy Border Rows on Motif (Creating Hook Points for Joining) :
Round 23 :
Ch3, *dc, ch1, skip 1 st, dc into next; along corners work (dc, ch2, dc, ch2, dc) to accent corners; rep around. Join. (This sets small picot-like openings around the motif)
Round 24 :
Ch1, *sc in each dc, (sc, ch3, sc) in corner ch2 spaces; rep around. Join. (Edge now has consistent small loops for scallop attachment)
Info :
If you prefer a tighter join-as-you-go, reduce ch-3 to ch-2 on this round. For a more open vintage look keep ch-3. This is also the round where you will begin joining motifs to neighbors in the runner after completing the first motif of the row.
— Join-As-You-Go Preparation Round :
Round 25 :
Ch4 (counts as tr), *skip 1 sc, tr in next sc, ch2, skip 1 sc; rep around forming tall arches. Join. (This round creates prominent loops used for slip-stitch joins later)
Round 26 :
Ch1, sc in each tr and ch2 space around to tidy (counts will vary by gauge). Join. Fasten off cream leaving a 20-24" tail if joining later, or leave attached if joining-as-you-go before fastening.
Info :
If you are making a long runner (8 motifs as photographed), work each motif fully to round 26 then join them side-to-side using the join method described in the next section. Alternatively, join-as-you-go between motifs on round 25 by slip-stitching through corresponding loops as described below.
— Joining Motifs Into a Runner (Join-As-You-Go Instructions) :
Info :
Photography shows motifs joined on two opposite sides end-to-end to form a linear runner. The recommended method is to use round 25's tall arches for slip-stitch joins. Work motifs left to right: complete first motif fully, then begin second motif and, on its round 25, align with previous motif and join each arch to the matching arch using sl st or sc as described below.
Round 27 (Joining - motif 2 side A) :
With cream yarn and the second motif worked to round 25, when you reach the first tall arch on the second motif, hold it next to the corresponding arch on the finished motif and sl st through both loop spaces to connect (work 1 sl st in your motif loop then 1 sl st into the corresponding loop of the finished motif), ch2 to continue; rep across side. Finish the rest of round 25 for motif 2 and join to your first motif. (Join every tall arch to corresponding arch across entire side)
Info :
Push motifs gently flat as you join so the lace lays even and the cocoa-sage centers align. Use blocking pins after all joins to shape runner.
Round 28 (Joining subsequent motifs) :
Repeat joining process when adding motifs 3, 4, 5, etc. For straight runner arrangement, join each new motif only along one pair of opposing sides so the final layout is a one-dimensional strip. If you prefer a wider tablecloth, join additional motifs to both sides using the same procedure.
Info :
If joins look loose, reinforce by working a second round of sl st joins through the next available chain spaces inside the arches. Make sure joins remain flat and not pulled tight; uniform tension across joins produces the most professional look.
— Optional Reinforcement Round After Joining (All motifs joined) :
Round 29 :
With cream, and motifs joined in a linear strip, work along the seam on the right side of the runner: attach cream at the seam point, ch1 and work sc evenly through seam gaps (1 sc in each sl st join and 1 sc in each adjacent space) to even out join. Work entire seam length. Fasten off when complete.
Info :
This reinforcement gives a cleaner look to joins and adds stability for table use. Weave in ends neatly on the underside to keep the topwork clean.
— Motif Repeat Count and Runner Planning :
Info :
The photo runner is eight motifs long; to replicate, make 8 motifs and join them in one straight line. For a shorter runner make 4-6 motifs; for a longer table make 10 or more. Count motifs as you go and measure length after blocking to achieve desired fit for your table.
— Final Scalloped Edge and Border Around Full Runner :
Round 30 :
With cream attached at any outer corner, ch1, sc in same st, *ch5, skip 2 sts, sc in next st; along edges where motifs meet at seams work sc evenly to cover seam gaps; in corners work (sc, ch3, sc, ch3, sc) to maintain corner points; rep around entire perimeter of runner. Join. (This preps for final scallop)
Round 31 :
Ch3 (counts as dc), *3 dc into next ch5 loop, sl st in next sc to anchor scallop, rep along sides; in corner loops work (5 dc, ch2, 5 dc) to curve corner; rep around. Join. (This creates pronounced scallops along outer edge)
Round 32 :
Ch1, sc in each dc around to tidy scallops; in each corner, work (sc, ch2, sc) into ch2 space to keep corner shape. Join. Fasten off leaving long tail for weaving. (Edge should now be clean and consistent)
Info :
For the photo look the scallops are small and neat—if you prefer a more delicate edge use ch3 scallops instead of ch5 in round 30 and reduce the number of dc in scallops accordingly. Matching tension around corners keeps the runner flat.
— Optional Row of Sage Accent Around Perimeter :
Round 33 :
Optional: Join sage at intervals around scallop peaks. Ch1, sc into top of each scallop (peak), *ch3, sc in next peak continuing around. Join. This adds subtle sage flecks around the edge to echo the leaf color in the center motifs.
Round 34 :
Ch1, sc in each sc and ch3 loop to tidy. Join. Fasten off and weave ends. (This completes the decorative sage trim)
Info :
Sage trim is purely decorative; if you prefer a pure cream runner, skip rounds 33-34. Alternatively, use a darker cocoa for tiny picot accents for a more grounded look.
— Blocking and Finishing :
Info :
Wet or steam block the entire runner: pin flat to the desired rectangle/length, using pins in scallops and corners to shape. Let dry thoroughly before removing pins. Blocking evens stitches, shapes petals, and sets joins to lie flat.
Round 35 :
Finishing: Weave in all ends on the underside, trim tails close, and lightly press if desired. Use a blunt tapestry needle to pull any slightly loose puffs into a uniform look. Optionally use a tiny dab of fabric glue below centers for extra stability if used frequently.
Info :
Keep the underside clean by sewing in all ends and trimming. If gifting, wrap runner around a board or fold gently to show motif repeats. Store flat or rolled to preserve scallops and raised petals.
— Yardage Notes and Making Fewer/Lots of Motifs :
Info :
A sample 8-motif runner used in the photo consumed approximately 300-350g cream, 100g sage, and 40-60g cocoa. For different numbers of motifs multiply yarn needs accordingly. Make a test motif and weigh it to extrapolate yarn for your full runner to be safe.
Info :
If you want to make a central runner with mirrored ends, make an even number of motifs and plan staggered border treatments on each end as desired. This pattern allows simple length adjustments by adding or removing motif units.
This beautiful table runner blends textured flower centers and layered sage leaves into timeless lace squares you can treasure and display. Each motif is a small work of art—when joined they become a flowing, elegant accent for your table. The neutral cream base with sage and cocoa highlights fits many decor styles and seasons. Enjoy the meditative rhythm of repeating motifs and the satisfaction of bringing them together into a finished runner! 🧶🌿