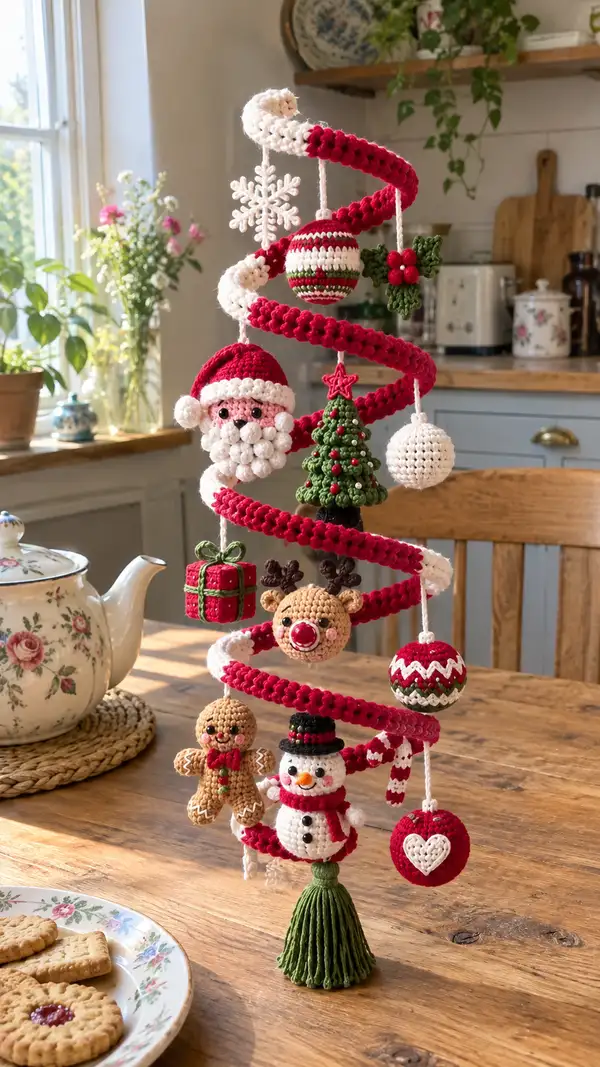
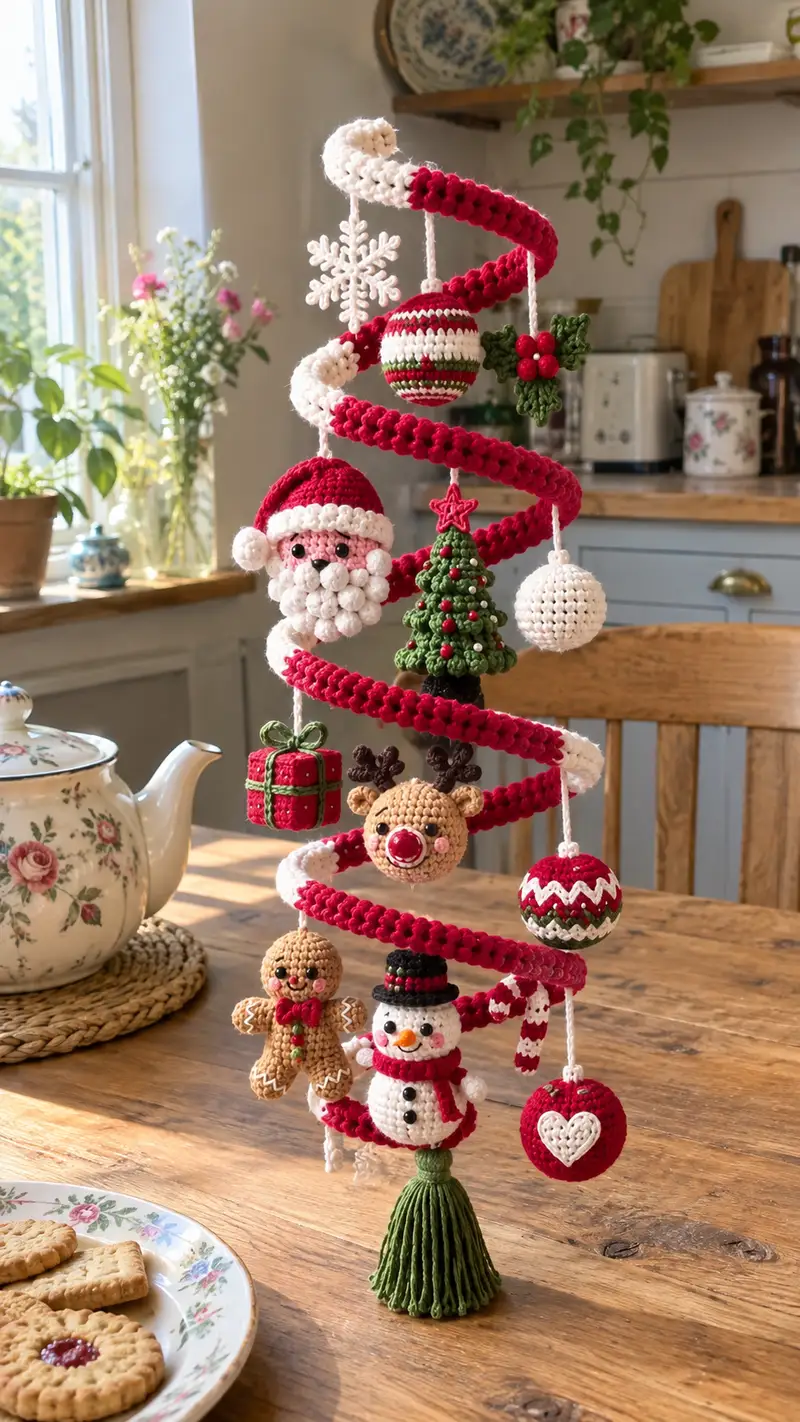
Create a whimsical spiral Christmas mobile featuring a coiled red-and-white spiral, a jolly Santa head, snowman, reindeer, gingerbread, mini tree, wrapped present and assorted baubles. This finished set nests together on a wire spiral with tiny embroidered details, bobble-beard, and a tassel base for display. Designed to hang as a tabletop mobile or small tree topper, the finished piece is richly textured and perfect for holiday décor or handmade gifts.
Progress Tracker
0% Complete
— Materials & Prep :
Info :
Prepare wire spiral core (16-18 gauge) cut to desired height (approx 40-45cm). If using a dowel for the base, wrap the wire around dowel or make a loop at the bottom for securing the tassel. Work all amigurumi pieces with the round counted in continuous rounds unless otherwise noted. Use stitch marker at start of each round.
— Spiral Tube (work 1) :
Info :
This spiral is a long tube worked in rounds and then coiled around a wire core. You can make two-tone coils by changing color every few rounds; here we alternate red and cream to match the photo. Final length should allow 5-6 coils around the wire core depending on spacing.
Round 1 :
Chain 120 (adjust chain length to desired coil length). Join with sl st to first ch being careful not to twist. Do not count ch as st (120)
Round 2 :
1 sc in each ch around, join with sl st (120)
Round 3 :
1 sc in each st around (120)
Round 4 :
1 sc in each st BLO (120) — this will create a neat ridge that helps the spiral hold its coil shape
Round 5 :
1 sc in each st (120)
Round 6 :
1 sc in each st (120)
Info :
Change to cream/white yarn now for an accent section. Carry the unused yarn inside the tube or weave in later. Working in BLO here will help the spiral textures pop.
Round 7 :
Change color to cream. 1 sc in each st (120)
Round 8 :
1 sc in each st BLO (120)
Round 9 :
Change to red. 1 sc in each st (120)
Round 10-24 :
Alternate color banding every 2-4 rounds following the photo (work 1 sc in each st). Total rounds should produce a tube approx 6-8cm diameter and long enough to coil 5-6 times around the wire (120)
Info :
Insert wire core through the tube before stuffing the very lightly. The tube is primarily decorative — stuff lightly so it keeps its tubular shape without bulging. Coil the tube around the wire in a spiral and mark positions where ornaments will hang. Secure ends by wrapping yarn firmly and sewing closed around the wire tip.
— Santa Head (Make 1) :
Round 1 :
With skin-tone yarn (light pink/tan), mr, 6 sc in ring (6)
Round 3 :
(1 sc, 1 inc) x 6 (18)
Round 4 :
(2 sc, 1 inc) x 6 (24)
Round 5 :
(3 sc, 1 inc) x 6 (30)
Round 6 :
(4 sc, 1 inc) x 6 (36)
Round 7 :
(5 sc, 1 inc) x 6 (42)
Round 8 :
(6 sc, 1 inc) x 6 (48)
Info :
Place safety eyes between rounds 10 and 11, approximately 8-10 sts apart depending on your desired expression. Mark eye placement before you stitch and make sure they sit even. Leave space for the bobble beard below the nose line.
Round 9 :
1 sc in each st (48)
Round 10 :
1 sc in each st (48)
Round 11 :
1 sc in each st (48)
Round 12 :
1 sc in each st (48)
Info :
Embroider nostrils or attach a small black nose between rounds 11-12. If using a sewn nose, use a small black oval or a few black embroidery stitches to create a triangular nose shape. Begin stuffing head firmly from the top now while continuing rounds.
Round 13 :
(6 sc, 1 dec) x 6 (42)
Round 14 :
(5 sc, 1 dec) x 6 (36)
Round 15 :
(4 sc, 1 dec) x 6 (30)
Round 16 :
(3 sc, 1 dec) x 6 (24)
Info :
Stop stuffing frequently to check shape. Head should be rounded but not overfilled as beard bobbles will add bulk at front. Finish stuffing level so top and sides are full but the chin area will be covered by bobbles.
Round 17 :
(2 sc, 1 dec) x 6 (18)
Round 18 :
(1 sc, 1 dec) x 6 (12)
Info :
Fasten off leaving a long tail for sewing if you finish this way, or continue to attach hat and beard separately. For a very neat finish, close using a yarn needle and weave the tail through the last round, tightening to close. We will attach the beard bobbles to the lower front in a later section.
— Santa Hat (Make 1) :
Round 1 :
With red yarn, mr, 6 sc in ring (6)
Round 3 :
(1 sc, 1 inc) x 6 (18)
Round 4 :
(2 sc, 1 inc) x 6 (24)
Round 5 :
1 sc in each st (24)
Round 6-9 :
1 sc in each st (24)
Round 10 :
Switch to cream/white. Work 1 sc in each st around to form hat trim (24)
Round 11 :
1 sc in each st BLO (24) — this produces a folded trim edge
Round 12 :
Fasten off leaving tail to sew hat onto head. Optionally make a pompom: make a small ball by mr 6 sc, inc rounds to 12 and 18, fasten off and stuff lightly, sew to hat tip.
— Santa Bobble Beard (Attach multiple bobbles) :
Info :
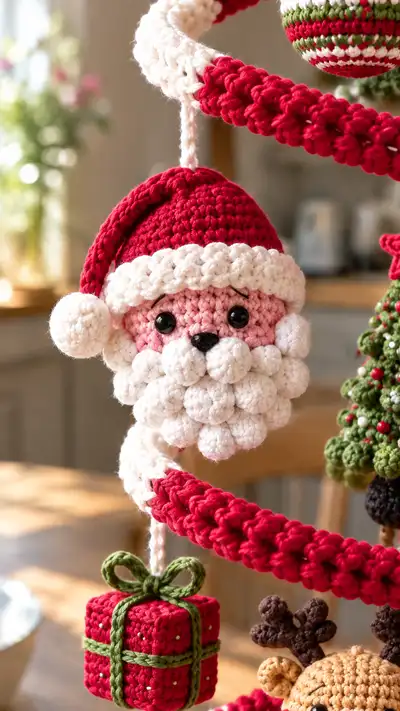
Make 15-20 small bobbles to attach around the lower half of Santa's face. A bobble stitch here is small closed ball made separately and sewn on, or created as tightly worked 5dc bobbles in a mini sphere. We'll instruct separate bobble spheres for consistent shape.
Bobble Small (Make 18) Round 1 :
With cream yarn, mr, 6 sc in ring (6)
Bobble Round 2 :
6 inc (12)
Bobble Round 3 :
1 sc in each st (12)
Bobble Round 4 :
(1 sc, 1 dec) x 4 then 4 sc (8) — shape to small rounded bobble
Bobble Round 5 :
6 dec to close partially (3) - do not fully close; fasten off leaving tail for sewing. Stuff lightly.
Info :
Sew bobbles densely across the lower front of Santa's head and chin area in rows. Use photo as guide: row of 5, then 4, then 3, then 2, then 1 centered to create full beard. Secure tightly so bobbles do not move.
— Striped Hanging Ball (Make 2) :
Round 1 :
With red yarn, mr, 6 sc in ring (6)
Round 3 :
(1 sc, 1 inc) x 6 (18)
Round 4 :
(2 sc, 1 inc) x 6 (24)
Round 5 :
(3 sc, 1 inc) x 6 (30)
Round 6 :
(4 sc, 1 inc) x 6 (36)
Round 7-9 :
1 sc in each st (36)
Info :
Change colors for stripes following photo: work two rounds in cream, two rounds in green, then two rounds in white and repeat. Carry yarn along inside or fasten off and weave ends for crisp stripes.
Round 10-15 :
Alternate color bands (36)
Round 16 :
(4 sc, 1 dec) x 6 (30)
Round 17 :
(3 sc, 1 dec) x 6 (24)
Round 18 :
(2 sc, 1 dec) x 6 (18)
Round 19 :
(1 sc, 1 dec) x 6 (12)
Round 20 :
6 dec (6) - Stuff firmly, close and leave a long tail to create a hanging cord or sew to a braided loop.
— Snowman (Make 1) :
Snowman Head Round 1 :
With white yarn, mr, 6 sc in ring (6)
Round 3 :
(1 sc, 1 inc) x 6 (18)
Round 4 :
(2 sc, 1 inc) x 6 (24)
Round 5 :
(3 sc, 1 inc) x 6 (30)
Round 6-8 :
1 sc in each st (30)
Info :
Place small black eyes between rounds 6-7 approximately 6-8 sts apart. Embroider carrot nose using two rows of orange stitches between rounds 6-7 centered slightly lower than eyes.
Round 9 :
(3 sc, 1 dec) x 6 (24) - stuff head
Round 10 :
(2 sc, 1 dec) x 6 (18)
Round 11 :
6 dec (6) - close and fasten off, weave tail into body or attach to scarf area later
Snowman Body Round 1 :
With white yarn, mr, 6 sc in ring (6)
Round 3 :
(1 sc, 1 inc) x 6 (18)
Round 4 :
(2 sc, 1 inc) x 6 (24)
Round 5 :
(3 sc, 1 inc) x 6 (30)
Round 6 :
(4 sc, 1 inc) x 6 (36)
Round 7-11 :
1 sc in each st (36) - stuff firmly but leave opening for attaching head
Round 12 :
(4 sc, 1 dec) x 6 (30)
Round 13 :
(3 sc, 1 dec) x 6 (24)
Round 14 :
(2 sc, 1 dec) x 6 (18)
Round 15 :
6 dec (6) - close and leave tail for sewing to head
Info :
Make a small hat by working a flat circle of black then adding a few rounds to make a top hat shape in black with a red ribbon band (6-9 rounds). Make a small scarf: ch 30, work hdc back along chain, fasten off and tie around snowman neck.
— Mini Christmas Tree (Make 1) :
Trunk Round 1 :
With dark brown yarn, mr, 6 sc in ring (6)
Trunk Round 2 :
6 inc (12)
Trunk Round 3 :
1 sc in each st (12) - 2 rounds
Info :
Stuff the trunk lightly and finish off leaving tail to sew to base of tree layers.
Tree Layer 1 Round 1 :
With green yarn, ch 6, join to make a small ring and work 12 sc into ring (12)
Round 2 :
(1 sc, inc) x 6 (18)
Round 3 :
(2 sc, inc) x 6 (24)
Round 4 :
Worked in FLO: (3 sc, inc) x 6 (30) - creates a slightly ruffled edge
Info :
Work three tree layers of decreasing width stacked on the trunk: bottom largest, middle medium, top smallest. Add single crochet picot or small shells to the edge for branch tips to give texture and hang tiny bead decorations with surface slip stitch or sewing on beads after assembly.
Tree Layer 2 Round 1 :
With green yarn, mr, 6 sc (6)
Round 3 :
(1 sc, inc) x 6 (18)
Round 4 :
(2 sc, inc) x 6 (24)
Round 5 :
1 sc in each st, finish with picot shell edge: (sc, ch 3, sl st in next st) x around
Tree Layer 3 Round 1 :
With green yarn, mr, 6 sc (6)
Round 3 :
1 sc in each st (12) then finish with small star topper (see star instructions) and sew layers together centered on trunk
Info :
Decorate tree with tiny French knots of red/white yarn or sew on small beads as baubles. Sew layers offset so branches look full. Total rounds across layers approx 20-25.
— Reindeer Head (Make 1) :
Round 1 :
With light brown yarn, mr, 6 sc in ring (6)
Round 3 :
(1 sc, 1 inc) x 6 (18)
Round 4 :
(2 sc, 1 inc) x 6 (24)
Round 5-7 :
1 sc in each st (24)
Info :
Attach safety eyes between rounds 6-7 about 6-8 sts apart. Stitch a small red nose as a tiny ball or a glossy bead onto the front center between eyes to create Rudolph look. Add blush with fabric blush if desired.
Round 8 :
(3 sc, 1 dec) x 6 (18)
Round 9 :
(2 sc, 1 dec) x 6 (12)
Round 10 :
6 dec (6) - close and leave tail for sewing
Antler (Make 2) Round 1 :
With dark brown, ch 4, sl st in 2nd ch from hook, sc in next ch, hdc in last ch, turn and work back along chain with slip stitches to create short antler branch. Make second branching by attaching a short branch at mid point with a small round of 6 sc to create base. Make two antlers and sew to top sides of head.
Info :
Embroider a smile and sew antlers just behind the top of head, using the photo as a positioning reference. Slight forward tilt gives a cute expression.
— Gingerbread Person (Make 1) :
Head Round 1 :
With tan yarn, mr, 6 sc (6)
Round 3 :
(1 sc, 1 inc) x 6 (18)
Round 4-6 :
1 sc in each st (18)
Round 7 :
(1 sc, 1 dec) x 6 (12)
Round 8 :
6 dec (6) - stuff lightly and close
Body Round 1 :
With tan yarn, mr, 6 sc (6)
Round 3 :
(1 sc, 1 inc) x 6 (18)
Round 4-8 :
1 sc in each st (18) - shape with simple increases at waist if desired
Info :
Add white icing details using surface slip stitch or embroidery: zig-zag lines on arms and legs, plus buttons on torso. Sew head to body and add small stitched eyes and mouth with black yarn or embroidery thread.
— Wrapped Present (Make 1) :
Round 1 :
With red yarn, mr, 6 sc (6)
Round 3 :
(1 sc, 1 inc) x 6 (18)
Round 4 :
(2 sc, 1 inc) x 6 (24)
Round 5-8 :
1 sc in each st (24)
Round 9 :
(2 sc, 1 dec) x 6 (18)
Round 10 :
(1 sc, 1 dec) x 6 (12)
Round 11 :
6 dec (6) - stuff lightly and close
Info :
Wrap present with green yarn ties. Make two long chains for ribbon, sew as cross on box and form a bow on top by making a small looped bow and sewing in place. Add small gold seed beads to mimic decorative studs if desired.
— Holly Sprig (Make 1) :
Round 1 :
With green yarn, ch 6, sl st to first ch to make ring, work 6 sc in ring (6)
Round 2 :
Work small leaf units: ch 4, (sc, hdc, dc) in next st, sl st to next st. Repeat to make 3 leaves attached at center. Fasten off and sew 3 small red bobbles (3 small mr 6 sc each or beads) at center as berries.
Info :
Sew holly to spiral at a high point near striped ball, using photo as reference. You can add a second holly sprig if desired for balance.
— Simple Round Bauble (Make 2-3) :
Round 1 :
With chosen color, mr, 6 sc (6)
Round 3 :
(1 sc, 1 inc) x 6 (18)
Round 4 :
(2 sc, 1 inc) x 6 (24)
Round 5-7 :
1 sc in each st (24)
Round 8 :
(2 sc, 1 dec) x 6 (18)
Round 9 :
(1 sc, 1 dec) x 6 (12)
Round 10 :
6 dec (6) - stuff lightly and close, leave long tail for hanging loop
Info :
For patterned baubles, surface stitch zig-zag or stripes after closing, or work color changes in rounds while stuffing. Attach a short chain loop (ch 10) for hanging and slip stitch ends to top center of bauble.
— Candy Cane (Make 1) :
Round 1 :
With white yarn, ch 18, join with sl st to form ring (18)
Round 2-6 :
1 sc in each st around (18) - create tube, stuff lightly
Round 7 :
Change to red, continue 1 sc around for 2 rounds, alternate red and white every 2 rounds for candy cane stripes.
Round 8-16 :
Continue stripes until tube length matches desired candy cane. To make hook end, decrease gradually over 3-4 rounds and shape by curving while sewing base closed.
Info :
Sew candy cane to spiral with a small loop at top or slip it around the coil if spacing allows. Stuff lightly to maintain curve.
— Tassel Base (Make 1) :
Round 1 :
Construct a small tightly crocheted cap for the tassel in green: mr, 6 sc (6)
Round 3 :
1 sc in each st (12)
Round 4 :
Fasten off leaving long tail. Create tassel by winding green yarn 60-80 times around a 6cm board, fold center and tie the center with yarn, attach to tassel cap, and trim ends to even length. Secure tassel to base of wire spiral.
Info :
Tassel weight helps mobile hang straight. Make sure tassel knot is tightly sewn to the wire core to prevent rotation. You may add a dab of fabric glue for security.
— Assembly & Hanging Loops :
Info :
Create hanging loops for each ornament by braiding or crocheting a small cord: ch 30, sl st back along chain or braid 3 strands of yarn 25cm long and knot ends. Attach loops with a small sewn tie to the top of each ornament. Pin positions of ornaments on spiral before sewing.
Info :
When joining head pieces and ornaments to the spiral, use long tails from each ornament to stitch through the spiral tube and wire core if needed — this anchors them firmly. For very small ornaments, a single cross-stitch through the tube will suffice.
Info :
Balance the mobile visually by spacing ornaments evenly around the spiral; heavier ornaments (like the tree and double-spheres) should be lower to keep center of gravity stable. Use small craft pliers to bend and shape wire core ends and cover sharp points with glue or a wrapped yarn knot.
Info :
Weave in all tails and press lightly with a steam iron on low through a pressing cloth if working with cotton yarn to neaten rounds. Add small beads for extra sparkle on tree and baubles as desired.
This spiral Christmas mobile is a joyful mix of texture, color and tiny character details that come together into a delightful holiday display. Each small amigurumi ornament is a sweet miniature scene—Santa's bobble-beard, a snowman in a snug scarf, a tiny decorated tree and a cheeky reindeer—all suspended on a cheerful red-and-cream coil. The project is perfect for gifting or using as a unique seasonal centerpiece. 🎄🧶 Spread some handcrafted cheer and enjoy assembling this festive mobile—it's a lovely way to savor the holiday spirit! ✨