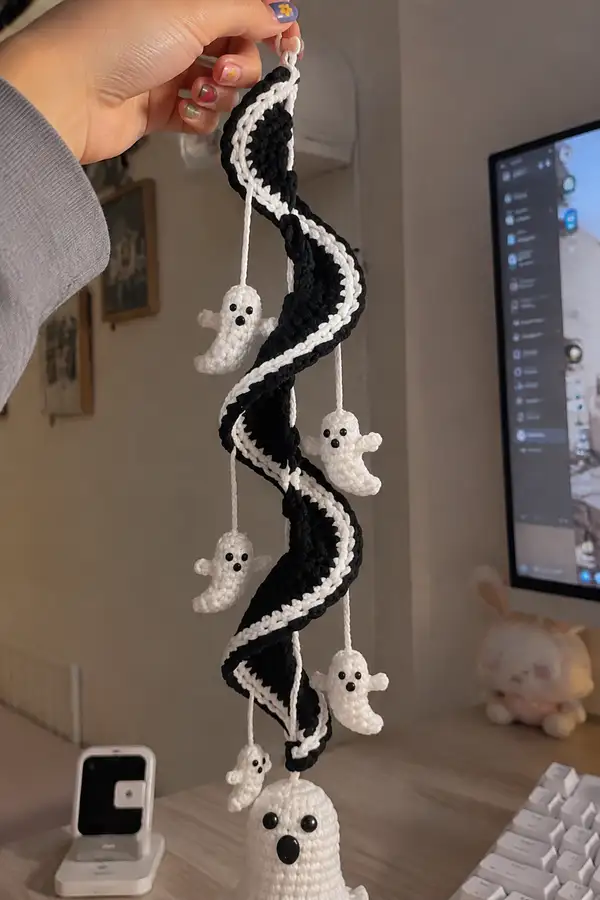
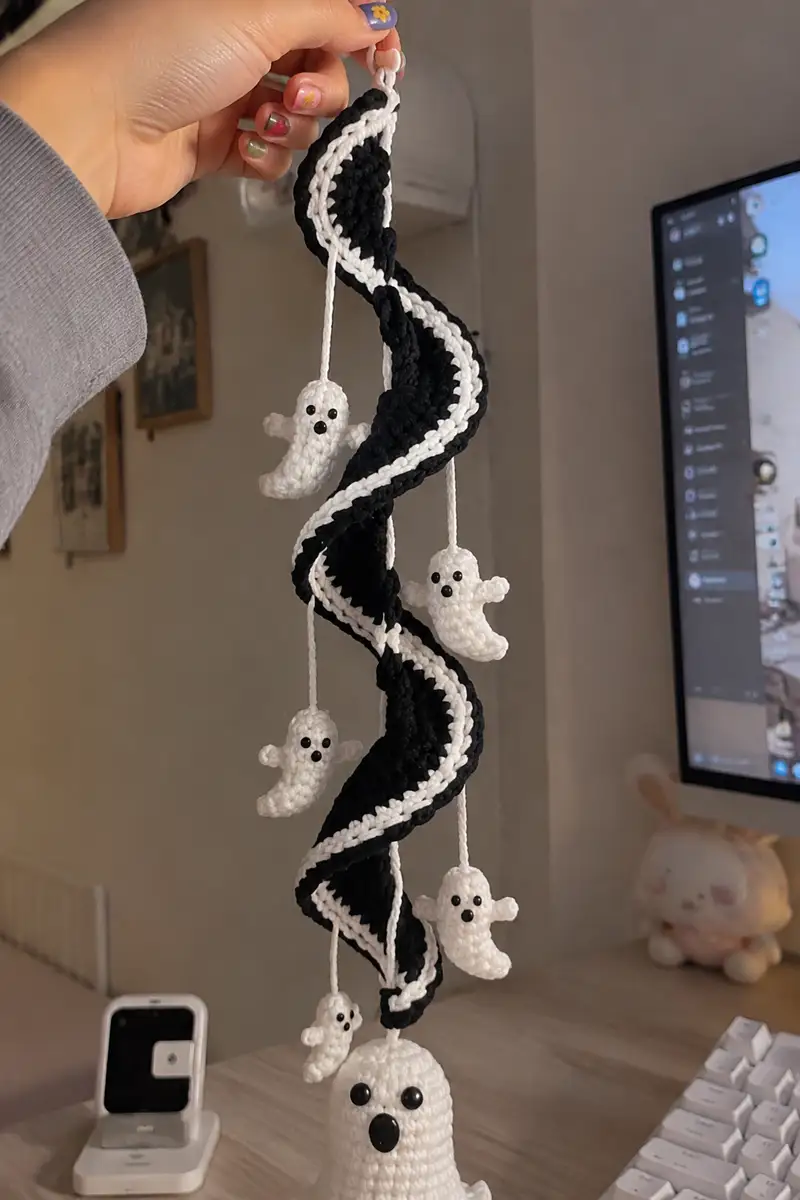
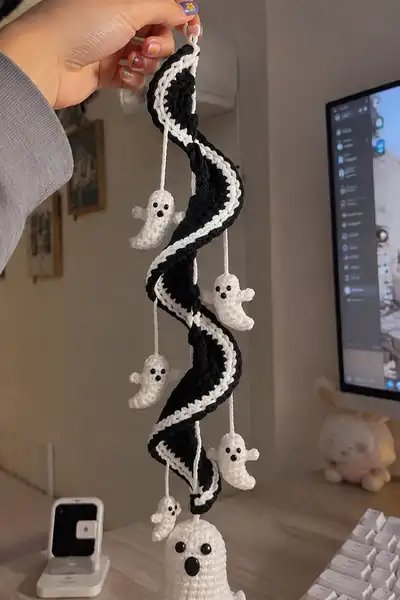
Create a spooky-cute hanging mobile featuring a dramatic black-and-white twisted spiral with dangling little ghosts and a larger anchor ghost at the base. This amigurumi pattern uses simple amigurumi shaping for the ghosts, a long flat spiral panel worked in rows and delicate assembly to create a flowing mobile. Perfect for Halloween decor, a nursery touch of whimsy, or a gift for someone who loves handmade seasonal crafts.
Progress Tracker
0% Complete
— Large Base Ghost (Head + Body Combined) :
Round 1 :
6 sc in magic ring (6)
Round 3 :
(1 sc, inc) x 6 (18)
Round 4 :
(2 sc, inc) x 6 (24)
Round 5 :
(3 sc, inc) x 6 (30)
Round 6 :
(4 sc, inc) x 6 (36)
Info :
This creates the rounded top of the base ghost. Use a stitch marker at the first stitch of each round to keep track. Position large safety eyes between rounds 10 and 11 about 6-8 stitches apart depending on desired expression; secure backs now before increasing further.
Round 7 :
(5 sc, inc) x 6 (42)
Round 8 :
(6 sc, inc) x 6 (48)
Round 9-14 :
1 sc in each st around (48)
Info :
These even rounds build the tall head/neck area. If you want a slightly taller head, add 1-4 more even rounds here. Attach safety eyes now if you haven't; for the large base ghost we used 12mm safety eyes centered between rounds 10-11 and approx 8 stitches apart. Embroider or attach a black bead for nose centered three rounds below the eyes.
Round 15 :
(6 sc, dec) x 6 (42)
Round 16 :
(5 sc, dec) x 6 (36)
Round 17 :
(4 sc, dec) x 6 (30)
Info :
Begin stuffing the large ghost firmly but not rock hard: use small pieces of fiberfill pressed in with a blunt tool so the head keeps its round shape. Stuff more into the upper head and slightly less into the lower body to keep the top domed.
Round 18 :
(3 sc, dec) x 6 (24)
Round 19 :
(2 sc, dec) x 6 (18)
Round 20 :
(1 sc, dec) x 6 (12)
Info :
After round 21, fasten off leaving a long tail to sew the underside closed. Finish stuffing through the hole before closing. We will shape the base so it sits flat — add a small disk of felt inside the bottom if you want extra stability.
Round 22 (Base Skirt Start) :
Join yarn at one stitch along the side opening and ch1, sc evenly around the bottom edge into the underside to shape a small skirt (work approx 18 sc evenly around the bottom opening and join) (18)
Round 23 :
(2 sc, inc) x 6 (24)
Round 24 :
(3 sc, inc) x 6 (30)
Round 25 :
1 sc in each st around (30)
Info :
Work these rounds to create the ruffled bottom of the base ghost. If you prefer a straight bottom, skip increases and work even rounds until desired length. Finish with a decorative edge by working 1 rnd sc, then a rnd of sl st or crab stitch for a neat finish.
Round 26 :
(4 sc, inc) x 6 (36)
Round 27 :
1 sc in each st around (36)
Round 28 :
(5 sc, inc) x 6 (42)
Round 29 :
1 sc in each st around (42)
Info :
Attach the loop for hanging at the top: find the top center stitch and, with a long tail, chain 30-40 (or desired length) and sl st back into the same stitch to create a hanging loop. Reinforce by stitching the tail back through the join several times.
— Small Ghost Charm (Make 5) :
Round 1 :
6 sc in magic ring (6)
Round 3 :
(1 sc, inc) x 6 (18)
Round 4 :
(2 sc, inc) x 6 (24)
Info :
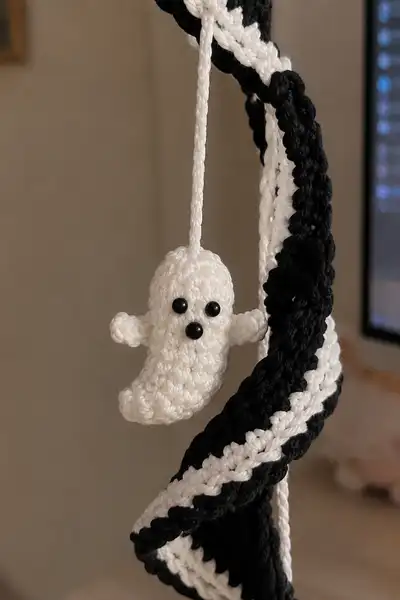
This small ghost is worked top-down. Place small 6mm safety eyes between rounds 4 and 5 about 4-6 stitches apart depending on how wide you want the face. If using beads, sew them on after stuffing.
Round 5 :
1 sc in each st around (24)
Round 6 :
1 sc in each st around (24)
Round 7 :
(3 sc, dec) x 6 (18)
Round 8 :
(2 sc, dec) x 6 (12)
Info :
Stuff lightly now to keep the little ghost soft and squishy. Too much stuffing will make the little ghosts appear rigid; we want them gently rounded.
Round 10 :
Fasten off leaving a long tail for closing and for sewing the hanging cord. Close opening by sewing through the 6 sts with a tapestry needle and pulling tight.
Info :
For the little arms: join yarn at side stitch on row 4 (approx), ch 1, 4 sc in same stitch (form a small nub), sl st to close. Fasten off and hide tail. Make two arms per ghost and position symmetrically. Alternately you can crochet a tiny tube of 4-6 sc and stitch it on for a defined arm.
Round 11 :
With a long tail, attach cord: join white yarn to top center of ghost, ch20-40 (adjust length depending on desired hang), fasten off and weave tail inside. You can also knot cord to secure position for hanging.
Round 12 :
Use embroidery or a 3rd small bead for a nose below the eyes. Secure beads/eyes with thread or glue if using non-locking beads. Ensure all small parts are secured for safety if the mobile will be accessible to small children.
— Tiny Arm (Make 10 for 5 ghosts - optional alternative) :
Round 1 :
Magic ring 6 sc (6)
Round 2 :
1 sc in each st around (6)
Round 3 :
Inc, 4 sc, inc (8)
Info :
Flatten lightly and sew to sides of small ghost at round 4. This creates a little stubby arm. Alternatively, crochet ch4 and sl st back into the base to make a flatter arm.
— Spiral Panel (Flat Stripe) — Make 1 long panel then add white spine and twist :
Info :
The spiral is a long flat rectangle worked in rows. This pattern uses a base width of 24 stitches (chain 25) and repeats 120 rows to create ample length for twisting and hanging. Adjust number of rows to make the spiral longer or shorter. The black panel receives a white stripe by working a central white row along one edge or by tapestry in row - we use an after-row slip-stitch edge in white to create the bright spine.
Row 1 :
Ch 25, sc in 2nd ch from hook and across to last ch, sc in last ch (24) turn (24)
Row 2 :
Ch1, sc in each st across (24) turn (24)
Rows 3-30 :
Ch1, sc in each st across (24) turn (24)
Info :
Work rows 1-30 to build the initial length. If you want a very full spiral you can work 120 total rows. The sample photographed used approximately 90-110 rows for a mid-length mobile; adjust to taste. Keep edges straight by making the first and last stitch of each row tight and consistent.
Rows 31-60 :
Ch1, sc in each st across (24) turn (24)
Info :
Every 20-30 rows pause and smooth the panel flat; pin to a blocking surface if needed so it stays even. If your gauge changes mid-panel, steam or wet block to even tension before adding the stripe.
Rows 61-90 :
Ch1, sc in each st across (24) turn (24)
Rows 91-120 :
Ch1, sc in each st across (24) turn (24)
Info :
When you reach the desired length, fasten off. For the white center/spine: with white yarn, join at one short edge and work a single row of sl st or sc along the central line of the panel to create a raised white stripe; another option is to work the final row in white so the white shows on one face as a sharp line. We recommend working a narrow raised spine on both faces by working 1 row sc in white down the center using tapestry technique or by sewing a white chain along the center and stitching it down.
Edge Finish :
With white yarn, join at one long edge and work 1 rnd sc around the entire rectangle edge, placing 2 sc in each corner. This creates a clean white border that will highlight the spiral when twisted (stitch counts will be approx 2*width + 2*height; keep stitches even). Fasten off and weave ends.
Info :
To create the twist: fold the panel along its long axis (right sides together) and sew the long edges with sc or whip stitch about 2-3 stitches per inch, creating a long tube. Turn tube right side out and press flat. Pin the flat tube into a helical spiral on a blocking mat and allow it to relax overnight. Alternatively, leave the long panel open and simply twist into a helix and sew seams at the top and bottom to maintain shape. You can optionally insert thin wire or a stiff floral stem into the central fold before closing for more structure.
— Alternate Spiral Construction (Two Narrow Strips Joined) :
Strip A - Black (Make 1) :
Ch 13, sc in 2nd ch from hook and across (12) turn. Row 1-120: ch1, sc 12 (12) - repeat until desired length. Fasten off leaving long tail.
Strip B - White Spine (Make 1)
Ch 5, sc 4 across, repeat rows until length matches black strip; fasten off. Position white strip centrally on black strip and stitch along both long edges with whip stitch to secure. When strips are joined, twist as described above and sew closed edges to maintain helix.
Info :
This method is slightly faster to work and produces a crisp white central stripe. It also reduces bulk when folding the panel into a spiral because the white stripe is thinner and sits between the black faces.
— Hanging Cords and Final Touches :
Cord 1 :
For each ghost, make a hanging cord by chaining 30-60 (or desired length) with white yarn. Fasten off and weave tail through the top center of each small ghost using a tapestry needle and secure with backstitches. Make 5 total cords for the 5 small ghosts; vary lengths slightly so they hang staggered through the spiral.
Info :
Tightly knot and weave the knot into the top seam of each ghost to avoid slipping. You can also sew the cord to the inside of the ghost with a few secure stitches for extra durability.
Top Loop :
Create a sturdy hanging loop for the entire mobile: use 3 lengths of yarn about 40cm each, braid them, knot both ends and sew the knot securely into the top center of the spiral. Cover the top join with a small decorative cap or a crochet circle to hide the seam.
Info :
If you will hang the mobile from a hook, make the top loop long enough to clear the hook and to allow the spiral to swing freely without catching on nearby objects. Test the hanging balance by temporarily pinning the spiral to a hook and adjust cord lengths of ghosts until the composition is pleasing.
— Decorative Details (Eyes, Nose, and Blush) :
Eyes :
Small ghosts: 6mm black safety eyes inserted and locked between rounds 4-5. Big ghost: 12mm safety eyes inserted and locked between rounds 10-11. If you prefer embroidered eyes, use black embroidery floss and a satin stitch for a soft, child-safe finish.
Nose :
Sew a small black bead or embroider an oval nose centered three rounds below the eyes on the large ghost. For small ghosts use a seed bead or a single embroidery stitch for a tiny nose.
Info :
For a softer look and safety for small children, replace beads or safety eyes with embroidered features. Use several passes of thread to make the stitches secure.
— Repeats, Variations and Additional Rounds :
Info :
If you want more small ghosts, repeat the small ghost charm pattern as many times as you like. You can also create ghosts in different sizes by starting with 8 sc in the magic ring instead of 6 (use 8 sc for a slightly larger head and increase row counts proportionally). To make the spiral fuller, increase the width from 24 to 30 stitches and/or increase the number of rows.
Final Finishing :
Weave in all ends securely. If using safety eyes, tighten washers and double-check. Lay the spiral flat and shape before hanging; steam lightly or wet block if necessary. Attach small ghosts to the spiral with their cords threaded through and knotted at chosen positions, and sew knot tails into seam allowance to keep them neat and secure.
This Spiral Halloween Ghost Mobile Amigurumi Pattern brings together playful amigurumi ghosts and dramatic geometry to create a show-stopping hanging decoration. Each ghost is quick to make, and the long spiral gives the whole piece cinematic movement. Hang it in a doorway or window for a spooky-yet-sweet effect. 🧶👻✨