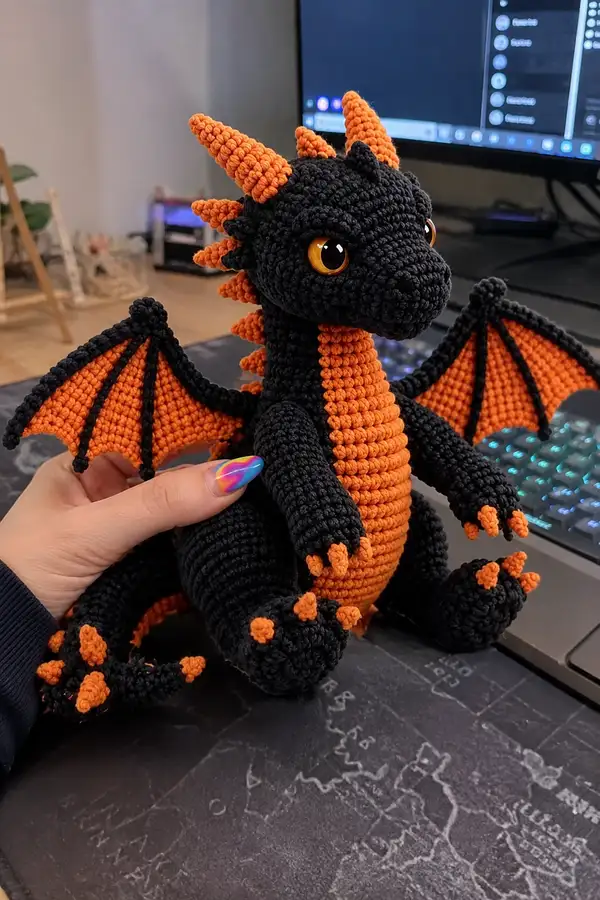
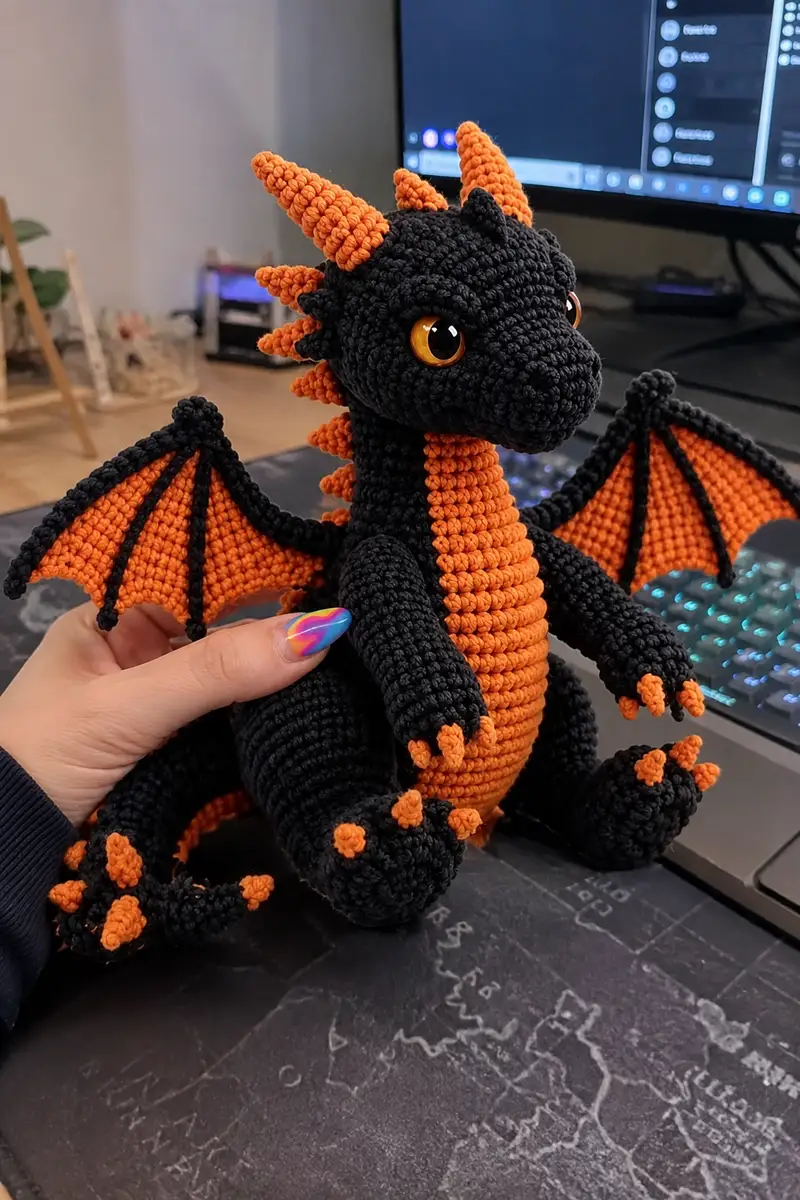
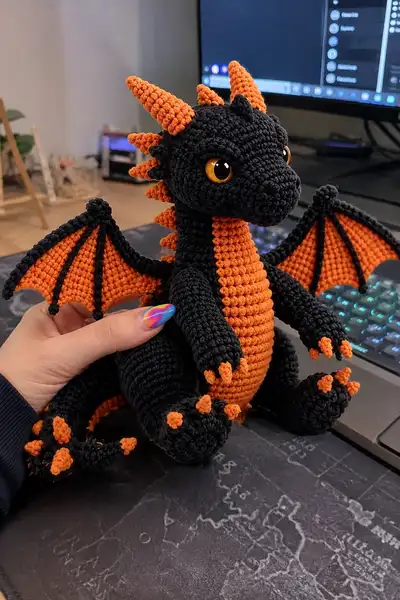
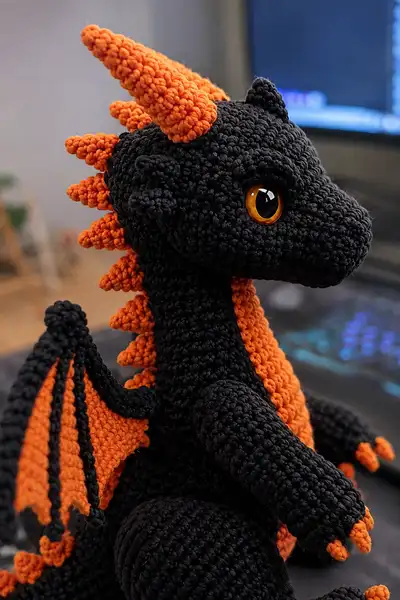
Create a striking black-and-orange dragon plush with bold spikes, large amber eyes, articulated wings and a cuddly plump body. This pattern recreates the Halloween-themed dragon pictured — glossy safety eyes, a ridged orange belly, and contrasting wing membranes. Perfect as a seasonal gift or dramatic decor, the finished dragon sits with realistic posture and chunky texture.
Progress Tracker
0% Complete
— Head :
Round 1 :
6 sc in magic ring (6)
Round 3 :
(1 sc, 1 inc) x 6 (18)
Round 4 :
(2 sc, 1 inc) x 6 (24)
Round 5 :
(3 sc, 1 inc) x 6 (30)
Round 6 :
(4 sc, 1 inc) x 6 (36)
Round 7 :
(5 sc, 1 inc) x 6 (42)
Round 8 :
(6 sc, 1 inc) x 6 (48)
Info :
At this point the crown of the head is established. Work tightly to prevent holes. Keep a stitch marker to mark the first stitch. If you prefer a slightly larger head, add one more increase round here (resulting in 54) before continuing.
Round 9-14 :
1 sc in each st (48) — work 6 rounds to build height (48)
Info :
Place safety eyes between rounds 13 and 14 approximately 12-14 stitches apart (measured center-to-center). Use pins to test spacing; typical placement on this design is roughly 12 stitches apart for a soft expression with the eyes set high on the muzzle.
Round 15 :
(6 sc, 1 inc) x 6 (54)
Round 16-18 :
1 sc in each st (54) — elongating the muzzle area (54)
Info :
These rounds add forward length for the snout. Stuff lightly as you go from round 17 onward, adding small handfuls to fill out the cheeks but keep the muzzle shape soft. Use polyester fill and push down to reach the nose tip area.
Round 19 :
(6 sc, 1 dec) x 6 (48)
Round 20 :
1 sc in each st (48)
Round 21 :
(5 sc, 1 dec) x 6 (42)
Round 22 :
(4 sc, 1 dec) x 6 (36)
Info :
Begin stuffing more firmly now to shape the forehead and upper muzzle. Ensure even filling so the eyes sit flush. If using safety eyes, fasten their washers now before adding much more stuffing to avoid distortion.
Round 23 :
(3 sc, 1 dec) x 6 (30)
Round 24 :
(2 sc, 1 dec) x 6 (24)
Round 25 :
(1 sc, 1 dec) x 6 (18)
Round 26 :
(1 sc in next st, dec) x 6 (12)
Info :
For the lower neck opening the stitch count reduces. Leave a long tail for sewing the head to the neck later; do not close completely. Finish stuffing firmly so the head keeps its shape where it will join the neck.
Round 27 :
1 sc in each st around (12) — work 2 rounds to lengthen neck base area (12)
Round 28 :
1 sc in each st (12)
Round 29 :
(1 sc, inc) x 6 (18) — create slight flare for neck seam if desired
Round 30 :
1 sc in each st (18)
Info :
Sculpt the nose by selectively stuffing the frontmost stitches more firmly; this will give the dragon a soft rounded snout. Use the yarn tail to sew a small point if you want a slightly narrower nose.
— Neck (Make 1) :
Round 1 :
Attach yarn to head neck opening and pick up stitches evenly around opening, or create neck separately: 6 sc in magic ring (6) if crocheting separately
Round 3 :
(1 sc, inc) x 6 (18)
Round 4 :
(2 sc, inc) x 6 (24)
Round 5-6 :
1 sc in each st (24)
Info :
Neck is a long column in the pictured dragon; the orange ridge runs down the front. You will work the neck primarily in black, then add the orange belly ridge separately as a strip to sew on or by working alternating color rounds (instructions follow).
Round 7-20 :
1 sc in each st (24) — work 14 rounds for neck height (24)
Info :
If you prefer a poseable neck, insert a length of floral wire or a thin rod running through the center of the neck before it becomes fully stuffed. Leave wire ends tucked into the head and body to secure.
Round 21 :
(3 sc, 1 dec) x 6 (18)
Round 22 :
1 sc in each st (18)
Round 23 :
Continue 1 sc in each st for 2 rounds to reach height where neck meets body (18)
Info :
Do not fasten off; leave long tail for sewing to body. The neck top attaches under head; ensure your head opening aligns with neck seam and that stuffing is even for a smooth join.
— Belly Ridge (Front Orange Strip) :
Info :
This orange ribbed strip gives the dragon its distinctive belly. You can either crochet it as a separate flat strip and sew it on, or work it in joined rounds along the neck and body front. The following creates a separate strip to be sewn on.
Round 1 :
With orange yarn ch 7, join to form a small tube by working 6 sc into 2nd ch from hook and across, slip to first sc to form a tiny round tube (6)
Round 2 :
1 sc in each st (6)
Round 3 :
(1 sc, inc) x 3 (9)
Round 4 :
1 sc in each st (9)
Round 5 :
(2 sc, inc) x 3 (12)
Round 6-36 :
1 sc in each st (12) — work 31 rounds to form long ribbed strip (12)
Info :
To create the ribbed look: work each round in BLO for one round, then work next round normally. Alternatively, use hdc rows to add texture. Lengthen the strip to match the front curve of the neck and down onto the body—measure against the body before final sewing. Fasten off leaving a long tail for sewing.
— Body :
Round 1 :
6 sc in magic ring (6)
Round 3 :
(1 sc, inc) x 6 (18)
Round 4 :
(2 sc, inc) x 6 (24)
Round 5 :
(3 sc, inc) x 6 (30)
Round 6 :
(4 sc, inc) x 6 (36)
Round 7 :
(5 sc, inc) x 6 (42)
Round 8 :
(6 sc, inc) x 6 (48)
Round 9-14 :
1 sc in each st (48)
Info :
The body is fairly chunky—work even rounds to create the main belly. If you want a slightly wider bottom, work one more increase round to 54 before continuing. Now is a good time to change to orange yarn for the belly strip if you want it integrated rather than sewn on.
Round 15 :
(6 sc, 1 dec) x 6 (42)
Round 16 :
1 sc in each st (42)
Round 17 :
(5 sc, 1 dec) x 6 (36)
Round 18-22 :
1 sc in each st (36)
Info :
Begin stuffing the body from the bottom upward. Add small amounts of stuffing between rounds to keep the body evenly filled. This project benefits from a moderately firm body for stable sitting posture.
Round 23 :
(4 sc, 1 dec) x 6 (30)
Round 24 :
(3 sc, 1 dec) x 6 (24)
Round 25 :
(2 sc, 1 dec) x 6 (18)
Round 26 :
(1 sc, 1 dec) x 6 (12)
Round 27 :
1 sc in each st (12) — shape towards neck join (work 2 rounds)
Round 28 :
1 sc in each st (12)
Info :
Stop here to attach the neck. Before fully closing the body top, pin the neck into place and ensure the orange belly strip aligns over the front. Sew neck to body using mattress stitch or whip stitch, matching color changes carefully.
— Arms (Make 2) :
Round 1 :
6 sc in magic ring (6)
Round 3 :
(1 sc, inc) x 6 (18)
Round 4-6 :
1 sc in each st (18) — form the hand/paw base (18)
Info :
Stuff the hand area firmly to maintain shape. The hand is short and rounded; you will add small claws afterwards. Mark the base stitch to maintain orientation for thumb/claw placement.
Round 7 :
(2 sc, inc) x 6 (24)
Round 8-13 :
1 sc in each st (24) — lengthen lower arm (24)
Info :
If you add internal arm wiring for poseability, insert thin wire or pipe cleaner now before stuffing. Leave about 1.5cm free at the top to fold over inside the shoulder for security.
Round 14 :
(3 sc, 1 dec) x 6 (18)
Round 15 :
1 sc in each st (18)
Round 16 :
(2 sc, 1 dec) x 6 (12)
Round 17 :
1 sc in each st (12)
Round 18 :
Fasten off leaving long tail for sewing; position and attach to body at rounds 16-18 on body sides (12)
Info :
Sew arms to the body using long tail and ladder stitch through the arm top and body seam area. Position arms angled slightly forward as in the picture for a natural seated posture.
— Claws (Make 6 small for each limb tip) :
Round 1 :
4 sc in magic ring (4)
Round 3 :
(1 sc, inc) x 2 (6)
Round 4 :
1 sc in each st, fasten off leaving long tail for sewing (6)
Info :
Sew claws onto hand tips and toe tips in clusters of three or four depending on limb. Use pins to position claws evenly before sewing. Claws are crocheted in orange accent color as pictured.
— Legs (Make 2) :
Round 1 :
6 sc in magic ring (6)
Round 3 :
(1 sc, inc) x 6 (18)
Round 4 :
(2 sc, inc) x 6 (24)
Round 5-8 :
1 sc in each st (24) — form foot base and widen slightly (24)
Round 9 :
(3 sc, inc) x 6 (30)
Round 10-14 :
1 sc in each st (30) — build calf area (30)
Info :
Stuff foot area firmly; add a slightly flattened base so the dragon can sit stably. Insert small plastic pellets (optional) inside the foot base before stuffing for added weight and stability.
Round 15 :
(3 sc, 1 dec) x 6 (24)
Round 16 :
(2 sc, 1 dec) x 6 (18)
Round 17 :
1 sc in each st (18)
Round 18 :
(1 sc, 1 dec) x 6 (12)
Round 19 :
1 sc in each st (12)
Round 20-22 :
Fasten off leaving long tail to sew leg into body hip region (12)
Info :
Sew legs at the bottom front of the body so the dragon sits upright. Place them slightly apart for a stable seated pose. Add claws to toes as described in Claws section.
— Tail :
Round 1 :
6 sc in magic ring (6)
Round 3-4 :
1 sc in each st (12)
Round 5 :
(1 sc, inc) x 6 (18)
Round 6-12 :
1 sc in each st (18) — lengthen tail (work 7 rounds or more to achieve desired length)
Round 13 :
(2 sc, 1 dec) x 6 (12)
Round 14-18 :
1 sc in each st (12)
Round 19 :
(1 sc, 1 dec) x 4 then 1 sc in last 4 stitches (8+4=12 total) — tapered tip shaping
Round 20-24 :
1 sc in each st (12) — finish tip area and leave tail for sewing (12)
Info :
Sew small cone spikes along the tail as you like (see Spike section). The pictured dragon has clustered spikes near the tail tip and a row down the spine—space them evenly for good visual rhythm.
— Dorsal Spikes / Spine Cones (Make 10-12) :
Info :
Small cones are made in orange and vary slightly in size. The pattern below creates a tapered cone suitable for the dragon's dorsal ridge. Make 10-12 cones and sew them along the neck, head and tail spine evenly spaced.
Spike Round 1 :
6 sc in magic ring (6)
Spike Round 3 :
(1 sc, inc) x 3 (9)
Spike Round 4 :
1 sc in each st (9)
Spike Round 5 :
(2 sc, inc) x 3 (12)
Spike Round 6 :
1 sc in each st (12)
Spike Round 7 :
(2 sc, 1 dec) x 3 (9)
Spike Round 8 :
1 sc in each st (9) — leave tail for sewing, fasten off (9)
Info :
Vary cone sizes by stopping earlier (for smaller spikes use 4 rounds) or working additional increase rounds for larger cones. Attach larger cones at top of head and largest at base of horns for more dramatic effect.
— Horns (Make 2) :
Horn Round 1 :
6 sc in magic ring (6)
Horn Round 3 :
(1 sc, inc) x 3 (9)
Horn Round 4 :
1 sc in each st (9)
Horn Round 5 :
(2 sc, inc) x 3 (12)
Horn Round 6 :
1 sc in each st (12)
Horn Round 7 :
(2 sc, 1 dec) x 3 (9)
Horn Round 8 :
(1 sc, 1 dec) x 3 (6) — tapering tip, stuff lightly
Horn Round 9 :
6 dec (3) — close if desired, fasten off leaving long tail for sewing (3)
Info :
Horns are formed as tapered cones. Stuff lightly, leaving open end to sew to head. In the pictured dragon the horns are oriented back and slightly outward. Sew to crown of head symmetrically.
— Wing (Make 2) :
Info :
Wings are made of a black outer ridge and orange membrane with black ribbing. The following creates the membrane first, then an outer edge and ribs are added.
Membrane Row 1 :
Ch 21 with orange yarn, sc in 2nd ch from hook and across (20)
Membrane Row 2 :
Ch 1, turn, 1 sc in each st across (20)
Membrane Row 3 :
Ch 1, turn, (3 sc, inc) across to create slight taper at outer edge — work pattern to remain 20 stitches (20)
Membrane Row 4-10 :
1 sc in each st (20) — build height of membrane for a triangular wing (work 7 rounds)
Info :
Shape the wing into a soft triangular membrane by decreasing a few stitches at the tip end on alternate rows if you like. The pictured wings have a pronounced outer ridge and 3 ribs; we will add ribs next in black yarn.
Wing Rib Row 1 :
With black yarn, join at base of membrane and sc evenly along the inside base (20)
Wing Rib Row 2 :
Ch 1, work slip stitch up three stitches to create first rib, ch 1 and sl st back to base; repeat to create three ribs equally spaced across membrane
Info :
Alternatively, work thin tubes (i-cords) for ribs and sew them on for a pronounced 3D effect. Ribs should converge at the wing base near the shoulder when attached.
Wing Edge :
With black yarn, sc around entire wing membrane in BLO or around both loops creating a framed edge. Work 2-3 rounds of sc to create the thick outer ridge (approx 60-70 sc per round depending on joins)
Info :
Insert a strip of thin wire inside the outer ridge before finishing if you want the wing to hold posed shapes. Fold the wire ends and secure inside the seam so they are not exposed.
Fasten :
Fasten off leaving long tail for sewing. Knead wings into final shape, pin into place, and hand-sew to body along the shoulder seam. The pictured dragon's wings are angled and slightly drooped; position them at body rounds 12-16.
— Small Ear Fins (Make 2) :
Round 1 :
4 sc in magic ring (4)
Round 2 :
(1 sc, inc) x 2 (6)
Round 3 :
1 sc in each st (6)
Round 4 :
Fasten off leaving long tail for sewing (6)
Info :
Sew ear fins near the top sides of the head, between the eyes and the crown, oriented slightly back. The small fins give the head a frilled look consistent with the photos.
— Eye Details & Facial Embroidery :
Info :
Set 15mm amber safety eyes between rounds 13-14 of the head, 12-14 stitches apart. Fasten washers behind the eye, then add additional stuffing to seat the eyes properly. For eyelids, embroider a short line of black yarn above the eye for expression or stitch small felt pieces for lids.
Embro Round 1 :
Using black yarn, embroider two small nostril stitches at the end of the snout approximately 4 stitches apart. Make a small smile stitch by bringing yarn from under nose area and creating a shallow curve.
Info :
Use a blunt yarn needle for embroidery. Make small invisible knots on the inside and weave tails thoroughly to secure.
— Assembly & Final Touches :
Info :
Pin all pieces in position before sewing. Sew head to body at the neck opening using whip stitch or ladder stitch. Sew horns, spikes, and ear fins to designated points using long tail and secure knotting. Add wing to body sides and reinforce with extra stitches through the body for stability. Attach tail to back center of body and sew securely.
Info :
Weave all ends inside the body. Trim and hide tails. Add optional blush using soft pastel powder or fabric paint to cheeks for extra character. If adding weight to feet, make sure any additives are enclosed in a small bag and inserted before final stuffing and closing.
Completing this dragon is such a joyful reward — those bright orange spikes and ribbed belly really bring the character to life. The contrast between deep black and pumpkin orange makes it an unforgettable handmade gift. I hope you enjoy every round of stitching; the detailed shaping and assembly produce a durable, display-ready dragon. 🧶🦇✨