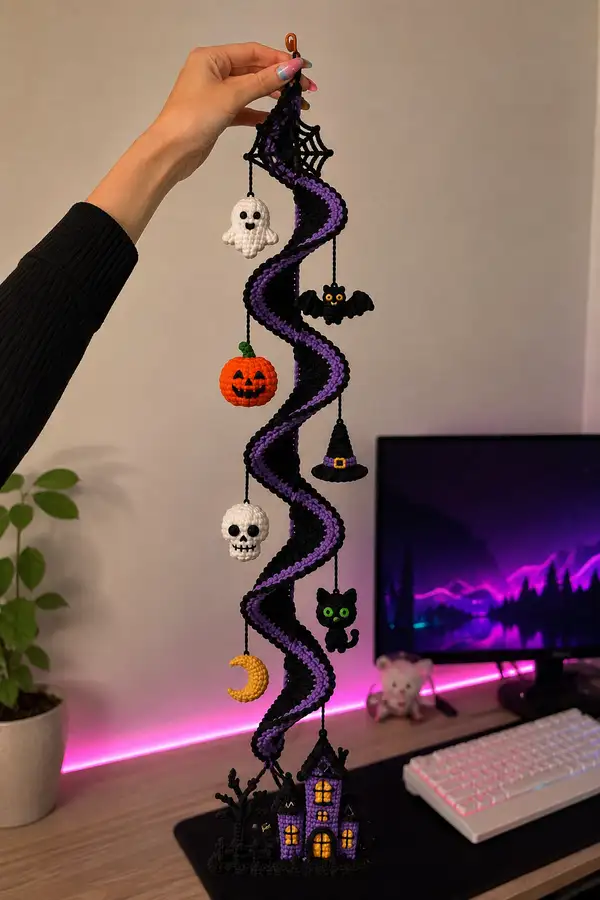
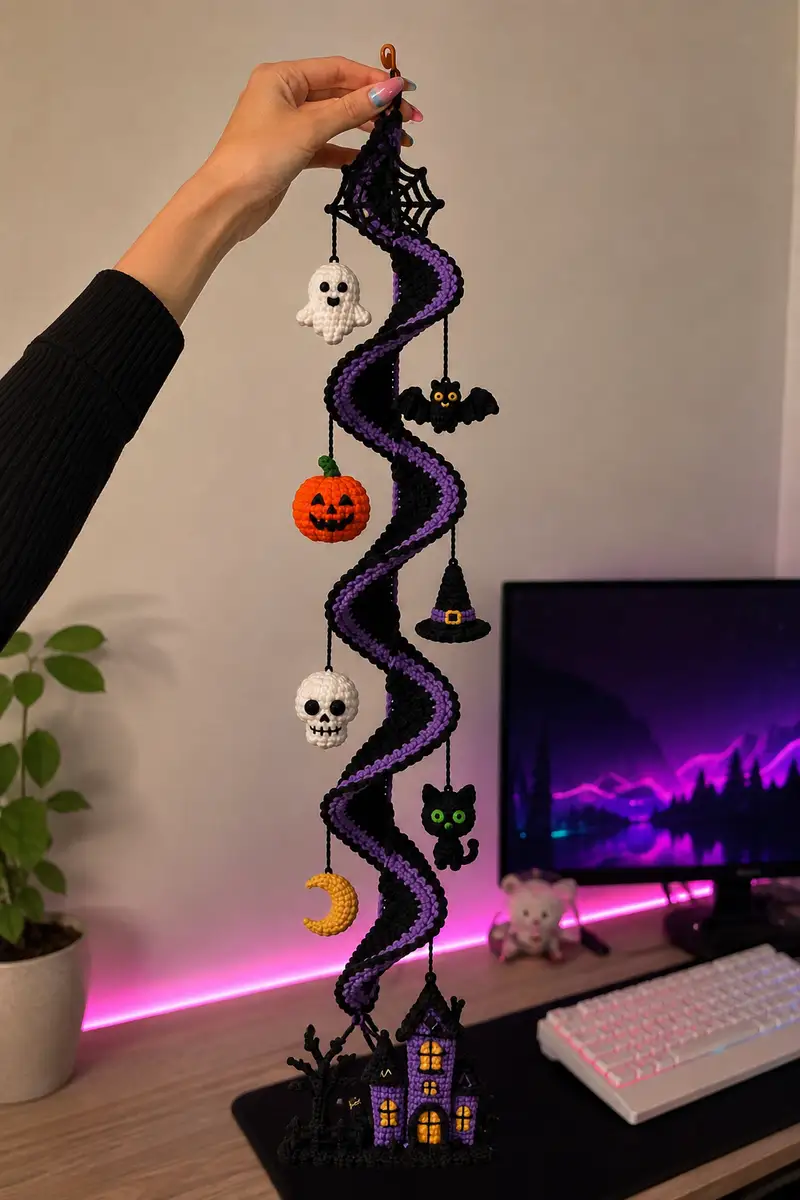
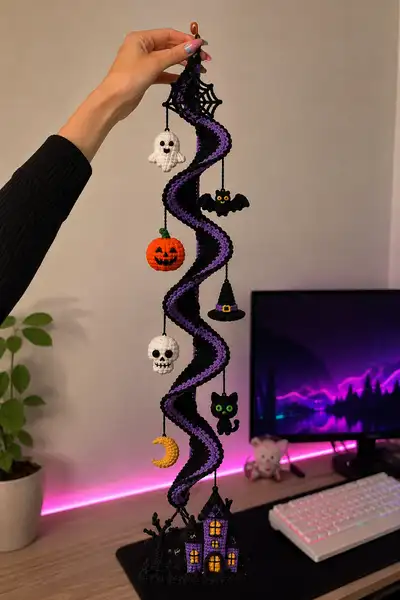
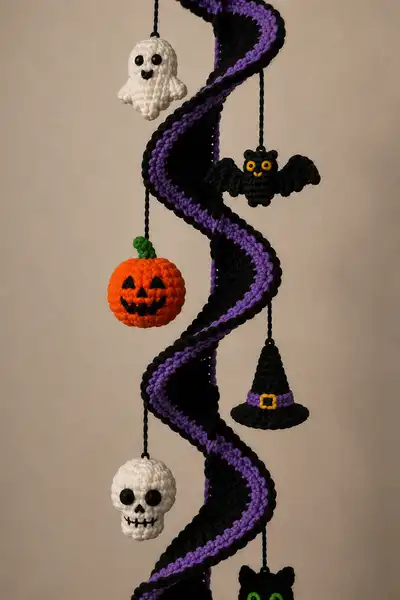
Create a dramatic hanging Halloween spiral garland featuring a tall black spiral trimmed in purple and seven cute amigurumi charms: ghost, pumpkin, skull, bat, witch hat, black cat, crescent moon and a tiny haunted house base. This pattern builds a sturdy wire core wrapped in crocheted tubing with spiral edging and lightweight stuffed charms that hang beautifully. Perfect for doorways, windows, or spooky mantel displays — detailed, modular, and highly customizable.
Progress Tracker
0% Complete
— Materials & Preparation :
Info :
Before beginning, wind small cakes of each color so that long color changes are easier. Pre-cut the floral wire/core to desired length (approx 60-70cm for the spiral shown). Use a wire slightly shorter than your finished spiral strip so both ends can be anchored into the base and the top web piece.
— Spiral Core (Black Tube) :
Round 1 :
6 sc in magic ring (6)
Round 3 :
(1 sc, inc) x 6 (18)
Round 4 :
(2 sc, inc) x 6 (24)
Round 5 :
(3 sc, inc) x 6 (30)
Round 6 :
(4 sc, inc) x 6 (36)
Round 7 :
(5 sc, inc) x 6 (42)
Round 8 :
(6 sc, inc) x 6 (48)
Info :
Insert the prepared floral wire/core into the tube by sliding it into the central cavity. Leave about 2-3cm free at the top and bottom for anchoring later. You will work in continuous rounds from here to build the tube length. Use a stitch marker to mark round start.
Round 9-18 :
1 sc in each st (48)
Info :
Check tube circumference occasionally; 48 sts gives a robust tube that will hide the wire. If you prefer a thicker tube, increase rounds to 54 or 60 using (7 sc, inc) patterns until desired size. Work consistently tight to prevent stuffing or wire showing.
Round 19-28 :
1 sc in each st (48)
Round 29-38 :
1 sc in each st (48)
Info :
Continue until tube reaches desired finished length (approx 55-65cm). In the sample project the black tube was worked for a total of 70 rounds including increases; adjust to your hanging height. Keep the core centered; you can use an extra long darning needle to ease wire into position if needed.
Round 39-70 :
1 sc in each st (48)
Info :
When you reach near the top anchor point, leave the open end long enough to fold the wire tip inside and sew a few closing rounds. Do not fasten off yet — you will close after purple edging is attached at some points.
Round 71-74 :
(1 sc, dec) x 12 (36) then (2 sc, dec) x 9 (27) adjust to close top if needed; leave long tail for sewing
Info :
Do not completely close the top yet: this short closure is to secure the wire. Fasten off leaving a 25cm tail for sewing. Ensure the wire end is folded back inside the tube and anchored with a couple of whip stitches through both tube and wire-wrapping yarn.
— Purple Edge Strip (worked flat rows) :
Info :
Make a long purple strip that will be sewn spirally along the black tube to create the purple motif in the center. Work in rows; this will be long — the finished strip length should be about twice the finished tube length to create the raised spiral edge.
Row 1 :
Ch 220 (adjust to be roughly twice tube length/2; if your tube is longer, ch additional multiples of 2) turn, sc in 2nd ch from hook and across (219)
Row 2-6 :
Ch1, turn, sc in each st across (219)
Info :
These initial flat rows create the solid purple band. Keep edges straight. For a slightly ruffled look use hdc in row 6. Trim if you prefer narrower purple band — the sample has about a 6-8cm wide purple stripe.
Row 7 :
Ch1, turn, sc in each st BLO across to create a soft ridge (219)
Row 8 :
Ch1, turn, sc in each st across (219)
Info :
Fasten off leaving a long working tail for sewing. You will sew the purple strip along a diagonal seam up the black tube in a spiral formation — measure placement using pins every 3-4 cm to set the spiral spacing before sewing.
— Making the Spiral Shape (Assembly of Edge to Tube) :
Info :
Pin one end of the purple strip near the tube top. Wrap the purple strip around the tube, offsetting it slowly so it makes a spiral with equal spacing between turns. For a 60cm tube with 4 turns, offset the strip so each turn descends approx 12-15cm. Use pins to hold the strip in place as you proceed.
Row 9 :
Sew purple strip to black tube with mattress stitch or whip stitch using the tail; secure every 1cm along the strip (work entire length)
Info :
Sew through both fabric layers without catching the wire. Pull stitches snug but not tight so strip lies smoothly. Once sewn, go back and add small decorative sc edging along the purple strip edges in black to mimic the raised black border in the sample.
Row 10 :
Attach black yarn at one purple strip edge and work 1 sc in each st along edge for a neat ridge (approx 219)
Info :
This creates the raised black edging that frames the purple center. If you prefer a scalloped look, alternate (3 sc, sl st) across the edge instead of straight sc.
— Hanging Cord Preparation :
Info :
Prepare braided or twisted black cords for each charm; the sample uses approx 8-12cm cord lengths depending on charm placement. To create a uniform look, make 7 cords: top ghost (10cm), bat (14cm), pumpkin (22cm), witch hat (28cm), skull (36cm), cat (44cm), moon (52cm) measured from top anchor point. Add small knot loops at the top to sew into tube seam.
Row 1 :
Make 7 cords by ch 40 and then sc back along chain or braid three lengths of yarn for 40cm then knot at both ends—adjust length to your layout
Info :
Sew top loop into the topmost purple-to-black seam so cords hang down the spiral. Be mindful of weight distribution; heavier charms should be lower and further apart to avoid twisting the spiral too much.
— Ghost Ornament (Make 1) :
Round 1 :
6 sc in magic ring (6)
Round 3 :
(1 sc, inc) x 6 (18)
Round 4 :
(2 sc, inc) x 6 (24)
Info :
Place 6mm safety eyes between rounds 4 and 6 approximately 6 stitches apart for a cute expression. Crochet the face mouth later with black yarn or embroidery.
Round 5 :
1 sc in each st (24)
Round 6 :
1 sc in each st (24)
Round 7 :
(3 sc, dec) x 6 (18)
Info :
Begin stuffing lightly around round 6-7 to give the ghost a plump head. Stuff more toward the top, leaving bottom open for the ghost skirt shaping.
Round 8 :
1 sc in each st (18)
Round 9 :
(1 sc, dec) x 6 (12)
Round 10 :
1 sc in each st (12)
Round 11 :
Start wavy skirt: *ch3, skip 1 st, sl st in next* around creating 6 chain loops; at each loop sc 5 into chain to create scallop. Fasten off and weave tail inside for sewing (6 scallops)
Info :
Use small black embroidery for the mouth below the eyes (a small heart or smile). Attach the top of the cord by sewing through the very top round inside the head where you left an opening. Fasten off and hide ends.
— Pumpkin Ornament (Make 1) :
Round 1 :
6 sc in magic ring (6)
Round 3 :
(1 sc, inc) x 6 (18)
Round 4 :
(2 sc, inc) x 6 (24)
Round 5 :
(3 sc, inc) x 6 (30)
Round 6-9 :
1 sc in each st (30)
Info :
To create pumpkin ribbing, when rounds 6-9 are complete, work slip stitch lines from top to bottom by pulling a length of yarn and working sl st up and down the sphere at 6 evenly spaced points (6 vertical ribs). Alternatively, use surface slip stitch method to embroider ribs after stuffing.
Round 10 :
(3 sc, dec) x 6 (24)
Round 11 :
(2 sc, dec) x 6 (18)
Info :
Begin stuffing firmly at round 10-11 to maintain round pumpkin shape. Add a small pellet of stuffing to keep bottom slightly flat if desired for stability.
Round 12 :
(1 sc, dec) x 6 (12)
Round 13 :
6 dec (6) Fasten off leaving long tail for closing and for sewing stem
Round 14 (Stem) :
Using green, mr 6, round 1: 6 sc (6); round 2: inc x3 (9); round 3: 1 sc in each (9); FO leaving tail and sew to top center of pumpkin. Embroider jack-o-lantern face using black yarn and satin stitch; or cut small triangles of black felt and glue.
Info :
Sew a loop at the stem base to attach the hanging cord so the pumpkin hangs straight. Secure the stem well with multiple stitches.
— Skull Ornament (Make 1) :
Round 1 :
6 sc in magic ring (6)
Round 3 :
(1 sc, inc) x 6 (18)
Round 4 :
(2 sc, inc) x 6 (24)
Round 5 :
(3 sc, inc) x 6 (30)
Round 6-9 :
1 sc in each st (30)
Info :
Place 8mm safety eyes between rounds 7 and 8 roughly 6-8 stitches apart. Embroider nasal cavity and teeth later using black yarn with backstitch. Stuff firmly for firm skull shape prior to sculpting jaw.
Round 10 :
(3 sc, dec) x 6 (24)
Round 11 :
1 sc in each st (24)
Round 12 :
(2 sc, dec) x 6 (18)
Round 13 :
(1 sc, dec) x 6 (12)
Info :
Create jaw: make a separate lower jaw piece. Using white, mr 6; round1 6 sc (6); round2 inc x6 (12); round3 (1 sc, inc) x6 (18); round4 1 sc in each (18) then row5: (2 sc, dec) x4 (14) to shallowly shape; FO leaving long tail to sew to skull bottom. Embroider teeth by making small black vertical stitches across jaw and small V stitches for nose.
Round 14 :
Sew jaw to bottom of head aligning center and use yarn to define cheek hollows by sewing in and out creating slight indentations. Fasten off and weave ends.
Info :
Optional: add a tiny loop at skull top to attach hanging cord. Ensure the jaw is secure; add a dab of fabric glue if necessary and hide glue inside jaw seam so it is not visible.
— Bat Ornament (Make 1) :
Body Round 1 :
6 sc in mr (6)
Round 3 :
(1 sc, inc) x6 (18)
Round 4 :
1 sc in each st (18) FO leaving tail for sewing wings
Wing (Make 2) Round 1 :
Ch 8, turn, sc in 2nd ch from hook and next 6 (6)
Wing Round 2 :
Ch1, turn, 2 sc in first st, sc in next 4, 2 sc in last (8)
Wing Round 3 :
Ch1, turn, (sc, inc) across to shape scallop 12 sts
Wing Round 4 :
At outer edge of wing work 3 sc in same st to create scalloped tip then reverse along edge with sc to base; FO. Make a second wing mirror image.
Info :
Sew wings to sides of body at round 2-3. Add tiny yellow safety eyes or embroider bright orange eyes with French knots. Add a small inverted V stitch for the mouth.
— Witch Hat Ornament (Make 1) :
Cone Round 1 :
6 sc in mr (6)
Round 3 :
(1 sc, inc) x6 (18)
Round 4-8 :
1 sc in each st (18)
Info :
For a tall witch hat, continue even rounds to desired cone height (7-10 rounds). Stuff lightly if you want it stiff enough to hold shape. The sample hat is lightly stuffed to keep tip rounded.
Brim Round 1 :
With black, ch 24, join to form ring with sl st. Round1: sc in each ch around (24)
Brim Round 2 :
(1 sc, inc) x 8 (32)
Brim Round 3 :
1 sc in each st (32) FO leaving long tail to sew cone to brim
Decoration :
Make a narrow purple band: ch 10, sc across, wrap around base of cone and sew. Add a small yellow buckle by embroidering a square of yellow yarn and sewing in place.
Info :
Sew a loop in the hat top for the hanging cord so the hat hangs level. Secure multiple stitches around the brim when joining to the cone so it doesn't flop off.
— Black Cat Ornament (Make 1) :
Head Round 1 :
6 sc in mr (6)
Round 3 :
(1 sc, inc) x6 (18)
Round 4 :
(2 sc, inc) x6 (24)
Round 5-6 :
1 sc in each st (24)
Info :
Place 6mm green safety eyes between rounds 4-5 approx 6-8 sts apart. Stuff head lightly for a squishy look. Leave opening for sewing to body (if you make a body) or for direct hanging loop.
Ear (Make 2) Round 1 :
3 sc in mr (3)
Ear Round 2 :
Inc in each st (6)
Ear Round 3 :
1 sc in each st (6) FO leaving tail for sewing
Body/Optional Tail :
If you want a body: mr6, inc rounds to 18 as with small amigurumi, stuff lightly and sew head on top. For the tail: ch10, sl st back, curl slightly and sew to body back. If making a simple hanging cat, attach cord to top of head.
Info :
Use felt or extra yarn to add pupils or brighten the eyes. Sew small whiskers with black embroidery thread (three short stitches either side) for character.
— Crescent Moon Ornament (Make 1) :
Round 3 :
(1 sc, inc) x6 (18)
Round 4 :
Work short oval then shape into crescent: ch2, turn, (sc, inc) across for 10 sts, FO leaving long tail and block into crescent bend by sewing the ends to form crescent shape. Alternatively crochet a slightly flat half-sphere and pull the ends together to shape.
Info :
Embroider a smiling face or leave plain. Because the moon is lightweight, a short braided cord is sufficient for hanging.
— Spider Web Top & Hook (Make 1) :
Round 1 :
Ch6, sl st to first to make ring, ch3 (counts as tr), work 12 tr into ring, join (13)
Round 2 :
Ch4 (counts as tr+ch1), *tr in next tr, ch1* around join (13 tr, 13 ch1 spaces)
Round 3 :
Slip into each ch1 space and make *sc, ch5, sc* to form radiating loops (13 spokes)
Round 4 :
Working in FLO of spokes, join and sc in between spokes creating a webbed round: *sl st to reach next spoke, sc in between* repeat. FO leaving a long tail to sew to top of tube and to affix a hanging hook or ring.
Info :
Sew a small metal ring or heavy duty stitch marker to the top of the web for hanging. Attach the wire core securely to the web base with several tight stitches so it supports the spiral weight.
— Haunted House Base (Make 1 - multiple parts) :
House Base - Floor Round 1 :
Ch 18, join with sl st to form ring. Round1: sc in each around (18)
Round 2 :
Inc evenly to 36 by (1 sc, inc) x9 (36)
Round 3-6 :
1 sc in each st (36)
Info :
Work a rectangular house body: from the circular base, build walls by working in rows instead of rounds for a box shape or crochet several panels and sew together. The sample has a tall narrow tower and a base lawn with little tree and path accents.
Wall Panel (Make 2) Row 1 :
Ch 18, turn, sc across (17)
Wall Panel Row 2-14 :
Ch1 turn, sc across (17) — work 12 rows for height
Roof - Tower Top Round 1 :
6 sc in mr (6)
Roof Round 3 :
(1 sc, inc) x6 (18)
Roof Round 4-7 :
1 sc in each st (18) FO forming tall pointy roof. Sew roof to tower top; use yellow yarn to embroider window panes and cut tiny shapes for windows, then sew yellow felt or yarn behind windows to mimic glowing light.
Info :
Make small tree silhouette separately by working a flat branch motif (ch 6, sc across and shape with small branches) and sew to lawn. Anchor the spiral bottom wire into the base by folding the wire end into the base cavity and stitching around; secure with small bead of hot glue inside for added strength (optional).
— Extra Texturing & Finishing Touches :
Info :
After sewing all charms to their cords and arranging spacing on the spiral, add small embroidered details (eye pupils, mouths). Use a black fabric marker to darken seams or a tiny brush of acrylic paint to add highlights to windows. Weave in all loose ends and trim. For structural longevity, tie the base to a small wooden disc under the house and add a felt pad to protect surfaces.
— Final Blocking, Weighting & Hanging :
Info :
Lightly steam-block the spiral if using acrylic yarn to relax the stitches and shape. Weigh the bottom house with a small washer or coin inside the base so the garland hangs straight and doesn't rotate excessively. Hang by the web hook or attach to a curtain rod or dowel.
This spooky spiral garland is a dramatic, fun way to celebrate the season — each stitched charm adds personality and the tall spiral makes a real statement. The modular approach means you can switch charms each year or scale the spiral to suit your space. I hope you enjoy making and displaying this playful Halloween piece — it’s perfect for gifting or seasonal decorating! 🧶🎃👻