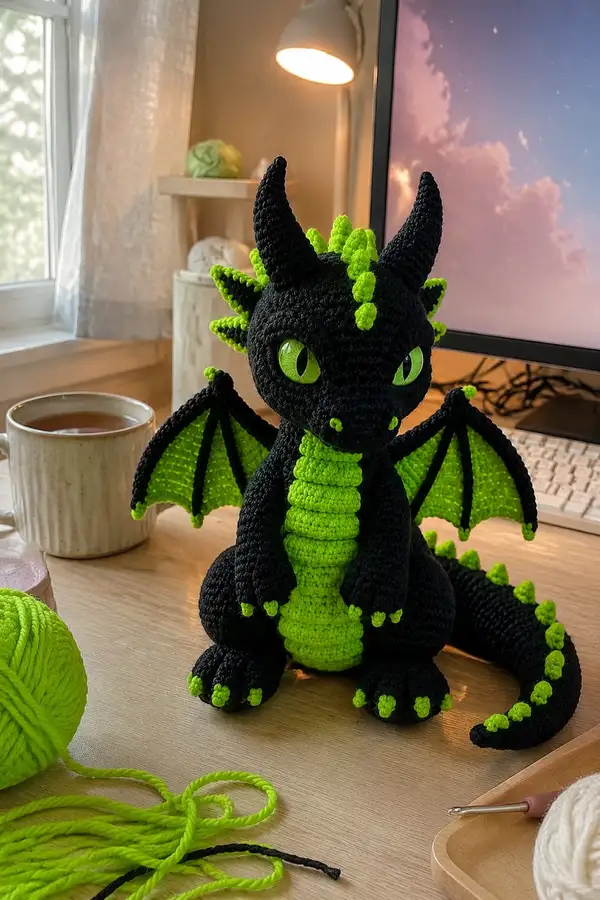
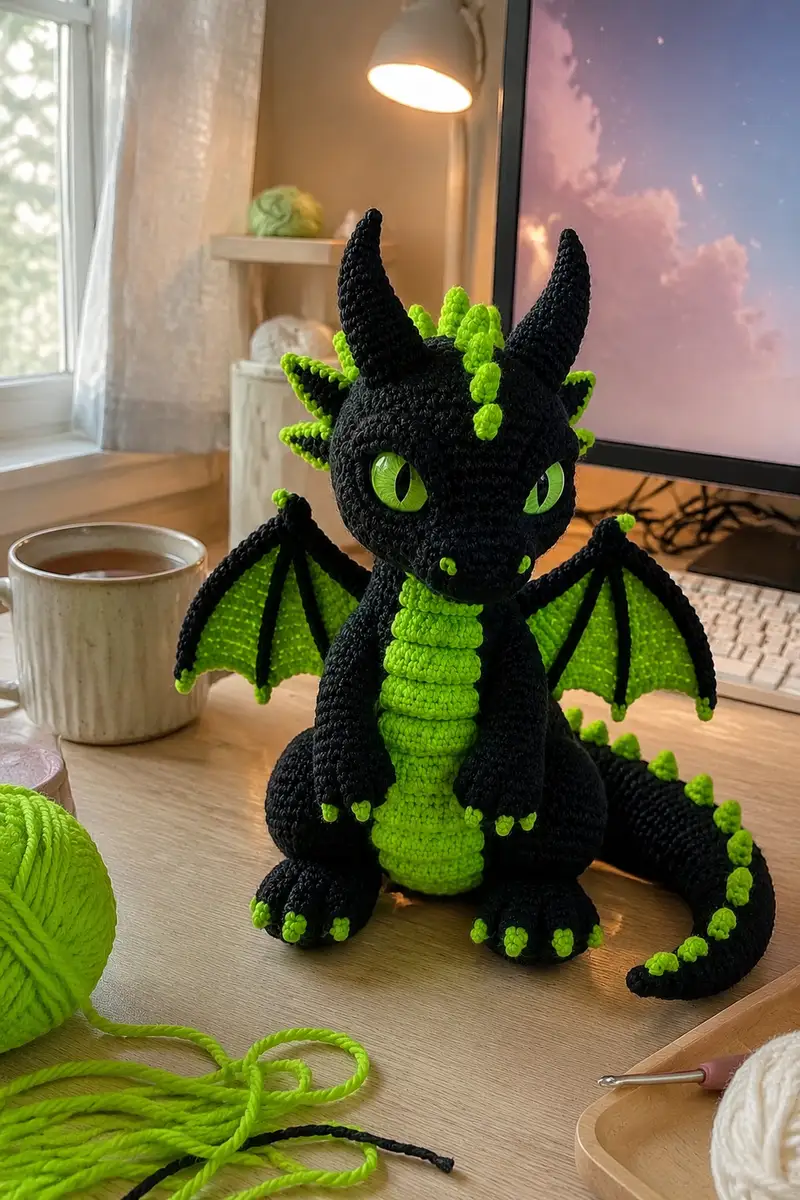
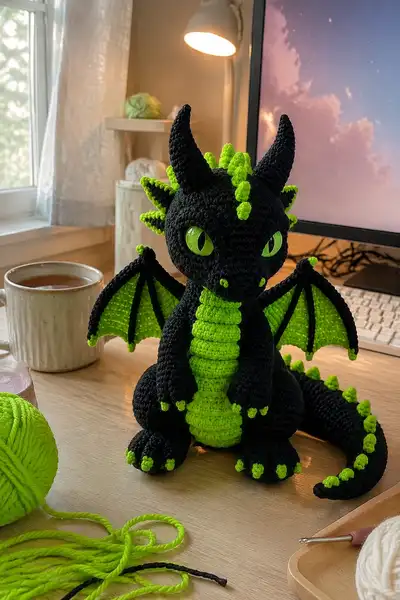
Create a spooky, neon-accented dragon plush with a dramatic black body and vivid lime-green details. This pattern recreates the large expressive slit eyes, curled tail with bobble spikes, segmented ridged belly, bat-style wings with raised "finger" ridges, and adorable clawed feet. Detailed round-by-round instructions and assembly tips make this a satisfying project for intermediate to advanced crocheters who love character and contrast.
Progress Tracker
0% Complete
— Head :
Round 1 :
6 sc in magic ring (6)
Round 3 :
(1 sc, 1 inc) x 6 (18)
Round 4 :
(2 sc, 1 inc) x 6 (24)
Round 5 :
(3 sc, 1 inc) x 6 (30)
Round 6 :
(4 sc, 1 inc) x 6 (36)
Round 7 :
(5 sc, 1 inc) x 6 (42)
Round 8 :
(6 sc, 1 inc) x 6 (48)
Round 9 :
1 sc in each st (48)
Round 10 :
1 sc in each st (48)
Round 11 :
1 sc in each st (48)
Info :
Place safety eyes between rounds 13-15 later. Keep a stitch count on the back of the head to align snout shaping. Use stitch marker at beginning of each round.
Round 12 :
(7 sc, 1 inc) x 6 (54)
Round 13 :
1 sc in each st (54)
Round 14 :
1 sc in each st (54)
Info :
Eye placement: mark positions on round 14 at approximately 7-9 stitches in from each side of head center depending on desired gaze. For slitted safety eyes (20-24mm) place the center of each eye about 6-8 sts apart across the face horizontally and on round 14.
Round 15 :
(8 sc, 1 inc) x 6 (60)
Round 16 :
1 sc in each st (60)
Round 17 :
1 sc in each st (60)
Round 18 :
1 sc in each st (60)
Info :
Start stuffing head lightly now. Use small amounts of fiberfill at first to keep the face malleable for snout shaping. Add more stuffing as you close the head.
Round 19 :
(8 sc, 1 dec) x 6 (54)
Round 20 :
(7 sc, 1 dec) x 6 (48)
Round 21 :
(6 sc, 1 dec) x 6 (42)
Round 22 :
(5 sc, 1 dec) x 6 (36)
Round 23 :
(4 sc, 1 dec) x 6 (30)
Info :
Begin more firm stuffing for the top of the head and cheeks; keep the snout area slightly less filled so you can shape the muzzle and attach nose details later. Use your fingers to shape cheeks outward.
Round 24 :
(3 sc, 1 dec) x 6 (24)
Round 25 :
(2 sc, 1 dec) x 6 (18)
Round 26 :
(1 sc, 1 dec) x 6 (12)
Info :
Fasten off leaving a long tail (20-30 cm) for sewing the head onto the body. Finish stuffing through the opening before you close completely. Weave tail through remaining stitches and pull tight to close.
— Snout & Nose details :
Round 1 :
6 sc in magic ring (6)
Round 3 :
(1 sc, inc) x6 (18)
Round 4 :
1 sc in each st (18)
Round 5 :
(2 sc, dec) x6 (12)
Info :
Stuff lightly and sew snout to front center of head between rounds 12-16 using long tail. Add two small neon green bobble nostrils by embroidering or creating two 3-sc bobbles and sewing them centered on the snout tip.
— Eyes (safety or embroidered) :
Info :
If using safety eyes, insert them between rounds 13-15 about 6-8 stitches apart across the face depending on desired expression. Secure firmly with washers before stuffing further. If embroidering slits, use black embroidery yarn and satin stitch to create vertical pupils once the head is assembled.
— Horns (Make 2) :
Round 1 :
6 sc in magic ring (6)
Round 3 :
(1 sc, inc) x6 (18)
Round 4 :
(2 sc, inc) x6 (24)
Round 5 :
1 sc in each st (24)
Round 6 :
(3 sc, dec) x6 (18)
Round 7 :
(2 sc, dec) x6 (12)
Round 8 :
(1 sc, dec) x6 (6)
Round 9 :
Inc in each st (12) - begin to curve horn by working tighter rows
Round 10 :
(1 sc, inc) x6 (18)
Round 11 :
1 sc in each st (18)
Round 12 :
(2 sc, dec) x6 (12)
Round 13 :
(1 sc, dec) x4, 4 sc (8)
Round 14 :
1 sc in each st (8)
Info :
Stuff horns firmly and insert optional wire to help them stand. Leave a long tail for sewing and position on top of head angled slightly outward and forward. Horns are tapered but shaped to have a slight curve—use stitches to alter curve if required.
Round 15 :
Dec x4 (4) Fasten off leaving long tail for sewing
— Ear-fins / Side Spikes (Make 4 small ear/spikes pairs) :
Round 1 :
6 sc in magic ring (6)
Round 3 :
(1 sc, inc) x6 (18)
Round 4 :
1 sc in each st (18)
Round 5 :
(2 sc, dec) x4, 2 sc (14)
Round 6 :
1 sc in each st (14)
Info :
These tiny ear spikes are worked in main black then a contrasting neon green bobble worked on the outer edge: after finishing, join neon to edge and sc around one side for three stitches then work a bobble of 3 hdc in next st to create neon tip. Sew them along the head center/back rows behind ears and along upper skull rows.
Round 7 :
Dec until 6 remain, fasten off leaving tail for sewing
— Neck Join (worked as continuation on body assembly) :
Info :
When joining head to body, align the neck opening of the head (after closing last head rounds) with the top opening of the body. Use mattress stitch or whip stitch through both layers to create a secure seam. Sew evenly around to avoid gaps.
— Body :
Round 1 :
6 sc in magic ring (6)
Round 3 :
(1 sc, inc) x6 (18)
Round 4 :
(2 sc, inc) x6 (24)
Round 5 :
(3 sc, inc) x6 (30)
Round 6 :
(4 sc, inc) x6 (36)
Round 7 :
1 sc in each st (36)
Info :
At this stage the body is beginning to form. If you want the dragon to sit sturdily, consider adding a small bag of poly pellets at the base before you finish stuffing—place the pellets in a separate small fabric bag and insert into the bottom of the body while stuffing.
Round 8 :
1 sc in each st (36)
Round 9 :
1 sc in each st (36)
Round 10 :
1 sc in each st (36)
Round 11 :
(4 sc, inc) x6 (42)
Round 12 :
1 sc in each st (42)
Round 13 :
1 sc in each st (42)
Info :
Change to neon green for belly plates later. We'll work belly plates separately and sew them into a vertical column on the front of the body for a raised segmented look. Mark the center front stitches where belly plates will attach (approx 10-12 stitches wide depending on gauge).
Round 14 :
(5 sc, inc) x6 (48)
Round 15 :
1 sc in each st (48)
Round 16 :
1 sc in each st (48)
Round 17 :
1 sc in each st (48)
Round 18 :
(6 sc, inc) x6 (54)
Round 19 :
1 sc in each st (54)
Info :
Begin light stuffing at round 18-19 to give soft shape. Continue stuffing gradually as you finish body. Keep the front open for belly plate attachment and head sewing.
Round 20 :
1 sc in each st (54)
Round 21 :
1 sc in each st (54)
Round 22 :
(6 sc, dec) x6 (48)
Round 23 :
(5 sc, dec) x6 (42)
Round 24 :
(4 sc, dec) x6 (36)
Round 25 :
(3 sc, dec) x6 (30)
Round 26 :
1 sc in each st (30)
Round 27 :
1 sc in each st (30)
Round 28 :
(2 sc, dec) x6 (24)
Info :
Stop stuffing moderately; leave opening for attaching head. Body should be firm enough to sit upright but not rock-hard. Neck opening should remain flexible for sewing head seam evenly. Fasten off leaving long tail for sewing into head.
Round 29 :
(1 sc, dec) x6 (18)
Round 30 :
6 dec (6) Fasten off leaving long tail for closing bottom if you plan to close base - otherwise leave opening to slip in a weighted bag
— Belly Plates (Make 10 segments) :
Info :
Each plate is a short ridged oval worked in neon green using BLO to create a raised segmented look. Make about 10 plates of slightly decreasing size from top to bottom to fit across center front of body.
Plate Round 1 :
6 sc in magic ring (6)
Plate Round 2 :
Inc x6 (12)
Plate Round 3 :
(1 sc, inc) x6 (18)
Plate Round 4 :
1 sc in each st BLO (18)
Plate Round 5 :
1 sc in each st (18)
Plate Round 6 :
Dec x6 (12)
Plate Round 7 :
Fold slightly and fasten off leaving tail for sewing. Make 10 plates; reduce plate size gradually by working Plate Round 3 as plain (12) for the smallest two plates to create tapered look at top or bottom.
Info :
Sew plates centered to the front of the body from neck to lower belly, overlapping slightly. Use the long tail to stitch each plate around the edge to secure. A vertical column of 9-11 plates gives the segmented look shown in the image.
— Front Legs / Arms (Make 2) :
Round 1 :
6 sc in magic ring (6)
Round 3 :
(1 sc, inc) x6 (18)
Round 4 :
1 sc in each st (18)
Round 5 :
1 sc in each st (18)
Round 6 :
(3 sc, inc) x4, 2 sc (22)
Round 7 :
1 sc in each st (22)
Round 8 :
1 sc in each st (22)
Info :
Work palm/hand area roundy. When you reach the hand end, create three small claw tips by crocheting 3 separate tiny bobbles in neon on the fingertip area and sew them on. Stuff the hand firmly but leave arm tube hollow enough to sew to shoulder securely.
Round 9 :
(4 sc, inc) x4, 6 sc (26)
Round 10 :
1 sc in each st (26)
Round 11 :
1 sc in each st (26)
Round 12 :
(4 sc, dec) x4, 6 sc (22)
Round 13 :
1 sc in each st (22)
Round 14 :
(3 sc, dec) x4, 6 sc (18)
Round 15 :
1 sc in each st (18)
Round 16 :
(2 sc, dec) x4, 2 sc (14)
Round 17 :
1 sc in each st (14)
Round 18 :
(1 sc, dec) x4, 2 sc (10)
Round 19 :
1 sc in each st (10) Fasten off leaving long tail for sewing to body
Info :
Stuff hands and lower arms firmly and upper arms lightly. Sew arms to sides of body around rounds 14-18 of body for natural placement; use many small secure stitches and reinforce inside seam if child-safe toy.
— Back Legs / Feet (Make 2) :
Foot Round 1 :
6 sc in magic ring (6)
Foot Round 2 :
Inc x6 (12)
Foot Round 3 :
(1 sc, inc) x6 (18)
Foot Round 4 :
(2 sc, inc) x6 (24)
Foot Round 5 :
1 sc in each st (24)
Foot Round 6 :
1 sc in each st (24)
Info :
Work toe shaping by dividing the round into 3 sections to make visible toe bumps on the foot top. Later we add neon bobble claws by sewing small neon bobbles onto toe tips.
Foot Round 7 :
(3 sc, inc) x6 (30)
Foot Round 8 :
1 sc in each st (30)
Foot Round 9 :
(3 sc, dec) x6 (24)
Foot Round 10 :
(2 sc, dec) x6 (18)
Foot Round 11 :
(1 sc, dec) x6 (12)
Info :
Before closing the foot fully, insert a little more stuffing into the toe area and a small disk of felt or firm insert if you want the base to be stable. Sew neon bobble claws onto the top three toe areas and one at heel if you prefer the look in the photo.
Foot Round 13 :
Fasten off leaving long tail for sewing. Repeat for second foot.
— Tail :
Round 1 :
6 sc in magic ring (6)
Round 3 :
(1 sc, inc) x6 (18)
Round 4 :
(2 sc, inc) x6 (24)
Round 5 :
1 sc in each st (24)
Round 6 :
1 sc in each st (24)
Round 7 :
(3 sc, inc) x6 (30)
Round 8 :
1 sc in each st (30)
Round 9 :
1 sc in each st (30)
Round 10 :
(4 sc, inc) x6 (36)
Round 11 :
1 sc in each st (36)
Round 12 :
1 sc in each st (36)
Round 13 :
(4 sc, dec) x6 (30)
Round 14 :
(3 sc, dec) x6 (24)
Round 15 :
(2 sc, dec) x6 (18)
Round 16 :
(1 sc, dec) x6 (12)
Info :
Stuff tail more densely at the base and lightly toward the tip to help the dragon sit upright and the tail to curl. Attach spikes along the top of the tail before final shaping—see spike instructions below. Fasten off leaving long tail for sewing to body.
— Tail Spikes / Bobbles (Make 14-16) :
Round 1 :
6 sc in magic ring (6)
Round 3 :
1 sc in each st (12)
Round 4 :
Attach neon and work 3 hdc into next st to create bobble, sl st to close bobble. Fasten off leaving tail for sewing (bobble size may vary).
Info :
Make 14-16 bobble spikes, sew them centered along the tail top with equal spacing. Use smaller spikes decreasing toward tail tip to match reference. Secure each spike firmly with multiple passes of yarn tail.
— Wing bones (Make 2, black raised ridges) :
Wing bone Round 1 :
Ch 30, sc in 2nd ch from hook and across (29)
Wing bone Round 2 :
Turn, ch1, sc across (29)
Wing bone Round 3-18 :
Repeat sc across to create a firm cord. For 3 raised bones per wing make three cords of the same length; sew them spaced evenly across the wing membrane later
Info :
Optionally stuff the cord lightly or insert wire for rigidity before sewing onto wing membrane. The raised bones in the photo are black and thin; keep them narrow and slightly padded if desired.
— Wing Membrane (Make 2) :
Membrane Round 1 :
Using neon green, ch 2, 6 sc in second ch from hook (6)
Membrane Round 2 :
Inc x6 (12)
Membrane Round 3 :
(1 sc, inc) x6 (18)
Membrane Round 4 :
(2 sc, inc) x6 (24)
Membrane Round 5 :
1 sc in each st (24)
Membrane Round 6 :
1 sc in each st (24)
Membrane Round 7 :
Work 3 more increasing rows to create a slightly triangular/rounded wing panel; shape: (3 sc, inc) x6 (30)
Membrane Round 8 :
1 sc each st (30)
Membrane Round 9 :
Continue shaping rows alternating (3 sc, inc) and (4 sc, inc) creating a taper to approximate wing shape. Work until membrane reaches desired size — about 12-14 rows total from start (approx 30-46 sts across widest).
Info :
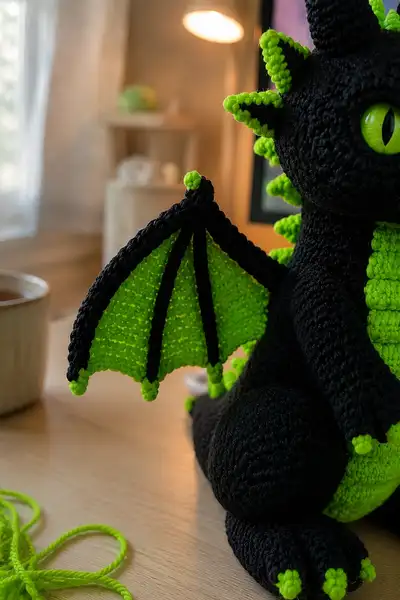
Edge finish: switch to black yarn and sc around the entire membrane in BLO to create a defined rim that frames the bright green. Attach wing bones (black cords) on top of neon membrane using mattress stitch and then sew bone ends to the wing root.
Membrane Round 10-12 :
Finish shaping and sc around edge in black to create frame. Make 2 mirror wings.
Info :
For the three black "finger" ridges seen on each wing, lay the black cords onto membrane and sew along both edges. Add a small neon bobble at each wing tip and at the three tip points as in image for the dotted effect.
— Wing tip bobbles (Make 6 small neon bobbles) :
Round 1 :
Ch 2, work 3 hdc in 2nd ch, sl st to join; fasten off leaving tail for sewing
Info :
Sew bobbles to wing points and at bone termini to match photo. This provides bright neon highlights on each wing tip.
— Dorsal Spikes (Make 8-10 medium spikes) :
Spike Round 1 :
6 sc in magic ring (6)
Spike Round 2 :
Inc x6 (12)
Spike Round 3 :
1 sc each st (12)
Spike Round 4 :
Join neon and sc across one edge to create neon tip row (3 sc then bobble), fasten off leaving tail
Info :
Sew these larger spikes along the top of the head and down the back from neck to tail root. Size them largest near neck and reduce slightly toward tail. Space them evenly and secure tightly with multiple passes.
— Claw bobbles / small neon tips (Make 12-15) :
Round 1 :
Ch2, 3 hdc in 2nd ch from hook, sl st to close (3-hdc bobble)
Info :
Sew these small neon bobbles to toe tips, hand tips and wing tips as little neon nails as shown in the reference image.
— Assembly Notes :
Info :
Before sewing pieces together, weave in all tails close to pieces but leave long tails on head, body, limbs, and tail for reliable sewing. Pin pieces in place and check symmetry. Use whip stitch or mattress stitch for a neat seam. Add extra reinforcing stitches at points that will bear weight.
— Final Embellishments :
Info :
Embroider eyelid shading and thin slits if you did not use slitted safety eyes. Add small embroidered nostril highlights and any small facial expression marks using matching yarn. Consider lightly felting or brushing to remove fuzz if desired; otherwise keep crisp amigurumi look.
This spooky neon dragon brings together bold contrast and playful details for a truly memorable amigurumi companion. Every stitch adds character—from the slitted eyes to the bobbled dorsal spikes and segmented neon belly. The result is a striking, poseable friend you'll be proud to display or gift. 🧶🖤💚 Happy crocheting and have fun customizing your dragon's expression and colors!