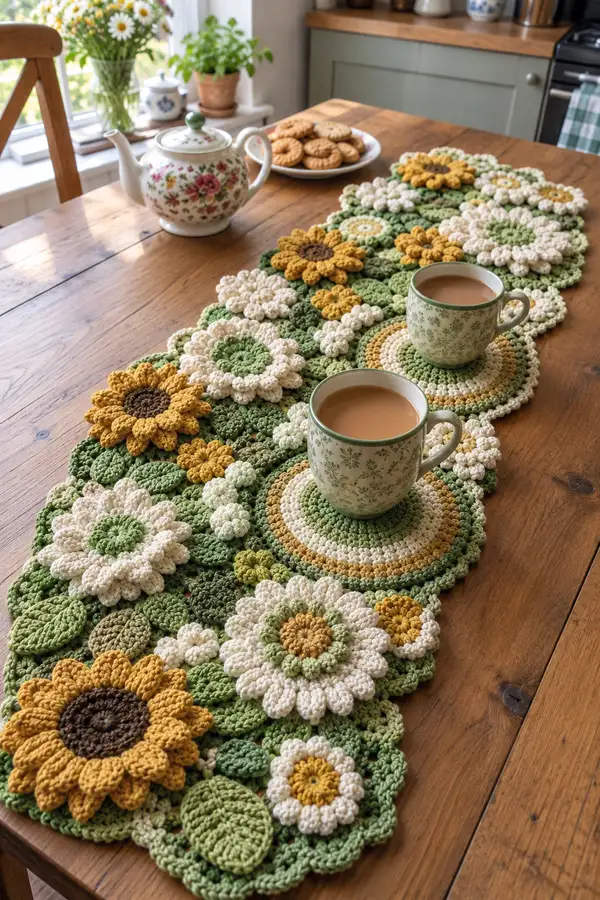
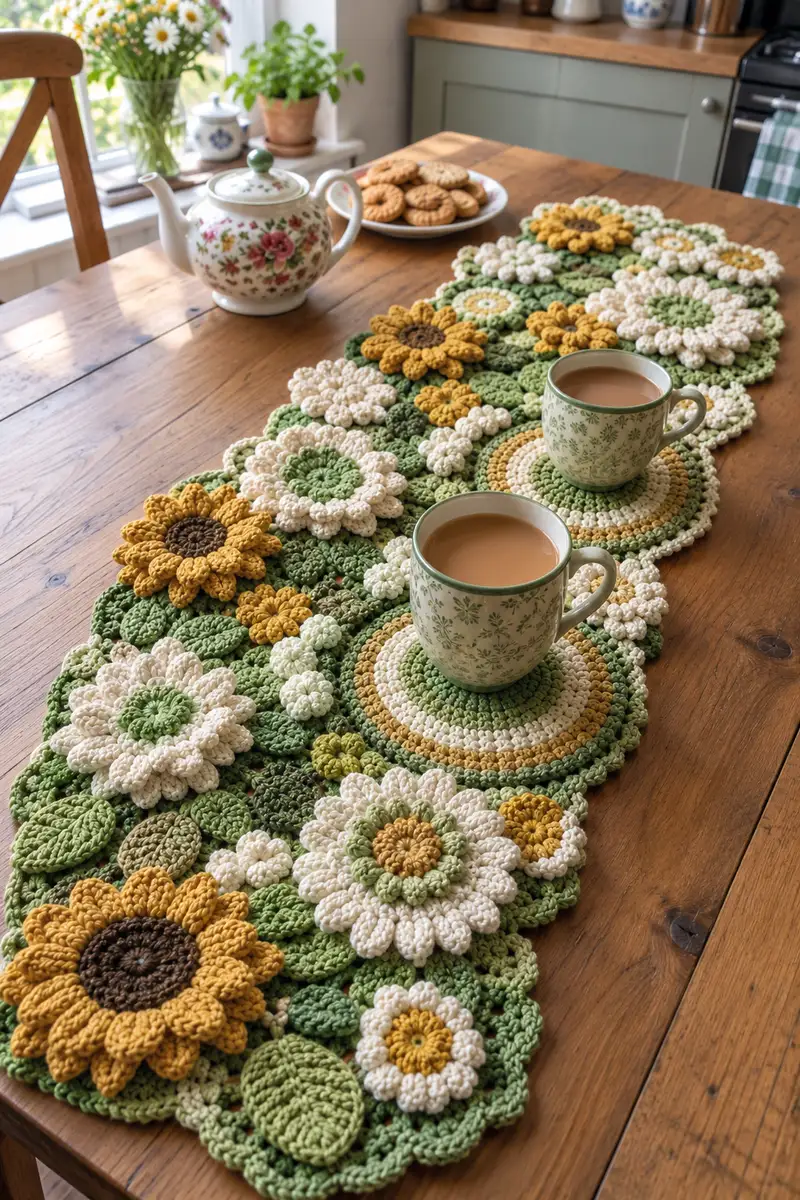
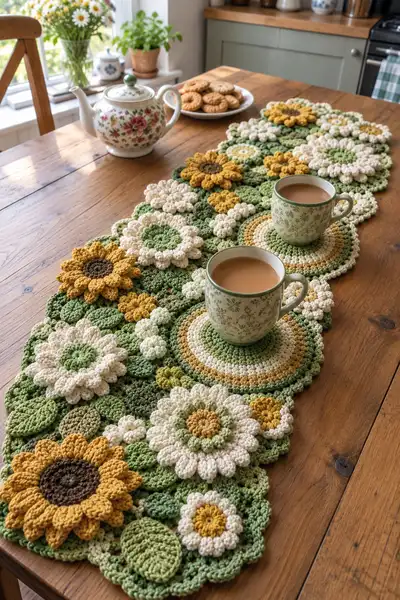
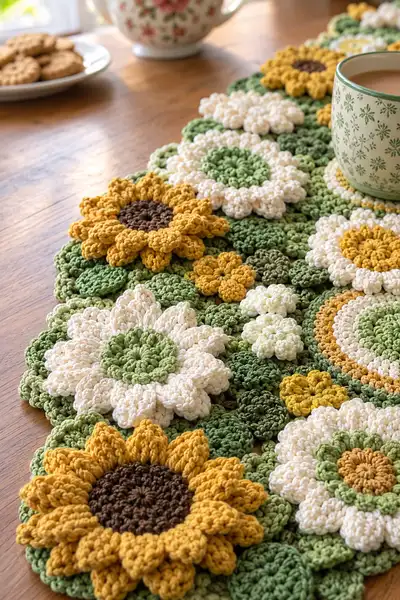
Create a gorgeous floral table runner built from layered round coasters, textured daisies, sunflowers and leafy fillers. This pattern combines puff petals, layered discs and linked leaf motifs in warm mustard, cream and three shades of green to create a dimensional table centrepiece. The design is modular so you can scale length and rearrange motifs to suit your table. Detailed stitch-by-stitch instructions, color-changing tips and finishing notes included.
Progress Tracker
0% Complete
— Coaster Base (Large Round Motif) :
Round 3 :
(1 sc, inc) x 6 (18)
Round 4 :
(2 sc, inc) x 6 (24)
Round 5 :
(3 sc, inc) x 6 (30)
Round 6 :
(4 sc, inc) x 6 (36)
Info :
Change to your coaster main color now if working multi-color rings. Maintain even tension and use a stitch marker to mark round starts.
Round 7 :
(5 sc, inc) x 6 (42)
Round 8 :
(6 sc, inc) x 6 (48)
Round 9 :
1 sc in each st (48)
Round 10 :
1 hdc in each st (48)
Round 11 :
1 dc in each st (48)
Info :
To create the ringed coaster look, change color after R10; fasten off and weave in ends neatly on the wrong side. These rounds give a stable, slightly raised base for layered flowers.
Round 12 :
Working in FLO: 1 sc in each st FLO (48) — creates a subtle ridge for petals to sit against
Round 13 :
Begin decorative join: (3 ch, skip 2, sl st) around alternately to create small picot edging (16 loops) — optional (48)
Info :
Fasten off leaving a long tail for sewing if you plan to attach the base to other motifs during layout. Make as many coaster bases as you need for your runner layout (photo shows 3 large coaster discs spaced along length).
— Large Daisy Motif :
Round 3 :
(1 sc, inc) x 6 (18)
Round 4 :
(2 sc, inc) x 6 (24)
Round 5 :
(3 sc, inc) x 6 (30)
Info :
These rounds form the center disc of the daisy. Use a contrasting center color (light green in photos). Keep tension moderate — this disc should sit slightly raised.
Round 6 :
1 sc in each st (30)
Round 7 :
(4 sc, inc) x 6 (36)
Round 8 :
1 sc in each st (36)
Round 9 :
Petal foundation: *ch 3, skip 2, sl st in next st* rep around to create 12 loops (12)
Round 10 :
Petals row 1: In each loop work (ch 2, 3-trpuff, ch 2, sl st) — 12 petals (12 large petals)
Info :
Trpuff: Yarn over twice, insert hook, yarn over pull up loop, repeat 3-4 times, yarn over and pull through all loops, ch 1 to close. Practice puff height to match other motifs.
Round 11 :
Secure petals: sl st into base st between petals, *sc 3 in base, sl st between petals* rep to secure petal bases (36)
Round 12 :
Optional second petal round: Working behind first petals, join yarn at back and make same petal sequence to create double-layer (12 petals) — attach with sl st (12)
Round 13 :
Finish center: From front, embroider a small raised ring using sc around base center or make a small puff round — (1 round to shape)
Info :
Fasten off and leave a 30cm tail to sew motif to coaster base or background. Use the tail to stitch through the coaster base and secure firmly. Block gently to shape petals outward.
— Sunflower Motif (Double Petal) :
Round 3 :
(1 sc, inc) x 6 (18)
Round 4 :
(2 sc, inc) x 6 (24)
Round 5 :
(3 sc, inc) x 6 (30)
Round 6 :
(4 sc, inc) x 6 (36)
Info :
Work these rounds in brown for a sunflower centre. A dense center helps petals stand out. You may use dc in the last 1–2 rounds to raise the centre slightly.
Round 7 :
1 sc in each st (36)
Round 8 :
Switch to mustard color. Foundation for petals: *ch 3, skip 2, sl st in next st* — rep around to make 12 petal loops (12)
Round 9 :
Petal row 1: In each loop work (ch 2, 3-puff, ch 2, sl st) — 12 outer petals (12)
Round 10 :
Petal row 2 (inner set): Join in between outer petals on the centre disc and work (ch 2, 3-puff, ch 2, sl st) to create a staggered inner petal set of 12 (12)
Round 11 :
Secure petals: From the back, sc around petal bases to lock shape (36)
Round 12 :
Reverse surface crochet: sl st around petal edges to accentuate shape (36)
Info :
To create the deeply cupped sunflower look, pull petals slightly forward when sewing onto a flat base, and stitch through the centre to hold shape. Add a second round of short petals if you want a fuller sunflower.
Round 13 :
Optional decorative rim: 1 sc in each st (36) — tidy edge for sewing
Round 14 :
Fasten off leaving long tail to sew. Weave in short ends on the wrong side.
— Small Puff Flower (Cluster) :
Round 3 :
Petal formation: *ch 2, 3-puff in next st, sl st in next* rep around to form 6 petals (6)
Round 4 :
Sl st between petals to tidy (12)
Round 5 :
Optional: Add a tiny centre puff by making 5 dc into centre and closing with sl st (1 tiny centre)
Info :
Small flowers are great to plug gaps. Use cream or mustard for these and make many — they are quick and modular.
Round 6 :
Fasten off leaving sewing tail.
— Leaf Motif (Flat Oval Leaf) :
Round 1 :
Ch 8, sc in 2nd ch from hook, hdc in next, 2 dc in next, (tr in next) 2 dc in next, hdc in next, sc in next, 3 sc in last to turn and work down the opposite side: sc in next, hdc in next, 2 dc in next, tr in next, 2 dc in next, hdc in next, sc in last, sl st to first sc — leaf shaped oval (18)
Round 2 :
Working around edge: *sc in next 3, hdc in next 2, dc in next 4, hdc in next 2, sc in next 3* adjust to shape evenly (total stitches 20–22 depending on spacing)
Round 3 :
Vein row: Using a contrasting green, work fpdc down the centre spine on right side (6 fpdc), then repeat on left side from back for subtle veining
Info :
Leaves can be made in three sizes by changing starting chain length: ch6 for a small leaf, ch10 for a longer leaf. Block leaves gently to create a flat but curved shape that sits naturally around flower bases.
Round 4 :
Fasten off leaving long tail for sewing the leaf into the runner layout.
— Mini Round Filler Motif :
Round 3 :
1 sc in each st (12)
Round 4 :
Optional puff cluster: *ch1, 3-puff in next, sl st* rep around to add texture (6)
Info :
Make dozens of these in various greens to fill gaps. They are quick and give a pebble-like background that helps the larger motifs sit securely.
Round 5 :
Fasten off, leave tail for joining.
— Joining and Runner Construction :
Round 1 :
Plan layout: arrange coaster bases, large daisies, sunflowers, filler discs and leaves on flat surface. Keep balance of color and size; typical layout repeats pattern: small leaf clusters, large daisy, coaster, sunflower, daisy, etc.
Info :
Use pins to hold motifs in place on a foam board or thick towel. Photograph your layout to remember placement before sewing. Leave 1–2 stitches gap between motifs for slip-stitch join textures.
Round 2 :
Join motifs pairwise: With right sides up, place motif A against motif B so edges slightly overlap. Using tail from one motif and yarn needle, mattress stitch or whip stitch around 8–12 points to tack them together — do not fully close; join only where edges meet (approx 8–12 small straight stitches per join)
Round 3 :
Once pairwise joins are complete, use a joining round of sc to unify seams: Join working yarn at an inside edge and sc through both motif edges around each joining point; work evenly to maintain shape.
Round 4 :
Link filler discs: Between larger motifs, place mini filler discs in the gaps. Use a 3-chain bridge and sl st into both neighbor motifs to anchor each filler disc at 2–3 points for stability.
Round 5 :
Stitch security: For high-use areas (beneath cups or teapots), reinforce joins by working an additional round of sc through both layers focusing on points beneath heavy items.
Info :
When joining using slip-stitch, keep tension slightly loose so the runner lies flat — too tight joins will pucker. Use a blunt tapestry needle to sew heavier seams where needed.
Round 6 :
Surface crochet connectors: With a contrasting green, work surface sl st lines between centers of adjacent large flowers to give an organic vine effect. This is worked on the surface with the needle or hook and helps stabilize motif spacing.
Round 7 :
Fill gaps: Place leaves and small puff flowers in gaps and sew down with a few sturdy stitches per piece (4–6 stitches each). Tuck leaf stems under nearby petals for a natural look.
Round 8 :
Edge reinforcement round: Working through both layers around the outermost edge, sc evenly spaced stitches to create a continuous edge foundation. Aim for 3–4 sc per inch depending on yarn to create an even edge.
Round 9 :
Check alignment: Lay runner flat and check for twists or bulges. Adjust sewn joins by unpicking small sections if necessary before the final edging rounds.
Round 10 :
Fasten off and weave in any remaining long tails, but leave the outer edge prepared for the scalloped edging round.
Info :
The joining stage is the most time-consuming. Work in small sections and test the runner on your table frequently to ensure the motif density looks balanced. Take photos to compare both ends for symmetry.
Round 11 :
Optional stabilization: If runner will see heavy use, stitch a lightweight, interfacing-style fabric on the underside with fabric glue or tiny hand stitches to reduce stretching. Do not cover the entire underside if you want a fully crochet look.
Round 12 :
Start outer foundation round: With main leaf green, join yarn at a midpoint edge and sc evenly around outer perimeter of runner joining through both sides of the outer motifs as needed (estimate 240–320 sc depending on runner size)
Round 13 :
(sc 4, skip 1) repeat around to soften edge and create scallop anchor points — maintain even count to keep pattern symmetrical
Info :
Keep good notes during the first perimeter round about stitch counts and repeats. This will make the final scalloped shell placement symmetrical at each end of the runner.
Round 14 :
Even round: 1 sc in each st (same total as previous round) to produce an even foundation (240–320)
Round 15 :
Prepare scallop repeats: Mark every 6th stitch with a removable marker for shell placement — adjust if your count differs to spread shells evenly around perimeter.
Round 16 :
Start shell scallops: *In marked stitch work (2 dc, ch 2, 2 dc), sl st in next 2 unmarked stitches* rep around to create airy shell scallops
Round 17 :
Reverse scallop neatness: Work 1 sc in each dc and ch2 space to tidy shells (same total as foundation)
Info :
If the runner edge begins to pull in or flare, adjust shell size (work smaller shells on crowded areas or add an extra sc between shells). Blocking after edging helps set the scallops.
Round 18 :
Decorative picot row: *ch 3, sl st into base of chain to form picot, sl st next 3 stitches* rep around for delicate finish
Round 19 :
Final tidy round: 1 sl st in each st to flatten and tidy the edge. Fasten off and weave in ends securely.
Round 20 :
Blocking: Pin runner to shape on foam and steam or wet-block gently to set petals outward and scallops even. Allow to dry completely.
Info :
For reversible look, sew down appliques slightly less on one side to keep underside cleaner. Always hide tails toward the back of petals or under leaves to maintain a neat front appearance.
— Scalloped Edge and Finishing :
Round 1 :
Edge foundation: Join color at any midpoint on long edge and sc evenly around the entire perimeter through the sc foundation established earlier (maintain same total)
Round 2 :
Even round: 1 sc in each st (same total) — this evens out any gaps and provides a solid band for scallops
Round 3 :
Scallop 1: *skip 2, 5 dc in next st, skip 2, sl st* rep around (shell spacing determined by previous markers)
Round 4 :
Tidy scallops: 1 sc across the top of each shell and 2 sc in the small spaces between shells to anchor them (maintain same shell count)
Info :
For a softer scallop, use hdc shells (5 hdc instead of 5 dc). Pick whichever shell height complements your motif scale.
Round 5 :
Optional braided rim: *ch3, sl st in next sc, ch3* around on top of scallops to create a delicate chain rim; fasten off
Round 6 :
Final weaving: Weave all tails to the wrong side with tapestry needle following curves and petal seams. Trim ends closely but not flush to avoid slippage.
Round 7 :
Spot clean: Gently hand-wash with mild soap and lay flat to dry to keep fibers vibrant. Avoid hot water which can shrink cotton yarn.
Info :
Display tip: Place heavy items (teapot) over coaster discs to keep sections lying flat. Rotate runner occasionally to prevent wear on one section.
Round 8 :
Final inspection: Check all joins for security. Add a few reinforcing stitches to any loose petals or fillers and re-block if necessary.
Round 9 :
Gift finishing: Add a small tag sewn to the back with yarn stating fiber content and care instructions if gifting the runner.
Info :
All motifs in this pattern are modular — you can increase or decrease counts to lengthen/shorten the runner. Keep the same proportion of large motifs to filler pieces to retain the balanced look.
This floral runner brings a sunny, handcrafted accent to any table — the puff petals and layered discs create luxurious texture and a cozy garden feel. Each motif is a little celebration of color and form, and I love how the modular build lets you change the layout to suit your home. Make one for your own table or gift it to someone who loves warm, handmade details. Happy stitching and enjoy the sunny vibes! 🌼🧶