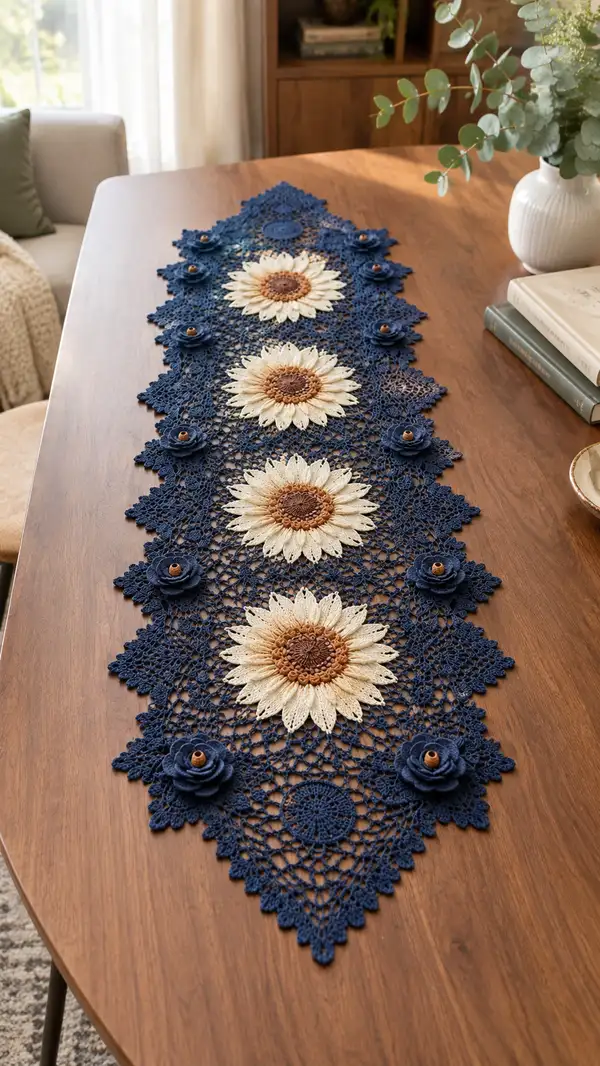
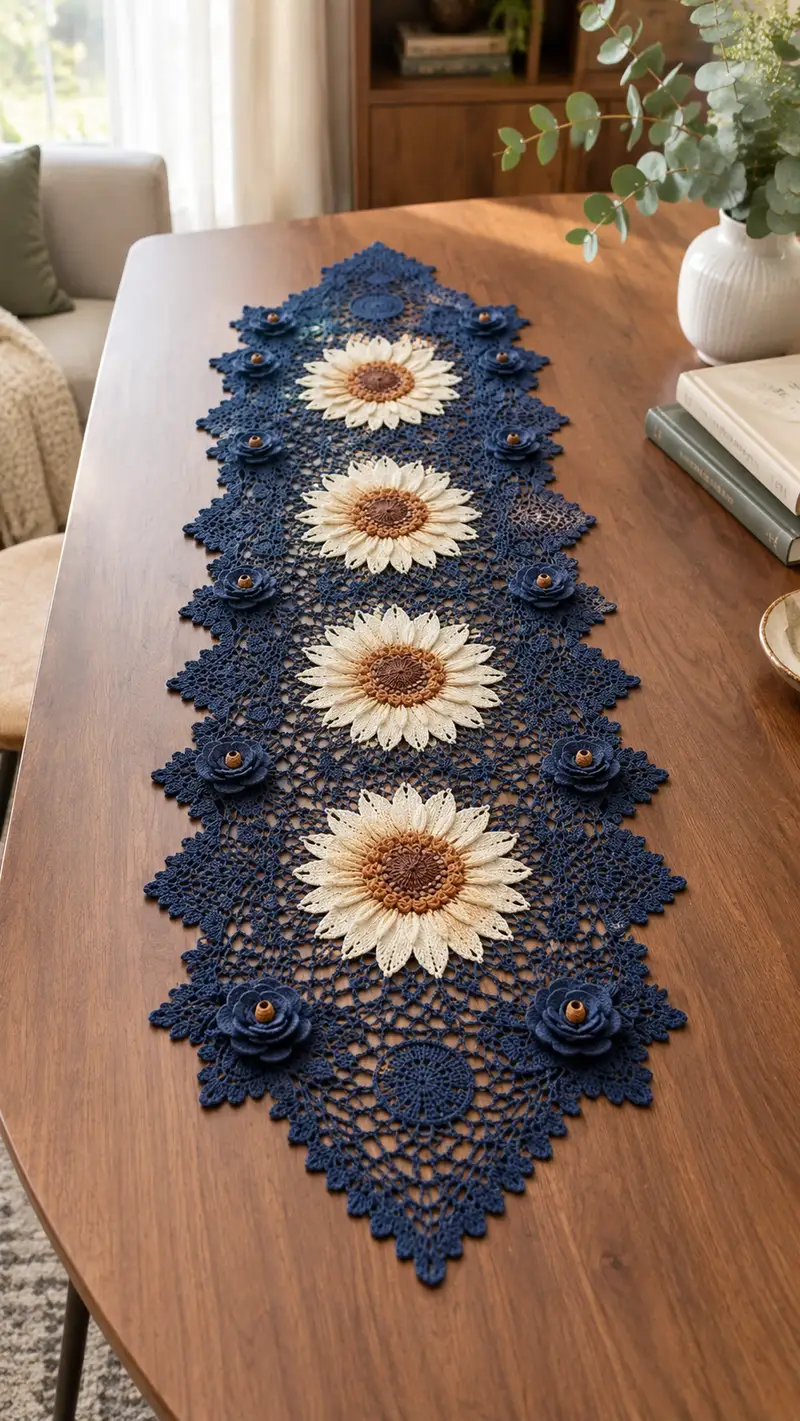
A beautifully detailed table runner featuring three large cream sunflowers set into a navy lace background with delicate corners and small navy rose embellishments. The design balances bold floral centers with airy crocheted lace for an elegant, vintage-inspired look. Perfect centerpiece for dining or console tables, this runner combines textured petals, layered centers, and openwork join-as-you-go panels. The pattern includes motif construction, floral details, and a decorative scalloped edging for a polished finish.
Progress Tracker
0% Complete
— Sunflower Center (Make 3) :
Round 1 :
6 sc in magic ring (6)
Round 3 :
(1 sc, 1 inc) x 6 (18)
Round 4 :
(2 sc, 1 inc) x 6 (24)
Round 5 :
(3 sc, 1 inc) x 6 (30)
Round 6 :
(4 sc, 1 inc) x 6 (36)
Round 7 :
(5 sc, 1 inc) x 6 (42)
Round 8 :
(6 sc, 1 inc) x 6 (48)
Info :
Switch to warm brown yarn now for a textured center. The center will remain a flat disc that will later be overlaid by a small raised crochet bobble round to emulate seeds.
Round 9 :
1 sc in each st (48)
Round 10 :
1 sc in each st (48)
Round 11 :
Make texture round: *(6 sc, 1 bobble) repeat to end* to create six bobble groups (48). Work a bobble as 5 dc cluster in same st, close and sl st to top — counts as one stitch.
Info :
When working bobbles, work them into every 7th stitch approximately to space 6 textured groups around the center. The overall stitch count remains 48.
Round 12 :
1 sc in each st (48)
Round 13 :
1 sc BLO in each st (48)
Info :
Fasten off warm brown. Leave a long tail if you will blanket-stitch later to secure the center onto the petal ring. Optional: add a tiny dab of textile glue to hold bobbles in place while assembling.
— Sunflower Petal Base Ring (tan/peach) :
Round 1 :
Join tan/peach yarn to any st of the center, ch1, 1 sc in same st, ch3, sk 1, *(1 sc, ch3, sk 1) repeat around to create 24 ch-loops (24 sc with 24 ch-3 loops)
Info :
These ch-3 loops form the anchoring points for petals. Count carefully; you should have 24 petal anchors spaced evenly around the center.
Round 2 :
*Into each ch-3 loop: (sc, hdc, 5 dc, hdc, sc) — forming a tall petal*. Repeat in each loop (24 petals). Fasten off tan/peach but leave tails for stitching to center if desired.
Info :
Each petal uses 9 stitches across the loop (sc + hdc + 5 dc + hdc + sc). The petals are worked in one round each so the stitch count around the base remains 24 anchor stitches.
Round 3 :
Light shaping row: Join cream yarn behind petals and sc evenly along the base of petals around (24 sc) to lock petals upright and create a ridge for the second petal layer.
Info :
Ensure all petals are pointing outward and gentle blocking at this stage can flatten and shape each petal to a consistent curve.
— Second Petal Layer (Cream) :
Round 1 :
On top of the first petals, create anchored loops for second layer: *ch4, sl st into the base between first-layer petals, ch4, sk 1 base st* repeat 24 times creating 24 ch-4 loops.
Info :
The second layer sits slightly staggered between the first petals to create fullness. Pin petals lightly when blocking to keep spacing regular.
Round 2 :
Work into each ch-4 loop: (sc, 2 hdc, 7 dc, 2 hdc, sc) to create larger, fuller petals (24 petals). Fasten off and weave in ends.
Round 3 :
Optional finishing: slip stitch around petal tips with cream to create a subtle ridge if desired (24 sl st).
Info :
If you want sharper petal points, use a small amount of fabric stiffener and shape petals with pins while drying.
— Small Inner Seed Ring (Optional, Brown) :
Round 1 :
With darker brown, work a small decorative ring that will sit on top of the textured center: mr, 8 sc in ring (8)
Round 2 :
(1 sc, inc) x 8 (12)
Round 3 :
1 sc in each st (12). Fasten off. Sew centered onto warm brown disc to increase seed texture contrast.
Info :
These small added rounds are purely decorative and optional; sew them in place with matching brown thread using small whip stitches into the center disc and tack down at a few points to make the seed cluster stable.
— Navy Lace Diamond Motif (Make 8, join-as-you-go) :
Round 1 :
mr, ch3 (counts as first dc), 11 dc into ring, sl st to top of ch3 to form a 12-dc small disc (12)
Round 2 :
Ch5 (counts as tr+ch2), *tr in next st, ch2* around to create 12 tr separated by ch2 (12 tr, 12 ch-2 sps)
Round 3 :
*Into each ch-2 sp: (sc, ch5, sc) creating 12 large loops around the disc. Sl st to join.* (12 sc anchors, 12 ch-5 loops)
Info :
These ch-5 loops will form the foundation for subsequent openwork; keep tension even so loops are uniform.
Round 4 :
Working into each ch-5 loop: *sc, hdc, (3 dc, ch3, 3 dc) , hdc, sc* creating petal-like open arches; repeat 12 times (12 arches)
Round 5 :
Between each arch, ch3 and sl st to the base chain to form chain bridges: *(ch3, sl st into top of next arch) repeat* forming 12 chain bridges.
Info :
At this stage your motif will begin to look like a lacy rosette. Use a blocking board to smooth arches before continuing.
Round 6 :
*Into each arch top: 3 dc, ch2, 3 dc forming mini shells; sl st to next arch top*. (12 shells)
Round 7 :
Ch4, *sk shell, sc into space between shells, ch3* around to create a delicate mesh; join. (12 sc, 12 ch-3 sps)
Round 8 :
Into each ch-3 sp: (sc, ch5, sc). This opens the motif further for later joining. (12 loops)
Round 9 :
Work a round of alternating sc and ch4 around the outer edge to create 48 anchor points for the lace network. (48 anchors)
Info :
This motif is designed with 48 outer anchors to mathematically align with the adjoining mesh so that join-as-you-go points fall evenly between motifs.
Round 10 :
Openwork round: *(ch6, sl st into 3rd anchor ahead) repeat* to produce diagonal chain lines across sides; keep stitches symmetrical so diamonds will join neatly (48 ch-6 segments).
Round 11 :
Reinforce joins with sc around the chainwork: 1 sc in each anchor and 1 sc in each chain turning point (maintain 48 main sc anchors but multiple sc may be used for reinforcement).
Round 12 :
Create scallop picot edging along the four triangle points that will become the diamond corners: *(5 sc, picot) around each point to create 4 dramatic points.*
Info :
Fasten off leaving long tails for join-as-you-go sewing along the diamond edges. Make eight of these motifs: they will be positioned alternating with the sunflower medallions to form the runner length.
— Corner Triangle Fillers and Small Circular Medallions (Make 6 small circles) :
Round 2 :
(1 sc, inc) x 5 (15)
Round 3 :
1 sc in each st (15)
Round 4 :
Slip stitch into a neighbor point and ch6 forming connector loop; fasten off leaving tail for join. These small medallions fill diamond corners and balance open lace spaces.
Info :
Create six of these small medallions to slip into the lattice intersections where necessary; they help the runner lie flat and give visual weight near edges.
— Navy Layered Rose Embellishment (Make 6) :
Round 1 :
Ch21, sl st to first ch to form a loop (or work a mr with 21 sc). For a tighter rose, mr, 12 sc in ring then continue.
Round 2 :
Row-based spiral: *Working along the chain strip: inc in next st, 2 sc in next, 3 hdc in next, 3 dc in next, 4 dc in next, sl st across next 3 sts, reverse the pattern to form petal outlines*. Continue along chain to end, creating a long scalloped strip.
Round 3 :
Roll the strip into a spiral, sewing or sl st at the base every 3-4 turns to hold petals in place. Create 6 roses total. Fasten off and weave in ends. Glue a 10–12mm wooden bead into each rose center and secure with a few sew stitches.
Info :
The strip may be made into 3 or 4 tiers of petals depending on desired fullness. Use slightly tighter tension to keep the rose from unfurling. Sew the rose base down to the lace motif later at specified positions.
— Large Lace Mesh Join Rounds (Work as you join motifs) :
Info :
The runner is assembled from repeating units: Sunflower medallion, diamond lace motif, small medallion, diamond lace motif, sunflower medallion, and repeat. The join-as-you-go method uses sl st and sc joins at each motif's outer anchor points to create a continuous mesh. Plan motif layout before joining.
Round 1 :
When joining two motifs, lay them right sides together at the points to be joined. Insert hook through anchor st of first motif, then through corresponding anchor of second motif, pull up a loop, ch1 and sl st to secure. Repeat at every anchor along the join (typical join uses every 3rd or 4th anchor depending on motif spacing).
Round 2 :
After initial sl st join row, work a reinforcement row on the right side: 1 sc into each sl st join and 1 sc into the next untouched anchor, creating a neat seam that looks like part of the lace (stitch count will vary but roughly maintain 48 anchor count per motif side).
Info :
Do not pull joins too tight; allow a bit of give so the lace does not pucker. Pin motifs flat as you join to ensure alignment and even tension across the runner.
Round 3 :
Extend mesh across between motifs by creating chain arches: *from a sl st join point ch6 and sl st into corresponding ch loop of adjacent motif to create diagonal mesh*. Repeat across all spaces to produce the open net seen in the photograph.
Info :
The mathematical relationship between motif anchors (48 per motif edge) helps the ch-arches fall into consistent positions; if your stitch counts differ slightly, adjust chain lengths (ch5 or ch7) to maintain even spacing visually.
— Outer Scalloped Edge and Pointed Corners :
Round 1 :
With navy, work 1 sc evenly around the entire runner edge, working 3 sc into every stitch at corner points to reinforce them. This forms a tidy base for the scallop round.
Round 2 :
Scallop round: *(5 dc, ch3, 5 dc) into next anchor to create a large scallop, skip 3 sts, sl st into next* repeat around to form large scallops between the diamond points.
Round 3 :
Picot finishing: Into each scallop peak work (sc, ch3, sl st into same st) creating small picot points for a delicate lace edge. Fasten off and weave in ends.
Info :
Block runner flat, pinning each scallop precisely to make the scallops even. Use steam or spray blocking for best result with cotton thread.
— Attaching Sunflowers and Roses :
Info :
Position each finished sunflower medallion at the three main centers across the runner length. The photo shows three sunflowers evenly spaced from one end to the other with diamond motifs between them. Pin each sunflower to the navy lace so petal tips slightly overlap adjoining mesh for a natural look.
Round 1 :
Sew sunflower center (brown disk) to the navy lace by mattress stitching the brown disc tail to the navy mesh at the intended center point. Then tack the tan petal ring's base every 8–10 stitches with small whip stitches to anchor petals. Finally whip-stitch the cream petal bases into the surrounding mesh every few points to secure edges.
Info :
Use matching thread for discrete seams. Secure petals at multiple places around the circumference but avoid flattening petals—only secure the petal bases near the mesh so petals remain dimensional.
Round 2 :
Sew navy roses at the positions indicated in the photograph: each diamond corner adjacent to the sunflowers and near ends. Secure wooden bead centers by sewing through rose base and bead multiple times to fasten bead firmly to rose and runner.
Info :
Where the rose meets lace, weave the mounting thread underneath mesh loops and tie firmly, then hide the knot beneath the bead center. Use a drop of clear-drying craft glue for permanent holds if the runner will be handled frequently.
— Finishing and Blocking :
Info :
Once all motifs are joined and floral embellishments attached, block the entire runner. Wet-block by pinning each motif to a foam board, arranging scallops and points precisely. Allow to dry completely and remove pins. Edge may be lightly starch-treated for extra body.
Round 1 :
Final inspection: check for loose ends, weave tails through 2–3 motifs away to hide, snip close. Ensure bead attachments are secure; reinforce with additional thread stitches if needed.
Info :
Store flat to maintain shape. If you need more rigidity for seasonal display, lightly spray with fabric starch and pin into desired shape until dry.
Completing this Sunflower Lace Table Runner feels like creating a small textile heirloom—each motif, petal, and picot scallop contributes to a luminous centerpiece that will be admired for years. The combination of bold sunflowers and airy navy lace makes a dramatic yet refined statement on any table. I hope you enjoy the rhythmic repetition of motifs and the satisfying final blocking that brings everything together. Happy stitching and may this runner brighten many meals and gatherings! 🧶🌻