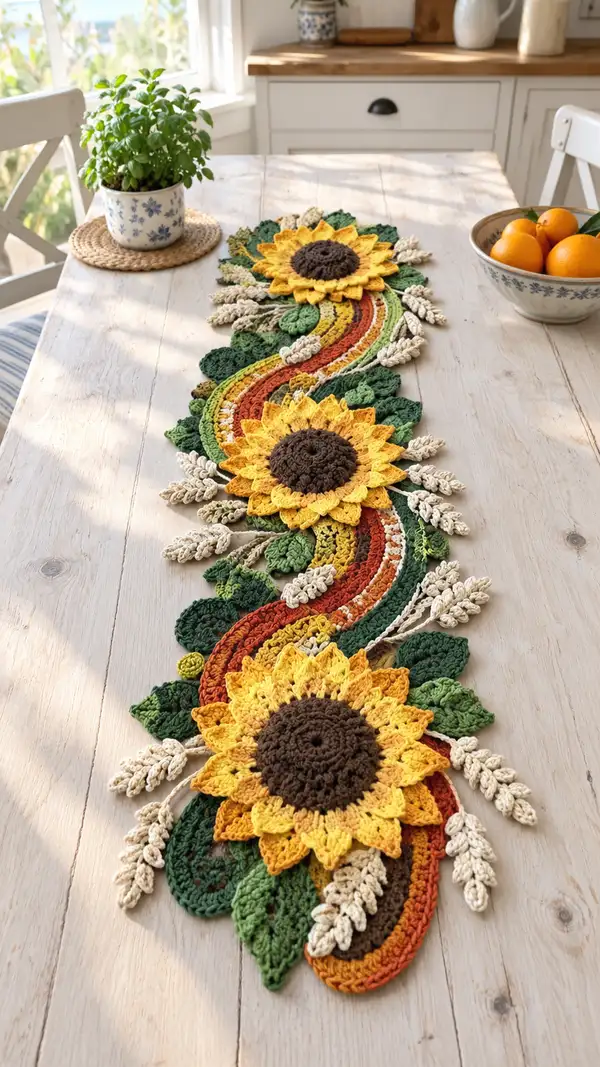
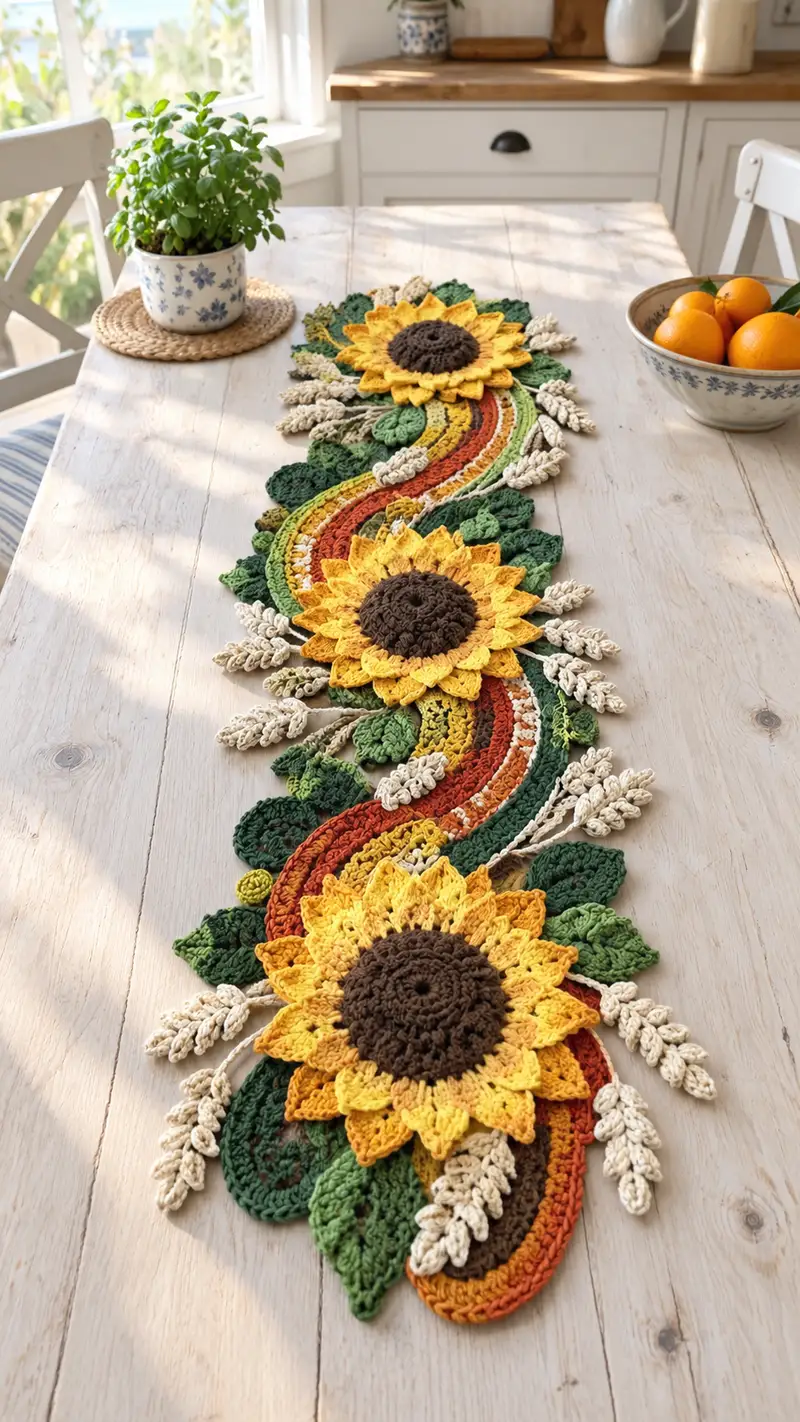
Bring sunny, rustic charm to your table with this detailed Sunflower Meadow Table Runner pattern. The runner features three large layered sunflower motifs, cascading textured paisley bands, leafy accents, and delicate wheat sprigs in warm autumn tones. Designed with modular motifs for easy assembly and customization, the finished piece sits beautifully along a dining table or console. Clear stitch counts and frequent technique tips guide you through each stage for a satisfying finish.
Progress Tracker
0% Complete
— Overview :
Info :
This pattern is modular: you will make three large sunflower motif units, assorted leaf motifs, wheat sprigs and multiple paisley/arc bands. Pieces are joined with slip stitch and whip stitch to create a flowing runner. Work in the round and in rows as indicated. Gauge is flexible for decorative use; however consistent tension will give the neatest joins and an even runner.
Info :
Color plan used in sample photo: Sunflower petals in Golden Yellow, center in Deep Brown, paisley bands in rust/mustard/olive greens, leaves in multiple greens, wheat sprigs in Natural Cream. Substitute tones as desired.
— Sunflower Center (Make 3 identical centers) :
Round 1 :
6 sc in magic ring (6)
Round 3 :
(1 sc, inc) x6 (18)
Round 4 :
(2 sc, inc) x6 (24)
Round 5 :
(3 sc, inc) x6 (30)
Round 6 :
(4 sc, inc) x6 (36)
Info :
If you want a slightly domed center, switch to a 3.5mm hook for Rounds 7-9 to pull the stitches tighter; otherwise continue with 4.0mm.
Round 7 :
(5 sc, inc) x6 (42)
Round 8 :
(6 sc, inc) x6 (48)
Round 9 :
1 sc in each st around (48)
Info :
To add texture, work Round 10 in front-post half double crochet (fphdc) around each stitch: fphdc in each st around (48). This creates a raised, nubby effect reminiscent of sunflower seed heads.
Round 10 :
1 hdc in each st around (48) OR fphdc in each st around for extra texture (48)
Round 11 :
(6 sc, dec) x6 (42)
Round 12 :
(5 sc, dec) x6 (36)
Info :
Start stuffing center lightly if you prefer a raised disc; generally sunflower centers are relatively flat. A very small amount of polyester fill gives just enough body to make petals pop.
Round 13 :
(4 sc, dec) x6 (30)
Round 14 :
(3 sc, dec) x6 (24)
Info :
Fasten off leaving a 30cm tail for sewing the center to the petal base. Weave tail through remaining rounds if you wish to flatten and secure center before attaching.
— Sunflower Inner Petal Layer (Make 3 per sunflower) :
Round 1 :
With Golden Yellow, ch 2, 10 hdc in same st (10). Join with sl st to form a small ring (10)
Round 2 :
Ch 2, (1 hdc in next st, 2 hdc in next) x3, (1 hdc in next st, inc) x2 to shape partial increases to (14)
Round 3 :
1 hdc in each st around (14)
Round 4 :
(2 hdc, inc) x3, (3 hdc, inc) x2 (19)
Info :
We will form petals using elongated stitches. Keep tension consistent; these petals will be worked in front loops of Round 4 to leave a round behind for sewing to the center.
Round 5 :
Work petals: *(ch 3, 2 dc in next st, tr in next st, 2 dc in next st, ch 3, sl st in base of petal) repeat around to make 10 petals (10 petals)
Round 6 :
Slip stitch between petals in the back loop of previous round to secure and create a ridge: sl st in each st behind petals (work 2 sl st between petal bases to flatten) (20 sl st approx)
Info :
Ensure petal bases align evenly around the center. Pin center to petal ring and check spacing before sewing. These inner petals are slightly shorter and will tuck under the outer petals later.
Round 7 :
Fasten off leaving a long tail for attaching to sunflower center. Sew inner petal ring to sunflower center by lining the back loop of Round 4 to the outer edge of the center and stitching evenly with the long tail.
— Sunflower Outer Petal Layer (Make 3 per sunflower) :
Round 1 :
With Golden Yellow or slightly brighter shade, attach to Round 6 between two inner petals using sl st. Ch 4, (1 tr, 2 dc, ch 2, 2 dc, 1 tr) all into same base st to form a larger petal. Skip 1-2 sts and sl st into next base. Repeat around to create 12 larger petals (12 petals)
Round 2 :
Work base reinforcement: 1 sc in each base stitch behind petals to secure (approx 24 sc)
Round 3 :
Edge decorative picot: *(ch 3, sl st into 3rd ch from hook) on outer edge of each petal tip to give delicate points (12 picots)
Info :
Block petal layers flat to open petal tips and ensure even curvature. Use steam blocking or wet-blocking on cotton yarn and pin petals to desired shape until dry.
Round 4 :
Fasten off leaving long tail for final assembly. Stack outer layer over inner and sew through petal bases and into the edge of the sunflower center, alternating stitches to anchor both petal layers securely. Use invisible whip stitch for neat join.
— Raised Seed Texture (Optional Accent for Centers) :
Round 1 :
Using Deep Brown, join to Round 9 of center with sl st, ch 1. Work bobble clusters: *ch1, (dc3tog bobble) in next st, sk 1 st, sl st in next; repeat around to create tightly packed bobbles approximately 18-24 depending on circumference (18-24 bobbles)
Info :
Work bobbles staggered across two rows if you want a more densely textured seed head. Staggering requires an extra row of sc between bobble rows.
— Medium Leaves (Make 8-10) :
Round 1 :
With Dark Green, ch 10, sc in 2nd ch from hook, hdc in next, dc in next 3 ch, hdc in next, sc in next, sl st in last ch to form one side of leaf; rotate to work other side: sc in base, hdc, dc3, hdc, sc and sl st to join. Shape yields approx (18 sts equivalent)
Round 2 :
Working around leaf edge: *(sc, hdc, dc) in side stitches to bulk up edge, place 2 sc at pointed tip to form neat point, continue (approx 28 stitches around)
Round 3 :
Work vein detail: With contrasting lighter green, use surface slip stitches from base to tip making three parallel lines: Surface sl st up center, then 1 sl st either side about 3-4 stitches from center for veining effect (visual only)
Info :
Leaves look best when blocked on the wrong side and lightly dampened, pinned to a teardrop shape then allowed to dry. Vary leaf sizes by making foundation chain of 8 to 14 depending on desired length.
Round 4 :
Fasten off leaving long tail for sewing to runner base.
— Small Sprig Leaves (Make 8-12 pairs) :
Round 1 :
Ch 8, sc into 2nd ch from hook, hdc next, dc next 2, hdc next, sc next, sl st to join; fasten off. Make small pairs and stitch a short stem by chaining 6 and sewing to base (approx 8 sts each)
Info :
These tiny leaves fill gaps between sunflowers and paisley arcs. Use a lighter green for contrast or variegated yarn for extra interest.
— Wheat Sprigs (Make 16-20) :
Round 1 :
With Natural/Cream, ch 20. Starting in 2nd ch from hook, work a looped popcorn cluster to mimic wheat grains: *(yo, insert hook in base, pull loop through, repeat 3 times to make cluster), sl st at base to secure cluster, ch 1, skip 1 ch, repeat along chain to create 6-8 small clusters per sprig (approx 6-8 clusters)
Round 2 :
Once clusters complete, work a thin stem: from base of chain use sl st working back toward base 1 sl st in each ch to form a twisted stem. Fasten off leaving tail for sewing.
Info :
Adjust the number of clusters per sprig to make them longer or shorter. Slightly pull each cluster to fluff before securing for a more natural look.
— Paisley/Arc Band Motifs (Make 6-8 segments of varying widths) :
Round 1 :
Foundation: Ch 18. Row 1: sc in 2nd ch from hook across (17 sc). Turn. (17)
Round 2 :
Ch 2 (counts as hdc), hdc in next 4, 2 hdc in next, hdc next 6, 2 hdc in next, hdc remaining to end (increases at arch) (approx 19)
Round 3 :
Ch 2, 1 hdc in each st across (19)
Round 4 :
To shape curve: (hdc, dc, tr) cluster on one side to form raised edge; on other side work (hdc, sc) to taper. Work across using pattern variations to produce an undulating arc. (Keeps approx 19-22 sts across center)
Info :
Change color at the end of Row 4 to create multi-colored stripes. Carry the unused yarn behind the rows or fasten off and join fresh colors for cleaner joins. For the runner pictured, sections are worked in rust, mustard, olive and cream alternately to create warm flowing bands.
Round 6 :
Ch 2, work 1 hdc in each st across in new color (19)
Round 7 :
Edge texture: Work (1 sc, 1 hdc, 1 dc) in first three sts to form a thicker leading edge then 1 hdc in each across then repeat 3-st edge cluster at far end (approx 22)
Round 8 :
Work surface slip stitch rows and small puff stitches across center channel to add dimension: *ch1, (dc3tog puff) every 6th st, sl st between puff to anchor. Makes surface texture similar to photo (variable)
Info :
Create several widths by starting with ch 12 (narrow), ch 18 (medium) or ch 28 (wide). Each band will be built up with 6–10 rows to create depth. Make at least 6 varied bands for the runner layout in photo.
Round 9 :
Fasten off leaving long tails for joining. Block each band flat; bands should have a slightly cupped edge on the outer side so they sit under leaves naturally when assembled.
— Small Paisley Insets and Motif Fillers (Make 8-12) :
Round 1 :
Ch 8, sc in 2nd ch, hdc in next, dc in next 2, hdc next, sc next, sl st to join. Shape tiny teardrops. Fasten off (approx 8)
Round 2 :
Edge with contrasting color: join and sc around adding 2-3 increases at the rounded end to make teardrop flatter (approx 12)
Info :
These small insets tuck between larger bands and sunflowers to soften the transitions and provide pops of color.
— Joining Base and Strategic Assembly Rounds :
Info :
Arrange your motifs on a flat surface following the sample layout: three sunflower clusters spaced evenly along the runner, paisley bands weaving between and beneath them, leaf clusters filling outer edges, and wheat sprigs fanning outward. Pin motifs in place before joining.
Round 1 :
Begin by joining paisley bands in sequence using whip stitch along the short ends: align edges and sew through corresponding hdc rows. Use a long tail to make the stitch invisible (sewn inside the bands). This produces the first continuous central line of the runner.
Info :
When joining, always face the right side of pieces in the direction you want the runner to read. To make seams sit flat, use mattress stitch or whip stitch catching the back loop only on one piece and both loops on the other.
Round 3 :
Attach sunflower assemblies to the band: Position sunflower so one petal layer slightly overlaps band edge. Sew through the back loops of the band and through the reinforcement round under petals, spacing 12–16 evenly spaced small stitches around the petal base. Repeat for each sunflower (connect 3 sunflowers).
Round 4 :
Sew leaf motifs around each sunflower: tuck larger leaves behind outer petal tips and sew through leaf base into band and petal bases with several passes to secure. Use long tails for hidden sewing.
Info :
Place small paisley insets and narrow bands between sunflowers to create the flowing S-curve seen in the photo. Pin, then tack with slip stitch along edges to hold before final sewing. Slip stitch joins are decorative and hold shape well for cotton yarn.
Round 6 :
Sew wheat sprigs in clusters of 3-5 around each sunflower and along the runner edges. Anchor stems behind leaves or into the band with a few catch-stitches. Make sure stems fan outward in natural directions.
Round 7 :
Fill gaps: Use small sprig leaves and tiny teardrop insets to fill visible gaps between motifs. Make symmetrical placement: balance both sides of the runner for a harmonious look.
Info :
To secure motifs strongly for frequent use, weave in additional reinforcement stitches through the band and into motif bases. For table-linens that will receive weight, add an extra row of stitches around heel points where plates might rest.
— Final Edge and Border Rounds :
Round 1 :
With medium green, pick up along one long edge of assembled runner and work 1 sc into every available edge stitch to create a stable border (work approx 150–220 sc depending on runner length)
Round 2 :
Work (1 sc, ch 2, skip 1) across to create an airy scallop foundation. At corners or curved outer petal edges, work 3 ch-2 loops to form a larger scallop for a decorative contour.
Round 3 :
In each ch-2 space, work (2 dc, ch 2, 2 dc) to form small shell scallops (approx 60–80 shells around full runner edge)
Info :
Info :
Edge counts will vary with runner assembly; adjust the number of shells to maintain symmetrical border density. If runner edges are wavy, use larger shells for dramatic shaping or smaller shells for subtle finish.
Round 4 :
Work a finishing round of slip stitches in contrasting cream around shell edges to highlight scallops. Alternatively, work a surface crab stitch (reverse sc) for a rope-like edge and extra durability.
Round 5 :
Fasten off and weave in all ends. Block entire runner flat, pinning outer shells and sunflower petals to shape, steam or wet block for cotton yarn until dry.
— Optional Raised Petal Puff Detail (Add for extra 3D effect) :
Round 1 :
With a smaller hook (3.5mm), work little puff stitches at petal midline: *(yo, insert hook in st, pull loop through, yo and pull through two loops) repeat 3 times then yo and pull through all loops to close puff, secure with sc) spaced evenly along each petal midline to create tiny ribs and heightened texture (6–10 puffs per petal depending on length)
Info :
Use this sparingly - too many puffs can make petals heavy and distort flatness. Add to every other petal for subtle texture or to all petals for a bold sculptural look.
— Assembly and Finishing Rounds (Detailed Steps) :
Round 1 :
Before final sewing, lay runner on table and check overall symmetry and spacing. Adjust motif positions by unpinning and shifting slightly to achieve pleasing S-curve flow from one sunflower to the next.
Round 2 :
Weave in tails using yarn needle: bury tails through the motif body catching several threads; tug gently and trim close. For cotton yarn, weave at least 6–8 cm into the fabric before trimming for secure hold.
Round 3 :
Block again if necessary after weaving ends. Re-pin petals and leaves to maintain shape after the stress of sewing and weaving. Allow to dry thoroughly before use.
Round 4 :
Final reinforcement: run a row of discreet stitches along the main seam line on the underside using matching yarn to secure motifs to the paisley base. This reduces movement and makes the runner durable for display or light use.
Info :
Label the underside with a small fabric tag or keep care instructions as cotton, hand wash cold and lay flat to dry. Avoid heavy heat drying which can distort the blocked shapes.
— Care, Blocking and Storage :
Info :
To clean, hand wash gently in cool water with mild detergent and reshape on a flat surface. Re-block if needed. Store flat to keep petals from crushing; avoid folding directly through flower centers.
Info :
If you intend this piece for table use where hot dishes are placed, use a thin heat-proof runner or trivet between hot cookware and crochet fabric to protect the cotton yarn and blocking shape.
This Sunflower Meadow Table Runner brings farmhouse warmth and artisan texture to your home. Each layered sunflower and winding paisley band is a little celebration of autumn color and handcrafted detail. The modular construction makes it a fun, creative project that yields a showpiece you’ll be proud to display. 🧶🌻 Enjoy every stitch as motifs come together into a flowing, sunny runner — perfect for gatherings, gifts, or seasonal decor. Happy crocheting and don’t forget to share your version! 🍂