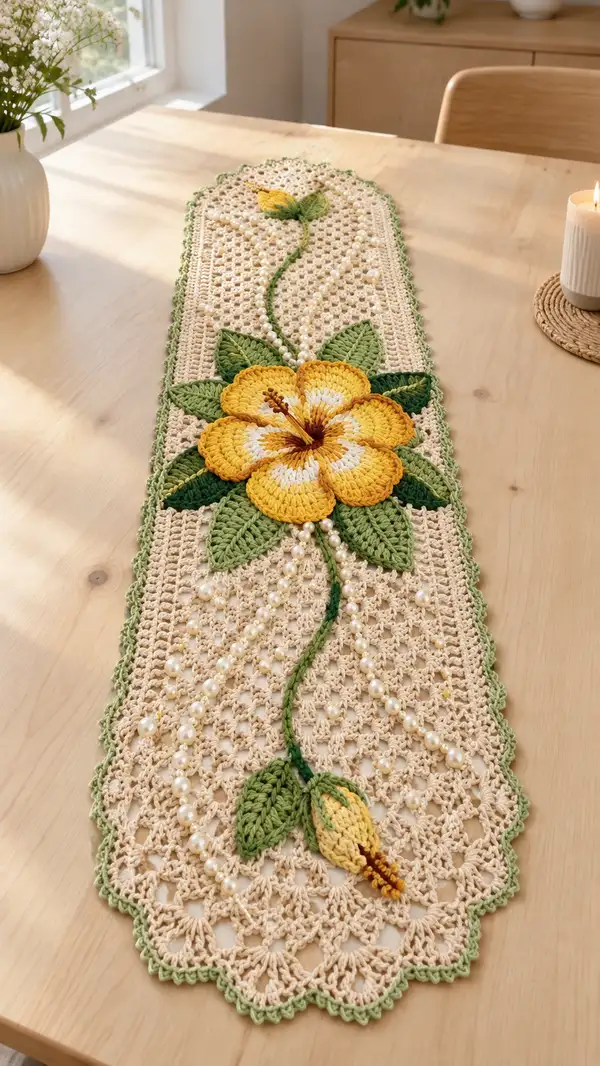
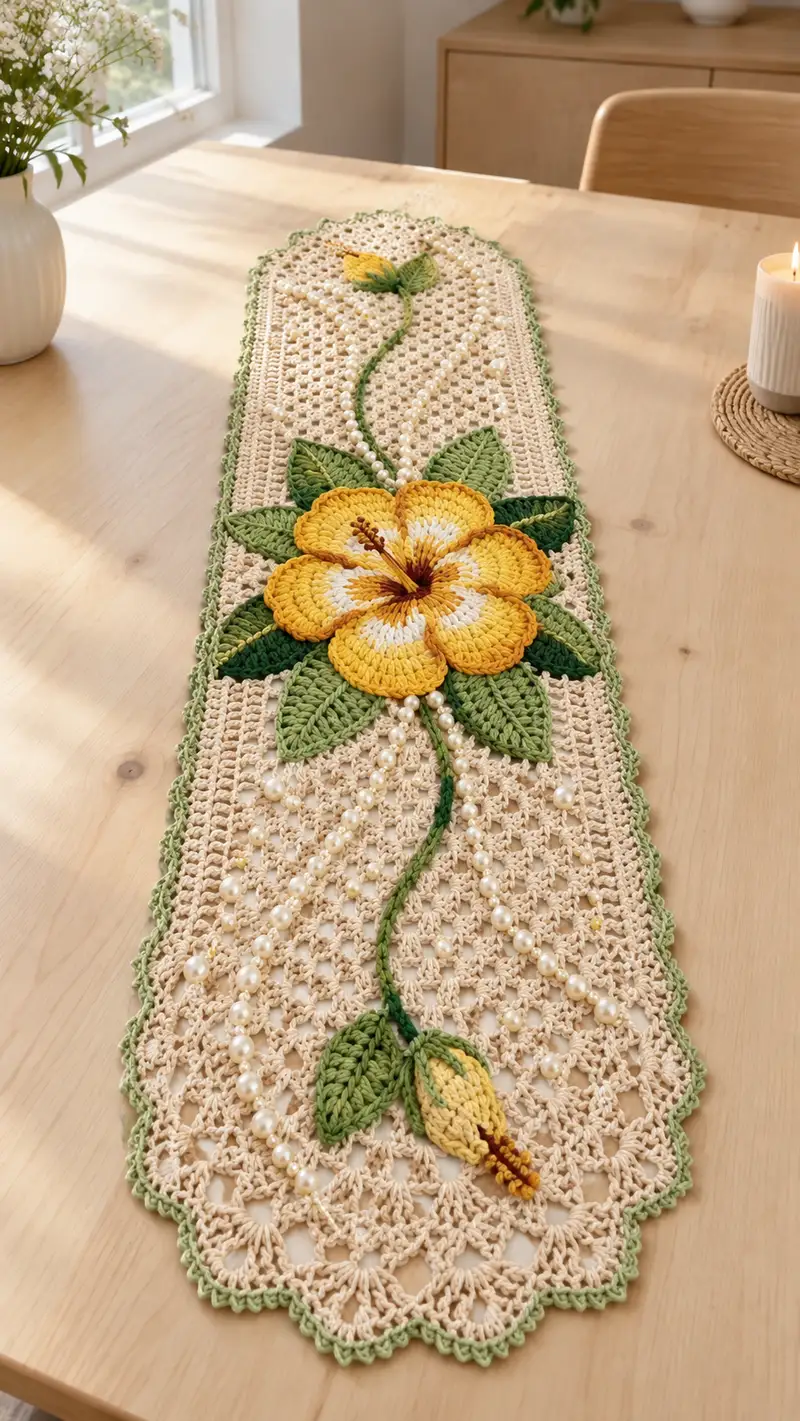
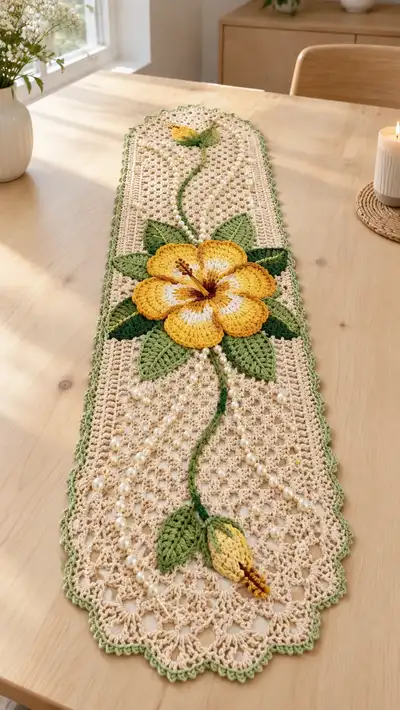
A romantic, hand-crocheted table runner featuring a large three-dimensional hibiscus blossom, layered leaves, a trailing stem and pearl accents on a delicate cream mesh background. The runner has scalloped light-green edging, a cream openwork center, and bold yellow petals with warm brown detailing. This pattern guides you through the base mesh panel, the floral applique9 components, and full assembly so you can recreate the elegant centerpiece shown.
Progress Tracker
0% Complete
— Materials & Gauge :
Info :
Gauge for the mesh panel: 12 mesh repeats (dc + ch1 pattern) x 10 rows = approximately 10 cm when using 3.5mm hook and worsted cotton. If your gauge differs, adjust starting chain length to keep proportions. Finished runner shown measures approximately 34 cm wide by 110 cm long (13.5 x 43")
— Main Panel (Foundation Mesh) :
Info :
Work the main panel as a flat rectangle in turned rows. The foundation chain is 101 chains (multiple of 2 + 1) — this yields 50 mesh repeats across. Adjust chain in multiples of 2 to change width, keeping symmetry for scalloped edging later.
Round 1 :
Ch 101. Row 1: Dc in 4th ch from hook (counts as dc), *ch1, skip 1 ch, dc in next ch; rep from * across until one ch remains, dc in last ch. (50 dc, 50 ch-1 spaces)
Round 2 :
Ch 3, turn. Dc in first dc, *ch1, skip next ch-1 space, dc in next dc; rep from * across to end, dc in top of turning ch. (50 dc, 50 ch-1 spaces)
Round 3-10 :
Repeat Round 2 maintaining mesh (50 dc, 50 ch-1 spaces each row). Work evenly to build the central mesh panel. (Rows 3-10 = 8 rows)
Info :
Keep edges neat by always working the first and last stitch as a dc into the top of turning ch or last dc. Place stitch markers in the first stitch of every 10th row to maintain straight sides.
Round 11-20 :
Continue mesh repeats (ch1 spaces between dcs) for additional 10 rows to reach mid runner point. Ensure counts remain 50 dc, 50 ch-1 spaces each row. (Rows 11-20 = 10 rows)
Info :
At row 15 measure to confirm length; adjust number of mesh rows to suit desired runner length. The pattern here uses 40 mesh rows before beginning a firm double-crochet band for the holding area of the applique9 and beads.
Round 21 :
Change to cream if you interrupted color. Ch 2, turn. Hdc in each st across working into both loops (50 hdc). This creates a firmer band to anchor applique9s and embroidery. (50 hdc)
Round 22 :
Ch 2, turn. Hdc in each st across. (50 hdc)
Info :
These two hdc rows create structure: pin centers of larger applique9s to this firmer band for easier sewing. Place pins to mark centerline where the large flower will be positioned (approx between rows 21-22).
Round 23-40 :
Resume mesh pattern (ch1-space dc rows) for 18 more rows to complete the long section of the runner. Maintain 50 dc across. (Rows 23-40 = 18 rows)
Info :
When you reach the final mesh section, stop at the same number of mesh rows as the opposite end so the scalloped ends will be symmetrical. Block this panel flat before adding border or applique9s to ensure accurate assembly.
— Border and Scalloped Ends :
Info :
Work around the entire rectangle to create a firm band and scalloped end shapes. Join yarn at one short end center and work around working in rounds; treat rows as rounds and place a stitch marker to mark round starts. Border rounds are counted here as rounds 1-25 (for the border section).
Round 1 (Border Round 1) :
Attach light green yarn to center short edge by sl st. Ch1, sc evenly around the entire panel working 2 sc in each corner to turn. Count approximately 220 sc around (this count may vary slightly depending on blocking). Place marker at first sc. (approx 220 sc)
Round 2 :
Ch 2, *hdc in next 3 sc, ch1, sk 1 sc; rep from * around to create a slightly open band. Work 2 hdc in corner sc to maintain shape. (approx 220 stitches with ch-1 spaces)
Info :
The scalloped short ends are shaped by working shells into the short-edge central area. Count the number of short-edge sc and mark the center to align shell pattern symmetrically across both ends.
Round 3 (Start Short End Scallops) :
When you reach the center of a short end, work *sk 2 sc, 5 dc in next sc (shell), sk 2 sc, sl st in next sc* to create the first shell. Repeat shells every 7 sc across the short end. Continue around side edges with 1 sc in each sc until you reach the opposite short end where you mirror the shells. (Shell repeats across short end)
Round 4 :
Ch1, sc in each st around, working sl st in the middle stitch of each shell to anchor and refine shape. (approx 220 sc)
Round 5 :
Ch3, *sk next st, 4 dc shell in next st, sk next st, sl st in next st* along short end shells to refine. On long edges: *ch3, sk 2 sc, sc in next sc* repeat to make small picot-like spacing between shells. This builds a decorative edge. (approx counts vary with shells counted individually)
Info :
Work final edging rounds until scallops are pronounced and symmetric; usually 4-6 rounds of refined shells/picots create the lacy edge seen in the image. Pin scallops before finishing to ensure crisp points.
Round 6-8 :
Repeat a thin finishing round: sl st into each dc and picot to smooth edges, then make final picot trim: *ch3, sl st into next st* across long edges. Finish off and weave ends. (Finishing rounds 6-8)
— Large Hibiscus Flower Applique9 (Make 1) :
Info :
The hibiscus is constructed as five identical sculpted petals joined at the center with a small central circle and a raised stamen detail. Petals are worked flat into small flaps shaped by increases and worked in dc and tr stitches to create the broad petal surface. Use yellow and white for central highlight, finishing with brown detailing.
Petal 1 - Round 1 :
Using yellow yarn, make a magic ring. 6 sc in magic ring. (6)
Petal 1 - Round 2 :
Inc in each st around (12)
Petal 1 - Round 3 :
(1 sc, inc) x 6 (18)
Petal 1 - Round 4 :
(2 sc, inc) x 6 (24)
Petal 1 - Round 5 :
Ch2, turn. Dc in next 6 sts, tr in next 6 sts, dc in next 6 sts (work across the 24 sts to start creating a fan). (24 shaped stitches)
Petal 1 - Round 6 :
Change to white in the center of the petal highlight: Info: To change color seamlessly, finish the last yarn-over of the last stitch with new color. Ch2, turn. Dc in first 2 sts, 2 dc in next st, 3 dc in top of tr cluster, 2 dc in next st, dc to end. This shapes the petal with a white center near the base. (approx 28 dc in shaping)
Petal 1 - Round 7 :
Change back to yellow. Work dc and hdc decreases toward petal tip: (2 dc, hdc) across the tip arc to refine. Fasten off leaving tail for joining. (petal finished)
Info :
Make five identical petals. For a fuller petal, you may add one more increase row before shaping the fan. Block petals flat on a pinning mat to open the fan and make the edges crisp.
Center Disk - Round 1 :
Using brown yarn, make a magic ring. 6 sc in ring. (6)
Center Disk - Round 2 :
Inc in each st (12)
Center Disk - Round 3 :
(1 sc, inc) x 6 (18)
Center Disk - Round 4 :
1 sc in each st around (18)
Info :
Sew five petals evenly spaced around the center disk. Pin petals so their inner curved edges sit close to the disk, then baste stitch each petal with long sewing tail to the disk to hold position before permanent stitching.
Stamen (Make 1) - Round 1 :
Using brown yarn for the stalk: Ch 12, sl st back along chain to create a thicker cord. Fasten off leaving long tail for anchoring through center. (short cord approx 11-12 ch)
Stamen - Round 2 :
Using small seed beads, thread 6-8 beads onto a thin beading thread and sew onto top of the cord with small stitches to create the pollen cluster. Secure thread ends on the back of the center disk. Info: Beads should be placed at the end of the cord then wrapped and stitched to create the visible stamen like structure in the photo.
Info :
When arranging petals on the runner, offset slightly from the exact midline to mimic the photo composition: the bloom sits near the center but slightly toward one end so the trailing bud and stem occupy the remaining length.
— Leaves (Make 6 in Two Shades: 3 Light, 3 Dark) :
Info :
Leaves are worked flat, shaped with increases to the center, then mirrored decreases. Work a central ridge by working into FLO on the return row to visually emphasize the midrib.
Leaf - Round 1 :
Ch 11. Row 1: Sc in 2nd ch from hook, sc across until end. (10 sc)
Leaf - Round 2 :
Ch1, turn. Inc in first st, sc in next 8 sts, inc in last st. (12)
Leaf - Round 3 :
Ch1, turn. Inc, (sc in next 2 sts), inc, sc across until 3 sts remain, inc, (sc in next 2 sts), inc. (16 sts) This creates symmetrical shaping.
Leaf - Round 4 :
Ch1, turn. Sc in next 3 sts, inc, sc across to three sts from end, inc, sc to end. (18 sts)
Leaf - Round 5 :
Ch1, turn. Work a short row across the top center to create the tip: sc2tog twice across center 4 sts, then sc to end. This pulls the center to a tapered tip. (approx 16 sts)
Leaf - Round 6 :
Reverse side: turn and work sc in each st FLO to create a visible rib down the middle. Fasten off leaving tail for sewing. Block leaves on a mat to shape the veins. (6 rounds per leaf)
Info :
Make 3 leaves in light leaf green and 3 in deeper green. Vary their sizes slightly by adding or subtracting a shaping row to give a natural layered effect when you arrange them under the flower.
— Small Bud (Make 1) :
Bud - Round 1 :
With yellow, ch 6. Round 1: Join to make a small tube: sc in each ch around both sides to make a tiny oval (12 sc). (12)
Bud - Round 2 :
Ch1, sc in each st around for 2 rounds to form short bud. (12)
Bud - Round 3 :
Change to brown for tip: (1 sc, dec) x 4 (8). Stuff lightly and close with invisible decrease. Fasten off leaving long tail for sewing. (8)
Info :
Attach small brown seed-bead clusters to the bud tip with a short beading thread to mimic stigma detail. Secure on the back of the bud.
— Stem / Cord (Make 1 long stem) :
Round 1 :
Using dark green yarn and smaller 3.0mm hook, ch 130 (or measure to required length to span between flower and bud on your finished panel; the sample uses approx 120-130 ch for a 110 cm runner). Fasten off leaving long tail. This chain is the skeleton for the cord.
Round 2 :
Join yarn at base of chain and sl st into each ch across to thicken the cord, working 2 sl st into base ch near ends to anchor. Fasten off and weave end. The result is a flat but thick cord ideal for a stylized stem. (approx 130 sl st)
Info :
For a more organic raised stem, use an i-cord technique or plait three chains together and single-crochet over them to create a twisted rope look. The sample runner uses a cord with slight twist and a sewn-on appearance secured with whip-stitching into the mesh rows.
— Pearls & Beaded Garlands :
Info :
Pre-string a selection of pearls on beading thread in varying sizes or thread them as you go. The design shows three diagonal garlands of pearls anchored near the flower and spread toward the ends. Decide on bead spacing - the sample alternates large 8mm pearls with smaller 4-5mm spacer beads.
Bead Stringing Step 1 :
Cut three lengths of beading thread long enough to follow the diagonal path across the panel (approx 50-70 cm depending on runner). Secure one end under the flower center by stitching through the center disk and knotting the thread on the underside.
Bead Stringing Step 2 :
String pearls in this pattern: large, small, small, large, small, small repeating until you reach the desired length. Pin bead string to panel along the diagonal mesh line and stitch the beading thread through several mesh holes every 3-4 beads to anchor. Repeat for the other two garlands with slightly different spacings for a natural look.
Info :
Ensure beads are sewn only through the mesh holes and not through the underlying table surface. Tie a secure knot, run the thread tail through a few stitches and trim. If desired, glue a tiny dot of fabric glue under the knot for extra security.
— Assembly & Placement :
Info :
Block all applique9 pieces (petals, leaves, bud) flat using a damp-blocking method or spritz lightly and pin to shape until dry. Blocking evens edges and makes sewing simpler. Layout the runner panel flat and arrange pieces before sewing.
Round 1 :
Position the large flower so its center aligns with the reinforced hdc band around rows 21-22 of the mesh (this anchors the heavy applique). The bottom edge of the flower should rest roughly at the middle of one hdc band; pin the disk and three petals first, then adjust outer petals so they radiate evenly.
Round 2 :
Using long tails from petals and center disk, whip stitch petals to the hdc band and the mesh near the center. Make sure to catch both the hdc rows and a few nearby mesh stitches for stability. Use invisible whip stitch or mattress stitch to hide sewing lines. Secure each petal with 6-8 evenly spaced stitches along the curved base.
Round 3 :
Position 6 leaves around and under the flower—three lighter green leaves on top of three deep green leaves, alternating. Pin and sew leaves by stitching along their center tails into the mesh and hdc band so leaves curve naturally outward from under petals. Use 4-6 small stitches per leaf base for secure hold.
Round 4 :
Lay the stem cord from the flower center toward the opposite end where the bud will be placed. Use hidden whip stitches every 2-3 cm along the cord to attach it to the mesh by catching the cord and mesh threads. Do not wrap cord under beads; instead, secure cord before final bead placement for neatness.
Round 5 :
Sew bud to the terminal end of the stem and position a pair of small leaves near the bud base. Anchor with small stitches. Weave in any remaining tails from the cord and secure on the underside of the mesh panel.
Info :
Test placement visually from several angles to ensure the floral composition flows—adjust leaf angles by shifting the sewing anchor points slightly. If a petal feels floppy, add a small hidden stitch through the petal body and the panel to pin it in desired curve.
— Final Details & Finishing Touches :
Round 1 :
Using spare brown yarn, embroider faint radial veins from the flower center into each petal with single strands of yarn to mimic the warm brown highlights in the photograph. Use a simple straight stitch radiating outwards, 5-7 stitches per petal, and secure tails on the underside.
Round 2 :
Weave all tails into the underside of the panel and apply a light blocking spray/wet-block to the entire runner so edge scallops settle into place. Allow to dry completely pinned. Trim all ends to neat finish.
Info :
If your runner will be laundered, stitch a small linen tag on the underside with care instructions: hand wash cold, lay flat to dry. Alternatively, use a fabric stiffener lightly on the petals if you want them to stay very sculptural over time.
This bright hibiscus table runner brings sunshine and texture to any table setting! Each carefully crocheted petal, leaf and pearl garland adds handcrafted elegance and personalized charm to your home. Assemble with care and enjoy the satisfying layering of lace mesh and bold applique — it's a beautiful heirloom-style piece to treasure. 🧶🌼✨