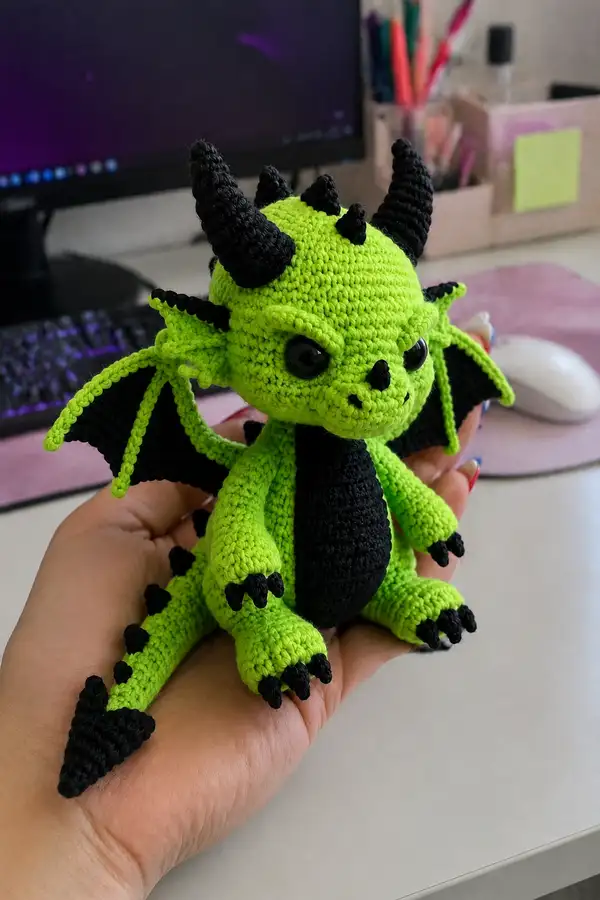
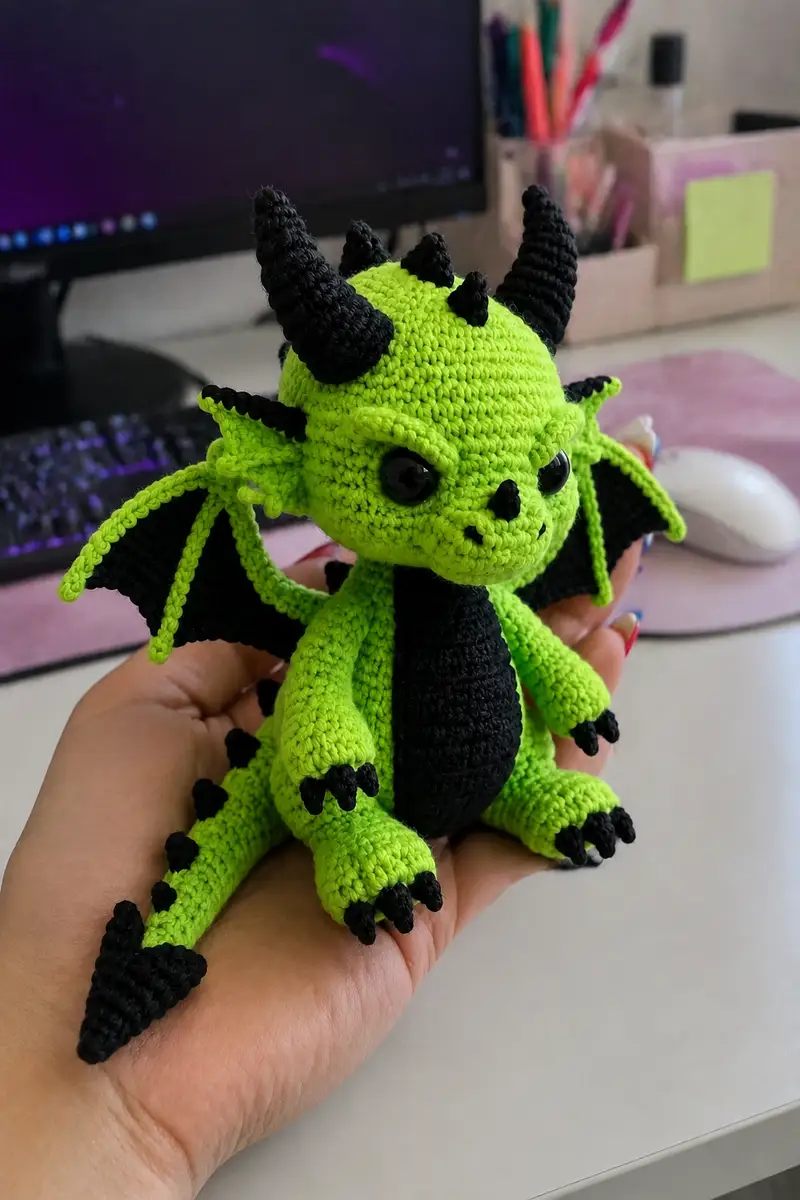
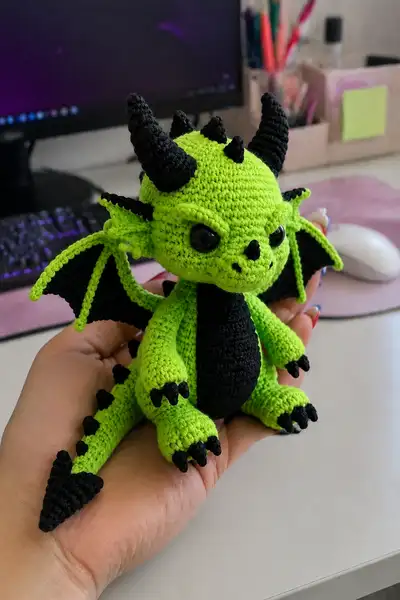
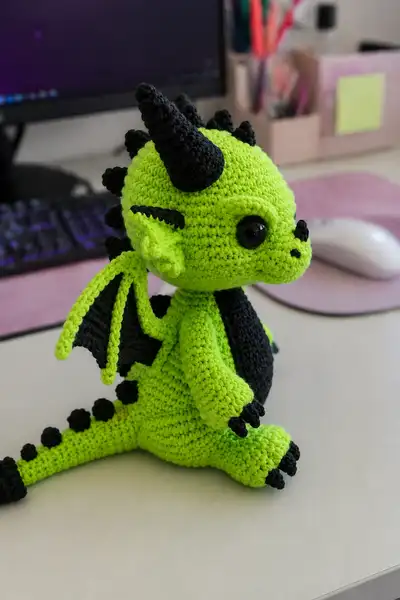
Make a spooky-cute Toxic Green Demon Dragon amigurumi with bold black horns, a black belly panel, spiked tail and bat-style wings. This detailed pattern teaches you how to crochet each part — head, body, limbs, wings, horns and tiny spikes — with step-by-step rounds, stuffing tips and realistic assembly guidance. Perfect to sit on a shelf or be a dramatic handmade gift.
Progress Tracker
0% Complete
— Head :
Round 1 :
6 sc in magic ring (6)
Round 3 :
(1 sc, 1 inc) x 6 (18)
Round 4 :
(2 sc, 1 inc) x 6 (24)
Round 5 :
(3 sc, 1 inc) x 6 (30)
Round 6 :
(4 sc, 1 inc) x 6 (36)
Round 7 :
(5 sc, 1 inc) x 6 (42)
Round 8 :
(6 sc, 1 inc) x 6 (48)
Info :
Head base complete. Use a stitch marker to mark the beginning of each round. Choose placement for safety eyes — they are positioned later between rounds 13-15. Work tightly so stuffing does not show through.
Round 9-12 :
1 sc in each st (48)
Info :
Between rounds 13-14 is a good place to insert safety eyes for the look in the photos. Typical spacing for this head size is 8-10 stitches apart (center-to-center of eyes), measured along round 13 stitches. Mark both eye positions on the outside of the head before inserting eyes.
Round 13 :
1 sc in each st (48) - mark eye positions now (count clockwise from marker)
Round 14 :
1 sc in each st (48)
Round 15-17 :
1 sc in each st (48)
Info :
Attach safety eyes between rounds 13-14 (through round 13/14 seam area) before you stuff heavily. Snap washers or secure eyes according to manufacturer instructions. If embroidering eyes, you can add them after stuffing using black yarn for pupils.
Round 18 :
(6 sc, 1 dec) x 6 (42)
Round 19 :
(5 sc, 1 dec) x 6 (36)
Round 20 :
1 sc in each st (36)
Round 21 :
(4 sc, 1 dec) x 6 (30)
Info :
Begin stuffing head firmly but not rock-hard. Use small tufts of fiberfill and a stuffing tool (or blunt pencil) to push filling into eye sockets and cheeks for a rounded look. Continue stuffing gradually after each decrease round to maintain shape.
Round 22 :
(3 sc, 1 dec) x 6 (24)
Round 23 :
(2 sc, 1 dec) x 6 (18)
Round 24 :
(1 sc, 1 dec) x 6 (12)
Info :
Fasten off leaving a long tail (approx. 25-30 cm) for sewing the head to the body. Do not completely close the hole with a quick pull — shape the neck opening by stitching later when precise fit is required. If you plan a visible seam, consider using a ladder stitch for an invisible join.
Round 26 :
Join green yarn at base of head and work 6 sc around to form neck ring (6)
Round 27 :
Inc evenly around (12)
Round 28 :
(1 sc, inc) x 6 (18)
Round 29-31 :
1 sc in each st (18) - work 3 rounds to form neck tube
Info :
Neck length here is 3 rounds to create a short chubby neck that matches the photo. Adjust neck length by adding or removing even rounds of 1 sc in each st to taste before finishing off. Keep a reference to how many rounds you did to sew to body accurately.
Round 32 :
(1 sc, 1 dec) x 6 (12)
Round 34 :
Fasten off and leave a long tail for sewing (head assembly tail). Finish stuffing if necessary (small amount to make neck firm) and shape the head so horns and spikes can be sewn on evenly.
— Facial Details (nose, muzzle and brow ridges) :
Info :
The muzzle on this dragon is a small snout that projects slightly. It is easiest to make a small tubed nostril piece and sew it centered between the eyes at rounds 13-14. The muzzle is formed by slight shaping on rounds 17-21. We will make two small nostrils and one small tip.
Round 1 (muzzle piece) :
6 sc in MR (6)
Round 2 :
(1 sc, inc) x 3 (9)
Round 3 :
1 sc in each st (9)
Round 4 :
Fold slightly and sew bottom edge to create a short snout. Fasten off leaving long tail for sewing. Make two tiny nostril bumps: mr 4 sc, sl st, fasten off (make 2).
Info :
Sew the muzzle piece to the front center of the head aligning with eye row (round 13). Sew the two nostril bumps onto either side of the muzzle tip and secure tightly. Add a few small black embroidery stitches for nostril highlights if desired.
— Body :
Round 1 :
6 sc in magic ring (6)
Round 3 :
(1 sc, 1 inc) x 6 (18)
Round 4 :
(2 sc, 1 inc) x 6 (24)
Round 5 :
(3 sc, 1 inc) x 6 (30)
Round 6 :
(4 sc, 1 inc) x 6 (36)
Round 7-12 :
1 sc in each st (36)
Info :
Switch to black yarn for belly panel later. For now work body in green. These even rounds form the widest part of the body. Keep tension consistent so head attachment will fit snugly. Mark the center front of the body where belly panel will be sewn (approx. align with rounds 6-12).
Round 13 :
(4 sc, 1 dec) x 6 (30)
Round 14 :
(3 sc, 1 dec) x 6 (24)
Round 15 :
1 sc in each st (24)
Round 16 :
(2 sc, 1 dec) x 6 (18)
Round 17 :
(1 sc, 1 dec) x 6 (12)
Round 18 :
1 sc in each st (12) - this will be the neck join opening
Info :
Begin stuffing the body moderately — firm but not overly tight. You will leave the top opening for sewing the head on; stuff the lower body more firmly so the dragon sits steadily. Keep stuffing incremental and small to avoid gaps.
Round 19 :
(1 sc, 1 inc) x 6 (18) - working upward if you prefer shaping for a slightly rounder belly before closing base
Round 20 :
1 sc in each st (18)
Round 21 :
(1 sc, 1 dec) x 6 (12)
Info :
Fasten off leaving long tail for sewing base and attaching legs. Finish stuffing so bottom is flat enough for sitting. If you prefer a flat-bottom base, place a small stiff felt circle and sew around it inside the base before final closure to help stability.
— Belly Panel (Black) :
Info :
This black oval belly panel is crocheted flat and sewn on after the body is stuffed. It creates the dramatic contrast seen in the photos.
Round 1 :
6 sc in MR with black (6)
Round 3 :
(1 sc, inc) x 6 (18)
Round 4 :
(2 sc, inc) x 6 (24)
Round 5 :
(3 sc, inc) x 6 (30)
Round 6-8 :
1 sc in each st (30)
Info :
To make an oval rather than a circle, in row 9 work increases only on two opposite sides and plain sc along the sides. This yields a longer oval belly suitable for sewing onto the front of the body.
Round 9 :
*Inc in next st, 4 sc; rep from * twice on short ends to create elongation (approx. 34 sts, adjust to keep smooth oval)
Round 10-12 :
1 sc in each st (34) - fasten off and leave a long tail for sewing
Info :
Pin belly panel onto the front of the stuffed body aligning center of panel with the front midline seen in photo (approx. body rounds 6-12). Sew evenly around panel with black yarn using a whipstitch or ladder stitch for an invisible join. Stuff slightly under the belly if needed before final sewing so it sits slightly raised from the surface.
— Arms (Make 2) :
Info :
Arms are gently tapered tubes with a small paw/hand at the end. Work in green and add black claws at the tips. Stuff hands firmly and arms lightly.
Round 3 :
(1 sc, inc) x 6 (18)
Round 4 :
1 sc in each st (18)
Round 5 :
(2 sc, dec) x 6 (12) - shaping wrist
Info :
Stuff the hand portion firmly at the tip. Create a small flat paw by slightly flattening the top and adding claws later. Use stitch markers to mark the outer side to orient the arm when sewing to body.
Round 6-12 :
1 sc in each st (12) - work 7 rounds to form lower arm and forearm
Round 13 :
(4 sc, inc) x 2, 1 sc around remainder to total (14) - small increase to round out upper arm
Round 14-18 :
1 sc in each st (14) - adjust rounds for preferred arm length (total rounds = 18)
Round 19 :
Stuff arm lightly and shape shoulder area; fasten off leaving long tail for sewing
Claws (Make 6) :
Using black yarn: mr 3 sc around (3), sl st, fasten off leaving tail. Sew three claws to each hand tip equally spaced.
Info :
When sewing arms to the body, place them slightly forward of the widest point so the dragon appears to be hugging its belly. Sew through several body rounds for stability.
— Legs (Make 2) :
Info :
Legs are larger than arms to create sitting stability. Feet are rounded and have three visible black claws at the front.
Round 3 :
(1 sc, inc) x 6 (18)
Round 4 :
(2 sc, inc) x 6 (24)
Round 5 :
(3 sc, inc) x 6 (30) - foot widest point
Round 6-8 :
1 sc in each st (30) - work 3 rounds to create foot depth
Round 9 :
(3 sc, dec) x 6 (24) - shape toward ankle
Round 10-14 :
1 sc in each st (24) - leg tube rounds
Round 15 :
(2 sc, dec) x 6 (18)
Round 16-20 :
1 sc in each st (18) - continue leg to hip area
Round 21 :
(1 sc, dec) x 6 (12)
Round 22 :
Fasten off leaving long tail for sewing. Stuff foot firmly, leg lightly. Make three small black claw bumps (mr 3 sc) x 3 and sew to the front of each foot with slight spacing.
— Wings (Make 2) :
Info :
Wings are made in two colors: green frame (outer edge and wing 'fingers') and black membrane. We will crochet a thin tubular frame for each wing finger then join with the membrane using sc stitches to create the bat-wing silhouette shown in photos.
Wing Finger (make 3 per wing) Round 1 :
6 sc in MR with green (6)
Round 2 :
1 sc in each st (6) - continue in spiral to make a short tube
Round 3-8 :
1 sc in each st (6) - work 6 rounds to create finger length; make 3 fingers per wing (make 6 tubes total)
Info :
Optional: Insert thin floral wire into each finger tube for poseability. Leave ends folded and sealed inside finger tubes before sewing them into the wing membrane.
Wing Membrane (black) Round 1 :
Chain 14, sl st into 2nd ch from hook and sc down the chain to form a base (12 sc across)
Round 2 :
Working along the other side of the chain, sc across and join to create a small rounded triangle (24 sc total along short oval)
Round 3 :
Dec evenly at two corners, sc along the rest to shape pointy wing tip (approx 20-22 sts depending on tension)
Round 4-6 :
1 sc in each st (maintain shape) - on round 6 attach the 3 green finger tubes by sewing them spaced across the inner edge, then sl st in green along membrane edge to join colors where desired
Info :
When sewing the wing frame to the membrane, position the largest finger at the top and two shorter ones below, matching the photo. The outer edge has a green raised ridge made by working sc in FLO or a reverse sc ridge.
Round 7 :
With green yarn slip-stitch along the membrane edge in FLO to create a raised border (approx 1 sc per membrane stitch) - fasten off and weave ends.
Info :
Sew the completed wings to body on either side at the seam around body rounds 7-10, slightly below the shoulder line. Pin and check symmetry before sewing.
— Large Horns (Make 2) :
Info :
Large horns are conical and made in black yarn. They are worked in the round and stuffed lightly to keep shape. The larger horn in photos has a slight spiral taper; we achieve this by occasional increases then steady decreases.
Round 1 :
6 sc in MR with black (6)
Round 3 :
1 sc in each st (12)
Round 4 :
(2 sc, inc) x 4 (16)
Round 5-8 :
1 sc in each st (16) - begin forming cone
Round 9 :
(2 sc, dec) x 4 (12)
Round 10-12 :
1 sc in each st (12)
Round 13 :
(1 sc, dec) x 4 (8)
Round 14-16 :
1 sc in each st (8) - tapering further
Round 17 :
4 dec (4) - stuff lightly before closing
Round 18 :
Fasten off leaving long tail for sewing. Slightly bend horn or shape by applying a small amount of stuffing only in the base; sew onto head between rounds 3-6 of the head crown as pictured. Make two matching horns.
— Small Spikes (Make 6 for head + 6 for tail) :
Info :
Small spikes are made with black yarn; they are tiny cones or puff bumps sewn into a row down the head and along the top of the tail. Make 12 total or more as desired.
Round 2 :
(1 sc, inc) x 3 (9)
Round 3 :
1 sc in each st (9)
Round 4 :
(1 sc, dec) x 3 (6)
Round 5 :
6 sc (6) - fasten off and leave long tail for sewing
Info :
Sew these small spikes spaced evenly down the center-back of the head (3-4 spikes) starting near the skull crown and continue along the tail with consistent spacing between each. Use photos for spacing reference: head spikes are denser near the horns.
— Tail :
Info :
The tail is tapered and long with a black spade tip. Place several small black spikes along the top of the tail to mirror the photos. Work the tail in green and crochet the tip separately in black.
Round 3 :
(1 sc, inc) x 6 (18)
Round 4 :
(2 sc, inc) x 6 (24)
Round 5-8 :
1 sc in each st (24) - begin tapering for length
Round 9 :
(2 sc, dec) x 6 (18)
Round 10-14 :
1 sc in each st (18) - length rounds
Round 15 :
(1 sc, dec) x 6 (12)
Round 16-20 :
1 sc in each st (12) - continue tail to desired length (adjust number of even rounds for longer or shorter tail)
Round 21 :
(1 sc, dec) x 4 (8)
Round 22 :
1 sc in each st (8)
Round 23 :
Fasten off leaving long tail to sew on tail tip; stuff tail lightly but firmly, adding more stuffing near the base so it sits naturally when attached to the body.
Tail Tip (black) Round 1 :
6 sc in MR (6)
Round 3 :
(1 sc, inc) x 6 (18)
Round 4 :
1 sc in each st (18)
Round 5 :
(1 sc, dec) x 6 (12)
Round 6 :
6 dec (6) - stuff lightly and fasten off leaving tail for sewing
Info :
Sew the black tail tip to the tail end and then sew the whole tail to the body at the lower back center (body rounds 1-4 area). Place tail at a slight downward angle so the dragon sits as in the photos.
— Ears / Side Fins (Make 2) :
Info :
These side fins are green with a black ridge along the top. They sit slightly behind the eye and just below the horn base.
Round 3 :
(1 sc, inc) x 6 (18)
Round 4-6 :
1 sc in each st (18) - shape into a triangular fin by dec on one side on round 6: (4 sc, dec) x 3
Round 7 :
Sew a line of black sc or slip stitches along the top ridge using black yarn to create a contrast (fasten off and weave ends).
Info :
Sew these ears to the sides of the head aligning bottom edge with head round 12 and rear edge near the horn base. Slightly fold forward to mimic the slightly curled ear in the photo.
— Claws (Make 12 small claws for feet and hands) :
Claw Round 1 :
mr 3 sc (3) with black
Claw Round 2 :
1 sc in each st (3) - sl st, fasten off leaving tail
Info :
Sew three claws to each foot and three to each hand as shown in the photos. The claws should point slightly outward; position by pinning before sewing for best placement.
— Assembly Notes & Finishing Touches :
Info :
Before sewing pieces together: weave in all short tails, block flat pieces lightly if necessary, and pre-position pieces with pins to verify symmetry. Use matching green or black yarn to stitch pieces invisibly. Reinforce legs and wings by sewing through multiple rounds for stability.
Sewing Head to Body :
Align neck tube rounds (head rounds 26-31) with body neck opening (body round 18). Pin evenly around (approx. 18 stitches). Using mattress or whip stitch, sew head to body with green yarn; stitch through both layers for a firm attachment. Weave tail of yarn inside and knot securely.
Sewing Arms :
Place arms on either side of body approx. between body rounds 8-12. Pin in place and sew the arm seam through both body and arm stitches for at least 6-8 passes to secure. Stuff a final bit if needed before closing the shoulder seam.
Sewing Legs :
Sew legs to bottom of body spaced evenly so dragon can sit. Typical placement is body bottom rounds 1-3 with 6-8 stitches between legs. Sew through leg tube and body for a firm join; add extra stitches for stability if you will pose the amigurumi.
Wings Attachment :
Sew wings to body on sides at approximately body rounds 7-10. Attach each wing at two points for stability: base and mid-finger join where the green finger meets the body. Use matching green to hide seams; secure tightly for display.
Horns & Spikes Attachment :
Sew the large horns to the head crown just behind the brow (approx head rounds 3-6). Sew small spikes down the center back of the head and along the top spine of the tail. Use black yarn and sew through several stitches to secure firmly.
Final Finishing :
Trim and weave in all ends. Use small black embroidery stitches to add nostrils and small mouth details if desired. Apply a tiny dab of fabric glue behind safety eye washers for extra security if giving to a child.
Info :
Optional: Use a small amount of cosmetic blush or diluted acrylic paint to add subtle cheek shading. Protect eyes and yarn by allowing any glue/paint to dry fully before handling.
This Toxic Green Demon Dragon comes together into a dramatic, collectible amigurumi full of personality and attitude. The contrasting black belly, horns and spikes make the neon green color pop, and the wings and tail give it a lively silhouette. Every little detail — from the tiny claws to the horns — is satisfying to crochet and assemble. 🐉🖤 Enjoy each stitch and show off your finished dragon with pride! ✨