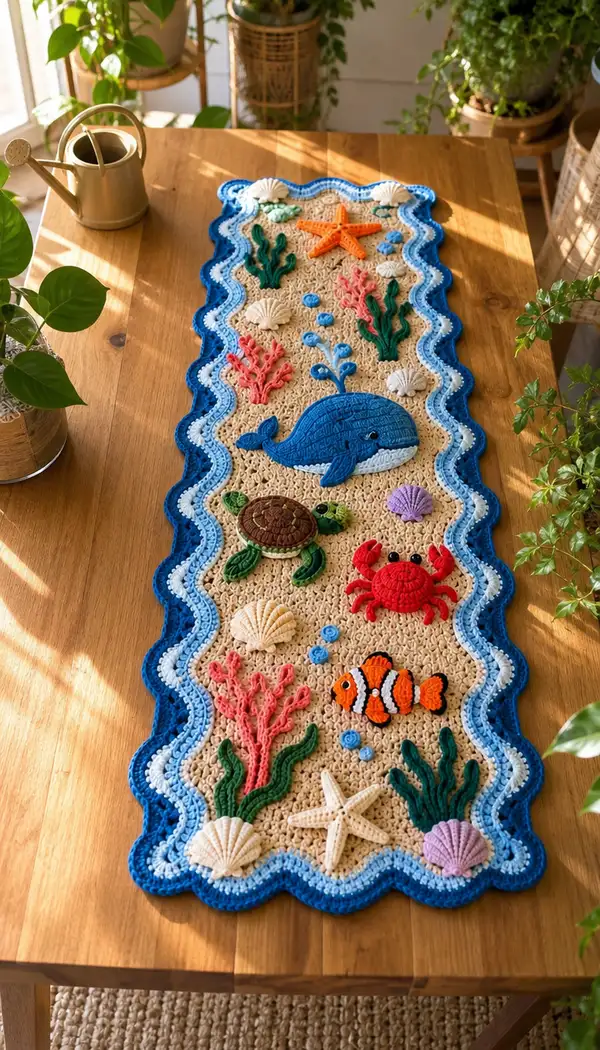
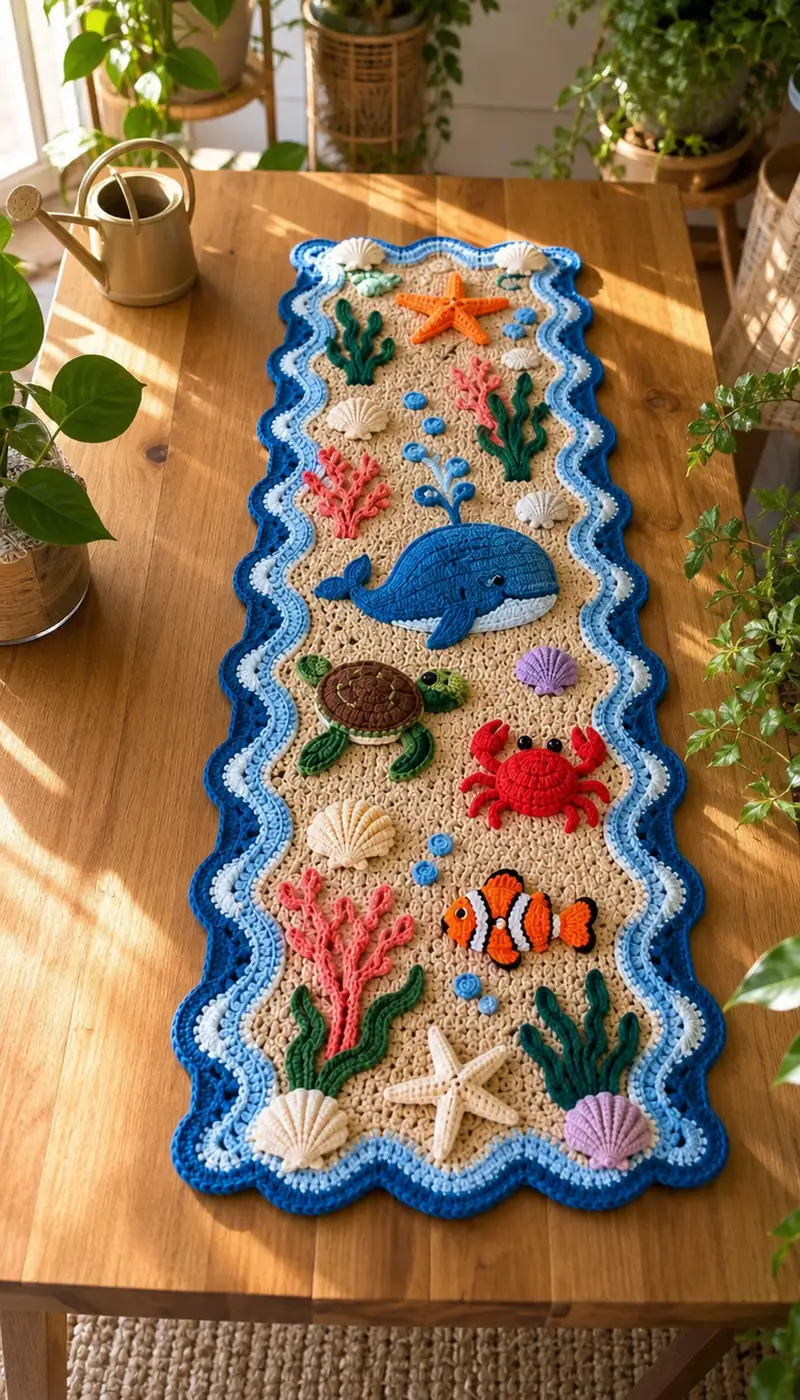
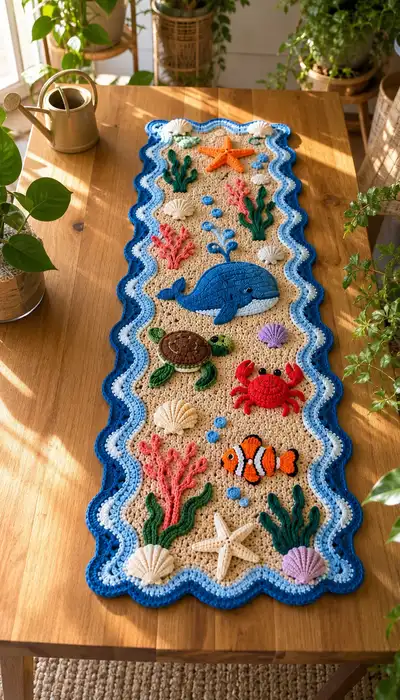
Bring a playful seaside vignette to your table with this detailed Undersea Table Runner pattern. The runner features a sandy lacy center, scalloped layered blue waves border, and an array of textured appliques: a whale, turtle, crab, clownfish, starfish, shells, corals and seaweed. Each applique is worked in the round or flat and sewn onto the sandy panel for a dimensional, tactile display that looks beautiful in natural light.
Progress Tracker
0% Complete
— Materials & Gauge :
Info :
Gauge is not strict for this decorative runner but aim for a tight enough tension so the lace sand texture still looks dense: 16 sts and 10 rows in shell stitch = 4 inches using 3.5mm hook and worsted weight yarn. Block as needed to get length.
— Center Panel (Sandy Lacy Panel) :
Round 1 :
Using sand/beige yarn, foundation chain 90 (this will create a long narrow runner; adjust in multiples of 6+2 to change width). Do not join; turn to begin Row 1.
Round 2 :
Row 1: ch 3 (counts as first dc), dc in 4th ch from hook, *sk 2 ch, (dc, ch1, dc) in next ch (shell made), sk 2 ch; dc in next ch; rep from * across to last ch, dc in last ch. (Approx 30 shell spaces and 32 dc columns depending on count)
Round 3 :
Row 2: ch 3, turn. Dc in first dc, *in ch1 space of shell: (dc, ch1, dc); dc in next dc column; rep across to end, ending dc in top of turning ch. (Maintain same number of shells as Row 1)
Round 4-10 :
Repeat Row 3 for rows 3-9 (maintain shell count). Keep edges neat by making 1 dc into turning space at beginning and end of each row. (Panel width stays constant)
Info :
Use stitch markers every 10 shells across the first row to easily count positions for applique placement later. Work flat rows; each row is referred to as a round for consistency in this pattern.
Round 11-20 :
Continue working Row pattern (dc then shell in spaces) for rows 10-19 to reach desired runner length; this creates a lacy sand-like texture. Aim for 40 rows of shell pattern total for a runner approx 36-40 inches long depending on hook/yarn. (Panel should look dense but lacy)
Info :
If you prefer a longer runner, continue shell rows in multiples of 2 rows per extra 2-3 inches. Keep ends consistent for joining the scalloped border.
Round 21-40 :
Work rows to complete center panel length. On the final row, fasten off with a long tail for seam between border and panel. Block the panel flat to measurements and pin to blocking mat before making border to ensure scallops sit evenly.
— Border: Layered Wavy Scallop Edge (Make 3 Color Layers) :
Info :
We will work three stacked scalloped borders to create the layered wave effect: light blue, medium blue, and dark blue outer scallop. Join to the panel edges and work each scallop round around the perimeter. Work in joined rounds; each round will be called Round 1 etc for that color.
Round 1 (Light Blue) :
With light blue, join in any edge stitch at center of one short end with sl st. Ch1, sc evenly along short edge placing 1 sc in each row edge (approx 40 sc on short end). Continue along long side placing 1 sc in each dc and 1 sc in each shell turning space; around the opposite short end repeat sc count; finally sc evenly along second long side back to start. Join with sl st to first sc. (Total sc around ~2 * panel side counts; keep same number both long sides.)
Round 2 (Light Blue) :
Ch3 (counts as dc), *skip 2 sc, (5 dc) in next sc, skip 2 sc, dc in next sc; rep around to create scallop shells. Join with sl st to top of starting ch. (Each 5-dc shell forms a wave bump)
Info :
Adjust shell placement so each long side has an even number of shells; add an extra dc or sc in corners if necessary to keep scallops even. Use stitch markers to mark shell centers on long edges before working the round.
Round 3 (Light Blue) :
Ch1, work 1 sc in top of each dc around and 1 sc in each ch-space between shells to create a neat base for next color. Join and fasten off. (This evens the edge and prepares for medium blue)
Round 1 (Medium Blue) :
Join medium blue to the inside edge of the light-blue scallops by sl st in the top of the 3rd dc of each 5-dc shell. Ch3 (counts), 2 dc in same sp, *3 dc in center of next light-blue shell top; rep around making 3-dc shell on each previous shell top. Join. (This creates a double-layered wave effect.)
Round 2 (Medium Blue) :
Ch1, sc in each dc around to tidy. Fasten off. Work even tension so shells remain slightly 3D.
Round 1 (Dark Blue Outer) :
Join dark blue to top of each medium-blue 3-dc shell center. Ch3, (dc, ch1, dc) in same sp to form a picot-like bump, *sk next shell center, (5 dc) in next shell center; rep around to accentuate big wave. Join.
Round 2 (Dark Blue) :
Ch1, sc in each st and 1 sc in each ch1 space to tidy outer rim. Fasten off and weave ends. Block the entire runner gently, pinning scallops in place so waves sit evenly.
Info :
Blocking helps scallops open and sets the runner's rectangular shape. Use pins to shape waves so the layered blues cascade neatly around the sandy panel.
— Whale Applique (Large, worked flat, 28 rounds) :
Round 1 :
Start in bright blue yarn. Magic ring, 6 sc in ring (6)
Round 3 :
(1 sc, inc) x 6 (18)
Round 4 :
(2 sc, inc) x 6 (24)
Round 5 :
(3 sc, inc) x 6 (30)
Round 6 :
(4 sc, inc) x 6 (36)
Info :
We will now shape into an oval by adding increases only at two opposite sides to elongate the circle. Place markers at opposing stitch positions to guide directional increases for head and tail shaping.
Round 7 :
*1 sc in next 6 sts, inc in next st (right side increase), rep across until you reach opposite marker: 1 sc in next 6 sts, inc in next st, then 1 sc in the flanking stitches on the long edges. Total approx 42 (patterned increases focused at two sides)
Round 8 :
1 sc in each st around (42)
Round 9 :
To elongate: [1 sc in next 8 sts, inc] twice around the two long sides (44)
Round 10 :
1 sc in each st around (44)
Round 11 :
Along the nose end add 2 increases in the single stitch at the edge to create a gentle point: (1 sc in next 10 sts, inc, inc) twice, else 1 sc around. (48)
Round 12 :
1 sc in each st around (48)
Info :
Place eye as a small embroidered black stitch or sew a small safety eye at round 11-12, 6-8 stitches from nose edge. If using safety eyes, do so now before stuffing or before sewing whale to panel.
Round 13 :
(4 sc, dec) x 8 (40) - begin slight shaping toward belly edges
Round 14 :
1 sc in each st around (40)
Round 15 :
(3 sc, dec) x 8 (32)
Round 16 :
1 sc in each st around (32)
Info :
We will add a belly panel in light blue/white using surface slip stitch or by crocheting a second flatter oval to sew on. For dimension, make the belly oval now and stuff the main whale edge lightly when sewing to the panel.
Round 17 :
Switch to a slightly darker blue for surface texture: FLO 1 sc in each st around to create a ridge (32)
Round 18-20 :
1 sc in each st around for 3 rounds to build thickness (32)
Round 21 :
(2 sc, dec) x 8 (24)
Round 22 :
1 sc in each st around (24)
Round 23 :
(1 sc, dec) x 8 (16)
Round 24 :
1 sc in each st around (16)
Round 25 :
6 dec evenly (6) - this brings tip of tail/nose closed depending on orientation
Round 26 :
Fasten off leaving long tail for sewing. Shape and flatten slightly; no heavy stuffing required for this applique — keep it fairly flat so it sits on the runner. Use tapestry needle to weave and close if needed.
Info :
Make a separate belly oval: Chain 10, join and work 2 rounds of sc increasing at ends to make an oval approximately 14-16 sts around and 4-6 rows deep in light blue or white. Fasten off and reserve for sewing to whale body at center lower edge.
— Turtle Applique (Shell + Body + Limbs, 26 rounds total across parts) :
Shell - Round 1 :
Using brown yarn: magic ring, 6 sc (6)
Round 3 :
(1 sc, inc) x 6 (18)
Round 4 :
(2 sc, inc) x 6 (24)
Round 5 :
(3 sc, inc) x 6 (30)
Round 6 :
(4 sc, inc) x 6 (36)
Info :
Create patterning on shell by working front loop only rounds: FLO sc in next 2 rounds to produce a ridged look, then surface crochet hexagon shapes later with green/pale yarn to suggest shell segments.
Round 7 :
1 sc in each st around (36)
Round 8-9 :
Work 2 rounds of BLO sc to create a slight ridge (36)
Round 10 :
Fasten off shell leaving long tail for sewing. Embroider shell hex shapes with contrasting yarn: use slip stitch outlines in a spiral with darker brown, then anchor.
Body (under-shell oval) - Round 1 :
Using green, chain 6, join to make ring, 10 sc around (10)
Round 2 :
(1 sc, inc) x 5 (15)
Round 3 :
(2 sc, inc) x 5 (20)
Round 4 :
1 sc in each st around (20)
Info :
Place the shell on top of body, pinning to check coverage. The shell sits centered on the body; leave a small green rim showing for the turtle skirt.
Limbs - Make 4 :
Using green, magic ring, 6 sc (6) Round 1; Round 2: (1 sc, inc) x 2 (8); Round 3-5: 1 sc in each st (8). Fasten off leaving tail. Flatten and sew open end to body side for flipper look. Make one head: magic ring 6 sc; Round 2: inc 6 (12); Rounds 3-4: 1 sc around (12). Stuff lightly and sew to front of shell.
Info :
Sew shell to body with running whip stitch around edge so shell appears fixed with a slightly raised profile. Add embroidered eye or small safety bead on head before final sewing.
— Crab Applique (Body + Claws + Legs, 20 rounds total) :
Body Round 1 :
Using red yarn, magic ring, 6 sc (6)
Round 3 :
(1 sc, inc) x 6 (18)
Round 4 :
(2 sc, inc) x 6 (24)
Round 5 :
(3 sc, inc) x 6 (30)
Round 6 :
1 sc in each st around (30)
Info :
Slightly flatten body for crab, we will add legs and claws individually and sew onto the perimeter. Add two small black beads for eyes: position on top edge before attaching claws.
Claw (Make 2) - Round 1 :
Chain 6, join to work in rounds: Round 1: 10 sc around (10); Round 2: (1 sc, inc) x 3 + 1 sc in remaining (13); Round 3-4: 1 sc around (13). Fasten off leaving tail for sewing. Use shaping to make pincer by flattening tip and securing with a few stitches.
Legs (Make 6) :
For each leg: chain 8, turn, sc in 2nd ch from hook and across (7 sc), fasten off leaving tail. Roll or twist slightly when sewing to the body to create natural leg curve.
Info :
Sew claws to front sides of body and legs evenly spaced around lower perimeter. Sew eyes slightly above the top edge using small black beads or French knots with black yarn.
— Clownfish Applique (Flat Shaped Fish, 18 rounds) :
Round 1 :
Using orange, magic ring, 6 sc (6)
Round 3 :
(1 sc, inc) x 6 (18)
Round 4 :
(2 sc, inc) x 6 (24)
Round 5 :
1 sc in each st around (24)
Round 6 :
To shape the fish body, work (3 sc, dec) x 4 (20)
Round 7 :
1 sc in each st around (20)
Info :
Switch to white yarn for the clownfish bands. Use surface slip stitch or work small white oval pieces and sew them on. Outline with black yarn to create the familiar bold stripe edges.
Round 8-10 :
Add a small tail by chaining 6 and working 2 rows of sc to form a flat tail, then sew to body. Add dorsal fin by chain 5 and working dc cluster along chain; sew to upper body. Fasten off and weave ends.
— Starfish (Make 1, 12 rounds) :
Round 1 :
Using cream/orange yarn, magic ring, 5 sc (5)
Round 3 :
(1 sc, inc) x 5 (15)
Round 4 :
Fold the disk into five points by working: *ch 6, sl st into base at spaced positions to create a point; rep around 5 times to make arms. (Creates 5 loops for arms)
Round 5-8 :
Work each arm in turn: Join yarn into loop, 6 sc in loop, (1 sc, inc) around to make tapered arm about 6-8 sc long. Fasten off and stuff each arm lightly before finishing. Repeat for all arms.
Info :
Starfish should be lightly stuffed to keep them slightly raised. Sew onto runner with a few stitches in the center so arms spread naturally.
— Shells (Make 6 Mixed Shells, each 8-12 rounds) :
Shell A - Round 1 :
Cream yarn, magic ring, 6 sc (6)
Round 3 :
(1 sc, inc) x 6 (18)
Round 4 :
Work 1 row of BLO sc to add a ridge (18)
Round 5 :
Fasten off and shape the shell by folding and sewing the base with a few gathering stitches, creating a fan-like ridged shell.
Shell B (Ribbed) :
Chain 8, sc back across to make an oval, work 3 rows increasing ribs with BLO or FLO to create top ridges, fasten off and gather at one edge to make scallop shell shape. Repeat for variety and colors: lavender, pale pink.
Info :
Make a mix of shells (smooth fan shells and ribbed scallop shells). Sew these to panel near scallops and around animals for a natural beach scatter.
— Coral Branches (Make 6, 10-14 rounds each) :
Coral Type A :
Using coral pink yarn, ch 20; Row 1: sc in 2nd ch from hook and across (19). Row 2: ch3 turn, dc in each st across (19). Row 3: ch1 turn, *sl st in next 2 sts, (sc, ch3, sc) in next st to make a branch; rep along to create forked branches. Work 3-5 layered repeats to build fullness. Fasten off, block slightly to open branches.
Coral Type B :
Using darker coral, chain 14, sc back across; on both edges create small picot loops by ch3 sl st into base in every 3rd st to simulate fringing coral. Make 3-4 of these and vary lengths to create natural feel.
Info :
Sew coral pieces by their base to the panel so branches fan upward. Use a few transparent stitches to anchor without flattening the lacy sand texture beneath.
— Seaweed (Make 6, slender tall pieces, 12 rounds each) :
Seaweed A - Round 1 :
Using dark green, chain 30, turn. Row 1: sc in 2nd ch from hook across (29). Row 2: ch1 turn, BLO sc across to create a wave ridge; Row 3: ch3 turn, dc in next 2, skip 1 to make undulating stalk; Repeat for 6-10 rows to desired height. Fasten off leaving long tail for sewing.
Seaweed B (Twisted) :
Chain 16, sl st in each chain back to form a cord. Twist the cord and secure with a few stitches along its length to set. Create 3-5 of these to add vertical texture.
Info :
Sew seaweed pieces from the base into the sandy stitches so they appear to grow from the sand. Use a few anchoring stitches at base and one or two at mid-height to keep them upright.
— Small Bubbles & Details (Make many small discs and bobbles) :
Round 1 :
Using pale blue, magic ring, 6 sc (6)
Round 3 :
1 sc in each st around (12)
Round 4 :
Fasten off leaving tail to sew. Make many tiny bobbles of 6 sc and 12 sc sizes and randomly scatter around animals to suggest bubbles. Use a small dot of glue on the back to secure if sewn stitches would distort the sand pattern.
Info :
Make bubble clusters in three sizes to add realistic variety. Sew them with hidden stitches or lightly glue in place if you're concerned about surface stitches showing.
— Assembly Prep & Placement Guide :
Info :
Before attaching appliques, lay the blocked panel flat and arrange all motifs as shown in the photo: place one large whale roughly 9-12 inches from one end centered horizontally; turtle near the whale's lower quadrant; crab and clownfish grouped on the other half; starfish and shells spaced near scalloped border corners with coral and seaweed filling vertical spaces. Use removable pins to test placement.
Info :
We recommend using a combination of whip stitch and mattress stitch for secure attachment. For flat appliques like fish and shells, use invisible whip stitch around edge. For slightly raised pieces (whale, turtle shell, starfish), sew a few anchoring stitches at base and shape while sewing to maintain 3D appearance.
Round 1 :
Attach the whale by placing it with its belly aligned with 12th-18th shell-row of the panel. Using matched blue tail, sew through the middle rounds of the whale to the sand panel along the perimeter every 6-8 sts to keep it secure but slightly raised. Knot and weave ends.
Info :
For heavier pieces like the turtle shell, use small backstitches through the shell and the underlying body to create a secure anchor. Add a few stitches through the center underside to keep it from rotating.
Round 2 :
Sew coral pieces at intervals; attach seaweed with a few stitches at base; glue tiny beads for eye highlights if desired. Double-check scallop border is not pulled when sewing appliques—if so, add anchoring stitches in the sand panel near the border rather than the border itself.
Info :
Weave in all ends on the back of the runner and trim. Add a few extra stitches at stress points (under turtle and crab) for durability. Steam-block lightly to reset shape if sewing altered the panel stretch.
This Undersea Table Runner is a delightful blend of texture and color that transforms any table into a seaside scene. Each applique adds personality and tactile charm, making it perfect for casual dining or a whimsical centerpiece. The layered scalloped border frames the sandy lacy panel beautifully and the dimensional animals invite touch and smiles. 🐋🦀 Enjoy the meditative rhythm of crochet as this project comes together — it’s a lovely long-term keepsake or a treasured gift. 🌊