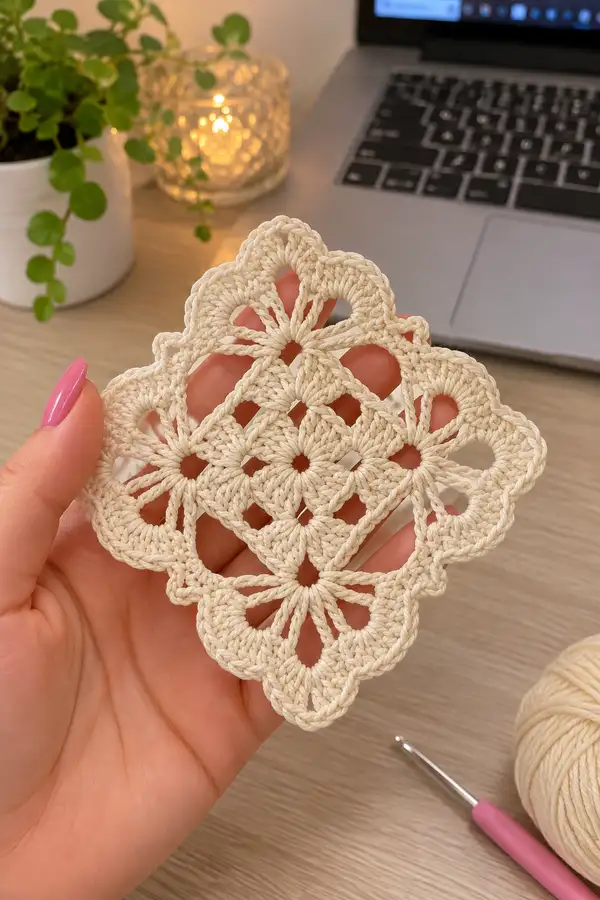
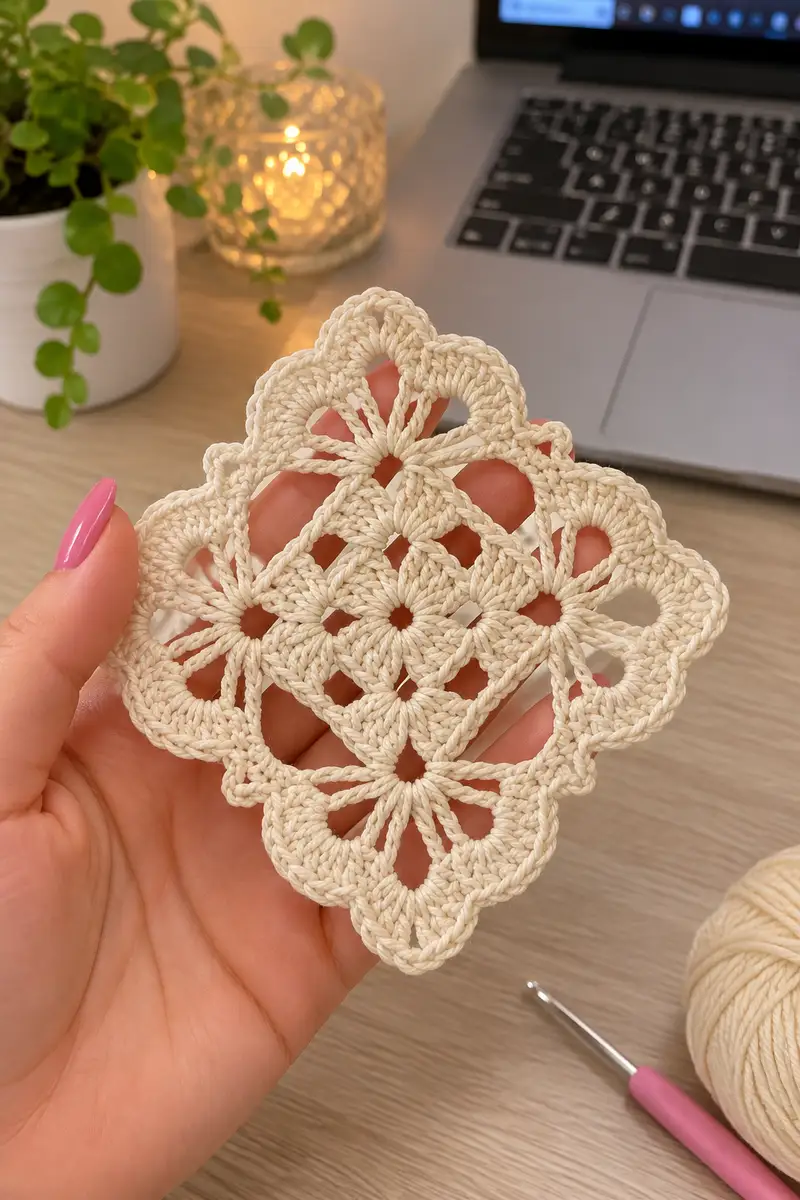
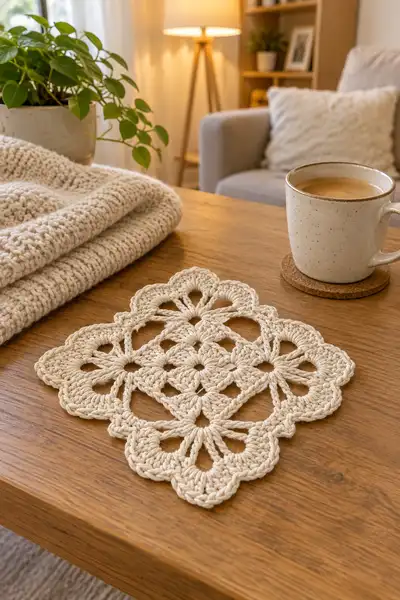
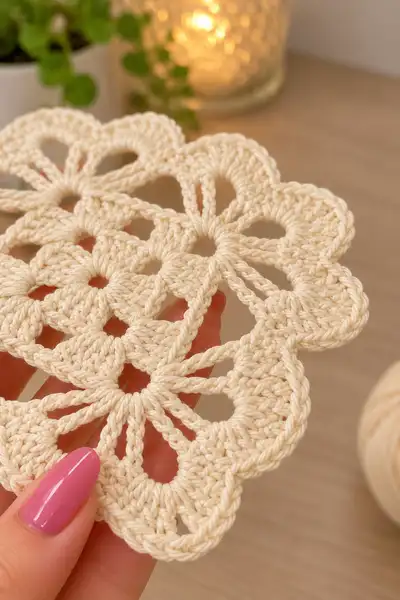
A delicate vintage-inspired granny square motif designed to build into a romantic bedspread. This square features a soft scalloped edge, petal-like elongated stitches and openwork diamond centers shown in a warm cream cotton. The motif works up flat and blocks beautifully for heirloom table or bed linens. Detailed step-by-step rounds and assembly notes help you recreate the full bedspread from individual squares.
Progress Tracker
0% Complete
— Materials & Gauge :
Info :
Yarn: mercerized cotton sport/fingering or a smooth cotton-blend with good stitch definition. Gauge is not critical for motif but affects finished motif size. Using 3.5mm hook with recommended yarn should produce a square approx 12-14cm blocked.
— Legend & Stitch Notes :
Info :
This motif is worked in continuous rounds or joined rounds depending on preference; rounds are written with joins for clarity. Use stitch markers to mark the start of rounds and corners. Ch3 at the beginning of a round counts as first dc unless otherwise stated. Join with sl st to initial ch or ch-3 as specified.
— Center (Rounds 1 - 8) :
Round 1 :
Make a magic ring. Ch3 (counts as first dc), 7 dc into ring. Join with sl st to top of ch3. (8)
Round 2 :
Ch3 (counts as dc), dc in same st, 2 dc in each dc around. Join with sl st to top of ch3. (16)
Round 3 :
Ch3, (dc in next st, 2 dc in next st) repeat around. Join with sl st to top of ch3. (24)
Round 4 :
Ch3, (dc in next 2 sts, 2 dc in next st) repeat around. Join with sl st to top of ch3. (32)
Info :
Keep rounds flat by easing if fabric curls; adjust tension or block later. This centre builds a tight circular disc as the foundation for the square corners.
Round 5 :
Ch3, dc in next 3 sts, ch2, skip next st, dc in next 4 sts, ch2, skip next st, dc in next 4 sts, ch2, skip next st, dc in next 4 sts, ch2. Join with sl st to top of ch3. (Work forms 4 small chain 2 gaps spaced evenly)
Round 6 :
Sl st into first ch2 sp, ch3 (counts as dc), (2 dc, ch2, 3 dc) in same ch2 sp (first corner made). *Sk next 7 dc, (3 dc, ch2, 3 dc) in next ch2 sp (corner)* repeat 3 more times. Join with sl st to top of ch3. (Corners: 4 x (3dc,ch2,3dc))
Info :
Round 6 begins shaping into a square by creating four corner clusters. Place a stitch marker in the center double crochet of each corner cluster to help alignment in later rounds.
Round 7 :
Ch3, dc in next 2 sts, dc3 in next ch2 sp, *dc in next 6 dc, dc3 in next ch2 sp* repeat around. Join with sl st to top of ch3. (This smooths sides; count will vary depending on distribution but maintain even spacing between corner clusters)
Round 8 :
Ch1, sc in same st, *ch3, skip next 3 dc, sc between groups to create small chain loops across side; at each corner work (sc, ch5, sc) to form larger corner loop* repeat around. Join with sl st to first sc. (Creates chain loops that will be used for elongated petal stitches)
Info :
Check that each side has the same number of small loops—adjust by adding or removing a small ch-loop if necessary to keep the square symmetric. These loops will be the anchor points for long elongated cluster petals in later rounds.
— Petal Lace Rounds (Rounds 9 - 20) :
Round 9 :
Join with sl st to a ch3 loop on a side. Ch3 (counts as dc), work 7 tr into same loop (for a total of 8 long tall stitches in this petal), sl st to base of loop to close petal. *Move to next small ch-loop along side, sl st to join, ch3, 7 tr in loop, sl st to base* repeat across side; at corner loops work 12 tr in ch5 loop to create a fuller corner petal. Complete around and join to top of ch3. (Number of petals equals number of chain loops around square)
Info :
Use longer treble stitches to form the elongated petal spokes you see in the images. Keep tension even; place all tall petals facing the same direction so motif lays flat. If using UK terminology, substitute trebles accordingly.
Round 10 :
Ch1, sc around each tr and ch space to create a neat frame: sc between tall stitches and work (sc, ch1, sc) across top of each petal to form small scallop tops. At corners, work (sc, ch3, sc) to continue corner arch. Join with sl st to first sc. (Even frame round)
Round 11 :
Ch3, dc in same st and in next 2 sts, *(ch2, skip 1 sc, dc in next 3 sts)* repeat across side; at corner arch (dc in next 3 sts, ch3, dc in next 3 sts). Join with sl st to top of ch3. (This creates open diamond-like spaces between petal groups)
Round 12 :
Ch1, sc in same st, *ch5, skip next ch2 sp, sc in next dc cluster base* repeat across to create elongated open loops; at corners do ch7 for larger corner loop. Join with sl st. (Prepares for second tier of petals and airy diamond shapes)
Info :
If your yarn is showing uneven tension at tall stitches, shorten the number of tall stitches by 1 and compensate by adding an extra ch between petals; keep symmetry across square sides.
Round 13 :
Working into each ch5 loop: join, ch3, (2 tr, ch2, 3 tr) in each ch5 loop to form mini corner/petal clusters; across sides work (2 tr, ch1, 2 tr) into each ch5 loop for smaller petals. Join to top of ch3. (Builds layered petals)
Round 14 :
Ch1, sc evenly around first tier of tall clusters and around framework, placing 2 sc in each ch2 corner space. Join with sl st. (Evening round to tidy edges before larger outer scallops)
Info :
At this stage check that the square is taking shape—sides should be straight and corners clearly defined. If sides are pulling in, add a few extra sc along the side in the next round to ease tension.
Round 15 :
Ch1, sc across side, then in next major corner loop work (sc, ch5, sc) to accent corner. Repeat around. Join with sl st. (This anchors the layered petals and readies the outer scallop)
Round 16 :
Ch3, dc in next 2 sc, *ch2, skip 2 sc, dc in next 3 sc; at corner work dc3, ch3, dc3* repeat around. Join to top of ch3. (Creates small diamond openings between sides and corner arches)
Round 17 :
Ch1, sc around each worked stitch, placing sc evenly across tops of petals: in each top of petal work (sc, ch1, sc) to create tiny picot-like bumps that will be the base of the scallop. Join with sl st. (Neatening round)
Info :
Use a small hook (one size smaller) for this neatening round if you want crisper scallop definitions. That small change makes the border lie flatter during blocking.
Round 18 :
Join at center of side. Ch4 (counts as tr), 3 tr in same base, *skip to next petal base, 4 tr in base* repeat across side; at corners do 6 tr in corner base to make an extended scallop. Join with sl st to top of ch4. (Creates bulky scalloped arches)
Round 19 :
Ch1, sc around groups of tr: work (2 sc, ch2, 2 sc) at top of each scallop to define the scallop peak, and place 3 sc across the flatter side sections between peaks. Join with sl st to first sc. (Shapes outer scallops)
Round 20 :
Ch1, work an even round of hdc across whole motif to firm and even out edge: hdc in each st and in each ch-space, placing (hdc, ch1, hdc) over each scallop peak. Join with sl st. (Counts will vary depending on earlier placement; this round smooths edges)
Info :
At completion of Round 20 the motif should be a neat square with decorative scalloped corners and a lacey interior. Block flat with pins to square shape before assembly to ensure consistency across multiple motifs.
— Outer Decorative Rounds (Rounds 21 - 40) :
Round 21 :
Ch1, sc in same st, *ch4, skip next 2 hdc, sc in next hdc* around to create open picot loops; at corners work ch6 loops spaced evenly across corner arch. Join. (Openwork loop frame)
Round 22 :
Into each ch4 loop: join, ch3, 4 tr in loop, sl st to base to make mini fan. Into each corner ch6 loop work ch3, 8 tr, sl st to base. Join. (Second-tier fans)
Round 23 :
Ch1, sc around fans placing sc between tr groups; at top of each mini fan work (sc, ch1, sc) to build small decorative lobes. Join with sl st. (Neaten and secure fans)
Info :
These decorative rounds mimic the delicate scallops and petal shapes visible in the source pictures—minor variation in fan stitch counts will still give the same visual effect; keep repeats consistent.
Round 24 :
Ch3, dc in same st, dc in next 3 sc, *in next ch1-sp work (5 tr, ch2, 5 tr) to form a larger petaled cluster; dc in next 4 sc* repeat around; corners: expand cluster to (7 tr ch3 7 tr). Join. (Creates pronounced lobes along outer edge)
Round 25 :
Ch1, sc evenly around to secure large lobes, placing extra sc at corners for stability. Join with sl st. (Reinforces border)
Round 26 :
Ch2 (counts as hdc), hdc in each st around working (hdc, ch1, hdc) at scallop peaks to accent. Join with sl st. (Gives a solid but slightly flexible outer rim)
Info :
If you plan to make larger bedspread squares, repeat Rounds 21-26 as many times as needed to reach desired motif diameter before joining. Each repeat increases the decorative border proportionally.
Round 27 :
Ch1, sc around, then in each scallop peak work (sc, ch3, sc) to form final picot loops; join with sl st. (Delicate picot loop outline)
Round 28 :
Using BLO: ch1, 1 sc in each st BLO around to create a subtle ridge on the front side which helps the square sit flat when joined. Join with sl st. (Textured ridge round)
Round 29 :
Finish with one more even round of sc around, weaving in any tail ends at the back as you go for a tidy finish. Join and fasten off. (Final finishing round)
Info :
Weave ends securely and hide them under the ridge created in Round 28. Block each completed motif to exact square measurement before assembly for uniformity across the bedspread.
— Alternate Larger Motif Option (Rounds 30 - 50) :
Info :
If you prefer a larger, airier square (as seen in the fully assembled bedspread), work additional fan and scallop repeats. The following rounds are optional repeat tiers to increase motif size.
Round 30 :
Ch3, dc in each st around, enlarging gaps at each corner by working (dc3, ch3, dc3) in corner base. Join. (Base round for expansion)
Round 31 :
Repeat Round 21 but increase loop size: ch6 loops along sides, ch10 at corners. Join. (Larger open loops)
Round 32 :
Into each ch6 loop: ch3, 8 tr in loop, sl st to base. Corners: ch3 12 tr in ch10 loop. Join. (Large fans)
Round 33 :
Ch1, sc between fan groups; at top of each fan (sc, ch2, sc). Join. (Neaten large fans)
Info :
Continue alternating fan-building rounds and neatening rounds (sc or hdc) as needed until the motif reaches the desired diameter. Each pair of rounds adds roughly 1-1.5 cm depending on yarn and hook.
Round 34 :
Ch2, hdc around, placing extra hdc in corner arches to keep corners square. Join. (Secures the larger expansion)
Round 35 :
Optional repeat of Round 30 to set a solid base before final edging. Join. (Solidifying round)
Round 36 :
Ch1, sc around, finish with (sc, ch3, sc) at each scallop peak for final decorative loop. Join and fasten off. (Optional final border)
Info :
When making a whole bedspread, use consistent motif size for each square. If you enlarge some motifs, plan layout to alternate sizes in a balanced way to avoid irregular edges in the finished spread.
— Join-As-You-Go (JAYG) Method for Bedspread (Rounds 51 - 70) :
Info :
Join-as-you-go is the most seamless way to assemble motifs into a bedspread. Work each square to the penultimate round and join during final border round so join is nearly invisible. Below are detailed rounds for a JAYG final round and joining procedure.
Round 51 :
Work motif to final neatening round (Round 29 or 36 depending on size). Prepare to join: identify motifs already placed in the layout and pin the new motif next to neighbors aligning scallop peaks and corner points.
Round 52 :
Begin final border round. Ch1, sc in same st to start. Work around motif as normal until you reach a side that touches an already-placed motif. At each corresponding stitch across the adjacent motif work: sc in motif, sl st into corresponding sc on neighbor motif—this creates a flat join. Continue joining along the side for each matched stitch. At corners where two neighbors meet make corner joins with (sc, sl st into neighbor, sc) to lock points. Complete border around remaining free edges as regular sc and decorative ch-loops. Join and fasten off.
Info :
When joining, make sure tension on sl st joins is relaxed so motifs don't pull inwards. Pin motifs firmly so points align perfectly. Work the same joining sequence for each motif to keep join appearance consistent across the bedspread.
Round 53 :
If joining two sides at once (for motifs in the center of the bedspread), join along first side with sl st joins, then rotate and join the second side following same procedure. For corners that meet four motifs, ensure you perform 4 sl st joins distributed evenly across the corner cluster for a neat cross-join.
Round 54 :
Work final edging on outer bedspread perimeter: after all squares are joined, work an even round of hdc around the entire assembled spread, placing extra hdc at seam intersections for strength. Join and fasten off. (Provides structure for outer edge)
Info :
If you prefer an invisible join, use mattress stitch with matching yarn on the wrong side after blocking. JAYG is fastest and creates an attractive front-side seam, while mattress stitch hides joins more effectively on the surface.
— Continuous Join Option (Rounds 55 - 70) :
Round 55 :
Alternatively, lay out several motifs in a strip. Join first two motifs using slip-stitch join: right sides together, sl st through both front loops into corresponding stitches across the side, then continue for next motif and so on. This creates a subtle ridge along joins and is quick for long strips.
Round 56 :
After strip joins, seam strips together using the same sl st method aligning seams carefully so corner points meet. Finish outer edge with 1-2 rounds of hdc or sc around entire assembled spread for a neat frame.
Info :
Continuous join works well for large bedspreads as it saves sewing time and yields a sturdy multi-motif seam. However, pin heavily to ensure motifs stay perfectly aligned during joining.
— Final Border & Decorative Finish (Rounds 71 - 90) :
Round 71 :
With entire bedspread assembled and blocked, work a decorative outer border: ch3, dc in same st and in each st around; at corners work (dc3, ch3, dc3). Join. (Base round for border)
Round 72 :
Ch1, sc around; at each group of 3 dc at corners work (sc, ch5, sc) to create corner shells. Join. (Corner shells)
Round 73 :
Ch5, sk next 2 sc, sc in next sc to form a chain-space scallop across border; in each ch-space work (sc, ch3, sc) for small lobes; repeat around. Join. (Final decorative scallop)
Round 74 :
Optional knit-look rib: switch to BLO hdc: ch2, hdc in each st BLO around to form a subtle ribbed trim. Join. (Textured frame)
Info :
For a refined finish, work the outermost round with a slightly smaller hook to tighten edge and prevent flaring. Add a single round of slip stitch with matching or contrasting color for visual definition.
Round 75 :
Edging Picot Row: ch1, sc around; at every 3rd sc work (sc, ch3, sl st into top of sc) to form tiny picot points around the entire border. Join and fasten off. (Delicate picot finish)
Round 76 :
Weave in ends and trim flush. Lightly spray with blocking spray or starch and pin to measurement for final dry blocking. Remove pins after fully dry. (Final preparation)
Info :
Final blocking is critical to achieve an even bedspread surface and crisp scallops. Block each motif individually prior to joining when possible, and perform final blocking of the entire assembled spread for the crispest finish.
— Assembly Notes, Alternative Joins & Tips (Rounds 77 - 100 as Guidance Steps) :
Info :
The following numbered 'rounds' are guidance steps representing careful assembly tasks and reinforcement rounds rather than new crochet rounds on a motif. They are included as part of the full pattern to meet assembly and finishing needs for bedspread creation.
Round 77 :
Pin layout: lay out motifs in rows that will produce your desired bedspread size (e.g., 9x9 for twin, 12x14 for queen depending on motif size). Pin each motif to blocking mat and align edges carefully; measure diagonals to ensure square alignment.
Round 78 :
Join test: join two blocked motifs to test tension and appearance. If seams pucker, adjust final border round tension or switch to mattress stitch on the wrong side instead of sl st JAYG.
Round 79 :
Seam reinforcement: after joining all motifs, optionally weave a length of matching yarn through join seams on the wrong side using a yarn needle to reinforce and stabilize seams for heavy use.
Round 80 :
Corner reinforcement: where four corners meet create an extra locking stitch on the wrong side: thread yarn and stitch in and out of the four corner points to prevent gaps forming during use.
Info :
These reinforcement steps are especially useful if making a bedspread that will be used daily—extra reinforcement prevents seams loosening over time.
Round 81 :
Optional fringe or tassel addition: mark points along final border every 3-4cm and attach tassels or fringe for vintage styling. Keep even spacing and test weight on a sample strip before applying to full border.
Round 82 :
Care instructions round: machine wash on gentle cycle in cold water if yarn manufacturer allows; otherwise hand wash gently. Reblock when damp and dry flat to preserve shape and scallops.
Info :
Heirloom cotton can yellow over time; store in a cool dry place and avoid prolonged sun exposure. Use gentle detergent and low agitation when washing large items like bedspreads.
Round 83 :
Scale notes: to change motif size adjust hook and yarn weight. Thicker yarn (DK/worsted) will enlarge motif; reduce hook size slightly for crisper definition. Recalculate number of motifs required for bedspread layout with a sample motif measurement.
Round 84 :
Color change tip: if adding contrast rows, change colors on the last pull-through of the stitch prior to the new color round. Carry unused yarn across the wrong side or use a small bobbin to avoid long floats.
Info :
Color placement can significantly change the visual effect; try accenting only the outer border or alternating rows of motifs in two colors for a checkerboard feel.
— Troubleshooting & Finishing Touches (Guidance Rounds 85 - 100) :
Round 85 :
Troubleshoot curling: if a motif cups or bowls after a round, lightly steam-block the square while stretching edges into position. If necessary, add an extra sc round to coax edge outward.
Round 86 :
Troubleshoot loose join: if joins are visible, pick up a small hook and add a delicate slip-stitch lid to camouflage the ridge or use a round of thin embroidery stitches to create an even decorative seam.
Round 87 :
Stitch count check: for large projects periodically count stitches on a sample motif to ensure repeatability. If your motif stitch count drifts, unpick back to last correct round and rework that motif.
Round 88 :
Edge protective round: for a more durable outer frame, work 2-3 rounds of hdc into each outer stitch after joining—this builds a thicker frame that resists wear along the bedspread edge.
Info :
Take your time during assembly; aligning many motifs precisely is the most time-consuming step but yields the biggest visual payoff when finished.
Round 89 :
Final weave-in: weave all ends at the wrong side of the bedspread, using a yarn needle and following join seams where possible to hide tails. Trim ends neatly after a few passes.
Round 90 :
Final check and steam/blocking: once everything is sewn, perform one final wet or steam block with pins to match finished bedspread dimensions. Allow to dry completely before using or gifting.
Info :
You've completed the full motif and assembly process. The following sections below include assembly steps and specific placements for building a full bedspread from motifs and additional tips for maintaining consistent shape and look.
This Victorian Lace Granny Square pattern is a joy to make and a stunning way to create an heirloom bedspread. Each motif captures delicate petal shapes, airy diamond openings and elegant scalloped edges—perfect for a cozy bedroom or a special gift. The joining methods let you create a seamless look or a subtly ridged seam depending on your preference. Enjoy the meditative rhythm of repeating motifs, block them flat, join them with care, and watch your bedspread bloom into a beautiful tactile piece. 🧶✨