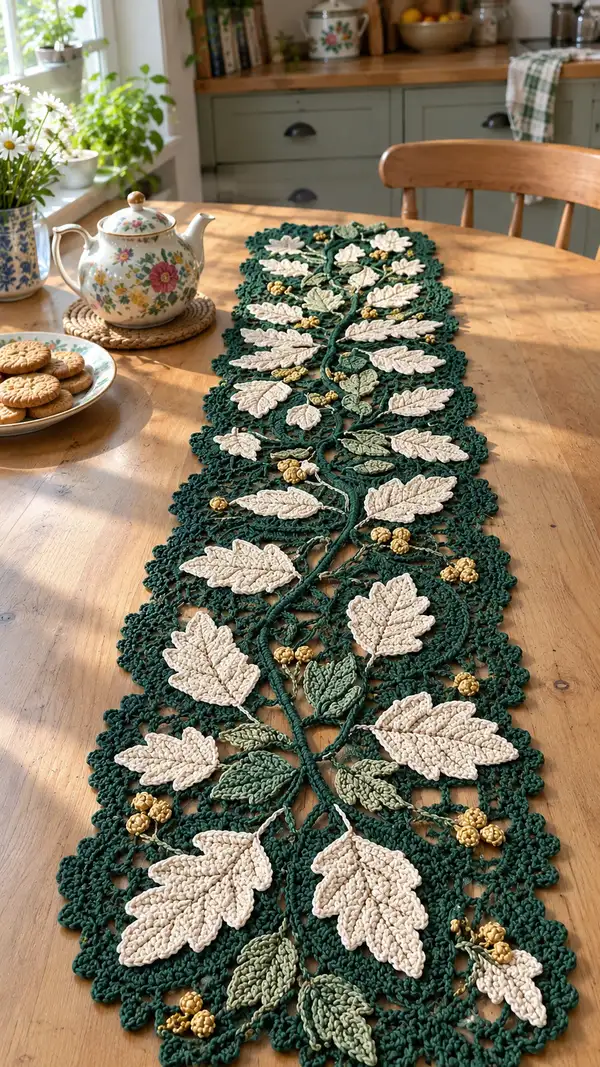
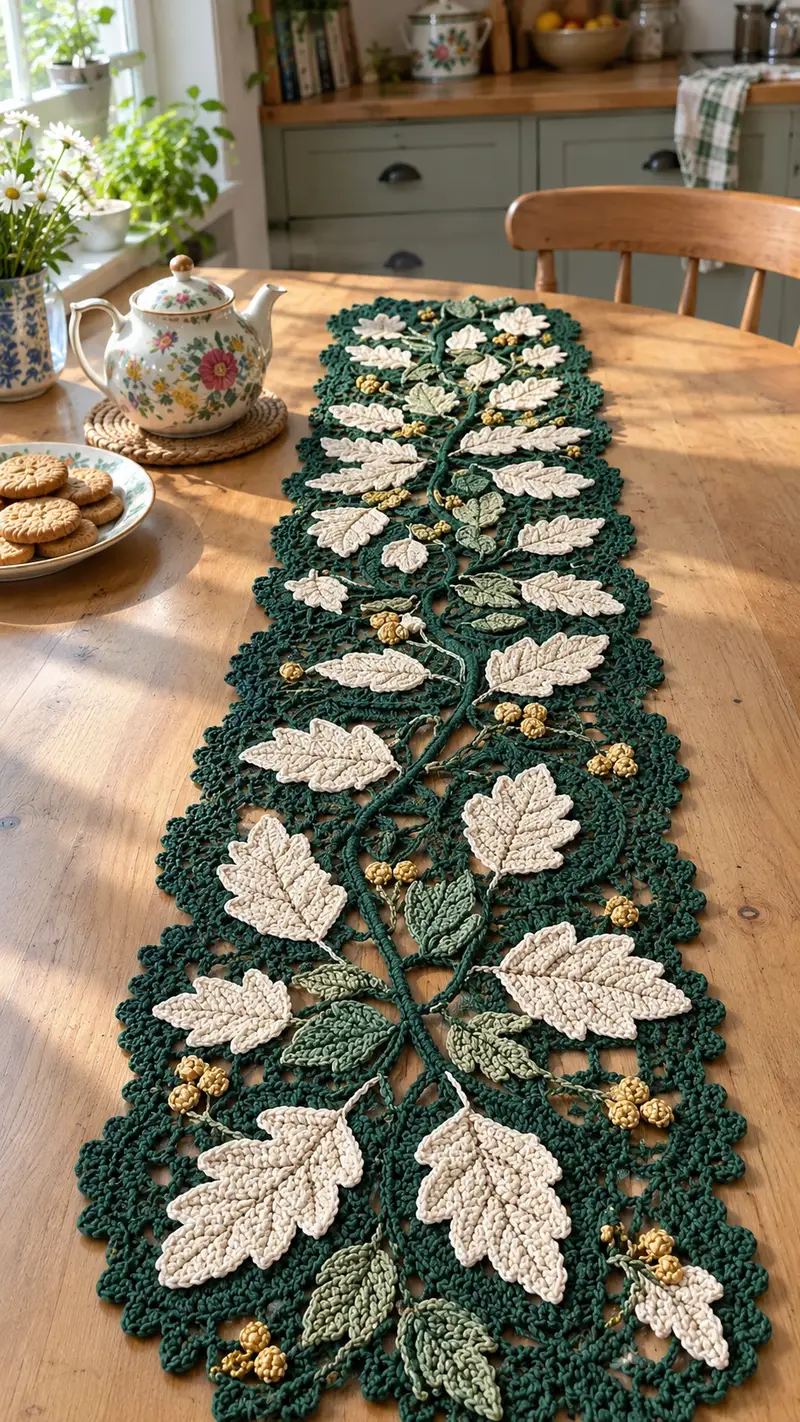
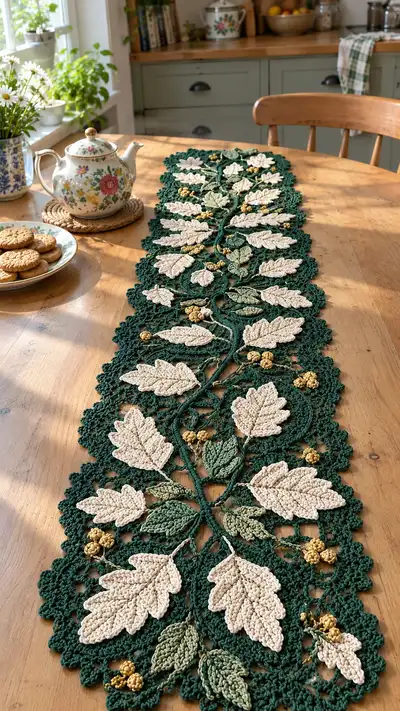
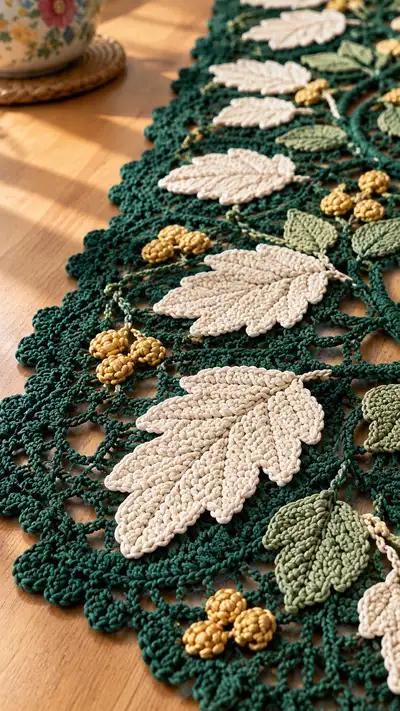
A long, elegant lace table runner inspired by botanical motifs — deep forest-green openwork background, layered cream and sage appliqued leaves, and clustered golden berries. This pattern recreates the textured, dimensional look seen in the photos with separate motifs (large leaves, small leaves, berry clusters and winding vines) stitched onto a delicate crocheted lace ground. Perfect as a seasonal or everyday centerpiece to dress a dining table with handmade charm.
Progress Tracker
0% Complete
— Project Overview :
Info :
This pattern creates a long table runner by crocheting a repeating lace ground in deep forest green, then appliquing layered leaf motifs (large cream leaves, small sage leaves), golden berry clusters, and winding corded vines. The pattern is written in motif sections so you can batch crochet similar pieces. All motifs are made flat and sewn or crocheted onto the ground. Gauge is flexible for decorative runners; adjust yarn and hook to preference, but keep consistency for all parts.
Info :
Suggested finished dimensions: approximately 12-14 inches wide by 48-58 inches long depending on number of repeats and gauge. Adjust length by adding/removing ground repeats.
— Ground Lace Medallion (Make repeating sections to reach desired runner length) :
Round 1 :
MR, ch3 (counts as dc), work 11 dc into ring. Sl st to top of ch3 to join. (12 dc)
Round 2 :
Ch4 (counts as tr), tr in same st, *ch3, 2 tr in next st; rep from * around; sl st to join to top of starting ch4. (12 groups of 2 tr separated by ch3)
Round 3 :
Ch1, sc in same st, *(ch5, sc) in space between tr groups, sc at base of next tr pair; rep around; sl st to first sc. (12 ch5 loops)
Info :
These ch5 loops are the foundation for the open lace. Keep tension even to maintain consistent loop size for later joining of motifs.
Round 4 :
Join with sc at top of any ch5 loop, *(sc, ch3, 3 dc, ch3, sc) into same ch5 loop to make a petal; sl st into next ch5 loop; rep around to create 12 petal clusters. Fasten off and weave end. (12 petal motifs)
Round 5 :
Using method of connecting medallions, join the next medallion by slip-stitching selected ch3 sp between petal clusters of previous medallion to form an open mesh row. Repeat medallion creation and join until runner reaches desired length. Each connection uses 4-6 slip-stitch joins distributed evenly per medallion edge to keep runner flat.
Info :
Work medallions in batches of 6-10 then block flat. Pin petal points in place before final blocking to get consistent scalloped edges. Blocking is essential to get the runner to lay flat later when you sew on motifs.
Round 6 :
Once medallion row is in place, work an open ground round across top joining medallion petals: along each connecting chain-run, sc in each join and ch4 between joins to form a netting base for vines. This creates a loose grid along the medallion centers for vine placement. Fasten off. (Grid with repeating sc and ch4 spaces)
Round 7 :
Using green yarn, work a reinforcing round around edges of entire joined medallion row: sc evenly around, placing (3 sc, picot, 3 sc) at medallion petal points to define scallops. Maintain even counts so scallops match across length.
Info :
If you prefer a denser ground, repeat the grid round with additional sc and chain spaces to reduce openness. Always test one repeat to ensure motif spacing remains consistent.
Round 8-12 :
Work 5 rounds of even mesh: (Ch4, skip 2, sc in next sp) repeat across each mesh row to elongate runner width and secure joins. Keep counts per medallion consistent; adjust ch lengths to maintain runner width of approximately 12-14 inches. (Even mesh rows)
Info :
Place markers at beginning and end of each medallion to track repeats. The mesh rows are where vines will be anchored — plan vine placement before sewing by holding leaf motifs in place with pins.
Round 13 :
Edge reinforcement: sc in each st/BLO along both long sides to prepare for scalloped border. Count stitches and note spacing to keep border symmetrical. (Even sc count per side)
Round 14-18 :
Work decorative open rounds for lace interior: alternate (ch5, sc) and (ch3, sc) rows to produce decorative holes for vine anchoring. These will not change stitch counts but create the leafy openwork appearance. Fasten off and weave ends.
Info :
After completing the ground, press lightly with steam blocking to set the shape. The ground should be slightly taut to give a firm background for applique. Mark locations for major leaves — place pins roughly 6-8 inches apart along centerline based on photos for large leaves, with smaller leaves clustered between.
— Large Sculpted Leaf (Make 12 cream leaves) :
Round 1 :
With cream yarn, ch8, sc in 2nd ch from hook, sc in next 5 chs, 5 sc in last ch to turn working on other side of foundation, sc in next 5 ch back along foundation, sl st to first sc to form a flat oval. (Total 18 sc)
Round 2 :
Ch1, (sc, inc) across long edge: work (sc in next st, 2 sc in next st) across first half of oval, continue (2 sc in last st, sc in next) along rounded end to work symmetrical increases, then sc in remaining sts to return to start. End with 22 sc. (22 sc)
Info :
This initial shaping produces the leaf base. Keep tension firm but not tight; large leaves are meant to be slightly sculpted and hold shape on the ground fabric.
Round 3 :
Ch2 (counts as hdc), hdc in next 2 sts, *(hdc, inc) in next st; rep across to rounded end, work (hdc, inc) symmetrically across other side; end with 28 hdc. (28 hdc)
Round 4 :
Ch1, sc in each st across for 1 round to tidy edges and set counts. (28 sc)
Round 5 :
Shape leaf lobes: *[ch4, skip 1 sc, sc in next 2, picot, sc in same st], sc in next 3; rep across each side to create 6 lobes total. Mirror lobes across center fold. Fasten off one side if preferred and rejoin to work center ribbing. (Decorative lobed edge)
Info :
To achieve the pronounced lobed look shown in photos, allow the lobes to slightly cup upward by shaping with your fingers when blocking and by leaving slightly tighter tension on the lobe rounds.
Round 6 :
Center vein shaping: rejoin at base center, ch1, work a row of sc along the midline folding the leaf in half: sc through both layers near midline to create a ridge. Work 10 sc along midline toward tip, then dec every other stitch for 4 sts to create tapered tip. Fasten off and leave long tail for sewing. (Midline ridge 10 sc then taper)
Round 7 :
Surface stitch detail: with contrast thin yarn or same color held double if desired, use embroidery backstitch or duplicate stitch to create 5-6 vein ribs off the center ridge; start at base and finish near tip. Secure ends by weaving in. (Surface veins)
Info :
If you prefer a puffed leaf, work Round 6 using front post hdc around the midline sc to raise the center ridge. Blocking after embroidery helps set the relief.
Round 8-12 :
Optional shaping rounds: repeat a finishing round of sc in each st for 3 rounds to firm edges and then a decorative picot edge of (sc, ch3, sl st) to make a crisp outline. Fasten off and weave ends. (Final tidy rounds)
Info :
Make 12 large leaves in cream. Block them lightly, pinning lobes flat and curving center ridge upward a touch for dimensionality. Leave tails for sewing onto ground later; do not trim.
— Small Two-Tone Leaf (Make 18 sage leaves) :
Round 1 :
With sage color A (darker sage), ch6, sc in 2nd ch from hook, sc in next 3 ch, 4 sc in last ch to turn, sc in next 3 ch along other side, sl st to first sc. (Total 12 sc)
Round 2 :
Ch1, sc in next st, inc in next, sc2, (inc) across the rounded end, sc2, dec to shape base so total becomes 16 sc. (16 sc)
Round 3 :
Switch to sage color B (lighter shade) — Info : Change to sage B now. Carry unused yarn inside if making several leaves at once to save ends. Ch1, sc in each st for one round to even color join. (16 sc)
Round 4 :
Ch2, hdc in next st, *(hdc, inc) in next; rep across both sides symmetrically to create gentle curve. (20 hdc)
Round 5 :
Edge picot: *sc3, picot, sc3 across edge to create a tiny scallop. Fasten off leaving a long tail. (Decorative edge)
Round 6 :
Optional vein: use yarn needle and contrasting olive to stitch a central vein by weaving through center of leaf from base to tip, pulling slightly to create ridge. Secure and weave ends. (Surface vein)
Info :
Make 18 small leaves in two-tone sage. Blocking helps these smaller leaves sit flat when sewn onto the ground. Leave tails for sewing onto vines and the ground.
— Tiny Berry Cluster (Make 24 clusters, 3 berries per cluster) :
Round 1 :
With golden yarn, MR, 6 sc into ring, sl st to join. (6 sc)
Round 2 :
Ch1, 6 inc (12) by working 2 sc in each st around. (12 sc)
Round 3 :
Ch1, sc in next st, (sc in next, dec) around to give small rounded berry; fasten off leaving long tail for sewing. (8-9 sc depending on decs)
Info :
To make plump berries, you can work a second round of increases then decrease to round them; the pictured clusters are small and tightly crocheted. Make 3 berries for each cluster and sew them together in a triangular formation for realistic cluster look.
Round 4 :
Form cluster by sewing three berries together with long tails: position two berries side by side and sew a third at base to form a triangular cluster. Use a few careful whip stitches to secure. Leave a long attaching tail to stitch to the vine. (3-berry cluster)
Info :
If you want even denser clusters, make 4 berries and arrange in a tight diamond pattern. Secure with several stitches through centers to make cluster stable.
— Corded Vine (Make 4 long vines) :
Round 1 :
With forest green, ch150 (or desired vine length depending on runner).
Round 2 :
Working back across chain: sc in 2nd ch from hook and in each ch to end to form a firm cord. Fasten off and weave tail. (sc cord)
Info :
For a rounder vine, use a 3-chain tubular cord method: ch long length, then insert hook through 3rd chain from hook and work alternating sc and ch to produce a tube; or use i-cord technique with crochet hook (crochet i-cord) for a tidy cord. If you want poseable vines, thread thin insulated wire through cord before stitching onto runner.
Round 3 :
Surface-decoration: work tiny chain loops off vine every 6-8 sc by inserting hook under cord, ch6, sl st back into cord to create tiny looped tendrils for attaching small leaves or berries. Space loops per photo spacing. (Tendrils every 6-8 sc)
Round 4 :
For thicker vines, hold two cords together and twist lightly before attaching; secure both cords together at end with a few whip stitches. Fasten off and leave long tails for sewing. (Thicker vine)
Info :
Vines should be slightly flexible not rigid. If using wire, ensure ends are folded and covered with yarn to avoid poking through fabric. Plan vine routing on runner before final sewing.
— Joining Leaves, Berries and Vines to Ground :
Round 1 :
Layout: Block and pin ground flat. Arrange vines along the centerline, spacing large leaf positions roughly 8-9 inches apart. Place clusters of small sage leaves and berries in groupings shown in photo — usually 1-2 small leaves and 1 cluster per vine segment. Pin everything in place first. (Layout planning)
Info :
Use pins to mark where the tip and base of each leaf meet the ground. If you prefer to crochet leaves on rather than sew, leave attaching tails long and use them to sl st through ground grid spaces at positions shown.
Round 2 :
Sewing technique: using long yarn tail from leaf, using whip stitch or invisible ladder stitch, stitch through ground grid and leaf base. Make sure stitches go through several ground threads to secure leaf firmly. For extra security, sew leaf base and a few stitches along midline onto the vine cord beneath for layered stability. (Sew leaves securely)
Round 3 :
Berries: attach clusters to vine tender loops or directly to ground at junctions near leaves using long tail. Stitch through cluster center multiple times to prevent rotation. Tuck a few stitches around back of cluster into ground stitches for invisible hold. (Attach berry clusters)
Info :
Place small leaves underneath larger leaves at strategic points to create layered foliage as pictured. Slightly overlap leaf edges and secure with a few stitches through both motifs to anchor them together before attaching to ground.
Round 4 :
Vine attachment: using long tails, stitch vine cord to the ground along its length using invisible stitches every 1/2 to 1 inch. When vine crosses medallion joints, sew through both medallions to ensure runner structural integrity. (Secure vine)
Round 5 :
Secure all motif tails by weaving ends into back of ground and trimming close after 10-12 weaves. Apply a small dab of fabric glue if needed to avoid slippage (optional). (Finish attaching)
Info :
Step back frequently and ensure motifs mirror on both sides of runner centerline for balanced look. Pin and baste first if you are not confident in direct sewing.
— Decorative Border / Scalloped Edge :
Round 1 :
With forest green, join at an edge point. Sc evenly around entire runner edge placing 3 sc in each medallion petal point to create base. Keep counts consistent; there should be 3 sc in each existing petal cluster. (Even sc around)
Round 2 :
Work scallops: *(ch3, 5 dc in next st, ch3, sl st in next st), skip 2 sc, sl st in next; rep along edge to make scallops; when you reach a corner/medallion join, adjust spacing slightly to keep scallop count even. (Scallop repeats)
Info :
If your scallops bunch, go back and increase chain lengths or switch to 6 dc in scallop for bigger lobes. Blocking will refine scallop shape after assembly.
Round 3 :
Picot finishing round: *sc into scallop center, (pic, sc) into scallop peak; rep to end to give crisp bead-like edge. Fasten off and invisible weave ends. (Final picot edge)
Round 4 :
Light blocking: pin scallops evenly spaced using blocking pins, steam lightly (or wet block) until dry. This defines the scallops and sets runner to flat elegant shape. (Blocking)
Info :
Blocking is the final shaping step — pin each scallop to same distance from center and allow to dry completely. If any motifs lifted during assembly, re-pin and lightly steam to re-shape.
— Finishing Touches and Embroidery Details :
Round 1 :
Using a darker olive yarn and a yarn needle, add small embroidered veins on large leaves if desired. Use split stitch or backstitch for neat lines; hide ends by weaving along the underside of leaf. (Leaf embroidery)
Round 2 :
Add small french knot-style triple wraps using mustard thread around berry bases for extra texture if desired: wrap yarn around needle 3 times and anchor through motif center. Alternatively use small bead embellishments sewn through berry centers for sparkle. (Embellishments)
Info :
Personalize with additional tiny flowers, different berry quantities or metallic thread highlights. Keep additions minimal to preserve the vintage botanical aesthetic seen in the photos.
Round 3 :
Final weaving: weave in all tails on wrong side of runner using yarn needle. Turn runner over and inspect both sides to ensure no loose ends protrude. Trim close. (Weave ends)
Round 4 :
Final blocking and pressing: re-block entire runner after assembly to ensure motifs sit flat and scallops are even. Use steam or wet blocking per yarn care. Allow to dry fully before laying on table. (Final block)
Info :
Store runner flat or rolled, not folded, to avoid creases in the lace. For table use, place a thin cloth beneath runner to protect delicate ground stitches from abrasion.
Completing this runner is a rewarding mix of lacework and applique — each pinned leaf and golden berry adds character and depth to the piece. The finished runner transforms a simple wooden table into a cozy, inviting vignette full of handmade charm. I hope working through the motifs and assembly brings you the same calm joy that comes from slow, creative making. 🧶🌿 Treat yourself to the finishing block and enjoy your table dressed in botanical prettiness! 🍃