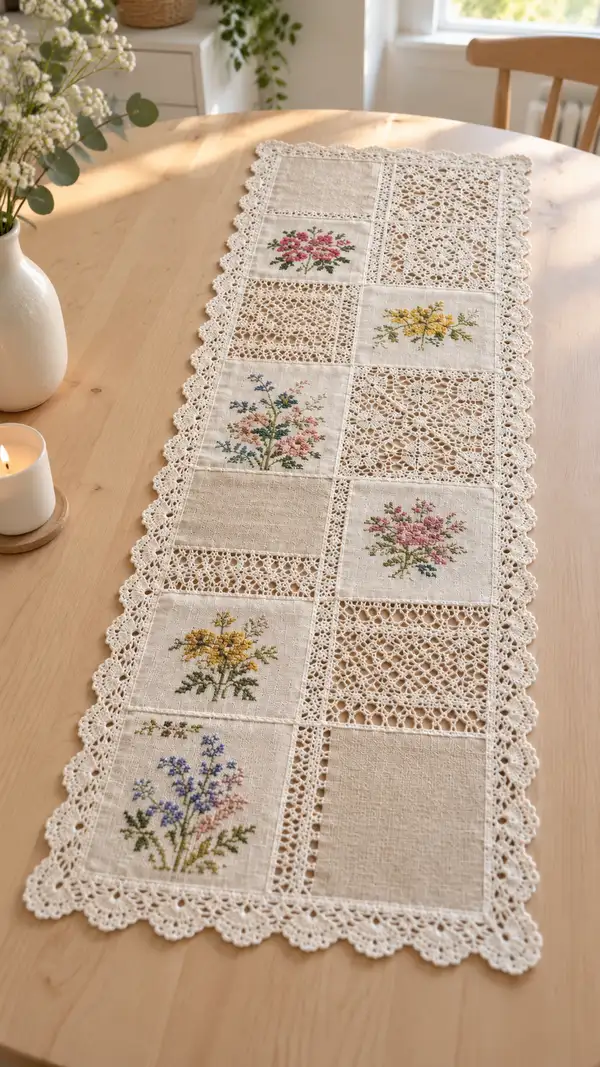
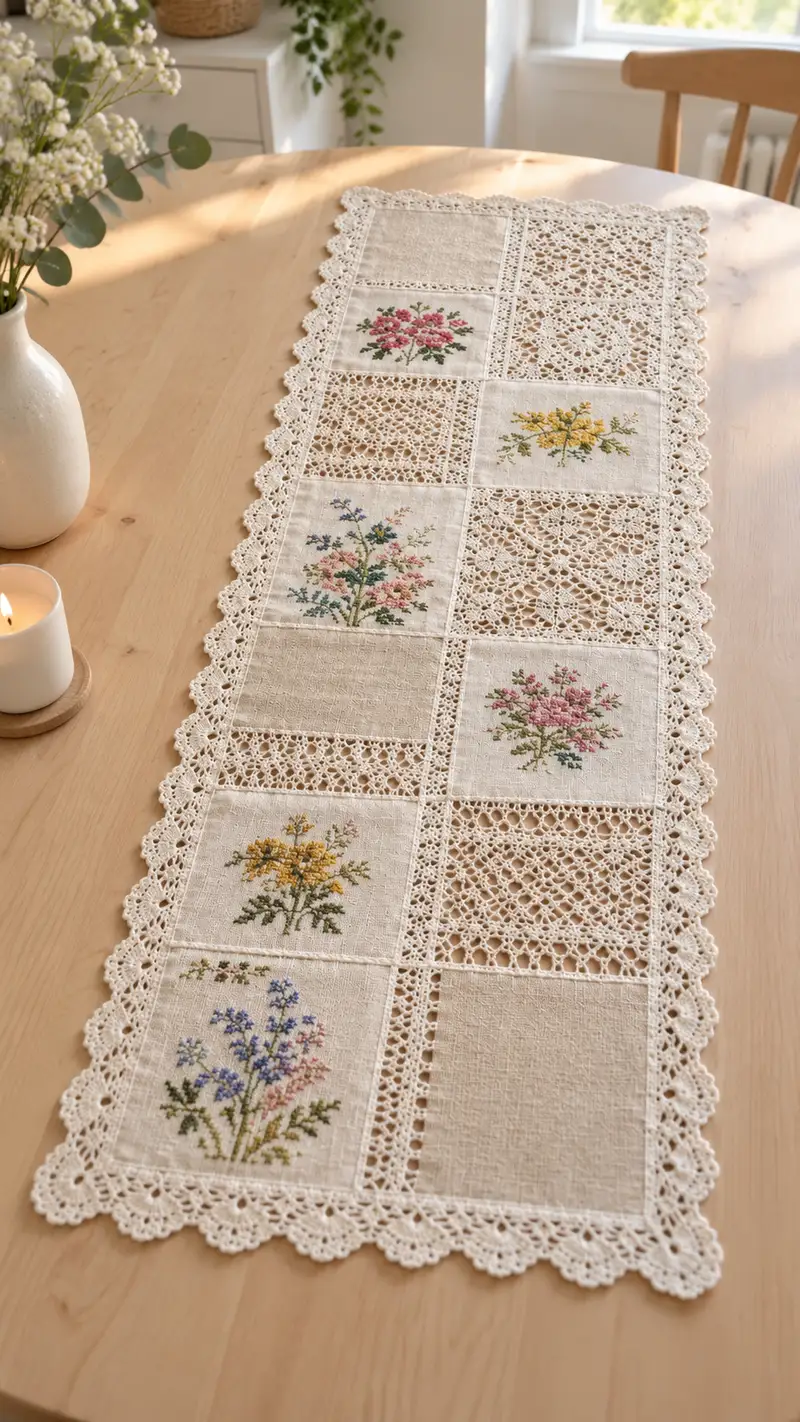
A charming vintage-inspired table runner combining embroidered linen squares with delicate crocheted lace panels and a scalloped cotton border. This runner features alternated floral linen inserts and airy lace inserts in a soft cream cotton thread. Perfect for a dining table, sideboard, or as a seasonal centerpiece—this pattern guides you through embroidered panel finishing, motif crocheting, joining, and a full scalloped edging.
Progress Tracker
0% Complete
— Project Overview :
Info :
This pattern creates a vintage-inspired narrow table runner approximately 30cm wide and 110-130cm long when made with the layout shown: two columns of alternating embroidered linen squares and crocheted lace squares, joined and edged with a continuous scalloped lace border. The pattern is modular: make more or fewer motifs to change the length. Use light cotton crochet thread and a small steel hook for a crisp, delicate look.
Info :
Final dimensions will vary with thread tension and embroidery square sizes; the sample pictured uses 12 linen squares 12 x 12 cm, alternated with 6 lace squares, resulting in an overall length of approximately 120cm. For a wider runner, add an extra column of motifs and follow the same joining and edging procedure.
— Materials & Gauge :
Info :
Gauge for lace: 10 rounds of the lace square motif (as written) = approximately 6.5cm across when blocked using size 10 cotton thread and 1.75mm hook. Linen squares used are 12 x12 cm; adjust motif rounds to fit those dimensions if needed.
Info :
Before beginning, prepare embroidered linen squares: finish embroidery, press gently, trim to desired size 12 x 12 cm, and, if desired, fuse a light piece of interfacing to the back to stabilize the fabric before crocheting around the squares.
— Preparation of Linen Squares :
Round 1 :
With contrast cotton thread (same color as lace or a slightly darker ecru), mark the center points and measure to ensure each square is 12 x 12 cm. Trim edges to ensure square sides are straight (12 x12 cm).
Round 2 :
Edge the linen square by working a neat crochet ground around the perimeter: Using 1.75mm hook and thread, with RS facing, join with sl st in the midpoint of one side (approx at 6cm mark).
Round 3 :
Round 1 (fabric edge): Ch1, work 1 sc evenly spaced along side edges, placing 3 sc in each corner (work 3 sc into corner point) to turn. Work approximately 40 sc around the entire 12cm square (actual count will depend on your tension; aim for even coverage). Join to first sc with sl st. (Approx 40 sc)
Info :
Spacing: If you count 40 sc around the square, you will place 10 sc per side (10 x 4 = 40). If your number differs due to thread tension, keep counts consistent for all linen squares so they align when joined.
Round 4 :
Round 2 (frame round): Ch3 (counts as dc), *skip 1 sc, dc in next sc, ch1* around to create a subtle openwork frame. Work 10 dc and ch1 spaces per side, and in each corner work (dc, ch2, dc) into the group of 3 corner sc to keep a neat corner. Join with sl st to top of ch3. (Approx 40 dc, 40 ch1)
Info :
This initial framing round yields a uniform edge so crochet lace squares and linen squares meet cleanly. Make sure all linen squares are edged identically so joining is even.
— Lace Square Motif (Make as many as needed) :
Info :
The lace square motif creates a delicate openwork panel that matches the framed linen squares when blocked. The motif is worked in the round and is designed to block to a 12 x 12 cm square. Use size 10 crochet thread and 1.75mm hook.
Round 1 :
Work 4 sc in magic ring. (4)
Round 3 :
(1 sc, inc) x 4 (12)
Round 4 :
(2 sc, inc) x 4 (16)
Round 5 :
(3 sc, inc) x 4 (20)
Round 6 :
(4 sc, inc) x 4 (24)
Info :
Rounds 1-6 establish four even sides (quarters) for a square-based motif. Keep a stitch marker at the start of the round to track round beginnings. Begin gentle blocking after Round 8 if desired to guide shape.
Round 7 :
1 sc in each st around (24)
Round 8 :
Ch4 (counts as tr), *sk next st, tr in next st; rep from * around to create an open ring of tr; join to top of ch4. (12 tr)
Info :
Round 8 uses longer stitches to open the fabric and establish the airy lace look. Keep stitches even; if your tr height is variable, substitute dc for tr to lower the profile.
Round 9 :
Ch1, sc in same st, *ch3, sk 2 tr, sc in next tr; rep from * around, adjusting ch3 spaces so there are 6 ch3 spaces per side and 24 sc overall to maintain geometry. Join with sl st. (24 sc, 24 ch3)
Round 10 :
Ch3, dc in same st, *in next ch3 sp work (2 dc, ch2, 2 dc) — this creates a small shell/corner unit across the ch3 spaces; rep from * around, placing shells centered over previous sc positions; join to top of ch3. You will have 8 shell clusters around (8 shells)
Info :
Round 10 begins to form the square's textural lace panels. Shell units should be evenly spaced; if you get slightly more or fewer, block gently to correct minor differences.
Round 11 :
Ch1, sc in same st, *ch5, sc in center stitch of next shell; rep from * around to create larger mesh spaces. Aim for (24 sc, 24 ch5) in this round after placement. Join with sl st.
Round 12 :
Ch3 (counts as dc), *in ch5 space work (dc, ch3, dc), ch1, sc in top of next shell; rep from * around. This begins to broaden each side and define the mesh. Count should adjust to roughly 24 clusters; block after this round if necessary. (Approx 24 cluster points)
Info :
At this point the motif still reads as circular; we will start creating defined sides and corners at Round 13 by using corner chain spaces. Place a removable stitch marker on each quadrant to track corner locations.
Round 13 :
Ch1, sc in same st, *sc in next 5 sts, (sc, ch3, sc) in next st to form corner, sc in next 6 sts; rep from * around. After completing the round you should have four corner ch3 spaces and a total stitch count of (4 corners counted as 3 sts each) approximately 32 sc plus 4 corner chain spaces. (Approx 32 sc, 4 ch3 corners)
Info :
Corner creation: the (sc, ch3, sc) forms the four corners that will help the square motif open to corners when blocked. The approximate stitch counts are dependent on your earlier counts; aim to create four evenly spaced corners.
Round 14 :
Ch3 (counts dc), *dc in each of the next 7 sc, in corner ch3 work (dc, ch3, dc), dc in next 7 sc; rep from * around. You will now have 4 corner ch3 spaces and a total of approximately 36 dc. (Approx 36 dc)
Round 15 :
Ch1, sc in same st, *ch4, sk 3 dc, sc in next dc; rep from * around placing four longer chain spaces at corners to open the sides. Join with sl st. (Approx 36 sc, 12 ch4 spaces)
Info :
Begin measuring motif across the corners; if it is significantly smaller than 12cm you may opt to add an extra mesh round or decrease hook size will affect size—adjust now so motif matches linen square frame.
Round 16 :
In each ch4 space work (2 dc, ch2, 2 dc) to create scalloped side clusters; in each sc between ch4 spaces work sc to stabilize. After finishing the round you should have a broader square with 4 corner clusters. (Approx 40 cluster points)
Round 17 :
Ch1, sc in same st, *ch6, sc in center of side cluster, rep around. Join. This lengthens mesh to match linen frames and prepares for more openwork. (Approx 40 sc, 16 ch6 spaces)
Round 18 :
Ch3, (dc, ch1, dc) in each ch6 space to create decorative fans; sc in the scs between fan spaces to keep edge tidy. Join. (Approx 40 fans)
Info :
If your lace motif is already 12cm square after Round 18, stop adding rounds to avoid oversizing. If it needs more width to match linen squares, continue with Rounds 19–24 as additional mesh expansion rounds.
Round 19 :
Ch1, sc in each st around, placing (sc, ch3, sc) in each corner ch2 space. Count approximately 44 sc after this tuning round. (Approx 44 sc)
Round 20 :
Ch3, *dc in next 9 sc, (dc, ch3, dc) in corner ch3; rep around. (Approx 48 dc)
Info :
From Round 19 onward, each round adds a modest amount of width—one or two rounds can be sufficient to bring the motif to the same finished square size as linen inserts. Check and block often.
Round 21 :
Ch1, sc in next st, *ch5, sc in top of next shell/fan; rep around; (Approx 48 sc, 12 ch5)
Round 22 :
In each ch5 space work (2 dc, ch3, 2 dc) to create openwork arches; sc in stabilizing scs. Join. (Approx 48 arches)
Round 23 :
Ch1, sc in each st around to even out shape and prepare for structured edging. (Approx 52 sc)
Round 24 :
Ch2 (counts hdc), hdc in each st around until corner ch3 spaces; in each corner work (hdc, ch2, hdc). Join to top of ch2. (Approx 52 hdc)
Round 25 :
Ch3, *skip next st, dc in next st, ch2; rep; this introduces a trim row of small arches around the motif. (Approx 26 arches)
Round 26 :
Ch1, sc in each st and sc in each arch apex; join. (Approx 52 sc)
Round 27 :
Decorative picot row: Ch3, dc in next st, *(ch3, picot, dc in next 2 sts), rep around to create a fine decorative chain inside the scallop. Join. (Picot quantity varies by count)
Round 28 :
Border foundation round: Ch1, sc in each st around the motif to create a tidy foundation for joining with linen squares; adjust counts to match the linen frame sts so join points align (target ~56 sc). Fasten off and weave ends. Block square to exact 12 x 12 cm measurement. (Approx 56 sc)
Info :
Blocking tip: Pin the motif to a 12 x 12 cm template while damp and allow to dry fully. This sets the geometry precisely so it lines up perfectly with linen frames when joining.
— Linen Square Final Edge (to match lace motif) :
Round 1 :
After the linen square was framed (see earlier Row 4), work an additional 6 tidy rounds to build an identical number of stitches to the lace edge: Ch3, dc evenly around matching the number of dc in lace motif final round; place (dc, ch2, dc) at each corner. Aim for ~56 dc total. Join. (Approx 56 dc)
Info :
Purpose: Create equal stitch counts and the same round profile on linen squares and lace motifs so that slip-stitch joining or whip stitching results in an invisible seam. Measure and adjust accordingly.
— Joining Motifs Into Panels :
Info :
Join motifs together in the grid arrangement shown: two motifs across x 6 motifs lengthwise (total 12 motif positions). Work the joining as follows: join motifs using a single crochet seam or slip-stitch seam, connecting a linen-framed motif to adjacent lace motif. Work seams on RS so the seam is slightly visible on RS as a decorative ridge, or on WS for invisible seams.
Round 1 :
Place two motifs RS together (linen framed motif & lace motif), align stitch-for-stitch. With a matching thread, insert hook through first matching st on both motifs, pull up loop, ch1, *sc through both loops of next matching sts across side; rep until side is joined. Join with sl st. Repeat for the opposite side to form a pair which has two motifs joined lengthwise. Each joined side uses the same number of foundation sc as the motif edges (~56). (Length of seam = ~56 sc)
Info :
When joining, place pins every 5–6 cm along the seam to keep motifs perfectly aligned. Work slowly and ensure that corner points line up squarely.
Round 2 :
Form pairs across the breadth of the runner by joining a second motif to create two-motif width units. For the runner pictured, join pairs side-by-side so the runner is two motifs wide. Join the pairs using the same sc through both motif edges. (Seam width ~12cm)
Round 3 :
After you have multiple two-wide columns, join columns lengthwise by placing columns RS together and working sc through both motif edges along the long seams. Work all interior seams in the same manner to create one continuous runner of motifs. Fasten off and weave ends. The result is a solid patchwork grid of alternating linen and lace squares with narrow joining seams. (Number of seams will depend on layout; for 12 motifs there will be 11 internal seams)
Info :
If you prefer a decorative ladder join, substitute kitchener-style chain stitch or reverse single crochet as your joining method. Reverse single crochet creates a rope-like ridge that looks tidy and gives more structure to the runner.
— Narrow Connector / Decorative Running Mesh (Optional) :
Round 1 :
If the image's runner shows narrow rectangular mesh connectors between some squares, you can work a simple mesh strip: join thread at the seam of two squares and ch1, *sc in seam sc, ch5, sk 3 sc; rep across to create a decorative mesh strip. (Number of ch5 spaces depends on seam length)
Round 2 :
Turn strip into a fuller mesh by working (2 dc, ch2, 2 dc) into each ch5 space to make arches that match the lace units. Sc into seam scs between arches. Join. This gives a matching lace aesthetic to the narrow connectors. (Repeat across every seam where connector desired)
Info :
These connectors are optional and can be used to reproduce the fine rectangular lace panels seen in the photograph that alternate with the linen squares. They are worked small, and you should block them in place after joining to match the rectangular opening width.
— Scalloped Outer Edging (Full Runner) :
Info :
With the runner assembled and blocked flat, prepare to work a continuous scalloped outer edging around the entire perimeter. Work this edging directly onto the outermost round of the outer motifs so it unifies the piece into one continuous framed runner.
Round 1 :
Using thread and hook, join at one corner with sl st on RS through both loops of outermost stitch. Ch1, work 1 sc in each stitch around the perimeter, working (3 sc, ch3, 3 sc) in each corner to create a strong corner foundation. Maintain an even count; join with sl st. (Total sc around will reflect perimeter stitches; estimate ~240 sc for full runner depending on total number of motifs)
Round 2 :
Ch3 (counts dc), dc in next 2 sc, *skip next sc, (dc, ch3, dc) in next sc to create scallop foundation; rep along the sides, and in corner ch3 spaces work (dc, ch4, dc) to enhance corner curve. Join. (Approx 80 scallop foundations depending on perimeter length)
Info :
Count your foundation repeats and make sure your scallop repeats are consistent around entire edge. If the stitch count does not divide evenly, adjust by adding or removing small sc groups on the long sides (not at corners).
Round 3 :
Ch1, sc in same st, *in each (dc, ch3, dc) work (sc, ch5, sc) inside the ch3 space to create a deeper scallop; in side dc groups work sc to maintain shape. Join. (Repeat across perimeter)
Round 4 :
Ch3, 6 dc in ch5 space (or appropriate number to create a shell—use 7 dc for a fuller scallop), sl st to center of shell, sc in each stabilizing dc; rep across. This forms the primary scallop shell. (Shell count = number of scallop repeats)
Round 5 :
Ch1, sc around shells, placing a picot at every 2nd sc for delicate points: *sc, sc, (ch3, sl st into next sc for picot), rep around. Join. (Picot count = approx half of shell count)
Round 6 :
Decorative finishing round: In front loops only (FLO) of the previous sc round work 1 sc in each FLO to create a raised rope along the scallop base, then in each shell apex work (sc, ch3, sl st in base) to define points. Fasten off and weave ends. (Perimeter rope rounds approx equal to sc count)
Info :
Work the edging slowly and pin the runner to the blocking board as you progress so scallops remain uniform. If you encounter uneven scallops, adjust by adding or removing a dc in the shell or by changing the picot frequency.
Round 7 :
Optional ornate scallop boost: For an even more heirloom look, in each shell work an extra decorative dtr cluster and secure with a tiny picot at the apex. This can be done around the entire runner or only at corner shells. Fasten off when complete. (dtr clusters per shell = 1)
Info :
If you plan to launder the runner, use mercerized cotton and test washing on a sample to ensure your edging and joining remain stable. Blocking after washing will revive the scallops.
— Corner Finishing :
Round 1 :
At each corner, after the scallop foundation, work an extra decorative triangular motif: from the corner ch3, ch5, sl st in corner loop to form apex, then work sc around connecting to the long sides to create a balanced rounded corner. Repeat for all four corners.
Info :
Corner motifs help the runner lie flat and produce a continuous scalloped look rather than abrupt corner cuts. Adjust chain lengths (ch3–ch5) to shape corner curvature.
— Final Finishing & Blocking :
Info :
Once the runner is fully edged, wet block the entire piece. Pin the scallops into uniform points and re-measure to the intended size. Allow to dry completely. If any joins need reinforcing, sew through the seam from the WS with matching thread for longevity.
Round 1 :
Weave all ends on the WS, and if you used washable glue or interfacing on the linen squares, press lightly with low iron using a cloth to protect embroidery. Trim any stray threads.
Info :
Optional: Add a tiny backing fabric (lightweight cotton) to the underside if you want to protect the crochet from dust or tabletop friction; this will slightly change the drape.
— Extra Decorative Options (Optional) :
Round 1 :
Add small crocheted rosettes (6-8 rounds each) in matching thread and sew onto select linen squares to echo embroidered blooms. Each rosette: ch4, join; Round 1: 12 sc in ring (12); Round 2: (sc, inc) x6 (18); Round 3: *ch3, sk 1 st, in next st work 3 dc; rep to form petals, fasten off and sew. (Rosette = 3–4 petals)
Info :
Tiny rosettes are optional embellishments for a more three-dimensional heirloom look. Sew securely to the linen using small stitches on the WS and reinforce with a few stitches through the base of the rosette.
Round 2 :
Alternatively add a narrow linen tape or ribbon sewn inside the seam channels to secure openwork and prevent snagging; choose narrow cotton seam binding for an invisible finish.
Info :
Care instructions: Hand wash gently in lukewarm water with mild detergent. Reshape and lay flat to dry. Re-block when needed to restore crisp scallops.
Finishing this runner feels like creating a little heirloom—each embroidered square and delicate lace panel comes together like a cherished memory. The scalloped border is the final flourish that makes the runner sing. 🌸 Pin, block and enjoy the many cups of tea or family dinners that will be made sweeter by this handmade accent. 🧶✨