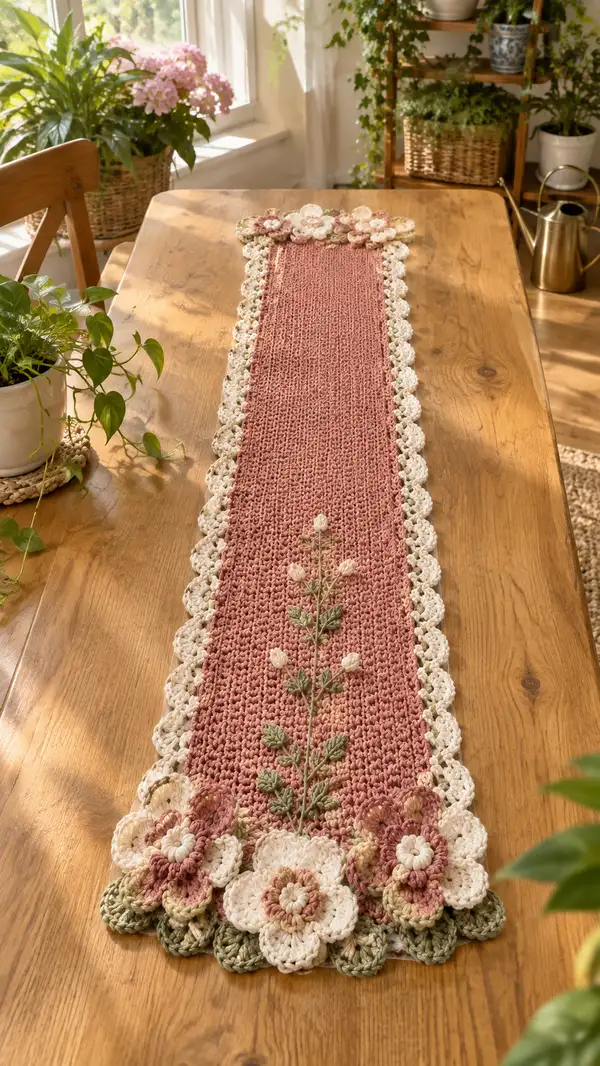
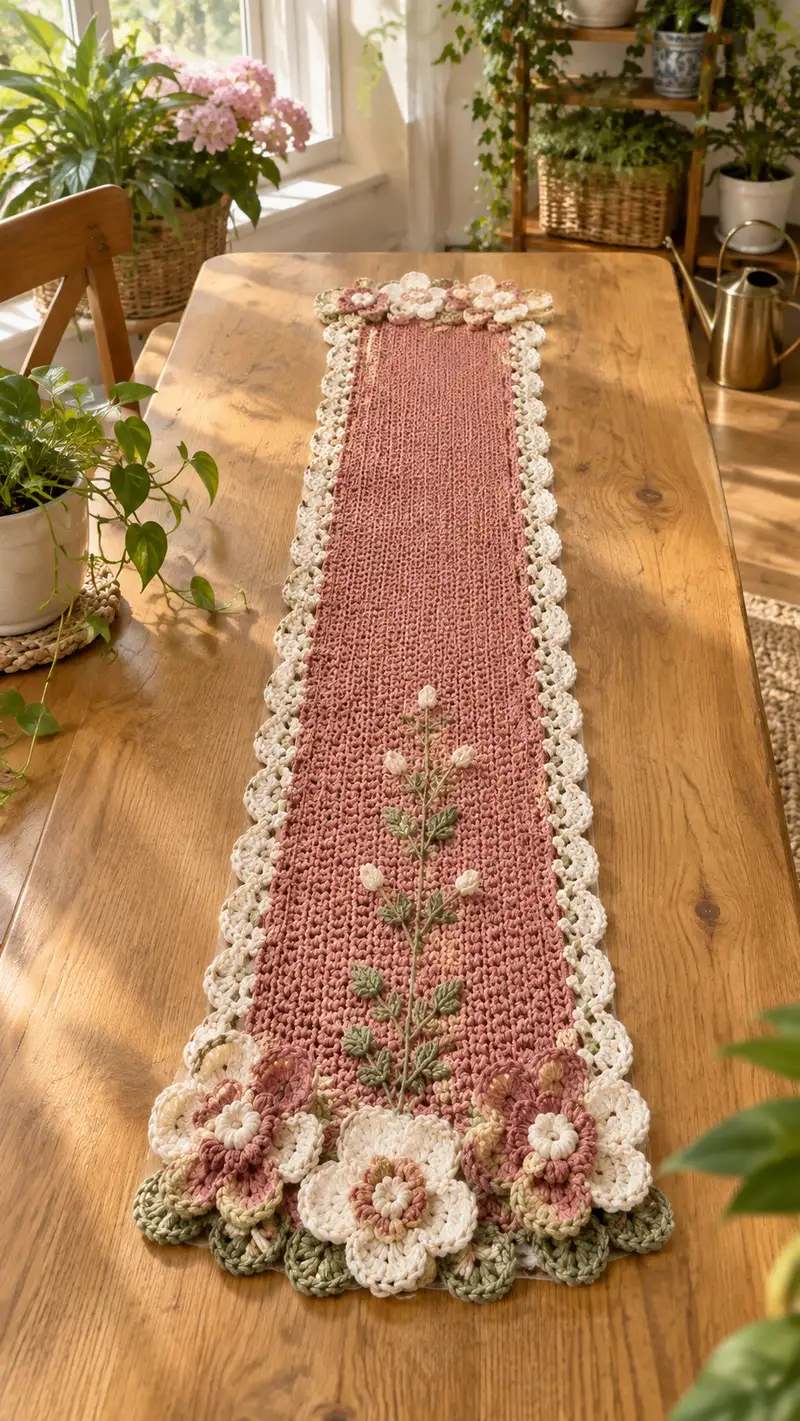
Create a charming vintage-inspired table runner with a textured dusty-rose center, creamy scalloped edges, and layered floral appliques in muted cream and sage. This pattern uses simple repeat stitches for the long center panel and builds delicate flowers and leaves to decorate both ends. Detailed instructions, helpful tips, and finishing notes guide you through every step to a beautifully finished runner perfect for a dining table or dresser.
Progress Tracker
0% Complete
— Materials & Gauge :
Info :
Use DK/light-worsted 100% cotton for a crisp, heirloom look. Gauge is not critical for width but for length and drape: 18 sts x 22 rows in linen stitch = 10 cm (4 in) using 4.0 mm hook. Adjust hook to obtain the same fabric density.
— Center Panel (Linen-Style Textured Rows) :
Round 1 :
Chain 81 (foundation chain). This yields 80 working sts across the width (80).
Round 2 :
Row 1: 1 sc in 2nd ch from hook and in each ch across, turn. (80)
Round 3 :
Row 2: Ch 1, *sk next st, sc in next st, ch1; turn work and sc into ch1 space from previous row* across so that each pair of rows forms a linen stitch look. End with sc in last st, turn. (80)
Round 4-7 :
Repeat Row 2 and Row 3 alternately to establish linen stitch. Maintain 80 sts each row. (80)
Info :
The linen stitch creates a tight, woven appearance. Keep tension even—if your edges pull in, increase your hook size 0.25-0.5 mm for the center panel only.
Round 8-15 :
Continue linen stitch pattern (alternating one sc row and one sc into ch1 row) for a total of 24 rows so far. Check width after 12 rows; adjust if needed. (80)
Round 16 :
Ch 1, sc in each st across in BLO for a subtle ridge along the long edges, turn. (80)
Round 17-24 :
Resume linen stitch for 8 more rows (maintain 80). At row 24 measure length; the runner photographed measures approximately 110-125 cm (43-49 in) long—you will extend through the next repeats to reach desired length. (80)
Info :
To lengthen the runner, continue linen stitch repeats in multiples of 2 rows until you reach the desired length. The pictured runner has approximately 120 rows in total center section; for this pattern we will define a target of 160 rows for a long table runner. Measure periodically and stop when length matches your table.
Round 25-56 :
Continue linen stitch pattern (1 sc row, 1 sc into previous ch1 row) for 32 rows to build a long center panel. Count to ensure you maintain 80 stitches each row. (80)
Round 57-64 :
Work 8 rows of sc in each st to create a consistent band before beginning the side edging; this evens the tension and gives a clean join for border. (80)
Info :
Fasten off dusty-rose yarn if you plan to join the edging in cream later. Block the panel lightly now if you prefer to determine final measurements before the scalloped edging.
Round 65-80 :
Optional: add a band of sc in BLO across the panel every 20 rows to create subtle vertical ridges reminiscent of the photographed texture. Work 4 such bands spread evenly along the center panel. (80)
Info :
When you reach your target length (approx. 120-160 rows or desired length), fasten off leaving a yarn tail for seam finishing if required. Block the center panel to exact measurements and allow to dry before edging for best results.
— Long Scalloped Edging (worked in rounds around the panel) :
Round 1 :
Join cream yarn at one short end corner with sl st. Ch 1, evenly sc along the short edge across approximately 80 sts (matching the number of rows or width). For long sides, work sc evenly along length inserting 1 sc in each side row end (approx. 160 sts per long side depending on length), then sc across opposite short end. Join with sl st to first sc. Total sc around will match your panel perimeter—record the number for repeat spacing. (perimeter stitch count varies)
Round 2 :
Ch 2 (counts as hdc), hdc in same st, *skip next 2 sc, 5 dc shell in next sc, skip next 2 sc, 2 hdc; rep across each side working shells into the long-side stitches evenly spaced. When working short ends, place a shell every 4th sc to maintain balanced corners. Join with sl st. (perimeter-dependent)
Round 3 :
Switch to 3.5 mm hook if you prefer a crisper scallop. Ch 1, *sl st into center dc of a shell, ch 3, (dc, tr, dc) all into same center dc to form a layered shell, sl st into next shell center; rep across joining corners with a trio of shells for continuity. Join. (perimeter-dependent)
Info :
Spacing shells evenly along long sides is key. To calculate spacing: count the sc around each long side and divide by number of shells you plan to make (photograph shows shells about every 4-6 sts). Mark positions with stitch markers before working shells.
Round 4 :
Ch 1, work 1 sc in each dc and sl st along the top of the layered shells to stabilize the edge, placing 3 sc into each shell center for a firm scallop base. Join. (perimeter-dependent)
Round 5 :
Edge round: Ch 1, *skip 1 st, 7 dc cluster in next st (shell), skip 1 st, sl st in next st; rep across to give a scalloped petal look. For corners, work 3 shells into corner spaces to maintain curve. Fasten off and weave in ends. (perimeter-dependent)
Info :
If shells look large, repeat Round 4 using fewer dc (5 dc) in clusters to scale down. Blocking the scallops by pinning them into a gentle curve will help create the photographed delicate scallop.
Round 6-12 :
Optional additional trim: With sage or variegated yarn, work a picot or chain loop row into the edge as decorative detail. Example: join contrast, *ch 5, sl st into base every 4th shell center; rep across both long sides and short ends. Fasten off and weave in ends. (perimeter-dependent)
Info :
Work the scalloped edging on a flat surface and pin to exact shape. If your center panel is slightly larger, the shells will draw in the edge slightly—allow for this when planning final dimensions.
— Large Layered Flower (Make 4 for each end cluster) :
Round 1 :
With cream yarn: Make magic ring. Ch 1, work 8 sc into ring, pull tight. (8)
Round 2 :
Inc in each st around (2 sc in each st) (16)
Round 3 :
*Sc in next st, inc in next st* repeat around. (24)
Round 4 :
Change to variegated neutral yarn (Info: carry cream inside ring if you want hidden tails). Ch 1, sc in each st around (24)
Round 5 :
Petal foundation: *Ch 2, 5 dc in next st (petal shell base), ch 2, sl st in next st* repeat around to create 12 petals; if count off, adjust by adding a sl st between petals to maintain spacing. (12 petals)
Info :
Work petals loosely so they flare. If petals stack awkwardly when layered, block each petal flat with a little steam or damp blocking solution to shape.
Round 6 :
Switch to dusty-rose yarn for petal overlay: in each petal shell, sl st into base, ch 2, (dc, tr, dc) into same shell center, sl st to anchor. This creates a layered petal that sits above the base. Repeat around for 12 layered petals. Fasten off and weave tail to back center. (12)
Round 7 :
With small amount of cream, embroider center: bring cream through center hole and work 8 sc tightly around center to form a small raised pad; weave in ends. Optionally add a small knot of embroidery thread for a contrasting button-like center. (8)
Round 8 :
Lightly stuff center with a scrap of yarn to give a soft domed center before attaching center sc stitches. Do not overstuff — the look is gentle and flat. (Info: stuffing increases depth by approximately 2-4 mm.)
Round 9 :
Fasten off leaving long tail for sewing. Use tail to sew this flower onto scalloped edging later, centering on the short end cluster placement. (Info: reserve a second layered flower to stack on top if desired.)
Info :
Make 4 large flowers following this sequence for the photographed cluster. Make slightly smaller variants by omitting Round 6 and using 4 dc instead of 5 dc for the base petals.
— Medium Flower (Make 4) :
Round 1 :
Make magic ring. Ch 1, work 6 sc into ring, pull tight. (6)
Round 2 :
Inc in each st around (12)
Round 3 :
*Sc in next st, inc in next st* repeat around. (18)
Round 4 :
Petal round: *Ch 1, 5 dc in next st, sl st in next st* repeat around to make 9 small petals. Fasten off. (9)
Info :
Make 4 medium flowers to layer with large flowers for the end clusters. Vary color placement between layers for a natural look.
— Small Cluster Flower (Make 6) :
Round 1 :
With cream or pale rose: ch 5, sl st to form ring.
Round 2 :
Inside ring: ch 1, work 8 sc into ring, sl st to join. (8)
Round 3 :
*Ch 2, 3 dc in next st, ch 2, sl st in next st* around to create 4 petite petals. Fasten off leaving tail for sewing. (4)
Info :
Use these small flowers to fill gaps and create depth. They are quick to make and arrange before sewing down.
— Leaf Motif (Make 12-20) :
Round 1 :
With sage green: ch 8. Starting in 2nd ch from hook, sc, hdc, dc, tr, dc, hdc, sc across to shape a pointed leaf, turn and sl st to base to create a flat leaf. Fasten off leaving tail for sewing. (leaf shape)
Round 2 :
Optional ribbing: rejoin sage at leaf center, work surface sl sts or chain loop embroidering a midrib with a yarn needle and matching yarn to add definition. (info)
Info :
Make 12-20 leaves in varied sizes; pinch the base to flatten slightly before sewing to the runner for a natural layered effect.
— Embroidered Vine & Buds (Center Accent) :
Round 1 :
Using embroidery thread or a strand of sage yarn, use a long-armed stem stitch to embroider a vine up the center of one side of the runner. Bring thread through the fabric from back to front near one end and secure with a small knot on the back. Work a continuous stem stitch for approximately 20-30 cm as pictured. (info)
Round 2 :
Add small buds by sewing tiny cream knots at intervals (French knots or small bullion knots) at the vine nodes—make 8-12 buds of varying sizes along the length. Secure all thread tails on the backside and weave in. (info)
Info :
Place the vine slightly off-center if you prefer asymmetry like the photo. Lightly starch or block the embroidered vine to keep it flat on the surface.
— Assembling Flower Clusters (Both Ends) :
Round 1 :
Plan placement: Lay runner flat on table and arrange 4 large flowers, 4 medium flowers and 6 small flowers on each short end. Place leaves under and between flowers to create an organic cluster. Take photo or sketch positions for reference. (info)
Round 2 :
Begin sewing: Use long tails from each applique and a blunt tapestry needle. Start with largest flower and attach through the center base to the scalloped edging at the short end (position approximately centered across short end). Use mattress or invisible whip stitch, bringing needle through back of center ring and catching the edging loop several times to secure. (info)
Round 3 :
Layer and overlap: Place medium flowers on top of the large flower edges and tack down through the base ring only so petals remain free. Sew small flowers into gaps and anchor leaves underneath. Reinforce each piece with 6-10 small stitches around the base for sturdiness. (info)
Round 4 :
Final anchor: After all pieces are in position, use a small stitch in a contrasting neutral to tidy any gaps and add a few additional embroidered veins to leaves for realism. Clip and weave all tails to the back. (info)
Round 5 :
Optional: from the back, add a small cream felt backing or applique circle and tack down with whip stitch if cluster needs reinforcement for high-traffic tables. (info)
— Finishing & Blocking :
Round 1 :
Pin the entire runner to blocking mat to match desired rectangular shape. For scallops, pin each shell outward slightly to accent curves. Dampen with spray or steam lightly and allow to dry completely. (info)
Round 2 :
Weave in all ends: Use tapestry needle to weave tails into the back fabric across multiple rows to secure. Trim ends carefully. (info)
Round 3 :
Spot-clean any stray marks with mild soap and water. Re-shape any petals by hand if necessary. Your runner is ready for display. (info)
Info :
Block one side at a time and let dry fully to ensure scallops hold their shape. If you expect frequent washing, consider adding a small washable stabilizer behind heavy clusters to reduce wear.
Finishing this vintage floral table runner is such a satisfying moment—watch the textured dusty-rose linen panel, creamy scallops, and layered blooms come together into a timeless centerpiece. Each stitch and applique builds a little heirloom of your own making. Whether displayed on a table or dresser, it brings warm charm and handcrafted detail to your home. 🧶🌸 Take a moment to pin your favorite photos and share your creation with friends! ✨