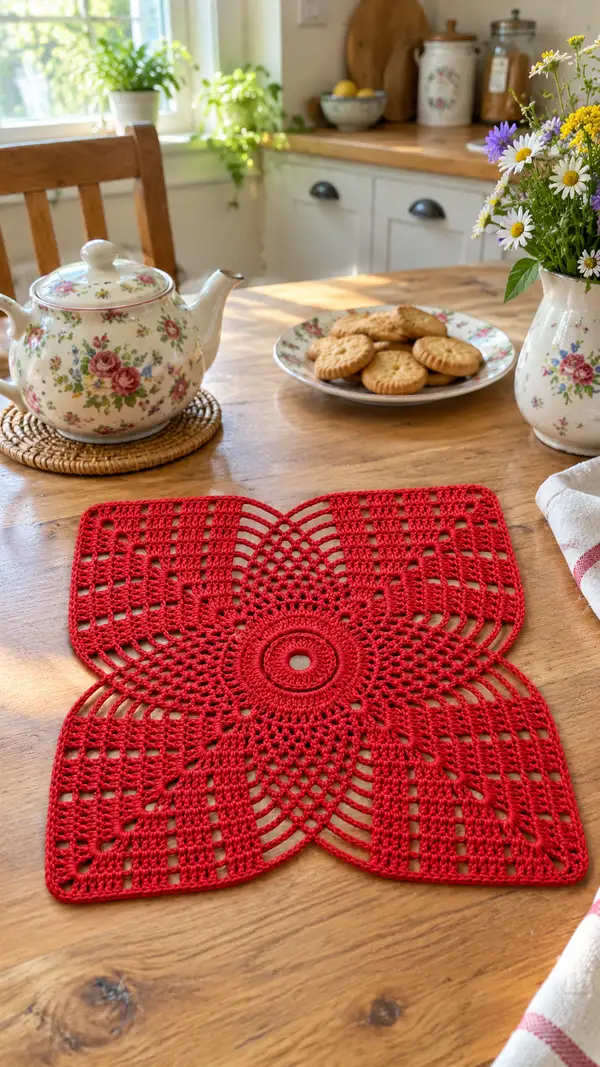
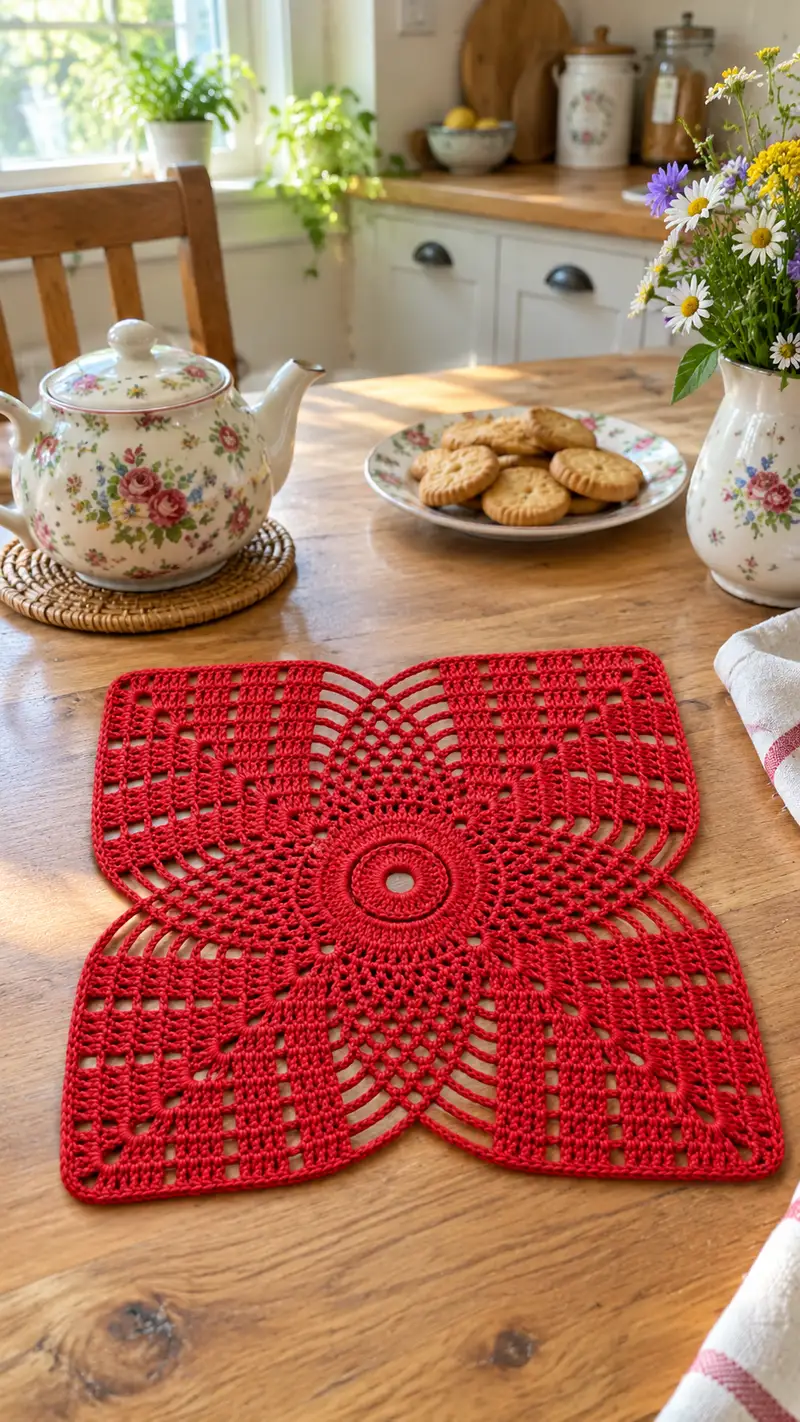
This vintage-inspired red lace centerpiece is a delicate, floral-motif table mat that combines circular lacework and square quadrant panels to create a graceful four-petal square doily. Worked in bright red cotton with crisp arches, mesh panels and a neat rounded border, it lays flat and displays beautifully on a wooden table or under a teapot. The pattern uses repetitive lace repeats and step-by-step shaping for a satisfying, meditative crochet project.
Progress Tracker
0% Complete
— Overview :
Info :
This pattern is worked in continuous rounds joined with sl st or worked in joined rounds depending on your preference. I describe rounds as 'Round X' for clarity. The piece is constructed from a central round outward and blossoms into four identical quadrants that give the square-with-rounded-corners shape. Work with a stitch marker for round starts. Gauge is not critical but use a hook that gives crisp stitches and closed mesh. Blocking will open the lace and square the corners.
— Center ring and foundation rounds :
Round 1 :
Make a magic ring. 12 sc into magic ring. Join with sl st to first sc. (12)
Round 2 :
Ch1, 12 inc (2 sc in each st) around. Join with sl st to first sc. (24)
Round 3 :
Ch1, (1 sc, inc) x12. Join. (36)
Round 4 :
Ch1, (2 sc, inc) x12. Join. (48)
Info :
Place a stitch marker at the first stitch of this round and move it at the end of each round. The first 4 rounds form a small tight disc; keep tension even so the center lies flat.
Round 5 :
Ch3 (counts as dc), (3 dc, ch2, 4 dc) into next 8 sts to form 4 small petal bases; you will instead work an evenly spaced sequence: *3 dc in next 6 sts, ch2, 3 dc in next 6 sts* repeat twice so that you create four tiny grouped sectors across the 48 sts. Join with sl st to top of ch3. (48 with ch2 spaces counted separately)
Round 6 :
Ch1, sc evenly around working 1 sc in each dc and 1 sc in each ch-2 space to tidy edges. Join. (48)
Info :
We will now work a sequence of expanding rounds that create the central medallion. Keep counts even by ensuring each quadrant has equal number of stitches; count and mark every 12th stitch if helpful.
Round 7 :
Ch3 (counts as dc), dc in same st, 2 dc in each of the next 2 sts, *ch3, sk 2, (2 dc, 2 dc) in next 3 sts* repeat across each quadrant so you create arch points every 12 sts; join. (72)
Round 8 :
Ch1, sc in each st and 1 sc in each ch-3 space to create a close round. Join. (72)
Round 9 :
Ch3, (dc, ch1, dc) in same st to form small cluster, *sk 3, 5 dc cluster over next 5 sts, sk 3, (dc, ch1, dc) in next st* repeat around. Join. (72 with ch1 spaces)
Round 10 :
Ch1, sc evenly around working sc into dc and into ch1 spaces to lock clusters. Join. (72)
Info :
Rounds 7-10 create the textured medallion that will become the central eye of the design. If you prefer a rigid hole in center, you can insert a small ring under the round-1 area before Round 5 and work rounds over it.
Round 11 :
Ch3, dc in same st, ch2, *skip 3 sts, (5 dc into next 5 sts making a fan), ch2, sk 3, (3 dc, ch2, 3 dc) into next st* repeat four times to mark four lobes. Join. (72 plus ch2 spaces)
Round 12 :
Ch1, sc around working sc into each dc and sc into each ch-2 space. Join. (72)
Round 13 :
Ch4 (counts as tr), tr in same st, *ch5, sk to the central ch-2 space of a lobe and work 7 tr across that lobe working evenly into the fan, ch5, (tr, ch1, tr) in the center connecting point; rep across each lobe to form tall arches. Join. (72 plus ch spaces)
Round 14 :
Ch1, sc around into each tr and into each ch-1 and ch-5 space as follows: 1 sc in each tr, 1 sc in each ch-1 and ch-5 to tidy arch bases. Join. (This round evens out stitch base for quadrant construction.) (Approx 96-112 depending on counted ch spaces)
Info :
At the end of Round 14 you should have a circular medallion with four marked arch points. We'll begin building the four quadrants outward from these marked points. It's helpful to place 4 markers at the four center connecting points to ensure symmetry as you expand into squares.
— Quadrant foundation and first arch repeats (Rounds 15-30) :
Round 15 :
Ch3 (counts as dc), work 2 dc into base of the first arch, ch3, sk into the next sector and work (3 dc, ch3, 3 dc) into the marked quadrant seam. Continue along the circle creating 4 large corner arches separated by chains of dc to create initial quadrant boundaries. Join. (Work so each quadrant has identical counts; expect approx 120 dc and ch spaces overall)
Round 16 :
Ch1, sc around tidying every dc and ch-3 space. Place a stitch marker at the seam of each quadrant. Join. (stitch count unchanged from previous round)
Round 17 :
Ch4, (tr) x6 in same st to create a tall arch, *ch7, sk to next quadrant seam, work (7 tr) across the seam to create an elongated loop* repeat for all 4 seams. Join with sl st. (This round forms the tall pinnacles seen in the petal tips.)
Round 18 :
Ch1, sc into each tr and sc in each ch-7 space across to secure the arches. Join. (Count will equal total trs + ch spaces; ensure even distribution across quadrants)
Info :
From here the pattern alternates between dense rounds (dc/hdc stacked) and open mesh rounds (chain spaces). The four quadrant seam markers are your guide—always make sure repeats per quadrant match exactly.
Round 19 :
Ch3, dc in same st, dc in next 5 sts across quadrant base, ch5, skip to next arc and repeat; each quadrant will receive a block of tall dc separated by ch-5 spaces creating the radiating ribs. Join. (Approx 160 dc across whole round including ch spaces)
Round 20 :
Ch1, sc around, working sc into each dc and 1 sc into each ch-5 space to secure. Join. (Stitch count returns to stable number equal to previous round's dc count)
Round 21 :
Ch3, (2 dc in next st) x6, ch3, *mesh: ch2, sk2, sc in next st, ch2* across the quadrant area to start the mesh insertion. Repeat across all quadrants so that mesh begins in each quadrant simultaneously. Join. (Counts vary but keep symmetry per quadrant)
Round 22 :
Ch1, sc in each st and into each ch-2 mesh space. Join. (Stitch count stabilized for this round)
Round 23 :
Ch3, 2 dc in next st, *ch4, skip 3, 5 dc shell over next 5 sts, ch4, sk3, sc in next designated base* Repeat to continue creating the petal fan shapes between the quadrant ribs. Join. (Number of shells per quadrant is consistent; total stitches increase by multiples of 12 or 16 depending on shells)
Round 24 :
Ch1, sc around into dc, shells and chain spaces to tidy the shapes. Join. (Even round)
Info :
If you prefer a more open look, substitute ch-6 for ch-4 in arch rounds and increase chain arches accordingly. For tighter, smaller lace, reduce ch lengths by 1.
Round 25 :
Repeat Round 19 pattern but increase each dc cluster to (3 dc) where shells are desired to give more body to the petal ribs. Work evenly across quadrants. Join.
Round 26 :
Ch1, sc around. Join. (stitch count equal to previous round's dc cluster total)
Round 27 :
Ch5 (counts as tr+ch2), tr in next 2 sts, ch3, sk to mesh and make a 9-tr fan across the center of each petal to create the lattice seen in the photos. Repeat for all petals and connect with ch-3 bridges between fans. Join. (Large open fans create airy effect)
Round 28 :
Ch1, sc around securing all tr and ch spaces. Work 1 sc in each tr and 1 sc in each ch-3 bridge. Join.
Info :
At this stage the center with four large fans should resemble the flower center in the photo. If your fans or mesh feel loose, drop down a hook size and redo the last fan round.
— Expanding quadrants into panels (Rounds 29-56) :
Round 29 :
Ch3, dc in same st, *work block of 12 dc across the next measured area of the quadrant to form the first solid strip, ch6, skip corresponding stitches, then work 3 dc in the mesh area to anchor* repeat for each quadrant to begin rectangular panel construction. Join. (Expect an increase in overall stitch count in multiples of quad repeats)
Round 30 :
Ch1, sc evenly across to tidy. Join.
Round 31 :
Info :
We will now build a repeated block-rib and filet mesh sequence across each quadrant to mirror the photo: a band of triple dc rows followed by a filet (dc-blocks separated by chains) that creates the square-grid look.
Round 32 :
Ch3, (dc) in next 2 sts, *(dc, dc, dc) in each of the next 6 sts forming a 3-row block across, ch4, sk 4, 1 dc into next st to anchor* repeat across all quadrants. Join. (This creates first block-and-mesh repeat.)
Round 33 :
Ch1, sc in each dc and in each ch-4 space to stabilize. Join.
Round 34 :
Ch3, dc in each st across the block; when you reach a ch-4 space, work (2 dc, ch2, 2 dc) into that space to make a small framed window. Continue across panel. Join. (Maintain equal window count per quadrant.)
Round 35 :
Ch1, sc across, weaving into each dc and ch-2 frame. Join.
Info :
Rounds 32-35 are the basic unit for the grid panels. Repeat this 4-round unit several times to build the long rectangular panels visible in each corner. Each repeat extends the quadrant outward while preserving the square shape when later rounded off.
Rounds 36-47 :
Repeat Rounds 32-35 three times (12 rounds total) to extend panels outward. After each 4-round repeat, check that the panels on all four quadrants match; place a marker at the outermost point for symmetry. (Total rounds progressed: 47)
Round 48 :
Ch3, dc evenly across the last row of dc to provide a stable top rail; when at a ch-2 framed window, work 3 dc into the frame to close corners of the window. Join. (This round evens the outermost edge)
Round 49 :
Ch1, sc around into each dc and into the tops of framed windows to tidy. Join.
Info :
At this moment you have built long panels that form the sides of the square. The piece will still be rounded at the corners; the next rounds round off each corner to create the distinctive rounded-square look seen in the photos with arcs of tall stitches.
Round 50 :
Work corner rounding sequence: At the corner marker, ch6, (dtr, tr, tr, dtr) all in same corner anchor to make a tall scallop. Then continue with dc across panel top in between corner scallops. Repeat for each corner. Join. (This produces four tall scallop corners.)
Round 51 :
Ch1, sc around into each dc and into each treble/dtr and ch-6 space to stabilize. Join.
Round 52 :
Ch3, (dc in next 2 sts), *in the corner scallop work (5 dc) evenly across to shape the rounded corner, ch5 between scallops to form arches, then continue dc panels across the face* repeat for all four corners and sides. Join. (Counts will increase in multiples of the corner shell stitches.)
Round 53 :
Ch1, sc around into each dc and ch-5 space. Join. (stitch count evened)
Info :
These corner scallops are visible in the photos as the rounded lobes which give the piece its flower-like appearance when viewed from above. Keep scallops identical by counting the number of stitches in each shell carefully.
Rounds 54-56 :
Work 3 rounds of: R54 ch3 dc around, R55 ch1 sc around, R56 ch3 dc around. These rounds build body height and add firmness to the outer panel before the final decorative rowwork. Join each round. (Maintain counts; stitches increase slightly at scallops.)
— Decorative lace arches and final mesh rows (Rounds 57-76) :
Round 57 :
Ch5 (counts as tr+ch2), *sk 2, (tr) x6 across the outer section to create the open rib arches, ch5, anchor with sc into the outermost dc to keep edge flat* repeat around. Join. (This round makes the tall outward arches seen at the petal tips.)
Round 58 :
Ch1, sc into each tr and into each ch-5 to tack down arches. Join.
Round 59 :
Ch3, (dc, ch3, dc) into top of each arch peak to form a picot-like openwork; between arch peaks work 3 dc to bridge to next peak. Continue around creating a scalloped lattice. Join.
Round 60 :
Ch1, sc around into every dc and into ch-3 spaces to create a tidy, small scallop ridge. Join.
Info :
These small ridge rounds add definition to the arches and reduce curl. If your piece begins to cup, do one extra sc round to flatten before continuing.
Round 61 :
Begin final mesh lattice: ch3, dc in next 2 sts, *ch7, sk 6 (working across rectangle space), 1 dc in next st* repeat along each side; across corners work ch9 arch and anchor at next quadrant panel. Join. (This makes large open cages which become the grid in the photos.)
Round 62 :
Ch1, sc into each dc and into the ch-7 spaces (1 sc per ch-7) to stabilize large meshes. Join.
Round 63 :
Ch3, work (dc) into each sc across; in the mesh centers work groupings of (5 dc separated by ch3) to create mini fans inside the cages; repeat across sides. Join. (This round adds texture into cages.)
Round 64 :
Ch1, sc around tacking each mini fan and mesh. Join.
Round 65 :
Ch4, tr in next 3 sts, ch5, sk to center of each cage and make 7-tr fan anchored by sc in opposite wall; repeat around to create the long, vertical arcs visible near each petal intersection. Join.
Round 66 :
Ch1, sc around to secure fans and arches. Join.
Info :
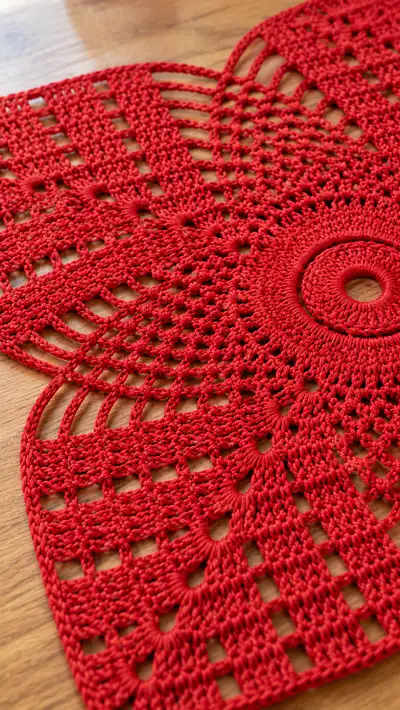
Rounds 61-66 form the lacy grid and decorative fans visible in the detailed close-up. At this stage the doily should lay relatively flat; if edges curl, add an extra sc round before continuing. Always match the number of fan and mesh repeats in each quadrant.
Rounds 67-72 :
Repeat a 3-round sequence twice: R1 ch3 dc across with small increases at corner shells, R2 ch1 sc tidy, R3 ch3 dc across with decorative tall stitches into designated ch spaces. These rounds bulk up the border and prepare the very final edging. Join each round.
Round 73 :
Ch3, dc in next 2 sts, *(dc, ch2, dc) into every 6th st to create small framed windows, then 6 dc across the solid band* repeat across each side and corner. Join.
Round 74 :
Ch1, sc around, working sc into each dc and into each ch-2 to stabilize windows. Join.
Round 75 :
Begin final picot-like edging: *ch3, sl st into same st, sc in next 4 sts; repeat across each side creating small picot points around entire perimeter.* Join.
Round 76 :
Ch1, sc evenly around to tidy edge, placing 3 sc into each corner scallop to maintain rounded corners. Join and fasten off. Weave in ends. (Final stitch count will reflect all picots and scs; ensure even counts per quadrant.)
Info :
After fasten off, block the piece by dampening lightly and pinning the outer scallops out to shape, stretching each corner evenly so the square becomes regular. Spray with fabric stiffener if you want a firm centerpiece that holds shape permanently.
— Optional final reinforcement and finishing rounds (Rounds 77-96) :
Round 77 :
If you prefer a firmer, thicker border, rejoin yarn at any side seam and work an even round of hdc in BLO around the outer edge to create a subtle raised ridge. Join. (hdc count equals previous sc count.)
Round 78 :
Ch1, sc in each st across to tidy the ridge. Join.
Round 79 :
Slip to the outermost edge and work a decorative scallop: *5 dc in next st, sl st in next; repeat* around for a lacy ruffle. Join.
Round 80 :
Ch1, sc around to flatten ruffle and weave in ends. Join and fasten off.
Info :
These last optional rounds (77-80) give a slightly heavier edge that photographs nicely and makes the doily sit less floppy under objects. Use them if you plan to set heavy items like a teapot on top.
Round 81 :
For a crisp finish rejoin yarn and sc around in the same color while placing a final line of slip stitches into the back loops only for a neat folded edge effect. Join. (This is optional but provides a professional finish.)
Round 82 :
Weave ends tightly into the last two rounds with a yarn needle. Trim close to work. Block gently to final shape. (Final finishing step.)
Info :
If you want to enlarge the piece, repeat the panel expansion unit (Rounds 32-35 and 36-47) an additional time per side before beginning corner scallops. Keep repeats symmetrical across all four quadrants. For a smaller piece, stop earlier and finish with the decorative scallop rounds.
Round 83 :
Optional: add a second row of picots by picking up from Round 76 edge and working *ch5, sl st into base* every 6 sts to add a lacy fringe. Join and fasten off.
Round 84 :
Final steam block lightly with iron at distance or wet-block fully; pin corners to square shape and leave overnight to dry. Admire your finished centerpiece.
Info :
Throughout the pattern keep quadrant symmetry as your top priority: many rounds increase stitch counts slightly at corner shells—count the number of dc groups per quadrant at the end of each round to ensure consistency. This pattern is intentionally modular: memorize the 4-round panel unit and the corner scallop sequences for the most efficient stitching experience.
You've just created a bright, bold centerpiece that brings vintage charm and modern crispness to any tabletop. The red lace pattern draws the eye to its floral center and delicate arches while being sturdy enough to hold a teapot. Blocking and the optional border rounds give it a professional finish that you'll be proud to display. 🧶 Enjoy the slow, satisfying process and the beautiful end result — a handmade accent full of personality. ❤️