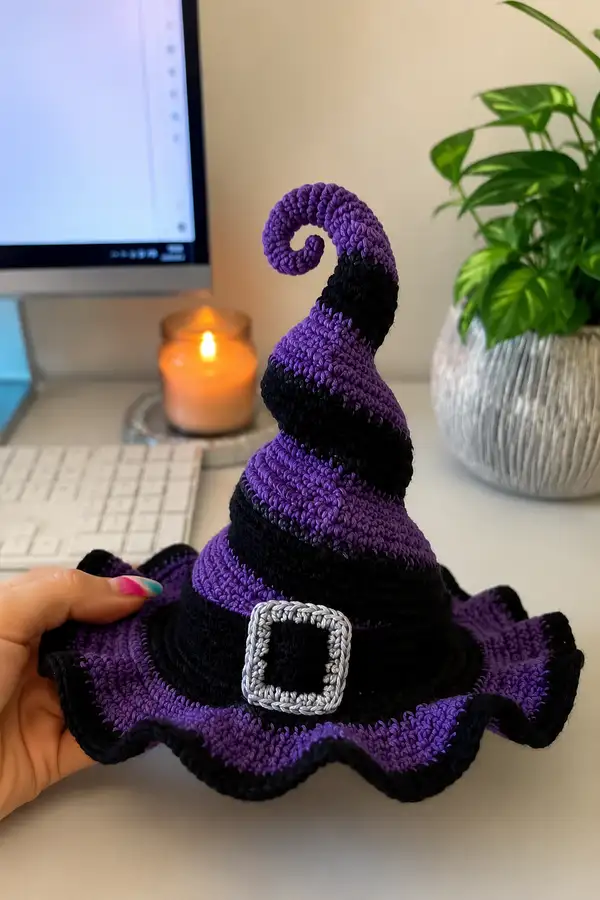
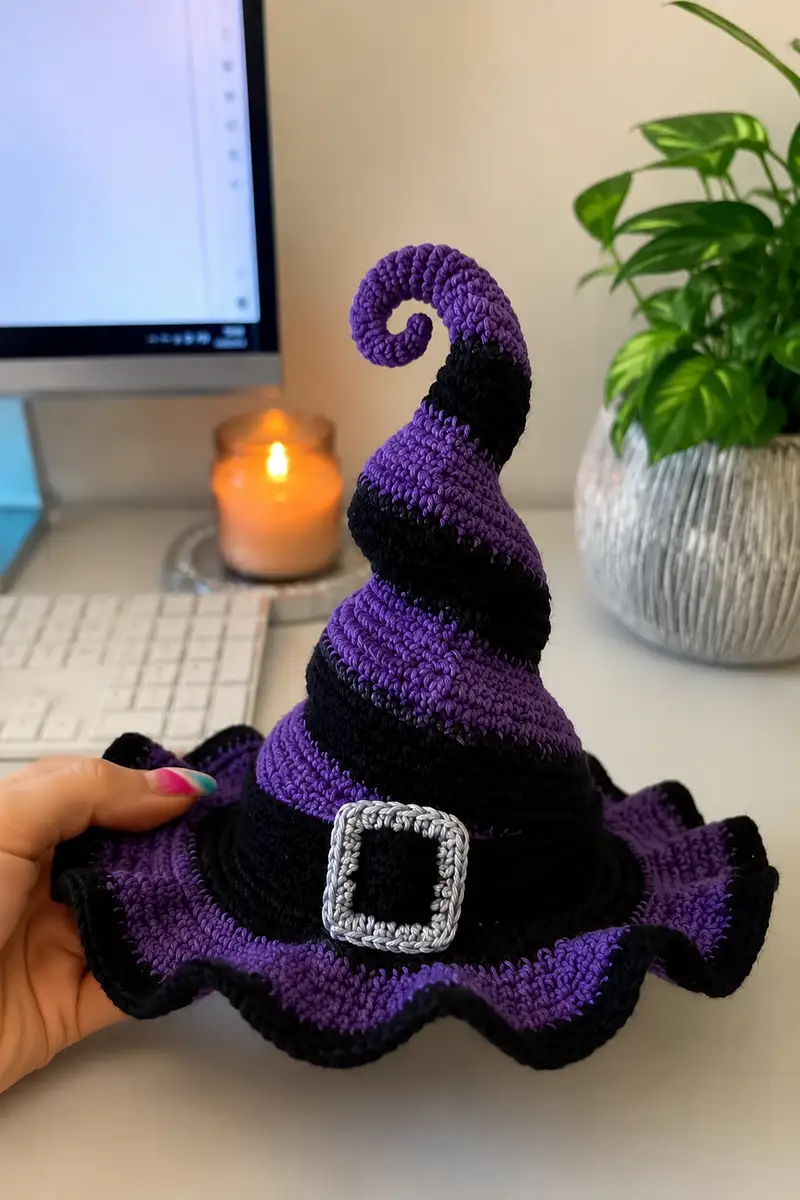
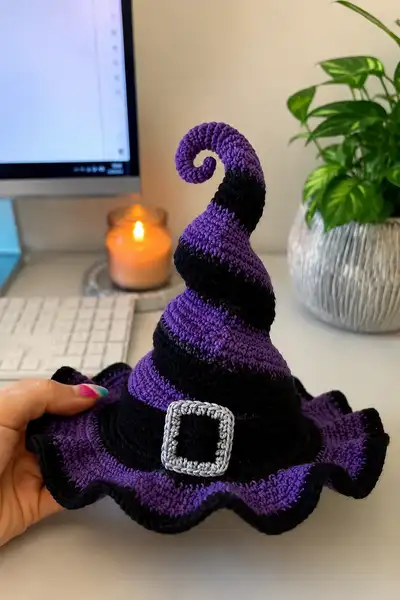
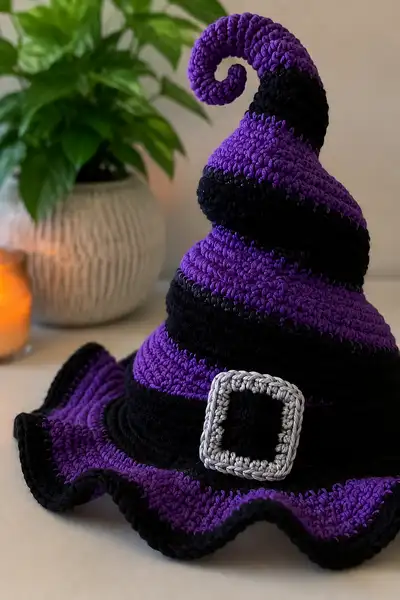
A whimsical spiraled witch hat worked in bold purple and black stripes with a dramatic ruffled brim and a decorative silver buckle. The hat has a tall curled tip that spirals into a tight corkscrew, a structured crown with alternating stripes, and a wide wavy brim that keeps its shape. Made in worsted-weight yarn, this pattern includes detailed round-by-round instructions and assembly notes to recreate the exact look and structure shown in the photos.
Progress Tracker
0% Complete
— Crown (base cone) :
Round 1 :
6 sc in magic ring (6)
Round 3 :
(1 sc, 1 inc) x 6 (18)
Round 4 :
(2 sc, 1 inc) x 6 (24)
Round 5 :
(3 sc, 1 inc) x 6 (30)
Round 6 :
(4 sc, 1 inc) x 6 (36)
Round 7 :
(5 sc, 1 inc) x 6 (42)
Round 8 :
(6 sc, 1 inc) x 6 (48)
Info :
These first eight rounds create a flat, wide base that will become the lower crown. If you need a larger crown opening to fit a head, continue increasing in the same pattern (7 sc, 1 inc) x 6 (54) then (8 sc, 1 inc) x 6 (60) until desired diameter is reached. I used 48 sts to match the photos for a decorative hat with a 6-7 inch head opening.
Round 9-16 :
1 sc in each st (48) (8 rounds: 9,10,11,12,13,14,15,16)
Info :
Work these rounds in continuous spiral (do not join) to avoid a visible seam line. Use a stitch marker to mark the first stitch of round 9 and move it up each round. These rounds build the straight side of the crown before the crown begins to taper into the cone.
Round 17 :
(6 sc, 1 dec) x 6 (42)
Round 18 :
(5 sc, 1 dec) x 6 (36)
Info :
Start shaping the crown inward. Stuff lightly if desired to create a firm base for the cone; do not overstuff — you want a soft but structured shape that will accept the cone attachment.
Round 19 :
(4 sc, 1 dec) x 6 (30)
Round 20 :
(3 sc, 1 dec) x 6 (24)
Round 21 :
(2 sc, 1 dec) x 6 (18)
Round 22 :
(1 sc, 1 dec) x 6 (12)
Info :
At the end of Round 23 the crown top will be a small closed point. Fasten off leaving a 6-8 inch tail for sewing if you plan to attach the cone tip separately. If you prefer to work the cone extension in the same continuous piece, do NOT fasten off; instead continue increasing again to begin the cone spiral. In the photos the crown flows smoothly into the cone, so we'll continue without fasten off to build the long cone section.
Round 24 :
Change to purple if not already using purple. 6 sc in first 6 sts evenly around previous center (6)
Round 26 :
(1 sc, 1 inc) x 6 (18)
Round 27 :
(2 sc, 1 inc) x 6 (24)
Info :
We are re-expanding into a taller cone that will form the sweeping spiral. For the striped look, alternate colors every 6-8 rounds as seen in the photos: purple then black, purple then black. Change colors at the start of a round and carry unused yarn inside if you want neat color transitions.
Round 28 :
(3 sc, 1 inc) x 6 (30)
Round 29 :
(4 sc, 1 inc) x 6 (36)
Round 30-33 :
1 sc in each st (36) (rounds 30,31,32,33)
Info :
Change to black at Round 34 to form the next stripe. When changing to black, fasten off purple tail as needed or carry purple along the inside and catch it on the wrong side. I recommend carrying when stripes are short to avoid many ends.
Round 34 :
Change to black yarn. 1 sc in each st (36)
Round 35-38 :
1 sc in each st (36) (rounds 35,36,37,38)
Info :
To create the spiral leaning effect, we will do very gradual increases on one side of the cone and slight decreases on the opposite side across several rounds. This is achieved by shifting where you place increases relative to your marked first stitch. Move the stitch marker one stitch to the right every two rounds to create a slow spiral bias in the fabric.
Round 39 :
(6 sc, 1 inc) x 5, 5 sc (41) — place increases clustered across one quadrant to tilt the cone slightly
Round 40 :
1 sc in each st (41)
Round 41 :
(5 sc, 1 inc) x 5, 6 sc (46)
Round 42 :
1 sc in each st (46)
Info :
Alternate color back to purple for the next stripe. The method above (clustered increases) subtly biases the cone so when we begin curling the tip it will naturally spiral clockwise as in the photos.
Round 43 :
Change to purple. 1 sc in each st (46)
Round 44-46 :
1 sc in each st (46)
Round 47 :
(6 sc, 1 dec) x 6, then 10 sc (40) — begin gentle tapering toward the tip by placing decs opposite the clustered increases
Round 48 :
1 sc in each st (40)
Round 49 :
(5 sc, 1 dec) x 6, 4 sc (34)
Round 50 :
1 sc in each st (34)
Info :
From here we will begin building the long narrow tip that is later curled. Work into the next rounds with occasional increases to keep the cone slender rather than abruptly narrow. Stuff very lightly as you go — you want shape but not a solid stuffed core. If you want a poseable tip, insert a thin florally wire before stuffing tightly at the very end of tip shaping.
Round 51 :
(4 sc, 1 dec) x 6 (30)
Round 52 :
1 sc in each st (30)
Round 53 :
(3 sc, 1 dec) x 6 (24)
Round 54 :
1 sc in each st (24)
Round 55 :
(2 sc, 1 dec) x 6 (18)
Round 56 :
1 sc in each st (18)
Round 57 :
(1 sc, 1 dec) x 6 (12)
Round 58 :
1 sc in each st (12)
Info :
The tip is now small. Instead of closing completely, we will extend a long narrow spiral by working a partial tube and then forming the curl. To form the spiral visible in the photo, continue in purple for 4 rounds and then black for 4 rounds, repeating colours so that the tip echo the striped motif. Leave the center slightly open while stuffing to allow curling freely.
Round 60 :
Change to purple. 6 sc in magic loop or pick up 6 sts evenly along the small opening to begin the extended tube (6)
Round 62 :
(1 sc, 1 inc) x 6 (18)
Round 63 :
1 sc in each st (18)
Round 64 :
Change to black. 1 sc in each st (18)
Round 65 :
1 sc in each st (18)
Round 66 :
Change to purple. (2 sc, 1 inc) x 6 (24)
Round 67 :
1 sc in each st (24)
Round 68 :
Change to black. 1 sc in each st (24)
Info :
To create the tight spiral tip: after building the tube to about 6-10 rounds long (depending on desired curl length), you will form the spiral by decreasing one side preferentially and then rolling the tube into a coil, or by crocheting short rounds on the inside that shorten the inside edge. The method below sculpts a spiral by doing alternating decs on one quadrant and then coiling.
Round 69 :
(3 sc, 1 dec) x 6 (18) — begin tapering one side so the tube curls inward
Round 70 :
1 sc in each st (18)
Round 71 :
(2 sc, 1 dec) x 6 (12)
Round 72 :
1 sc in each st (12)
Round 73 :
(1 sc, 1 dec) x 6 (6)
Info :
Stuff tip lightly to keep a soft but sculptable shape. If you are using wire, feed the wire from the inside of the cone down through the tube now, leaving about 2-3 inches extending into the tip to shape the final curl. Bend and wrap any wire ends so they are not sharp. Coil the tube into the desired tight spiral by wrapping it around a pencil or by manually coiling and tacking in place with sl st or a few whip stitches using a yarn needle.
Round 74 :
Use slip stitches and single crochet to anchor the curl: Fold the small 6-st opening into itself forming a spiral corkscrew. Working from the inside out, sl st through the inner loops to tack the spiral so it holds shape. Work around two or three times until firm.
Info :
Take time shaping the spiral so it looks like the photo: a tight inner coil that grows slightly looser as it leaves the cone. Adding a few extra anchoring stitches inside the coil secures it without being visible from the outside.
— Brim Base :
Info :
We will build the brim outward from the lower edge of the crown. The brim in the photos is wide and wavy; that look is achieved by progressive, deliberate increases each round. Work the brim in a new color (black and purple alternating) picking up stitches evenly around the crown base. Count the sts around the crown bottom to ensure your starting round matches. For the counts above, pick up 48-54 sts around the base depending on exact circumference. I recommend 48 as used here.
Round 1 :
Join black yarn to any stitch at base of crown. 1 sc in each st around (48)
Round 2 :
(1 sc, 1 inc) x 24 (72)
Round 3 :
1 sc in each st (72)
Round 4 :
(2 sc, 1 inc) x 24 (96)
Round 5 :
1 sc in each st (96)
Info :
These rounds create a gently sloped brim. Work in continuous rounds, keeping an eye on how the fabric wants to sit. If your brim curls upward too much, add a round of BLO to stabilize the edge.
Round 6 :
Change to purple. (3 sc, 1 inc) x 24 (120)
Round 7 :
1 sc in each st (120)
Round 8 :
Change to black. (4 sc, 1 inc) x 20 (144)
Round 9 :
1 sc in each st (144)
Round 10 :
(5 sc, 1 inc) x 24 (168)
Round 11 :
1 sc in each st (168)
Info :
Now the brim has grown wide. To create the ruffled waves, we will alternate a round that packs stitches (to force wave folds) with a round that smooths the surface. This gives the scalloped shape seen in the image. If your brim becomes too floppy, add a round in BLO near the join with the crown to provide structure.
Round 12 :
Change to purple. (2 sc, 1 inc) x 56 (224)
Round 13 :
1 sc in each st (224)
Round 14 :
Change to black. (3 sc, 1 inc) x 56 (280)
Round 15 :
1 sc in each st (280)
Round 16 :
Change to purple. (4 sc, 1 inc) x 56 (336)
Info :
If your brim has expanded beyond desired width, stop increasing earlier. The numbers above are intentionally generous to create a dramatic ruffle as seen in the photos. You can reduce increase density and stop around Round 12 or 13 if you prefer a subtler wave.
Round 17 :
1 sc in each st (336)
Round 18 :
Change to black. 1 sc in each st BLO (336)
Info :
Working a BLO round here helps create a ridge that visually separates the crown from the brim. It also helps the ruffle keep its upward curve. Make sure this round is snug and even.
— Ruffle Edge :
Round 1 :
Change to purple. We will now work scallops around the outer edge to form defined waves. *Skip 2 sts, 5 dc in next st, skip 2 sts, sl st in next st* rep around until the end; adjust pattern to distribute evenly (scallops approx every 8-12 sts depending on local count)
Round 2 :
1 sc in each st around the scallop peaks to stabilize (work into top of each 5-dc shell) — pick up each shell peak and sc across to create a defined ridge
Round 3 :
Change to black. Edge finish: 1 sc in each st around to neaten (work behind scallops to define contrast) — if you prefer a crisp black edge, use the black yarn for this round
Info :
The ruffle scallops can be sized by altering the number of dc in each shell (3 dc for smaller scallops, 7 dc for exaggerated waves). Block or steam the brim lightly after finishing to allow the waves to sit naturally.
Round 4 :
Optional decorative border: sl st in each st with black for a twisted finishing line, or hdc in black for a raised edge. Fasten off and weave in ends.
— Band & Buckle :
Band Round 1 :
Using black yarn, chain a length that wraps comfortably around the crown base with slight overlap (for a 48-st base, chain 52-56 to allow overlap and seam). Join to form a loop being careful not to twist.
Band Round 2 :
Round 1 sc in each ch around the loop, join with sl st, continue working in rounds evenly until band width is 10-12 rows (10-12 rounds of sc) — fasten off leaving long tail for sewing to crown
Info :
The band is essentially a narrow tube that wraps the crown at the brim junction. Pin the band in place before sewing. The photos show the band placed just above the brim ridge with the buckle centered at the hat's front.
Buckle Round 1 :
Using silver yarn, ch 12, (or fewer for smaller buckle) sc in 2nd ch from hook and across to create a small rectangle base; join work to form a flat square with 10-12 sc per side depending on desired buckle size.
Buckle Round 2 :
Turn and work 10-12 sc across the short edge to create a rectangle of about 10 x 10 stitches. Join and work around the rectangle with sc to form a solid tube; fold into a square and sew edges together to create an open square buckle (fasten off leaving a long tail).
Buckle Round 3 :
Work a second inner square in black (or leave open) by sewing a 6 x 6 sc fabric and stitching it into the middle if you want a filled buckle center like the photo. Weave a silver yarn border around the black square to form the raised outer edge.
Info :
The buckle can also be crocheted flat as a square ring by making a flat rectangle, cutting the center out, and then whipstitching silver around the outer edge. Use a stitch marker to hold shape while sewing onto the band.
— Finishing Touches :
Info :
Position the band around the crown where you wish (photo shows band about 6-8 rounds above the brim). Tuck any overlapping tail under the buckle and sew through both band and crown with the long tail using small whip stitches so that the band sits flat. Hide ends inside seam.
Round :
Sewing & Anchoring: Using black yarn, sew the band to the crown with small stitches every 6-8 sts so it does not shift. Attach the buckle centered on the front by sewing through the band and then around the back of the buckle so it sits snugly.
Info :
Final shaping: Adjust the brim waves and the spiral tip manually. If the tip is too floppy, add a small length of wire inside the spiral and cover the wire with a short stuffing column; if too stiff, remove a small amount of stuffing. Steam-block the brim lightly if you want a flatter appearance, or leave unblocked for dramatic waves.
Round :
Weave in all ends on the wrong side using a yarn needle. Trim excess yarn and tidy edges. If desired, add decorative touches like a small crocheted bat, patch, or additional band wraps.
Info :
Make adjustments as needed to match your personal size preference. If you want to wear the hat, consider adding a lightweight inner headband or elastic to keep it secure. For display-only pieces, lightweight stuffing and sewing alone should be sufficient.
This spiraled witch hat brings together bold stripes, a dramatic ruffled brim, and a playful curled tip for the perfect Halloween statement piece! The step-by-step instructions make it fun to build and shape, and the finished hat looks stylish on a shelf or as a costume topper. I hope you enjoy the shaping process — the spiral and ruffle are so satisfying to sculpt. Happy crocheting, and enjoy showing off your magical creation! 🎃✨