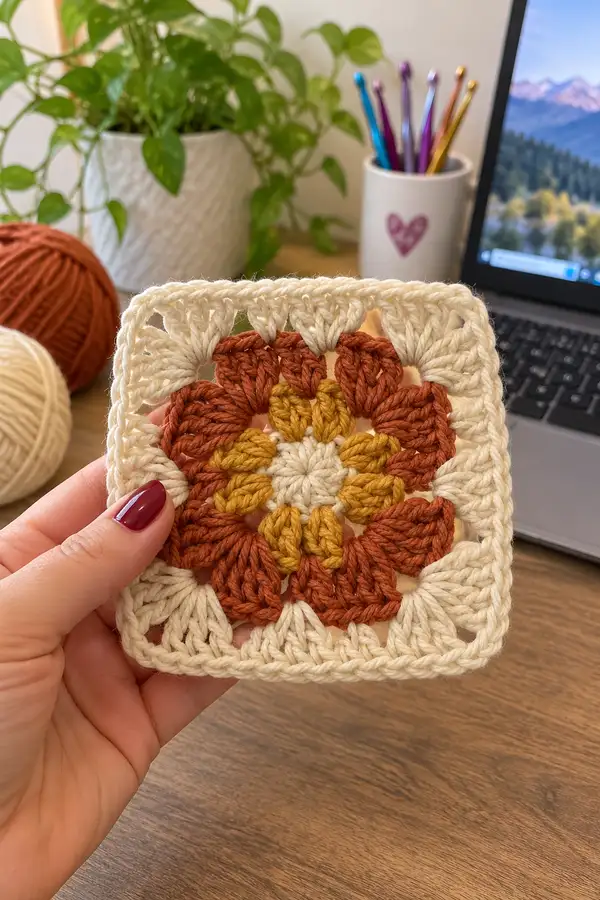
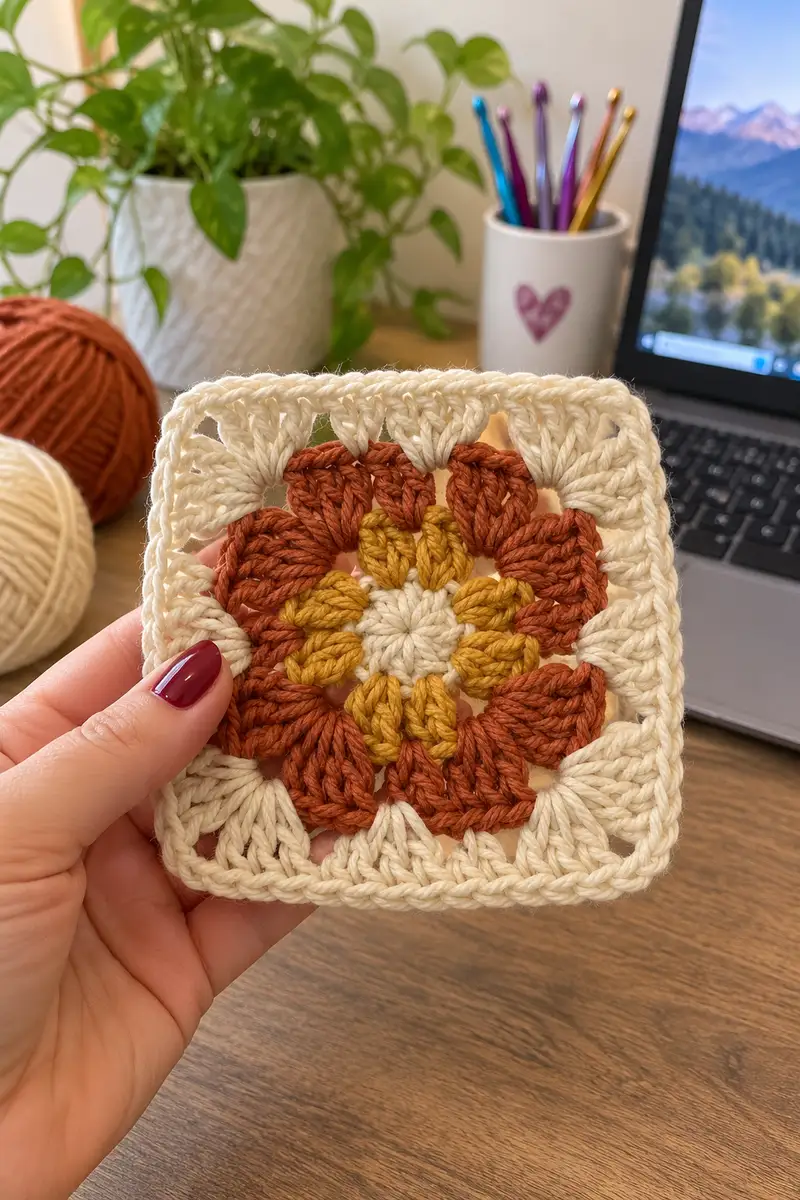
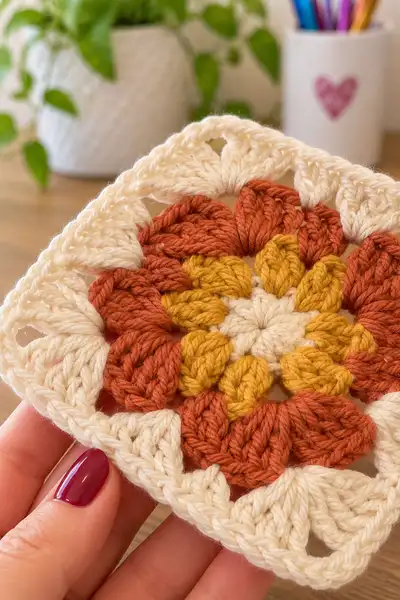
Create a cozy, warm floral granny square inspired by retro sunburst motifs. This square features a cream background with mustard inner petals and rich rust outer petals, finished with a soft cream textured border. Perfect for making a bedspread, pillow, or throw when repeated and joined — the petals are formed with puff/cluster stitches for a sculpted, floral look.
Progress Tracker
0% Complete
— Notes & Gauge :
Info :
Gauge is not critical for a decorative bedspread square, but to match the size shown aim for approximately 12-13 cm (4.75-5.25 in) square after blocking using worsted cotton and 4.5mm hook. The pattern uses an 8-repeat construction (eight petal segments) which keeps counting consistent. Work with slightly firm tension so stuffing/joins do not show through petals.
— Special Techniques :
Info :
Puff stitch: yarn over, insert hook, pull up a loop; yarn over, insert into same stitch, pull up a loop; repeat until you have 5 loops on hook, yarn over and pull through all loops, ch1 to close the puff. You can adjust loop counts for a taller or shorter puff.
Info :
Cluster: work 3 double crochets in same stitch leaving last loop of each on hook, yarn over and pull through remaining loops to close cluster. We use 3-dc clusters for sculpted petals.
— Center / Round Work :
Round 1 :
With cream yarn, make a magic ring. Ch1, 8 sc into ring. Pull ring closed. Join with sl st to first sc. (8)
Round 2 :
Change to mustard yarn. Ch1, (1 sc, inc) x8 around. Join with sl st to first sc. (24)
Round 3 :
Ch1, (2 sc, inc) x8 around. Join. (32)
Round 4 :
Ch1, (3 sc, inc) x8 around. Join. (40)
Round 5 :
Ch1, (4 sc, inc) x8 around. Join. (48)
Info :
These increases create a shallow dome ready for the inner petals. Change to mustard color before Round 6 if you want the inner petals in mustard. Secure color change tails neatly and carry yarn inside the petals or weave in as you go.
Round 6 :
Change to mustard if not already. Ch1, (5 sc, inc) x8 around. Join. (56)
Round 7 :
Ch1, (6 sc, inc) x8 around. Join. (64)
Round 8 :
Ch1, (7 sc, inc) x8 around. Join. (72)
Info :
At this point you have a circular repeat with 72 stitches. The next rounds form the inner mustard petals using puff/cluster stitches worked into established stitch positions. Use a stitch marker to mark the first stitch of round 9 to keep track.
— Inner Petal Formation (Mustard) :
Round 9 :
With mustard, ch3 (counts as dc), *skip 3 sts, puff in next st (puff: yarn over, insert hook, pull up loop; repeat 4 times total loops; yarn over, draw through all loops; ch1), ch1, sl st in next st; repeat from * around to make 8 evenly spaced puffs. Join with sl st to top of ch3. (8 puffs; placement across 72-st round)
Info :
Space the puffs evenly by working them into every 9th stitch approx. We have 72 sts so making 8 puffs gives ~9-st intervals. Use your eye and the previous increases to align petals into octants. Flatten each puff gently after working so the petals sit outward.
Round 10 :
Ch2, *in puff st work: (dc2tog, ch1, dc2tog) to make a split cluster that widens the petal; move to next sl st and sl st to secure; repeat from * around. Join. (8 petal clusters)
Round 11 :
Ch3, in each petal cluster work 3 dc in same base stitch to give height to petal; ch1 between petals, sl st into center join to secure; repeat 8 times. Join. (24 dc across petal round grouping)
Round 12 :
Ch1, sc in each st and ch-space around petal area, working 3 sc in ch1 spaces between petals for a tidy base for next color change. Join. (72)
Info :
Finish the mustard section by weaving in tails or carrying the yarn through the back of the petals. Before changing to rust, flatten petals so they fan outward and sit evenly around the center.
— Outer Petal / Rust Layer :
Round 13 :
Change to rust color. Ch1, (8 sc, inc) x8 around. Join. (80)
Round 14 :
Ch1, (9 sc, inc) x8 around. Join. (88)
Round 15 :
Ch1, (10 sc, inc) x8 around. Join. (96)
Info :
These increase rounds place more fabric under the rust petals so they can form full, rounded petals. The pulse of increases keeps the motif flat and prepares for cluster petals next.
Round 16 :
Ch1, (11 sc, inc) x8 around. Join. (104)
Round 17 :
Ch1, (12 sc, inc) x8 around. Join. (112)
Round 18 :
Ch1, (13 sc, inc) x8 around. Join. (120)
Info :
Now you have enough surface to build large rust petals. Marker placement: place stitch markers at the first stitch of each of the 8 repeats so you can easily place the large petal clusters in the next rounds.
Round 19 :
Ch3 (counts as dc), *skip 5 sts, work petal cluster into next st: (3-dc cluster), ch2, sl st in next st; repeat from * around for 8 large petal clusters. Join. (8 petal clusters; maintain 120 base stitch positions)
Round 20 :
Ch3, in each cluster work: (dc3 in same stitch, ch1, dc3 in same base) to fan the petal; sl st to next anchor and repeat. Join. (24 dc total in petal round)
Info :
After forming the rust petals, gently shape each petal with your fingers so they sit outward. If a petal is too flat, make the stitches a little taller (use ch3 starting chains) next time; if petals flop, use fewer chains between groups.
Round 21 :
Ch1, sc in each st and ch-space around the rust petal area, making 3 sc in each ch1-space between petals to stabilize the round. Join. (120)
Info :
If you prefer the rust petals to sit higher, try substituting dc for some sc in the round above; we keep sc here to create a firm foundation for squaring rounds.
— Squaring the Motif (establish corners) :
Info :
The square is formed by creating 4 corner spaces evenly around the round. Our construction uses the 8-repeat system — we will create a corner at every second repeat. With 120 sts, corners will be approx every 30 stitches (every second repeat). We’ll create corner ch-2 spaces and work sides with shells to visually square the motif.
Round 22 :
Ch3, *work 14 dc, (2 dc, ch2, 2 dc) in next st (corner made), work 14 dc; repeat from * twice more to complete 4 corners. Join. (128 total dc including corner increases — calculation: 120 base + 8 extra dc from corner shells = 128)
Round 23 :
Ch1, sc in same st and across each dc until corner, in corner work (sc, ch2, sc) to maintain ch2 corner. Continue around. Join. (128)
Round 24 :
Ch3, in each side between corners work (shell: 3 dc in same st) every 6 stitches to create a textured side. In corners work (2 dc, ch2, 2 dc). Join. (calculated approximately 4 corners + side shells; approx 160 total stitch positions after shells)
Info :
At this phase exact stitch tallies are less critical than symmetry — ensure your four corners are clearly defined and your side shells are evenly spaced. Use stitch markers to mark corner peaks for future rounds.
Round 25 :
Ch1, sc across making 3 sc in each ch-space and 1 sc in each dc to tidy the round. Join. (maintain approx 160)
Round 26 :
Change to cream for the border. Ch1, sc in each st for one round to create a crisp color break. Join. (approx 160)
Info :
Changing to cream creates the framed effect seen in the photos. Carry cream yarn neatly or join new skein and weave in ends later. This is the first of several border rounds that will firm the square and add texture.
— Built-Up Border (Texture & Frame) :
Round 27 :
Ch3 (counts as dc), *skip 2 sts, (3 dc in next st), ch1, skip 2 sts, dc in next st; repeat around, placing 2-dc shell clusters evenly on the sides and (2 dc, ch2, 2 dc) in each corner instead of shell. Join. (approx 176)
Round 28 :
Ch1, sc in each st and ch-space around; in corners work 3 sc in ch2 space. Join. (approx 176)
Round 29 :
Ch2, fpdc around the next 4 dc from previous round to make a raised ridge, *dc in next 6 sts, fpdc around next 4 dc; repeat to corner and in corner work (2 dc, ch2, 2 dc) then continue. Join. (approx 176)
Info :
Front post stitches add a pronounced ridge that really frames the petals. Work fpdc with consistent tension and watch the corners while working around posts to keep the square flat.
Round 30 :
Ch1, sc in each st across, making 4 sc in corner ch2 spaces for stability. Join. (approx 176)
Round 31 :
Ch3, (shell pattern) *in each side work: (2 dc, ch1, 2 dc) in every 8th stitch to form staggered scallops. In each corner work (2 dc, ch2, 2 dc). Join. (approx 200)
Round 32 :
Ch1, sc in each st and ch-space around to neat the scallops. Join. (approx 200)
Info :
If your square begins to ruffle, block more firmly after finishing rounds 32-34. This is a good stopping point if you want a smaller square — the bedspread shown uses many repeats and layers, but you can stop at round 32 for a medium square.
Round 33 :
Ch2, *work 1 dc in next 4 sts, bpdc around next 4 sts to create recessed ribs; repeat to corner then work (2 dc, ch2, 2 dc) in corner. Join. (approx 200)
Round 34 :
Ch1, sc in each st around, working 3 sc in ch2 corner. Join. (approx 200)
Round 35 :
Change to a slightly smaller hook if you prefer a tighter edge. Ch1, sc in each st for one tidy round. Join. (approx 200)
Info :
Switching hook sizes for the outermost rounds is optional but can give the border a professional, neat look. If you change hook, keep tension consistent and test on a scrap before applying to all squares.
— Decorative Edge Rounds (many to create substantial frame) :
Round 36 :
Ch3, *shell (3 dc) in next st, skip 2, sc in next st; repeat across side. In each corner work (2 dc, ch2, 2 dc). Join. (approx 216)
Round 37 :
Ch1, sc in each st and ch-space; work 4 sc in each corner ch2. Join. (approx 216)
Round 38 :
Ch2, *fpdc around next shell (3-dc shell), dc in next 4 sts; repeat, corner as before. Join. (approx 216)
Info :
These decorative rounds build the visible cream frame in the image. Keep the shells and posts balanced on each side and match corner shells to maintain symmetry.
Round 39 :
Ch1, sc in each st around. Join. (approx 216)
Round 40 :
Ch3, (shell in next st, ch1) x across sides; corner remains (2 dc, ch2, 2 dc). Join. (approx 232)
Round 41 :
Ch1, sc around, working 3 sc in corner ch2 spaces. Join. (approx 232)
Round 42 :
Ch1, work crab stitch (reverse sc) around for a neat finished ridge. Alternatively, work sc in BLO for a subtle turned edge. Join and fasten off. (approx 232)
Info :
Crab stitch creates a raised, twisted outer border. If you prefer a softer edge, use one round of sc and one round of slip stitch. Fasten off and weave in ends neatly. You can also add a picot round before the crab stitch for a delicate finish.
— Optional Extra Layers (if you want a larger square) :
Round 43 :
Ch3, *work a long side row: 2 dc in next 6 sts, shell in next, dc across until corner; corner (2 dc, ch2, 2 dc); repeat. Join. (increases occur as you add shells; approx 248)
Round 44 :
Ch1, sc around to tidy. Join. (approx 248)
Round 45 :
Ch3, *work 1 tr in every 6th st to create vertical texture lines; repeat to corner and continue. Join. (approx 248)
Round 46 :
Ch1, sc around. Join. (approx 248)
Info :
Work these optional rounds only if you want a bigger square. Many bedspreads use the square at about twice the size shown; building extra border rounds gives you design flexibility.
— Final Finish Rounds & Blocking :
Round 47 :
Ch1, sc in each st BLO to create a neat ridge; join. (approx same as previous)
Round 48 :
Ch1, sc around in FLO to create a subtle frame. Join. (approx same)
Round 49 :
Fasten off leaving 20 cm tail. Weave tail through last round to fasten and hide. Repeat for all color tails. Block square to exact dimensions, pinning corners and sides evenly and spraying or steaming lightly. Allow to dry fully.
Info :
Blocking makes a huge difference in how squares join and how the border behaves. Use steam or mist blocking for cotton yarns and pin to target size (we recommend 12-13 cm for the shown scale). After blocking, squares will lie flat and join cleanly.
— Joining Multiple Squares (for bedspread) :
Info :
There are several joining methods: whip stitch/seam with cream yarn, mattress stitch for invisible joins, or join-as-you-go (JAYG) while making the final border round. The photos show a slightly visible seam in cream, so both whip stitch and JAYG work.
Round 50 :
If joining as you go: on the final sc round, when you reach a side where a previously worked square sits, instead of sc in the st make sc through both loops of the previous square's corresponding stitch (or sc through the side ch-space). Continue to join all four sides to neighbor squares then fasten off. (no additional increase in stitch count)
Info :
For a bedspread, plan a grid (for a standard double bed you might need ~12x12 to 16x16 squares depending on size). Use consistent blocking across all squares to make seams neat. Sew rows together first, then join rows to form the full piece.
— Finishing Touches :
Round 51 :
Weave in all ends using a yarn needle. For extra durability sew the tail ends into the back of the square with a duplicate stitch approach and trim close. If desired, add a narrow crochet-backed fabric border for stability.
Round 52 :
Optional: Add a lightweight lining or fabric backing if you want a warmer bedspread; baste the fabric to the crocheted surface and sew with a sewing machine or hand stitch for a custom finish.
Info :
Make sure all seams are secure if the bedspread will be used frequently. For a softer drape use a lighter joining yarn or less sturdy seam; for durability use mattress stitch with doubled cream yarn.
— Tips & Troubleshooting (Info Sections Throughout) :
Info :
If your square cups (edges rise), add an extra sc round and block again, or use a slightly larger hook for the final 2 rounds to flatten; conversely if it ruffles, try a smaller hook on the last round.
Info :
To maintain equal corner spacing, always place corners on every second repeat of the 8-repeat system. Use markers to mark corners after the first corner round and check symmetry by folding square in half diagonally.
Info :
When joining, work one full pass across rows to align squares before finishing seams. If using join-as-you-go, test on two squares first to practice tension and stitch alignment.
Info :
This pattern intentionally gives extra rounds to suit large bedspread needs — you can stop earlier for small projects or continue adding borders for larger throws. The math uses multiples of eight for predictability.
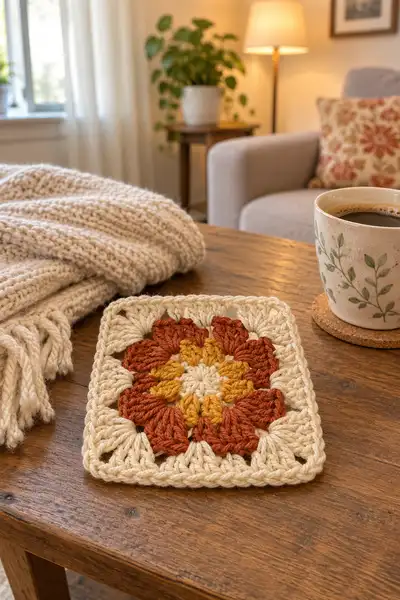
This warm floral granny square is a satisfying blend of texture and color — from mustard inner petals to rich rust outer petals, framed in soft cream. Each square feels like a little sunburst you can arrange into a beautiful bedspread or cushion cover. I love how the textured petals catch the light and the cream border creates a cozy, vintage-inspired finish. 🧶🌞 Make multiples, block them carefully, and enjoy joining them into a blanket full of warmth and handmade charm. Happy stitching! ✨