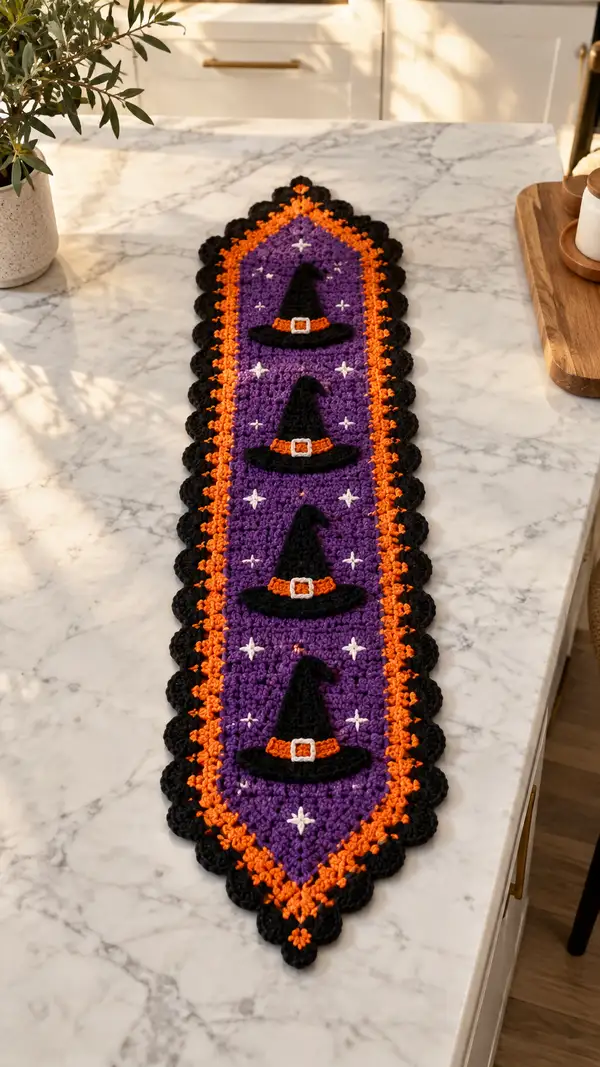
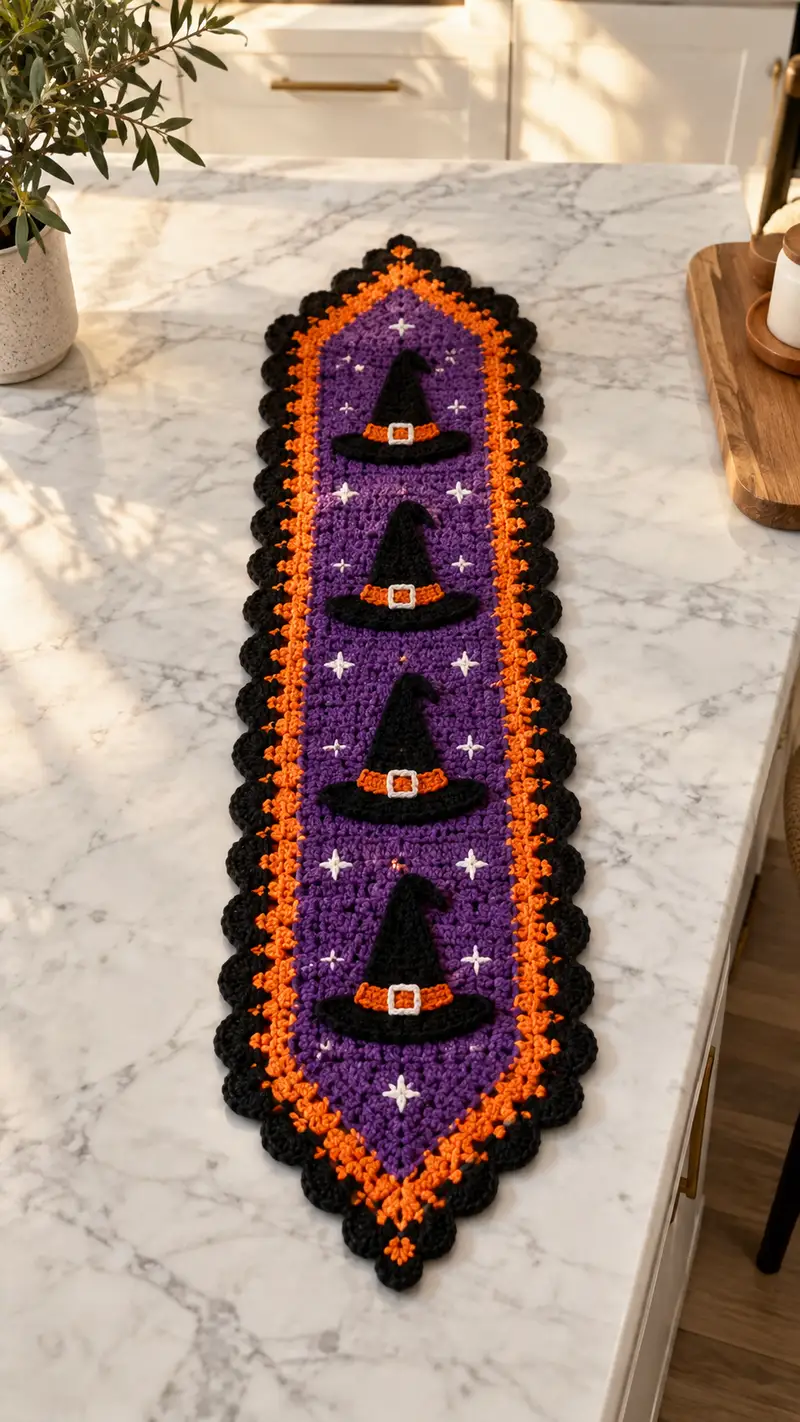
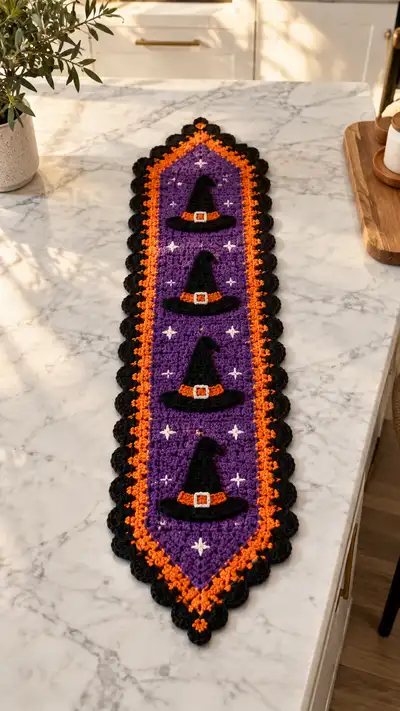
This festive Halloween table runner features a rich purple center framed by a bright orange border and a scalloped black edge. Four dimensional crocheted witch hat appliques sit evenly down the runner, each finished with a tiny orange hat band and a silver buckle. White embroidered stars add sparkle across the purple field, creating a playful, seasonal accent for mantels, tables, or consoles.
Progress Tracker
0% Complete
— Overview & Notes :
Info :
This pattern is written to create a tapered, pointed-end table runner approximately 10-11 inches wide and 48-52 inches long when worked in worsted weight yarn with a 4.0mm hook. You may adjust width by changing foundation chain length in the Main Panel. Terms: I call flat rows 'Rounds' to keep the pattern consistent and to make assembling appliques and border straightforward. Work the main body in purple, then add the orange inner border, then the black scalloped outer edge. Make four identical witch hat appliques and four small buckle motifs. Embroider stars across the purple field as shown. Gauge is not critical but helps determine final size.
Info :
Abbreviations: sc, hdc, dc, tr, sl st, ch, inc, dec. Use stitch markers: place one at the start of each round/row and additional markers where appliques will sit (we'll specify exact stitch placements later). Keep tension consistent between main panel and appliques for neat assembly.
— Main Panel (Purple Center) :
Materials :
Worsted weight purple yarn. 4.0mm hook. Foundation chain: ch 61 (this gives a finished width around 10-11 inches; adjust in multiples of 2 for wider/narrower runner)
Round 1 :
Ch 61. Turn and work 1 sc in 2nd ch from hook and in each ch across. (60)
Round 2 :
Ch 1, turn. 1 sc in each st across. (60)
Round 3 :
Ch 1, turn. 1 sc in each st across. (60)
Info :
Work tight, even sc to create a dense center that will show the embroidered stars well. Keep stitch markers at the first st of each round to track row start. If you prefer a looser texture, alternate sc rows with dc rows—this pattern will assume sc rows for stability.
Round 4-12 :
Ch 1, turn. 1 sc in each st across. (60)
Info :
Place temporary markers at these counts to mark where the first and last hat centers will be located later. For even spacing of four hats, mark positions approximately at Row 10, Row 20, Row 30, and Row 40 visually — we will refine exact stitch columns using vertical placement later.
Round 13-20 :
Ch 1, turn. 1 sc in each st across. (60)
Round 21 :
Ch 1, turn. 1 sc in first 4 sts, dec (sc2tog), 1 sc in next 46 sts, dec, 1 sc in last 4 sts. (58)
Info :
Begin gentle shaping toward the first pointed end. Reducing two stitches per round over several rounds produces the tapered point at the runner end. Stuffing is not used in flat runner—keep fabric flat and even by gently stretching and blocking later.
Round 22 :
Ch 1, turn. 1 sc in first 4 sts, 1 sc in each of next 2 sts together (sc2tog), 1 sc in next 44 sts, sc2tog, 1 sc in last 4 sts. (56)
Round 23 :
Ch 1, turn. 1 sc in first 3 sts, sc2tog, 1 sc in next 42 sts, sc2tog, 1 sc in last 3 sts. (54)
Round 24 :
Ch 1, turn. 1 sc in first 3 sts, sc2tog, 1 sc in next 40 sts, sc2tog, 1 sc in last 3 sts. (52)
Round 25 :
Ch 1, turn. 1 sc in first 2 sts, sc2tog, 1 sc in next 38 sts, sc2tog, 1 sc in last 2 sts. (50)
Round 26 :
Ch 1, turn. 1 sc in first 2 sts, sc2tog, 1 sc in next 36 sts, sc2tog, 1 sc in last 2 sts. (48)
Info :
Continue shaping until you reach the desired narrow point. We'll aim for a pointed tip of 6 sts across before reversing and re-expanding into the long central field.
Round 27 :
Ch 1, turn. 1 sc in first 1 st, sc2tog, 1 sc in next 34 sts, sc2tog, 1 sc in last 1 st. (46)
Round 28 :
Ch 1, turn. sc2tog, 1 sc in next 32 sts, sc2tog. (44)
Round 29 :
Ch 1, turn. sc2tog, 1 sc in next 30 sts, sc2tog. (42)
Round 30 :
Ch 1, turn. sc2tog, 1 sc in next 28 sts, sc2tog. (40)
Round 31 :
Ch 1, turn. sc2tog, 1 sc in next 26 sts, sc2tog. (38)
Round 32 :
Ch 1, turn. sc2tog, 1 sc in next 24 sts, sc2tog. (36)
Round 33 :
Ch 1, turn. sc2tog, 1 sc in next 22 sts, sc2tog. (34)
Round 34 :
Ch 1, turn. sc2tog, 1 sc in next 20 sts, sc2tog. (32)
Round 35 :
Ch 1, turn. sc2tog, 1 sc in next 18 sts, sc2tog. (30)
Round 36 :
Ch 1, turn. sc2tog, 1 sc in next 16 sts, sc2tog. (28)
Round 37 :
Ch 1, turn. sc2tog, 1 sc in next 14 sts, sc2tog. (26)
Round 38 :
Ch 1, turn. sc2tog, 1 sc in next 12 sts, sc2tog. (24)
Round 39 :
Ch 1, turn. sc2tog, 1 sc in next 10 sts, sc2tog. (22)
Round 40 :
Ch 1, turn. sc2tog, 1 sc in next 8 sts, sc2tog. (20)
Round 41 :
Ch 1, turn. sc2tog, 1 sc in next 6 sts, sc2tog. (18)
Round 42 :
Ch 1, turn. sc2tog, 1 sc in next 4 sts, sc2tog. (16)
Round 43 :
Ch 1, turn. sc2tog, 1 sc in next 2 sts, sc2tog. (14)
Round 44 :
Ch 1, turn. sc2tog across until 6 sts remain; if needed sc to get to 6. (6)
Info :
This is the narrow pointed tip. Fasten off, weave in ends if this is one end. To make a runner with a diamond/pointed end at both sides, you will now re-attach yarn to the opposite side of the tip and begin expanding outward again to reach the long central field width. Alternatively, work through the middle, increasing back up to full width to continue the central long panel.
Round 45 :
Join yarn at one edge of the 6-st tip. Ch 1. Work 6 inc evenly across tip to open, or use pattern: (1 sc, inc) x 3 across each side to reach 14. (14)
Round 46 :
Ch 1, turn. (sc, inc) x 7. (21)
Round 47 :
Ch 1, turn. (2 sc, inc) x 7. (28)
Round 48 :
Ch 1, turn. (3 sc, inc) x 7. (35)
Round 49 :
Ch 1, turn. (4 sc, inc) x 7. (42)
Info :
Continue increasing until you reach the full runner body width established earlier (60 sts). This mirrors the decreasing at the start. The rounds below continue expanding and then maintain even stitches for the long central field that will accommodate the four hats and embroidered stars.
Round 50 :
Ch 1, turn. (5 sc, inc) x 7. (49)
Round 51 :
Ch 1, turn. (6 sc, inc) x 7. (56)
Round 52 :
Ch 1, turn. 1 sc in each st across to reach target width; add occasional small increases to get to 60 sts. (60)
Round 53-84 :
Ch 1, turn. 1 sc in each st across for 32 rounds to build the long central field (60). (60)
Info :
These 32 rounds make the central length of the runner. Use pins to mark placements for four hats so they are centered vertically: mark approximately every 8 rounds starting after Round 56 for the first hat center, then Round 64, 72, 80 (adjust if you add or remove rows). We'll attach appliques after completing the panel and edging.
Round 85-116 :
Ch 1, turn. Mirror the shaping sequence used at the beginning to taper down toward the opposite pointed end. Reverse the decreases over 32 rounds exactly as Rounds 21-52 were done but in reverse order to reach the final 6-st tip. (decreasing from 60 to 6)
Round 117 :
Ch 1, turn. When you have reduced to 6 sts across for the tip, fasten off and weave ends. Block the panel lightly to square and shape the points, pinning the points to achieve an even look. (6)
Info :
If you prefer a different length, add or subtract multiples of 8 rounds from the central even-section (Rounds 53-84). Keep the tapering rounds equal on both ends to maintain symmetry.
— Embroidered Stars (Make many across panel) :
Info :
Using white yarn held doubled or white embroidery floss, embroider small star motifs across the purple field after blocking and before adding borders. Use an embroidery needle. Stars pictured are simple 4-point satin stitches made over the sc bumps — each star is approximately 6-8 stitches in diameter.
Star Stitch 1 :
Insert needle from back to front at center point, pull through. Make a long satin stitch up, down, left and right to form a central cross, then add diagonal short stitches for a twinkling effect. Secure ends at back. Repeat placing three stars evenly between each pair of hat positions and one star near each point tip.
Info :
Spacing tip: use the pins and earlier markers for hat centers. Place stars around hats so they appear to float in the field; plan spacing visually before committing.
— Witch Hat Applique (Make 4 identical) :
Materials :
Black worsted yarn (or your preferred dark color). Use 3.5mm hook for slightly firmer shape. Learnings: worked flat in rounds to create a stylized pointed hat with a wide brim.
Round 1 :
Make a small oval base for the brim: ch 12, 1 sc in 2nd ch from hook and across to end (10), continue working around the chain: 3 sc in last ch, 1 sc in each ch back along opposite side (10), 3 sc in first ch. Join with sl st to first sc. (26)
Round 2 :
Ch 1. 1 sc in each st around. (26)
Round 3 :
Ch 1. 1 sc in first 2 sts, inc, 1 sc in next 6 sts, inc, 1 sc in next 6 sts, inc, 1 sc in last 2 sts. (30)
Round 4 :
Ch 1. 1 sc in each st around. (30)
Round 5 :
Ch 1. Change to working the hat crown: sc2tog across 4 times evenly to begin shaping up from the brim — position these decs centered on the front and back of brim so the crown begins to rise. (26)
Round 6 :
Ch 1. 1 sc in each st around. (26)
Round 7 :
Ch 1. (4 sc, sc2tog) x 4. (24)
Round 8 :
Ch 1. 1 sc in each st around. (24)
Round 9 :
Ch 1. (3 sc, sc2tog) x 4. (20)
Round 10 :
Ch 1. 1 sc in each st around. (20)
Round 11 :
Ch 1. (2 sc, sc2tog) x 4. (16)
Round 12 :
Ch 1. 1 sc in each st around. (16)
Round 13 :
Ch 1. (1 sc, sc2tog) x 4. (12)
Round 14 :
Ch 1. 1 sc in each st around. (12)
Round 15 :
Ch 1. sc2tog across all sts working 6 decs to close top of crown slightly but leave a small opening for a whimsical curved tip. Fasten off leaving a tail for sewing. (6)
Info :
Before closing fully, you can add a little shaping: pull one corner slightly to create a slouched pointed tip. If you want a stiffer point, add a dab of fabric stiffener and shape carefully while damp.
Round 16 (Optional Tip Curl) :
Using contrasting technique, rejoin yarn at tip, ch 16 and sl st back along chain to create a small curled tip; fasten off and weave in. This gives the hat a whimsical curl as shown in the photograph.
Info :
Make 4 identical hats. Use a slightly smaller hook if you want a crisper brim that holds shape well. Block or steam lightly to flatten brims if needed. You can stuff the crown lightly with fiberfill to give slight dimension, but keep flat enough to sew onto the runner.
— Hat Band (Make 4 — orange) :
Round 1 :
With orange yarn and 3.5mm hook, ch 12, join with sl st to form small loop. (12)
Round 2 :
Ch 1. 1 sc in each ch around. (12)
Round 3 :
Ch 1. 1 sc in each st around. (12) Fasten off leaving tail to sew band around a hat brim. Wrap around hat brim and sew ends together, then sew band to hat where brim meets crown. Repeat for all hats.
Info :
If you prefer a braided look, make a 3-strand braid from orange yarn about 5-6 inches long and sew it to the hat instead of the crocheted band.
— Buckle (Make 4 — small square) :
Round 1 :
With gray or silver yarn and 3.5mm hook, ch 6, join to form a small ring or work a 6-st ch strip: sc in 2nd ch and across (5), ch 1, turn, sc across (5). (5)
Round 2 :
Ch 1, turn. sc across (5). Fold into tiny square and sew edges to form a small buckle. (shape)
Info :
Sew buckle at center front of orange hat band. Use a small dab of craft glue inside buckle to keep it square, and hide stitches beneath the band.
— Orange Inner Border :
Info :
Once the purple panel is complete and blocked, we’ll add an orange inner edging that frames the purple before the black scalloped edge. This is worked in rounds around the entire panel—use continuous crochet joining where you reach corners/points.
Round 1 :
Join orange yarn at any side center with a sl st. Ch 1. Work 1 sc evenly around the panel edges, placing 3 sc in each point tip stitch to keep the shape, and 1 sc in each sc along the edges. (Even across; approximate count will be the perimeter count of the panel)
Round 2 :
Ch 1. 1 sc in each st around, placing (sc, ch 1, sc) at point tips for a little decorative notch. Fasten off. (perimeter count)
Info :
Adding this orange frame creates a visual buffer between the purple center and the black scallop. Carry yarn along the wrong side if you plan to work the black border immediately; otherwise fasten off and weave in tails carefully behind the panel.
— Black Scalloped Outer Edge (Multiple Rounds) :
Round 1 :
Join black yarn at any side center with sl st. Ch 1. Work 1 sc in each st along edge for one round to create a firm base for scallops. Place 3 sc in each tip stitch to preserve points. (perimeter)
Round 2 :
Ch 3 (counts as dc), *sk 1 st, 5 dc in next st (shell made), sk 1 st, sl st in next st*; rep from * to * around, adjusting in tips to make shells sit evenly across points and straight edges. Join with sl st to top of ch-3. (approx shells around)
Info :
The shell stitch will create the bold scalloped look seen in the photo. If you need more prominent scallops, make 7 dc shells instead of 5 dc shells in Round 2. Keep shells centered and adjust placement at the point tips by using extra sc or sl st to maintain symmetry.
Round 3 :
Ch 1. Work 1 sc in top of each shell and 1 sc in each sl st from previous round to stabilize. In the center of each shell work (ch 2, 3 dc, ch 2) as a picot-style flourish to add depth. Fasten off and weave ends. (perimeter)
Round 4 (Optional Deep Shell) :
For extra drama, join black yarn and make a last round of shells: *in the center top of each shell make (3 sc, 3 dc, 3 sc) to puff each scallop, sl st to next top of shell; rep around.* This yields a pronounced scalloped edge like the photo. Fasten off and weave in ends.
Info :
Block and pin final runner to shape scallops and points so the scalloped edge lays flat and even. Use a damp cloth and steam or spray blocking for best results.
— Assembly & Placement of Appliques :
Info :
Before sewing, lay the blocked runner flat. Using your earlier markers for vertical positioning of hat centers, measure and mark the horizontal center of the runner (stitch column). Each hat should be centered on the runner width so the brim sits comfortably on the purple field without overlapping the orange border.
Attachment Step 1 :
Position first hat so that its brim center aligns with the center stitch at approximately Round 56 (or around the first marked placement). Pin through brim at three evenly spaced points (left, center, right) holding it flat against the panel.
Attachment Step 2 :
Thread tapestry needle with black yarn (matching the hat) and begin sewing along the underside of the brim using whip stitch or ladder stitch. Keep stitches small and discreet so the seam is not visible from the top. Repeat for all four hats.
Attachment Step 3 :
Sew orange band around the base of each crown where it meets the brim, securing with small stitches. Position the small buckle at the front center of each band and tack it in place with a few secure stitches.
Info :
When sewing appliques, work from right-side-visible locations and check alignment by stepping back from your workspace frequently. Adjust placement before finishing by unpicking a couple of stitches rather than cutting and resewing entire hats.
— Finishing Touches :
Info :
Weave in all ends on the wrong side. Use a bit of steam-blocking or spray-blocking to flatten seams and make the hats sit crisp. If desired, add a tiny bead or metallic thread to the buckle center for the illusion of a metal buckle. Lastly, press the runner lightly from the wrong side to set shape and scallops.
Final Care :
Spot clean as needed. Hand wash gently in cool water and reshape while damp. Avoid machine washing to preserve appliques and scallops. Store flat or rolled to prevent scallop flattening.
Info :
If you want a reversible runner, make two identical panels and join them together with an invisible seam or whip stitch, leaving the hats removable (sewn on with snaps) so the runner can be reversible when desired.
This Halloween table runner brings delightfully spooky style to your autumn decor, pairing deep purple with vibrant orange and bold black scallops. The four witch hat appliques add whimsical dimension and charm, while embroidered stars give a hand-stitched sparkle. Finishing and blocking make this piece look polished and professional — perfect for parties or seasonal displays. 🎃🕯️ Enjoy every stitch and be proud to display this festive handmade accent in your home!