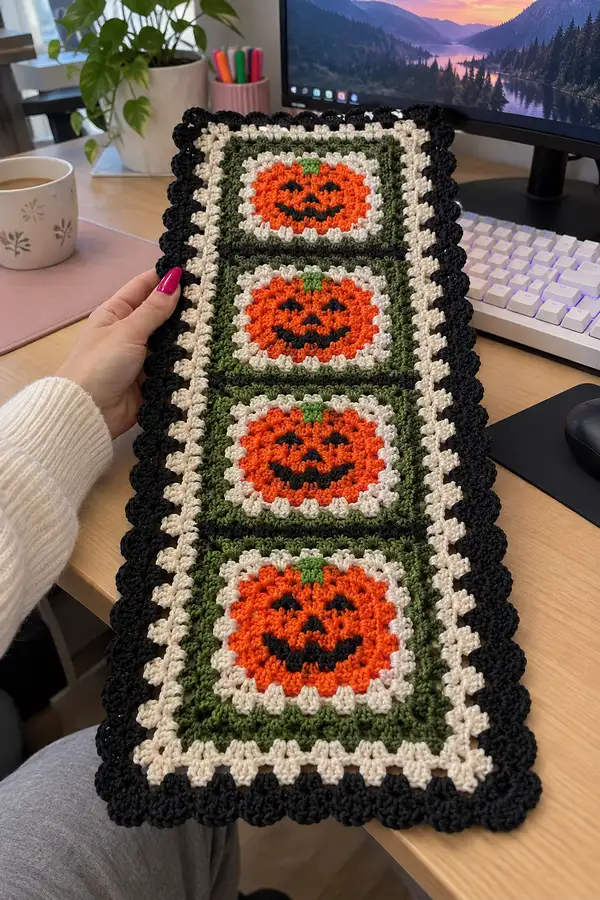
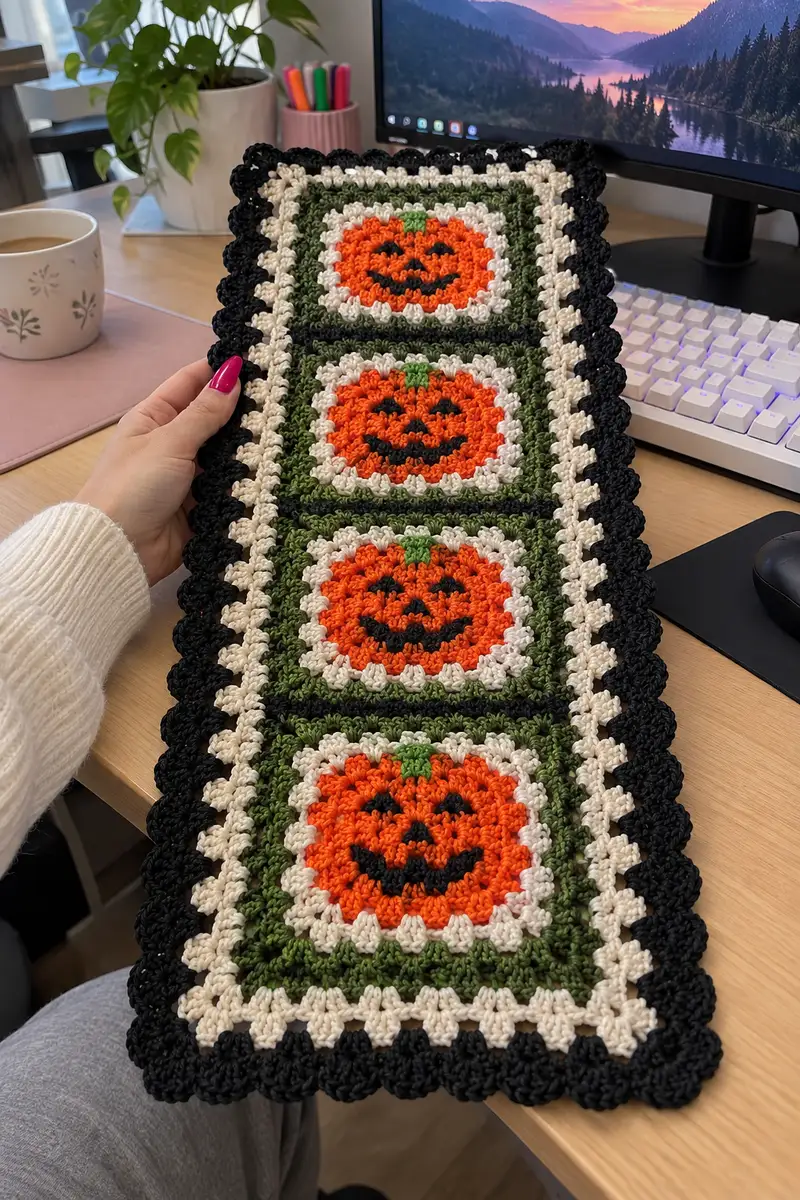
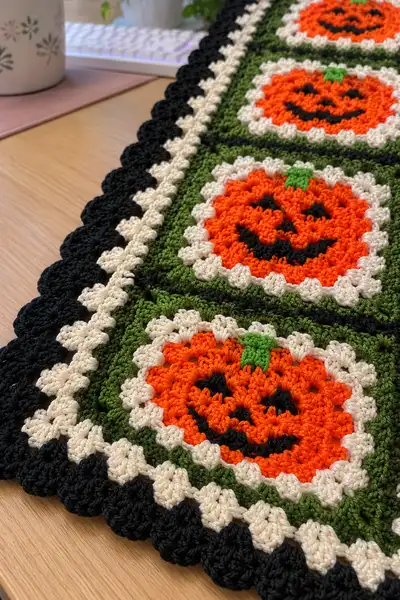
A festive Halloween-inspired table runner made from four pumpkin granny squares joined vertically, framed with contrasting borders and a scalloped edge. Bright orange jack-o-lantern centers sit inside crisp white scallops and olive-green squares, finished with cream and deep black borders for a classic seasonal look. This pattern uses basic granny-cluster techniques, color changes, and a join-as-you-go method to create a flat, stable runner perfect for a desk or narrow table.
Progress Tracker
0% Complete
— Overview :
Info :
This pattern makes one narrow table runner composed of four identical pumpkin granny squares joined vertically. Each square begins as an orange circular center built with single crochet rounds, expands into a scalloped white ring, then transitions into a green square field using granny-cluster and shell rounds. Join-as-you-go (JAYG) is used to attach squares; an optional seam method is provided. Final rounds include a cream decorative border, a thin black dividing line between squares, and a scalloped black outer edge.
Gauge :
Each completed pumpkin square measures approximately 4.5" (11.5 cm) across after blocking when using worsted weight cotton and a 4.0mm hook. The finished runner (4 squares joined vertically plus border) measures approximately 5" x 20" (12.5 cm x 51 cm). Change hook or yarn weight to resize.
— Notes & Techniques :
Info :
Read through the entire pattern before beginning. Colors are abbreviated: OR = orange, WH = cream/white, GR = olive/forest green, BK = black, ST = bright green. Work RS facing at all times; do not turn between rounds unless specified. Use a visible stitch marker at the first stitch of each round. When changing colors, work the final yarn-over of the last stitch with the new color to create a neat join. Carry unused yarn along the back where possible and catch it in with sc when crossing wide areas.
— Pumpkin Center (Make 4 identical squares) :
Info :
Start with OR yarn for the pumpkin center. These rounds build a circular orange disc which will then receive a contrasting WH scalloped round to form the pumpkin outline. All rounds are worked in continuous rounds (spiral) unless otherwise noted. Place a stitch marker in the first stitch and move it each round.
Round 1 :
6 sc in magic ring (6)
Round 3 :
(1 sc, 1 inc) x 6 (18)
Round 4 :
(2 sc, 1 inc) x 6 (24)
Round 5 :
(3 sc, 1 inc) x 6 (30)
Round 6 :
(4 sc, 1 inc) x 6 (36)
Round 7 :
(5 sc, 1 inc) x 6 (42)
Round 8 :
(6 sc, 1 inc) x 6 (48)
Info :
At this point you have a round orange disc of 48 sc. Keep stitches even and check the circle is lying flat; if you see cupping, reduce hook size by 0.25-0.5mm for subsequent rounds or add a round of sc without increases.
Round 9 :
(3 sc, 3 dc in next st) x 12 (72)
Round 10 :
1 sc in each of the 36 sc from previous round and 1 sc in the center of each 3-dc shell (72)
Info :
Round 9 creates a textured pumpkin surface by alternating sc and shell clusters. Count carefully: each repeat uses 4 base positions (3 sc + 1 shell) across 12 repeats. After Round 10 you should have 72 stitches total when counting each dc as one stitch for the purposes of placement.
Round 11 :
(2 sc, sc in shell center, 2 sc, sc in next 2 sts) x 12 (72)
Round 12 :
Working evenly, 1 sc in each st around (72)
Round 13 :
(2 sc, 1 inc) x 18 (90)
Info :
If you'd like a puffier pumpkin, add one more increase round (Round 13a: (3 sc, 1 inc) x 18 -> 108) before moving to the white scalloped round. For the pictured runner the 90-stitch round provides a round, slightly flattened pumpkin that sits well inside the white scallops.
Round 14 :
1 sc in each st around (90)
Info :
We are preparing for the white scalloped round which will create the 'halo' around the pumpkin. Make sure the orange disc is centered and not warped; adjust tension if needed. Fasten off OR leaving a tail if you plan to embroider pumpkin face with BK yarn first, otherwise leave a short tail to weave in later.
— Pumpkin Face Embroidery (Optional) :
Info :
Use BK yarn and a yarn needle to embroider the jack-o-lantern features directly on the orange rounds. Eyes are small triangles and a wide smiling mouth with triangular teeth. Position face centered on the orange rounds—use the stitch pattern as a grid. Alternatively, you can duplicate stitch face shapes in a later round when the white scallop is complete.
Face Placement :
From the center, count down 2–3 radial repeats to center the eyes roughly on Round 10/11 area. Place eyes about 6-8 stitches apart depending on desired expression. For a classic look, make two small triangular eyes (3-4 stitches wide) and a smile spanning ~18-22 stitches across.
Info :
If embroidering, use small, neat stitches and weave ends through at least 5–6 internal threads to secure. If using duplicate stitch, work over single crochet rounds to create smooth, flush facial shapes.
— White Scalloped Halo (All squares, Round W1-W3) :
Info :
Change to WH yarn with a standing dc in any stitch on the orange disc. The following rounds build the scalloped halo around the pumpkin. Work loosely enough that shells sit without pulling the orange center inwards.
Round W1 :
Join WH with standing dc, *ch1, sk 1 st, 3 dc in next st, ch1, sk 1 st, sc in next 2 sts*; rep around to create 24 shells and 48 sc units (statements counted as 120 stitches total by stitch equivalency)
Round W2 :
1 sc in each sc and place 3 dc shell in the center of each shell from previous round to maintain scallop shape (repeat exactly across all shell centers and sc spaces)
Info :
Round W1 distributes shells around the pumpkin; count shell centers to ensure you have an even number (24 shells is typical with this set of increases). The white scallop should lie slightly raised from the orange center, creating a clear pumpkin outline.
Round W3 :
1 sc in each st around (maintain even tension; do not add increases) – this creates a stable base for the square conversion (total stitch count will match the number of sts created in W1/W2).
— Convert to Square & Green Field (Rounds G1-G12) :
Info :
We convert the circular scallop into a square field using granny-cluster rounds and corner increases. Work RS facing. The pattern below uses clusters of 3 dc separated by ch-1 spaces (classic granny clusters). Each round expands the square outward. Stitch counts are provided in clusters and total-stitched equivalents where appropriate.
Round G1 :
Join GR in any ch-1 space between white shells. Work *ch3 (counts as first dc), 2 dc in same ch-1 sp (complete 3-dc cluster), ch1, sk to next ch-1 sp, 3 dc in next ch-1 sp* around, placing two extra 3-dc clusters in what will become the four corner positions: at four evenly spaced quadrants work (3 dc, ch2, 3 dc) into the same ch-1 sp to form square corners. After finishing round you should have 12 clusters per side equivalent across four sides (48 clusters total). Count clusters to confirm corners have ch-2 spaces.
Info :
To find proper corner locations: visually divide the round into four quadrants and place corner cluster sequences approximately 1/4, 1/2, 3/4, and full way around from join. This becomes easier if you temporarily place small safety pins at corner groups to track them as you expand.
Round G2 :
Slip into the next ch-1 sp, *3 dc cluster in each ch-1 sp, ch1 between clusters; in each corner ch-2 work (3 dc, ch2, 3 dc)*; rep around (maintain corner ch-2 spaces) (clusters per round approx 48 clusters)
Round G3 :
Repeat Round G2 exactly to expand square evenly (clusters increase along sides where needed as corners stay ch-2)
Info :
After each cluster round, gently lay the fabric flat to check squareness. You may need to adjust counts to keep sides even—add an extra cluster on the shorter side if one side pulls in. The aim is to make a visually square motif with the pumpkin centered within.
Round G4 :
Continue with 3-dc clusters in each side cluster space; aim for a square roughly 4.5" across including the white scallop (this typically means 3–4 cluster rounds from the white ring depending on tension). Count final clusters per side—target is 12–14 clusters per side.
Round G5 :
1 sc in each cluster top across if you prefer a denser fabric, or continue granny clusters for a more open look. For the pictured runner continue clusters for two further rounds to reach desired square size.
Round G6 :
Change to BK (thin black) with a standing sc and work 1 sc evenly around entire square in back loops only (BLO) to create a visual dividing line later when joining squares (stitch count equals total clusters x 3 equivalents from previous round; treat as one sc per cluster top for simplicity).
Info :
If you prefer a cleaner dividing line between squares, use 1 round of hdc instead of sc for a slightly raised ridge. Make sure you keep counts even at corners—work 2 sc in each corner ch-2 space to maintain sharp corners.
Round G7 :
Change to GR. Work 1 round of sc in each st around (including corners where you work 2 sc in ch-2 spaces) to create a solid edge (counts depend on your cluster numbers; use consistent increases at corners to keep shape)
Round G8 :
Repeat Round G7 to expand border to match height of adjacent squares; this will help when joining the four motifs vertically.
Info :
At the end of Round G8 you should have a square motif that is even on all sides. Fasten off GR leaving a tail for weaving or for use when joining squares. Make 4 identical squares.
— Join Squares (Make 4 into a Single Runner) :
Info :
The runner pictured uses join-as-you-go to attach each square to the previous one along one full side (vertical join). You may also seam them with whip stitch after finishing all motif rounds. Below we provide a join-as-you-go method where you crochet the final GR round and join on the last pass to the adjacent square.
JAYG Method Step 1 :
Lay out squares in final order (top to bottom). Begin with top square and work final exterior round of GR as described in Rounds G7-G8 but do not FO. When you reach the side where you will attach the next square, align the edge of the next square so its last round is facing you.
JAYG Method Round J1 :
Work sc in each stitch along the working square until you reach corner. For the joining side: *insert hook into next stitch of working square, then into corresponding stitch of adjacent square and sc through both loops (sc join); rep across entire side. At the corner, work 2 sc into the ch-2 corner space of both pieces to complete the corner join.* Continue around remaining free sides of the first square to finish the round. FO and weave in ends.
Info :
Make sure both squares are pinned together and edges are aligned before you begin joining stitches. Use stitch counts from both squares to ensure you are working into corresponding clusters/stitches. If counts differ slightly, gently adjust by occasionally skipping or adding a sc to match spacing; avoid more than two adjustments per side to keep edge even.
JAYG Round J2 :
Repeat the same join for the remaining pairs: join square 2 to square 1 along its top edge, then join square 3 to square 2, and join square 4 to square 3 until all four are connected in a vertical row. When all joins are complete, weave in all tails and block lightly.
— Interior Cream Border (B1-B3) :
Info :
Once the four squares are joined, work a clean cream/ivory round to frame the entire runner and visually separate each square. This border sits just inside the outer black scallop.
Round B1 :
Join WH in any seam or on a side. Work 1 sc evenly around entire runner, working 2 sc in each corner ch-2 space to maintain rectangular shape. Work sc joins into seams if necessary to keep edge tidy (total stitches will depend on your join counts; maintain consistency).
Round B2 :
1 sc in each st around (WH) to build a two-round cream band. This creates a framed look and is the base for the outer scallop border.
Info :
Keep the cream rounds neat and consistent; they will show against the black outer scallop. Weave in ends as you go or leave longer tails to weave in later for a tidier finish.
— Thin Black Divider Row (BK1) :
Round BK1 :
Change to BK. Work one round of hdc evenly around the runner on the outside of the cream band. Hdc gives a subtle raised ridge that echoes the slim black grid lines visible between squares in the photo.
Info :
If you prefer a thinner line, use sc instead of hdc. Keep corner increases (2 hdc in corner ch-2) to maintain shape.
— Outer Scallop Border (Scallop Rounds S1-S3) :
Info :
The outer scallop is made in deep BK to frame the runner boldly. The scallop uses shell clusters (5 dc shells) worked into a one-round base. This creates the chunky, vintage scalloped finish visible in the images.
Round S1 :
With BK, join with sl st to the edge. Work 1 sc in each stitch across the existing edge round to create an even base. At corners work 3 sc in corner ch-2 spaces for flexibility (counts vary).
Round S2 :
*Sk 2 sts, 5 dc in next st (shell), sk 2 sts, sl st in next st; rep around placing shells evenly; in corners, work (5 dc, ch2, 5 dc) to maintain rounded corner scallop. Adjust spacing so shells fall evenly along straight edges. FO at end and weave in tail.*
Round S3 :
If you want a double scallop (as pictured with a pronounced edge), work a finishing round in BK: sl st into the center of each shell, ch3, 2 dc in same center, ch3, sl st into center of next shell. This creates a layered scallop. FO and weave ends.
Info :
Block the runner flat by misting and pinning to shape. The scallops will relax into a consistent rounded shape when blocked. Trim or tuck any visible tails inside shells for a clean finish.
— Finishing Touches & Optional Variations :
Info :
Weave in all ends using a yarn needle. Lightly steam or wet-block the runner to flatten and even out edges. Optionally, add small embroidered vine accents with BRIGHT green around each pumpkin stem or attach tiny crocheted pumpkins at corners as embellishments. For a longer runner, repeat additional squares and follow joining instructions accordingly.
Variation - Longer Runner :
To make a longer runner, make 6 or 8 pumpkin squares and join them vertically using the same JAYG method. Add additional rounds of GR to widen the squares if you want a larger runner proportionally.
Info :
Care: Hand-wash in cool water and lay flat to dry. Cotton yarn can shrink slightly; blocking will restore shape if needed. Avoid tumble drying where possible to preserve crisp scallops.
This pumpkin granny-square runner makes a delightful seasonal accent that's both nostalgic and fresh. Each pumpkin sits framed by crisp white scallops and deep green fields, finished with a bold black scallop for classic Halloween charm. It's a rewarding weekend project with rhythmic rounds and a satisfying join-as-you-go assembly. 🧶✨ Make one for yourself or as a handmade gift — it's guaranteed to bring smiles and seasonal spirit to any table. Happy stitching! 🎃