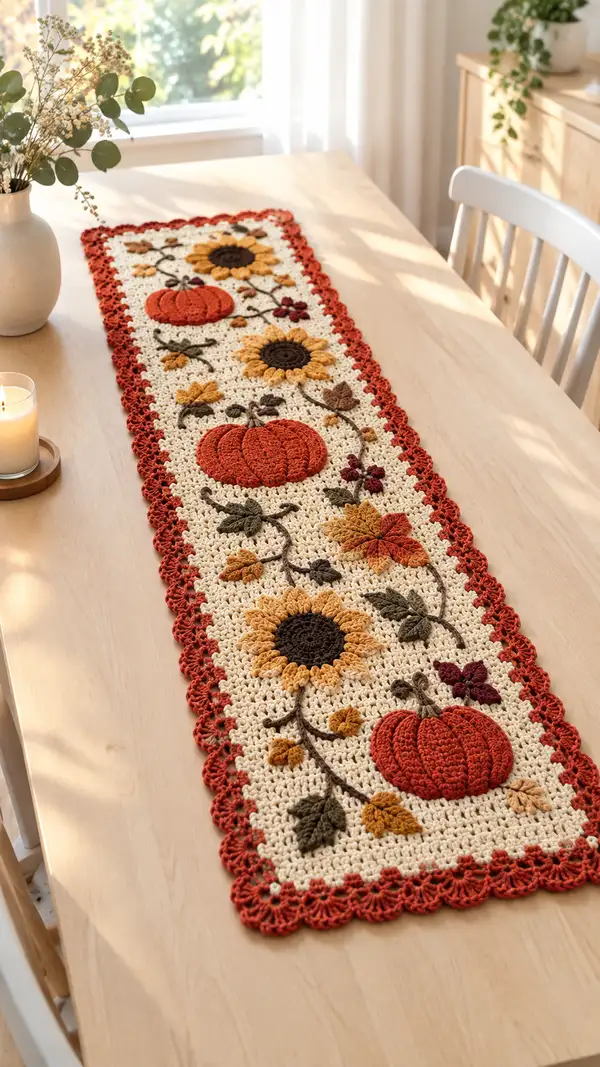
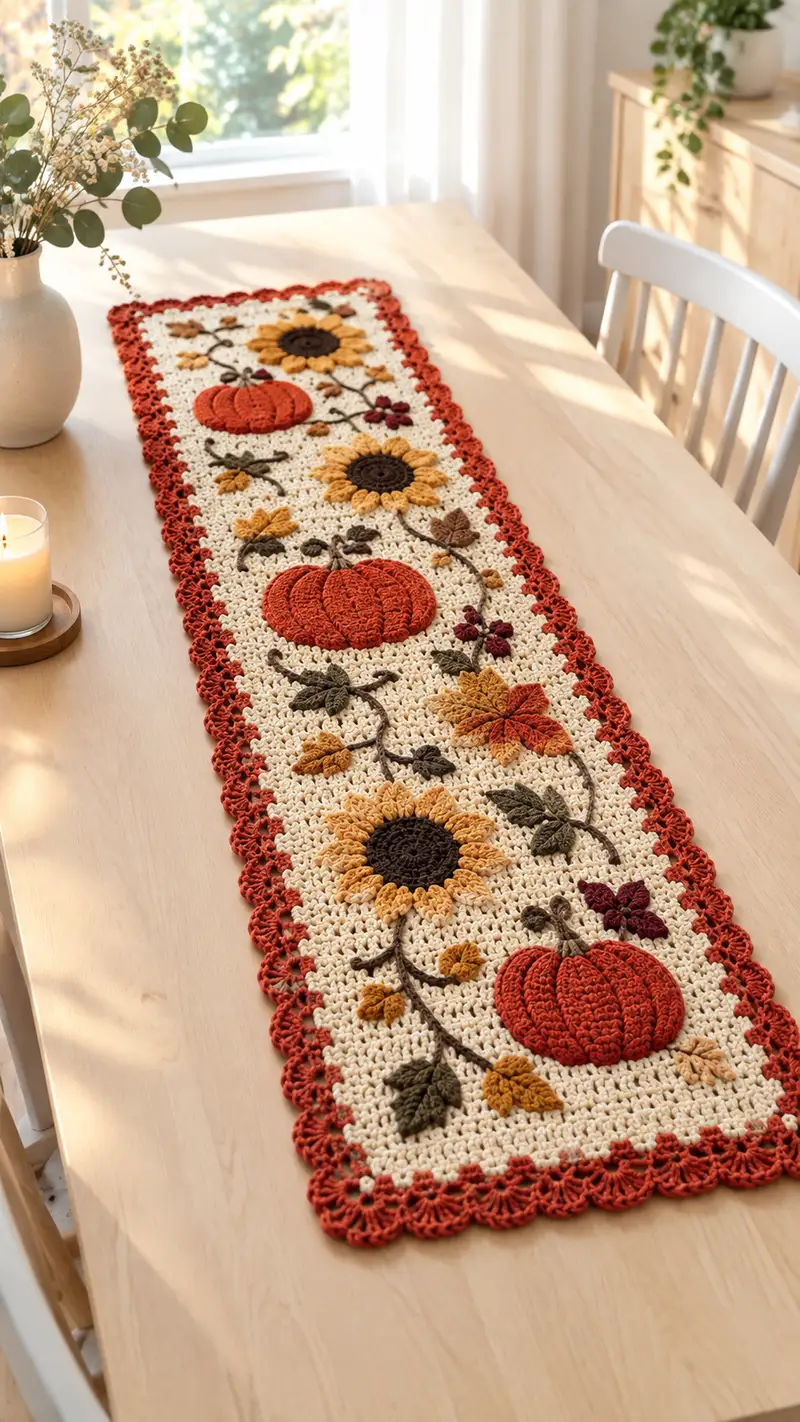
A warm, fall-inspired table runner featuring textured pumpkins, three-dimensional sunflowers, curling vines and layered leaves on a creamy background. Finished with a scalloped rust border for a cozy, handcrafted centerpiece. Perfect for autumn decor, seasonal dining tables, or as a heartfelt handmade gift.
Progress Tracker
0% Complete
— Notes & Gauge :
Info :
This pattern builds a long rectangular panel worked flat in rows, then embellished with appliques sewn on. Gauge: 14 V-sts x 18 rows = 4in (10cm) in V-stitch pattern with 4.0mm hook and worsted yarn. Adjust hook to match gauge for desired finished size.
Info :
Finished approximate size: 13-15 inches wide x 48-52 inches long depending on blocking and tension. Measurements will vary with yarn and hook choices.
— Main Panel (Cream background) :
Round 1 :
Chain 146 (multiple of 3 + 2). This gives 48 V-stitch groups across (146-2)/3 = 48 V-stitches.
Round 2 :
Row 1: Dc in 4th ch from hook (counts as first dc), *ch1, skip next 2 ch, 2 dc in next ch; repeat from * across until you have worked 48 V-stitches total, end with dc in last ch. (48 V-sts)
Round 3 :
Row 2: Ch3 (counts as dc), turn. Work *2 dc in next ch1-sp (work into the ch-1 space between 2-dc groups), ch1; repeat across, ending with dc in top of turning ch. (48 V-sts)
Round 4-7 :
Rows 3-6: Repeat Row 2. Maintain even tension to keep panel flat. (48 V-sts each row)
Info :
Keep your chain foundation loose but rows slightly firmer to avoid cupping. Use stitch markers to mark every 12th V-stitch if counting large widths for applique placement.
Round 8-20 :
Rows 7-19: Continue repeating Row 2 to build length. At the end of Row 20 you will have a short section of background to place the first cluster of appliques. (48 V-sts each row)
Info :
Block the panel flat after reaching Row 20 to check for evenness before adding appliques. The runner is assembled entirely on top of this background: markers will help identify exact V-stitch coordinates for applique placement.
Round 21-40 :
Rows 20-39: Continue V-stitch rows to reach desired length. For my layout I worked to Row 60 total for the background; here we will indicate placements at Rows 12, 28 and 48 to correspond to the three main pumpkin + sunflower groupings in the photo. (48 V-sts each row)
Info :
At Row 28, Row 48 and Row 12 (counting from short end), position and pin appliques: pumpkins approximately centered at V-stitch numbers 12, 24 and 36 across; sunflowers sit slightly offset at V-stitch numbers 8, 24 and 40 respectively. Use these centre coordinates when attaching appliques.
Round 41-60 :
Rows 40-59: Finish the background length to Row 60 (or your desired length). Maintain (ch3, turn) and V-stitch in prior ch-1 spaces. (48 V-sts each row)
Info :
Fasten off after the final row. Block the panel gently to square the edges and hold in place while you create and position appliques. We will attach motifs by sewing them to the blocked panel so measurements remain accurate.
— Pumpkin Applique (Make 3; same construction, vary size by working fewer or more rounds) :
Round 1 :
Using Rust yarn and 3.5mm hook. Work 6 sc in magic ring. (6)
Round 2 :
Inc x6 around. (12)
Round 3 :
(1 sc, inc) x6. (18)
Round 4 :
(2 sc, inc) x6. (24)
Round 5 :
(3 sc, inc) x6. (30)
Info :
These first rounds form a flat circular base for the pumpkin body. Keep stitches tight so the center does not cup excessively when working post stitches later.
Round 6 :
1 sc in each st around. (30)
Round 7 :
Ch2, turn. Work 1 hdc in each st around. (30)
Round 8 :
Change to 4.0mm hook for a slightly looser body if desired. Begin ribbing: *fpdc around next st, skip next st; rep * around to create vertical ridges (work 15 fpdc total alternating with skipped sts). When finished, rotate as needed so ridges are distributed evenly. (15 fpdc)
Round 9 :
Work 1 sc odd round (1 sc in each free st and in back loop of fpdc to anchor) around to lock ribbing in place. (30)
Round 10 :
Round of even sc maintaining shape. (30)
Info :
To emphasize pumpkin ribs: using a blunt-ended yarn needle, lay surface slip-stitches in brown or darker rust by following the ridges (see ribbing round) to create deeper channel lines. Alternatively, use heavy surface crochet (long slip stitch) in a contrasting color to define ribs.
Round 11 :
Begin to shape sides: (4 sc, dec) x5. (25)
Round 12 :
(3 sc, dec) x5. (20)
Round 13 :
(2 sc, dec) x5. (15)
Info :
Stuff lightly at this stage to round the pumpkin. Use small amounts of fiberfill so the applique remains flat enough to sew onto the panel rather than bulging.
Round 14 :
(1 sc, dec) x5. (10)
Round 15 :
5 dec (5). Fasten off leaving a long tail for sewing. Weave tail through remaining stitches and pull closed. (5)
Round 16 :
Using Brown yarn and tapestry needle, create 6 evenly spaced surface slip-stitch ribs from top center to the widest point to produce carved segments. Repeat on back if necessary. (Info: Use 6-8 ribs for full pumpkins)
Round 17 :
Stem: With Olive yarn, ch6, sc in 2nd ch from hook and next 4 ch (5 sc), work rounds of sc around the chain to form a short stem tube: 2 sc evenly placed around, slip stitch to first sc, fasten off leaving tail for sewing. Attach stem to top center of pumpkin and secure with whip stitch.
Info :
Make 3 pumpkins in identical technique. For variation, omit one decreasing round to make a slightly larger pumpkin, or add additional rounds of 1 sc in each st before ribbing to increase diameter.
— Sunflower Applique (Make 3) :
Round 1 :
With Dark Brown yarn and 3.5mm hook: 6 sc in magic ring. (6)
Round 2 :
Inc in each st around. (12)
Round 3 :
(1 sc, inc) x6. (18)
Round 4 :
(2 sc, inc) x6. (24)
Info :
This builds the sunflower center. Keep the center slightly domed for a natural look; do not overstuff appliques.
Round 5 :
Switch to Mustard yarn. Ch1, turn. Working in back loops only, 1 sc in each st around to create a defined edge for petal placement. (24)
Round 6 :
Petal round: *Ch3, skip next st, slip stitch in next st; repeat from * around to create 12 ch-loops for petals. (12 ch-loops)
Round 7 :
Work petal clusters: In each ch-loop work (3 tr, ch1, 3 tr) or (5 dc cluster) depending on preferred fullness — here: (3 tr, ch1, 3 tr) in each loop. Fasten off and weave ends. (12 petals)
Info :
Optional second petal layer: for fuller flowers, work a second petal round offset between the first petals using a slightly darker yellow to add depth. Stiffen petals gently with spray starch if you prefer upright petals.
Round 8 :
Using tapestry needle and dark brown yarn, embroider small radial lines from center to base of petals to mimic seed texture. Secure threads at back and weave in.
Round 9 :
Optional: Add a small round of 12 sc around petals underside to create a shallow cup that will help petals sit on panel neatly. Fasten off leaving sewing tail.
Info :
Make 3 sunflowers. Slight differences in size give a handmade look; to vary size, increase center rounds or add an extra petal round in one flower.
— Leaves (various sizes, Make many) :
Round 1 :
Small leaf (Make 10): With Olive yarn, ch10. Row 1: sc in 2nd ch from hook, hdc, dc, tr, dc, hdc, sc, sl st in last ch (leaf tip) then work down opposite side: sc, hdc, dc, tr, dc, hdc, sc across to join at base. Fasten off, leaving tail for sewing. (Symmetrical leaf worked on both sides)
Round 2 :
Medium leaf (Make 8): Ch12. Work as above increasing center tr to double treble (US tr x2) at tip for more curvature. Add picot at tip: ch3, sl st in 3rd ch from hook before finishing to create a small point. Fasten off.
Round 3 :
Large leaf (Make 6): Ch14. On center tip work (tr, tr, ch1, tr) cluster to create full tip, then work symmetrical decreases on return side. (Longer leaf for vine ends)
Info :
For layered leaves use mustard or rust for fallen leaves — sew one small golden leaf on top of a larger olive leaf to emulate color change. Crimp leaves slightly by sewing a small running stitch down the center and pulling to create vein effect.
Round 4 :
Textured maple-like leaf (Make 4): With mustard yarn, ch9. Row 1: sc in 2nd ch, hdc, dc into next 3 ch, hdc, sc, turn working along chain base with increases spaced to create lobes: (sc2tog, ch1, sc) to mimic leaf lobes. Finish and fasten off. (Detailed shaping creates maple shape)
Info :
Create varied leaf shapes to scatter across the runner; press lightly or starch to help them lay flat on the panel.
— Vine & Stem Embroidery :
Round 1 :
Using Olive yarn held with long length and yarn needle, create curving vines by couching: lay a long length of yarn in a soft S curve across the panel and sew small whip-stitches through the V-stitch spaces every 4-6 rows to anchor. Work vines to connect pumpkins and sunflowers, referencing the photo layout. (Info: Use pins to hold shape before couching)
Round 2 :
For raised stem texture, use surface slip-stitch (in Tunisian or regular slip stitches) along the couched line with darker olive for contrast. Knot ends on the back and weave tail through several stitches for security.
Info :
Vine placement tip: measure from one short edge to first pumpkin center ~12 rows, from first to second grouping ~18 rows, from second to third grouping ~16 rows (these are approximate; pin and adjust by eye for best composition).
— Small Accent Flowers (burgundy) :
Round 1 :
Make 6 small 4-petal flowers: Ch4, sl st to form ring. In ring: *(ch3, sl st) x4* to form tiny petals. Fasten off leaving tail for stitching. Attach as clusters near vines and pumpkins for color pops.
Info :
These small flowers are decorative accents. Vary placement and group in pairs or threes for a natural look.
— Assembly & Positioning :
Round 1 :
Lay your blocked background panel on a flat surface. Refer to photo placement: three major groupings spaced evenly along the length. Use pins to mark centers: place first center 12 rows from one short edge, second center at 28 rows from same edge, third center at 48 rows. Horizontally center each motif at V-stitch positions 12, 24 and 36 (count V-stitches left to right).
Round 2 :
Pin pumpkins to background first, matching center points to pinned marks. Use a blunt tapestry needle and matching Rust yarn to sew each applique with small whip stitches around the edge, avoiding pulling the background fabric tightly. Leave slight ease for dimensional effect.
Round 3 :
Next attach sunflowers: place so that their petals slightly overlap background V-stitch clusters but do not cover pumpkin detail. Sew with small, even stitches through the underside cup and background. Secure seams with knots on the back and weave ends.
Round 4 :
Sew leaves and small flowers around the vines and motifs. Use the couching vine lines as anchors and sew leaf bases into those stitch points so the piece appears integrated. Add a few leaves partially under pumpkin edges for a natural layered look.
Info :
Assemblage tip: sew motifs with the least visible thread color where the applique meets the background. For example, use cream thread to secure leaf bases against the cream background, and use rust or brown tail to secure pumpkins where colors meet.
— Decorative Scalloped Border :
Round 1 :
With Rust yarn, join to one corner with sl st. Work 1 rnd sc evenly around the entire panel: 1 sc in each st and 3 sc in each corner to keep edges square. (Count will match panel perimeter; work evenly across edges and mark corners with 3 sc.)
Round 2 :
Ch1, turn. Work 1 sc in each sc around to build base for scallops. Keep counts even so scallops align with V-stitch spacing below. (Perimeter sc count – no change in counts)
Round 3 :
Begin scallop round: *Skip 2 sc, in next sc work (sl st, ch3, 5 dc, ch3, sl st) to form a shell; skip 2 sc, sc in next sc; repeat from * around. When approaching corners, work shells slightly closer (skip 1 sc) so corner shells sit comfortably. Fasten off and weave ends.
Info :
Scallop placement: if your shells do not line up pleasingly with the V-stitch pattern, adjust by decreasing or increasing the number of base sc in Round 1 to create more or fewer shell anchors. Pin shells in place as you go to ensure even spacing.
Round 4 :
Optional second scallop row: Join Rust to center top of each shell and work a 5 dc cluster into each shell to create a layered lace edge for greater visual impact. Fasten off and block gently.
Info :
Blocking note: Wet-block the entire runner after assembly to coax motifs to lay flat and set scallops. Use pins to shape scallops evenly. Dry completely before trimming excess threads.
— Final Finishing Touches :
Round 1 :
Weave in all ends on the back of the panel. Trim any excess yarn short to prevent lumps. Check underside for loose stitches and secure them with additional backstitching if needed.
Round 2 :
If desired, add subtle embroidery details such as seed dots in sunflower centers with French knots (use darker brown), or small veins on leaves using backstitch in olive or deeper rust.
Round 3 :
Final block: Lay runner face down on a towel, spray lightly and pin scallops and edges straight. Allow to dry fully. For a stiffer scallop, apply a thin wheat-starch solution to the edge, reshape, and let dry.
Info :
Care instructions: Hand wash gently in cool water and reshape while damp. Avoid heavy agitation. Air dry flat away from direct heat or sunlight. Spot clean appliques carefully.
This cozy autumn table runner brings the warmth of fall right to your dining table, mixing tactile pumpkins, bright sunflowers and curling vines into a handcrafted centerpiece. Every applique and scalloped edge adds personality and charm to seasonal décor, and the detailed instructions make assembly approachable. Whether you gift it or keep it, this runner will add a touch of handmade magic to holiday gatherings. 🧶🍂