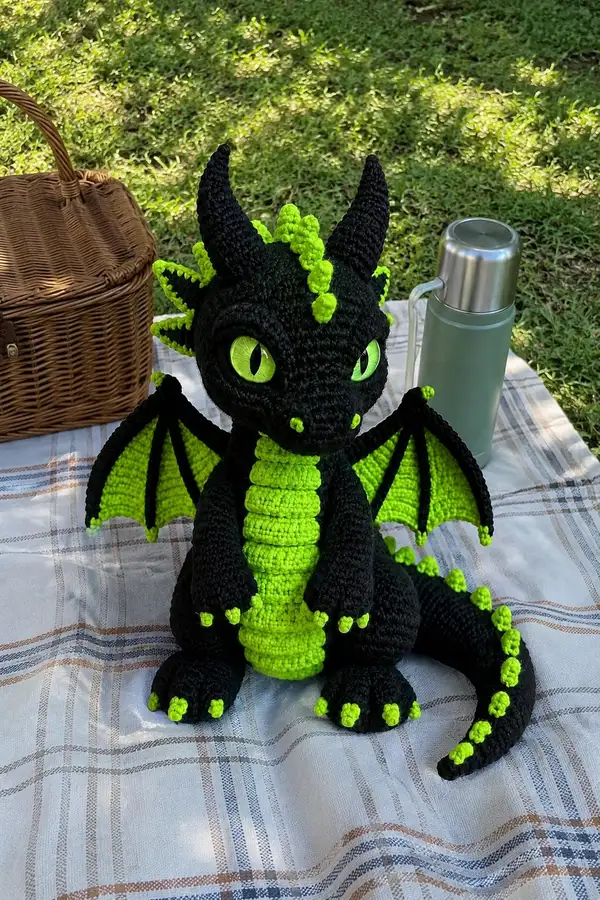
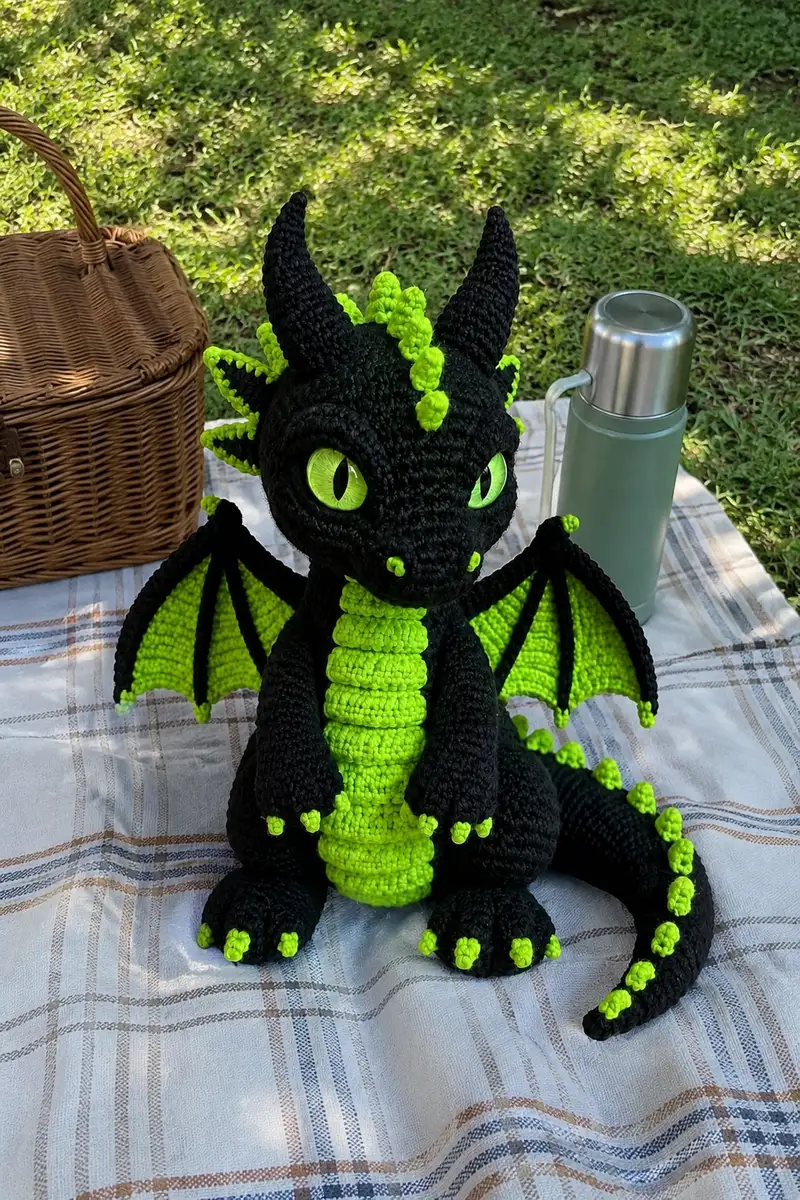
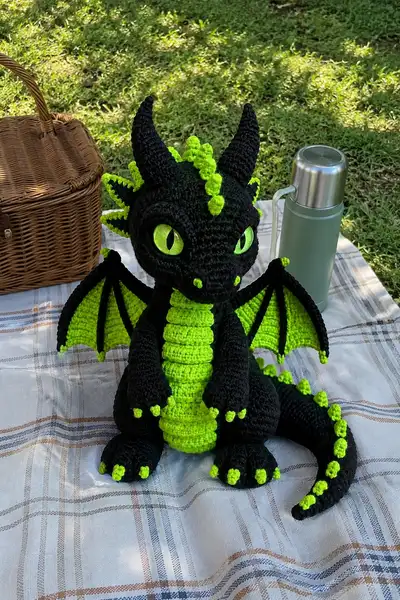
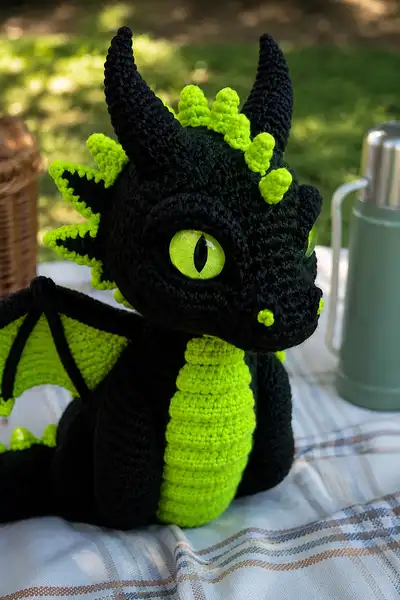
Create a striking spooky greenish dragon with neon lime accents and dramatic black contrast. This plush amigurumi features large glossy lime eyes, curled horns, a ribbed neon belly, articulated wings with black ribs, and a curled tail dotted with neon spikes. The pattern guides you through sculpted head shaping, expressive eyes, and layered details for a characterful Halloween-ready companion.
Progress Tracker
0% Complete
— Head :
Round 1 :
6 sc in magic ring (6)
Round 3 :
(1 sc, 1 inc) x 6 (18)
Round 4 :
(2 sc, 1 inc) x 6 (24)
Round 5 :
(3 sc, 1 inc) x 6 (30)
Round 6 :
(4 sc, 1 inc) x 6 (36)
Round 7 :
(5 sc, 1 inc) x 6 (42)
Round 8 :
(6 sc, 1 inc) x 6 (48)
Round 9 :
(7 sc, 1 inc) x 6 (54)
Round 10 :
(8 sc, 1 inc) x 6 (60)
Info :
Switch to smooth black yarn for head rounds if using different yarn types. Work tightly to prevent stuffing showing through. Place a stitch marker at start of round 10 to track placement for facial features.
Round 11-16 :
1 sc in each st (60)
Info :
Eye placement: Position large safety eyes between rounds 13 and 14 horizontally. The eyes in the photo sit approximately 12-14 stitches apart (measure center-to-center) for a slightly wide, expressive look. If using 30mm eyes, aim for 13 stitches between centers; pinch lightly to test spacing before securing.
Round 17 :
1 sc in each st (60)
Round 18 :
1 sc in each st (60)
Info :
Optional: Create eye rims before stuffing fully. Crochet two flat oval eye-rim pieces in black to frame the eyes: ch 2, 6 sc in mr, inc round to reach circumference slightly larger than eye, then sl st to join and fasten off. Sew rims around eyes on round 13-14 after inserting eyes.
Round 19 :
(8 sc, 1 dec) x 6 (54)
Round 20 :
(7 sc, 1 dec) x 6 (48)
Info :
Begin stuffing the head fairly firmly now, especially around cheeks and behind eyes to create a rounded skull shape. Stuff in small amounts to avoid lumps and use a stuffing tool to evenly push fiber into snout area.
Round 21 :
(6 sc, 1 dec) x 6 (42)
Round 22 :
(5 sc, 1 dec) x 6 (36)
Round 23 :
(4 sc, 1 dec) x 6 (30)
Round 24 :
(3 sc, 1 dec) x 6 (24)
Info :
Start snout shaping: count the front-most 12 stitches (center of face) and make a small tubular snout that will project forward. If you want a longer snout, do 2-3 extra rounds of even stitches before continuing decreases. Keep stuffing firmer in the snout to maintain shape.
Round 25 :
(2 sc, 1 dec) x 6 (18)
Round 26 :
(1 sc, 1 dec) x 6 (12)
Info :
Fasten off leaving a long tail for sewing the neck to the body. Finish stuffing head firmly, shaping cheeks around eyes and smoothing with your hands. Use an optional pipe cleaner or short wire through the snout if you want the head slightly poseable (wrap wire ends safely).
Round 28 :
Optional neck extension: Join black yarn at base of head and crochet 6 sc around the opening for a short neck tube: Round 1: 6 sc (6)
Round 29-34 :
1 sc in each st (6) - continue until neck tube reaches 6 rounds long, or desired neck height
Info :
Leave the neck opening large enough to slip over the body top if you're stacking pieces, or fasten off and leave long tail to sew neck directly to body. Keep symmetry when sewing; center seam goes between the eyes.
— Horns (Make 2) :
Round 1 :
6 sc in magic ring with black (6)
Round 3 :
(1 sc, 1 inc) x 6 (18)
Round 4 :
1 sc in each st (18)
Round 5 :
(3 sc, 1 inc) x 4 + 2 sc (22) - alternatively work (2 sc, 1 inc)x6 to total 24 depending on desired girth
Info :
Taper the horn by doing fewer increases or switching to straight rounds sooner for a slimmer horn; the pictured horns are tall and slightly tapered, so we will now work single crochet rounds with gradual decreases.
Round 6-8 :
1 sc in each st (22)
Round 9 :
(2 sc, 1 dec) x 6 + remaining sc to maintain shape (approx 18-20)
Round 10-14 :
1 sc in each st, pulling stitch slightly tighter to narrow horn tip each round (approx 18,16,14,12,10)
Round 15 :
(1 sc, 1 dec) x remaining stitches until tip narrows to 6-8 sts
Round 16 :
6 dec to close a small point (6)
Info :
Do not completely close the horns if you want to insert a short pipe cleaner or wire for shaping. Stuff lightly near the base to help horns stand upright but keep tips thin and closed. Sew horns to top of head symmetrically behind eye line; base should align roughly with round 12-14 of the head.
— Head Spikes (Make 7-9 small spikes) :
Round 1 :
5 sc in magic ring in neon green (5)
Round 3 :
1 sc in each st (10)
Round 4 :
(1 sc, 1 dec) x 3 + 4 sc to shape tip (7)
Round 5 :
6 dec to reduce to small nub (1-2) then fasten off leaving tail for sewing
Info :
Make multiple small spikes to sew along center ridge of head and down tail. Alternate sizes by adjusting rounds 2-3 for variety. Sew spikes in a line from crown to nape, spacing evenly about 6-10 stitches apart depending on head circumference.
— Body :
Round 1 :
6 sc in magic ring (6)
Round 3 :
(1 sc, 1 inc) x 6 (18)
Round 4 :
(2 sc, 1 inc) x 6 (24)
Round 5 :
(3 sc, 1 inc) x 6 (30)
Round 6 :
(4 sc, 1 inc) x 6 (36)
Round 7 :
(5 sc, 1 inc) x 6 (42)
Round 8 :
(6 sc, 1 inc) x 6 (48)
Round 9-14 :
1 sc in each st (48)
Info :
The body in the photo is a broad rounded egg shape with a ribbed neon belly panel. Decide whether to work the belly directly into the body (color change rows) or crochet a separate belly panel to sew on. This pattern uses an integrated ribbed belly for a clean finish—we will add the belly later in neon green as a separate panel sewn to the front.
Round 15 :
(6 sc, 1 dec) x 6 (42)
Round 16 :
(5 sc, 1 dec) x 6 (36)
Round 17 :
(4 sc, 1 dec) x 6 (30)
Round 18-22 :
1 sc in each st (30)
Info :
Begin stuffing body moderately from the bottom up so the base is firm to allow the dragon to sit. Keep stuffing denser at the bottom and lighter toward the top where the neck will attach. If adding internal armature or wire for posture, position it now and work around it.
Round 23 :
(3 sc, 1 dec) x 6 (24)
Round 24 :
(2 sc, 1 dec) x 6 (18)
Round 25 :
(1 sc, 1 dec) x 6 (12)
Round 26 :
6 dec (6) - leave opening large enough to attach neck or fasten off leaving long tail for sewing
Info :
If you left the neck tube on the head, slip the head over the body opening to assess attachment before sewing. Otherwise, sew the neck tube directly. Use many whip-stitches to prevent wobble; pass through both head and body stitches multiple times.
— Ribbed Belly Panel (Neon Green) :
Round 1 :
Ch 12, join with sl st to form a small loop or start with mr and 12 sc (12) - we will make an oval/tube lengthwise to sew onto body
Round 2 :
1 sc in each st around for 3-4 rounds to create a flat strip (12)
Round 3 :
Switch to back loops only and work 6 rounds to create visible horizontal ribs: 1 sc in each st BLO (12)
Round 4-12 :
Repeat Round 3 making at least 9-10 rib rows to match body height (12)
Info :
This ribbed panel will be seamed to the front center of the body. Stretch slightly and pin in place before sewing; the ribs should sit vertically on the dragon when fastened. Make the panel as long as needed to reach from neck seam to lower belly; measure against the body while stuffing for fit.
Round 13 :
Fasten off leaving long tail for sewing. Sew the panel to the front center using mattress or whip stitch, securing top-to-bottom and stretching slightly to emphasize ribs.
— Arms (Make 2) :
Round 1 :
6 sc in magic ring (6)
Round 3 :
(1 sc, 1 inc) x 6 (18)
Round 4-6 :
1 sc in each st (18)
Info :
Shape wrist and paw by working a slight decrease at the end of round 6 if you want a narrower wrist before the arm bulk. Stuff the paw area more firmly than the upper arm so hands keep a rounded shape.
Round 7 :
(3 sc, 1 inc) x 4 + 2 sc (22)
Round 8-12 :
1 sc in each st (22)
Round 13 :
(3 sc, 1 dec) x 4 + 2 sc (18)
Round 14-16 :
1 sc in each st (18)
Round 17 :
(2 sc, 1 dec) x 4 + 2 sc (14)
Info :
Make tiny neon claws by switching to neon green and doing sl st clusters on the last round: attach neon at three evenly spaced stitches near the paw tip and work small bobble/cluster of 3 sc in same stitch to create a little thumb/toe. Fasten off leaving tail to weave in.
Round 18 :
Finish stuffing arm lightly; leave long tail to sew arm to side of body at rounds 18-20 on body; position so elbows sit at front seams and hands rest on belly.
— Legs (Make 2) :
Round 1 :
7 sc in magic ring (7)
Round 3 :
(1 sc, 1 inc) x 7 (21)
Round 4 :
(2 sc, 1 inc) x 7 (28)
Round 5-8 :
1 sc in each st (28)
Info :
Create a flat foot base by working an oval if you prefer a flatter sitting posture: work two additional increases on one side of the round to make the foot broader, then work even rounds to shape the ankle up. Otherwise maintain a round foot to match the photo's rounded feet.
Round 9 :
(3 sc, 1 dec) x 7 + (1 sc) to maintain (24)
Round 10-14 :
1 sc in each st (24)
Round 15 :
(2 sc, 1 dec) x 6 + (2 sc) (18)
Round 16-18 :
1 sc in each st (18)
Round 19 :
(1 sc, 1 dec) x 6 (12)
Round 20 :
6 dec (6) - leave opening for stuffing and sewing to body
Info :
Stuff feet very firmly since these support the body when sitting. Sew legs to bottom of body: position toes forward and space legs evenly. The photo shows legs close together to create a sitting, cuddly posture; aim to sew legs between body rounds 2-6 of the lower body area for best stability.
— Tail :
Round 1 :
6 sc in magic ring (6)
Round 3 :
(1 sc, 1 inc) x 6 (18)
Round 4-8 :
1 sc in each st (18)
Info :
The tail tapers gradually and has a row of neon spikes sewn along the top. Work the tail long enough to curl around the side of the body; the pictured tail is roughly similar in length to body height. If you want a curl, insert a flexible wire along the last two-thirds of the tail before closing.
Round 9 :
(4 sc, 1 dec) x 3 (15)
Round 10-14 :
1 sc in each st (15)
Round 15 :
(3 sc, 1 dec) x 3 (12)
Round 16-20 :
1 sc in each st (12)
Round 21 :
(2 sc, 1 dec) x 3 (9)
Round 22-26 :
1 sc in each st (9) - lengthen until desired curl length reached
Info :
Create neon spikes (see Head Spikes) and sew them along the top of the tail in a staggered line, decreasing size toward the tip. Stuff the tail moderately firm, add wire if desired for posing, then sew tail securely to back lower rounds (approx. body round 3-5).
— Wing Frames (Make 2) :
Round 1 :
With black yarn ch 20 (or desired wingspan length) to form top rib, join to form chain loop if desired and single crochet back across to create a thick rod: Row 1: ch 20, turn, sc in 2nd ch from hook and each across (19)
Round 2 :
Work 2-3 rounds over the chain in sc to create a sturdy tube (19)
Info :
The framed look in the photo uses a strong black rib across the top and inner ribs that divide the neon membrane. Make multiple tubes to form the wing skeleton: a top long rib, a diagonal rib, and a shorter bottom rib. Stiffen by adding a thin wire inside or by crocheting tightly.
Round 3 :
Make 2 diagonal ribs: ch 14, sc back across to make 13 sc tube; sc around ends to create tie points. Make one shorter tube for wing lower edge (approx ch 10).
Round 4 :
Use slip stitch joins to secure rib intersections into a triangular skeleton shape; fasten off and set aside for membrane attachment.
— Wing Membrane (Make 2) :
Round 1 :
With neon green, join at one corner of rib frame and sc across outer edge to create a base loop that will mesh with the skeleton. Work sc around the frame filling in with rows of sc that attach to the ribs. Countable approach: start by making a small triangular flat piece then increase rows outward until it spans skeleton.
Round 2-10 :
Work in rows attaching to frame: each row ch1, turn, sc in each st and connection points to ribs. Use BLO on the last neon row (1 sc in each st BLO) to create a crisp edge that will be joined to black outline later.
Info :
Make the membrane taut but not overly stretched so seams are smooth. The neon interior should be flat and even. Use a smaller hook if needed to make a tighter membrane. Block lightly with a damp cloth to set tension if your yarn allows.
Round 11 :
Switch to black and work single crochet around entire wing edge (approx 60-80 sc depending on size), joining to ribs to create a bold black outline. At the points where ribs meet edge, slip stitch tightly to create a defined rib look.
Round 12 :
Work an additional sc round in black for thickness and to create a raised border (approx 60-80 sc)
Info :
Sew wings to back using strong whip stitches through the black frame to body rounds near the shoulder (approx. body rounds 12-16). Angle wings slightly outward and forward for the same dramatic pose as pictured.
— Wing Ribs (Decorative Black Lines) :
Round 1 :
With black yarn, embroider or crochet narrow chains (ch 20-30) and sew onto membrane to form ribs dividing the neon wing. Tack down at top rib and at edge at 3-4 anchor points.
Info :
Work 3 ribs per wing for a stylized look; stretch membrane while sewing ribs to keep even tension. You can also crochet flat tubes as earlier and sew them on top for a raised rib effect.
— Ear-Fins / Side Spikes (Make 4) :
Round 1 :
With black, 6 sc in magic ring (6)
Round 3 :
1 sc in each st (12)
Round 4 :
Attach neon green on outer edge for rim: 1 sc in each outer loop around to create green trim (12)
Info :
These triangular ear-fin pieces are sewn to the upper side back of the head near the horns to create the layered crest visible in the photographs. Make two larger and two slightly smaller pieces to create the staggered layered effect.
— Small Claws and Nose Details :
Round 1 :
Using neon green, ch 2, 3 sc in 2nd ch from hook, fasten off (3) - small nub.
Round 2 :
For a slightly raised claw, make a 3-sc bobble: yo, insert, pull up loop x3, yarn over pull through all loops, ch1 to secure, leaving tail for sewing.
Info :
Sew these tiny green nubs to toes, finger tips, and the very tip of the nose as seen in the picture. They are quick to make and add much character.
— Tail and Back Spike Assembly :
Info :
Sew larger spikes on the tail first: arrange 8-10 spikes decreasing in size toward the tip. Use secure sewing with multiple passes through each spike base and body foam to hold them upright. Slightly tilt each spike outward for a dramatic silhouette.
Info :
Attach the tail to the back lower center of the body. If using wire, make sure the wire ends are turned in and covered by yarn before assembly so nothing sharp is exposed.
— Final Finishing Touches :
Info :
Sew head to body using the long tail left from the neck. Use matching black yarn and invisible ladder stitch or whip stitch, making sure head sits centered above the ribbed belly panel. Add extra stitches around the neck base for stability.
Info :
Position limbs: Sew arms at body rounds 16-20 on sides so forearms rest on the belly; sew legs at bottom with toes forward and slightly outward to mimic the photo. Reinforce all limb joints with several passes of your needle through both piece and body core.
Info :
Weave in all ends by threading them through several stitches inside the body to hide and secure. Trim excess yarn. Use a small dab of glue behind the safety eyes if desired for extra security (not recommended for toys intended for small children).
Info :
To create eyelid definition like in the image, embroider a short arc above each eye with black yarn to deepen the expression. Add tiny stitches of lighter green for catchlights if you are not using glass eyes with reflections.
Info :
Optional: Lightly spray with fabric-safe stiffener if you want horns and ribs to be crisper. Always test on scrap before applying to finished piece.
Info :
Blocking: If your yarn tolerates it, steam-block the wings and spikes slightly to set shape. Don’t saturate stitches; use steam at a distance and shape with hands.
This spooky neon dragon amigurumi blends classic amigurumi sculpting with dramatic color contrast for a truly show-stopping result. Every row builds personality — from the ribbed neon belly to the curled horns and expressive eyes. With careful assembly and attention to stuffing, it becomes a cherished, poseable companion perfect for seasonal displays or snuggly gifts. 🧶🖤💚