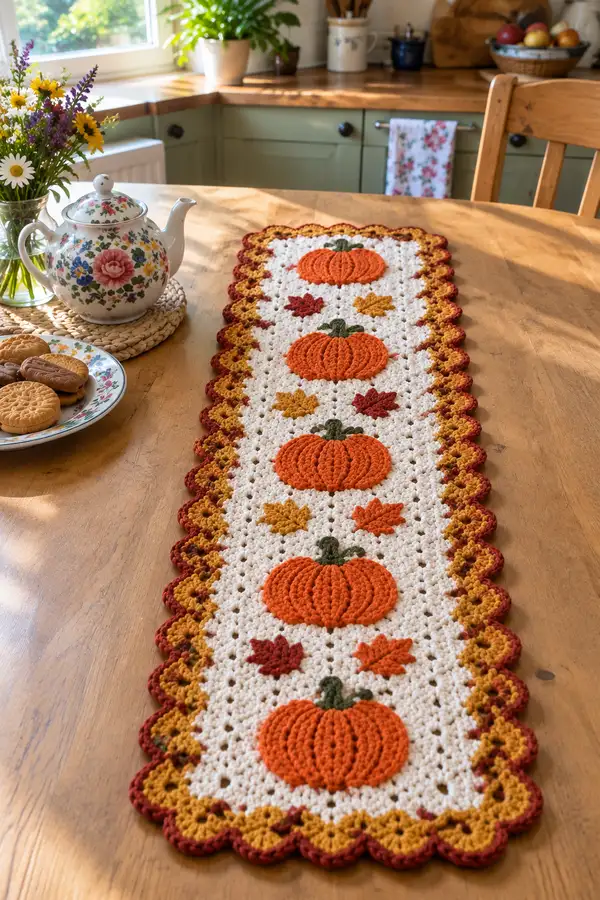
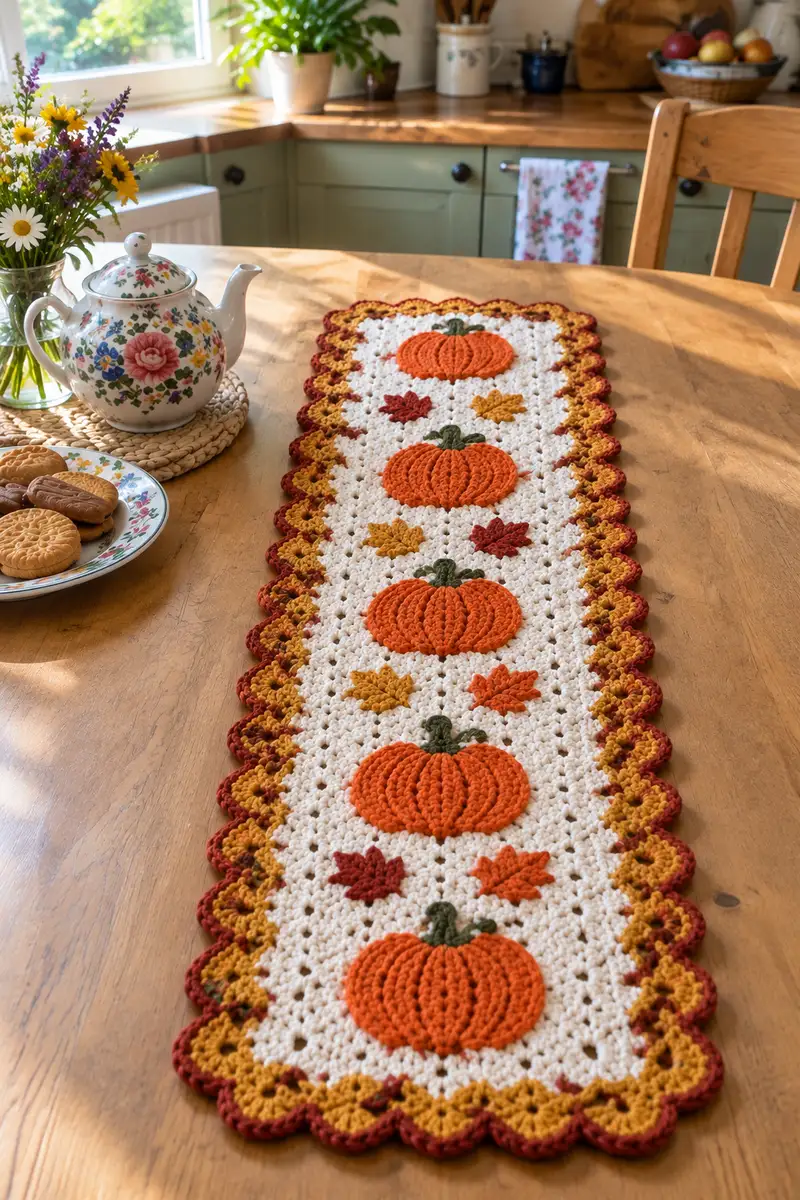
A warm, seasonal table runner featuring a row of puff-stitch pumpkins and scattered maple leaves on a soft cream background. Decorative scalloped edges in golden and rust tones frame the runner for a cozy harvest look. Designed to sit beautifully along a narrow table or dresser, this pattern combines classic granny-style background rows with textured appliques for a tactile autumn centerpiece.
Progress Tracker
0% Complete
— Notes & Gauge :
Info :
This pattern is worked flat in rows to create a long rectangular panel, then appliques (pumpkins and leaves) are crocheted separately and sewn on. Gauge for the main granny-style panel is approximately 18 clusters x 24 rows = 10 x 14 cm when worked with 4.0mm hook and worsted yarn; however, this runner is easy to adjust. Keep tension consistent for neat scallops and applique placement.
— Main Panel (Granny Shell Background) :
Round 1 :
Foundation: Chain 73 (this gives 18 repeating shell spaces across the width; your chain multiple is 4 x 18 + 1 for turning = 73)
Round 2 :
Row 1: Dc in 4th ch from hook (counts as first dc), *ch1, skip 1 ch, 3 dc in next ch; rep from * across for 18 shells total. End with dc in last chain space to finish row (total shells 18, total dc groups 18)
Info :
Keep your tension even. Place a stitch marker into the first stitch of the next row to help track row starts. The 3-dc groups create the little open hole 'granny' look that gives the runner its lacy background.
Round 3 :
Row 2: Ch3 (counts as dc), turn. Working into the ch1 spaces and groups: *3 dc into the ch1 space between shells, ch1; rep across. End with dc into top of ch3 turning chain (maintain 18 shells).
Round 4 :
Row 3: Repeat Row 2 exactly (18 shells). Keep even tension; do not increase or decrease in this panel — maintain constant width.
Round 5 :
Row 4: Repeat Row 2 (18 shells). This gives 4 even rows of shells to form a stable base.
Round 6-9 :
Rows 5-8: Repeat Row 2 (18 shells) for 4 more rows (total so far 8 body rows); keep marker at first stitch each row.
Info :
Measure as you work; the runner pictured has about 40-50 background rows plus the rows used to separate the pumpkin spacing. Plan layout: each pumpkin motif requires about 4-6 background rows above and below to sit in the center of its band.
Round 10-13 :
Rows 9-12: Continue repeating Row 2 (18 shells). After Row 12 you should have a neat stable panel that begins the first pumpkin band.
Info :
Decide the spacing of pumpkins along the length: this pattern creates 4 pumpkins spaced evenly with small leaf motifs between them. Count rows carefully so appliques will sit centered. Recommended layout: 6 rows between pumpkin bands; each pumpkin band occupies 6 rows for stitching and tacking.
Round 14-19 :
Rows 13-18: Work 6 foundation rows (Row 2 repeat) to form the first pumpkin band area (do not attach pumpkins yet). Maintain shell count: 18 shells per row.
Round 20 :
Row 19: Work a 'flat ground' transition row to make sewing appliques easier: Ch1, sc in each ch-space and around each dc top across the row to create a denser base for sewing (approx total stitches: 72 sc). This row compresses the holey pattern slightly and gives a nicer surface for applique attachment.
Info :
This denser transition row is optional but recommended under pumpkin appliques so they sit on a solid background rather than directly over holes. Count out 72 single crochets across if you changed to sc—this keeps width consistent.
Round 21-26 :
Rows 20-25: Return to shell pattern: Ch3, *3 dc in ch1 space across, repeat to maintain 18 shells per row for the next 6 rows. These rows form the visible band where the pumpkin will be centered.
Round 27 :
Row 26: Repeat the solid sc transition row (Ch1, sc across, approximately 72 sc) to stabilize for applique stitching above the pumpkin band.
Info :
Mark the center stitch of the row where the pumpkin will sit so you can position the pumpkin applique precisely. For a width of 72 sts, the center is between stitch 36 and 37; find your center by counting shells and dividing evenly. The pumpkin will be approx 16-18 stitches wide at its widest point when using the recommended worsted yarn and hook.
Round 28-45 :
Rows 27-44: Repeat sequences of 6 shell rows, 1 sc transition row as described above for each pumpkin band you plan to have. Work the sequence until you have space for all four pumpkins plus leading and trailing edge bands. For the sample runner: repeat the block of 7 rows (6 shell rows + 1 sc transition row) four times with an additional 6 shell rows at the end. Total panel length will be about 44-48 rows depending on final layout.
Info :
If you want a longer or shorter runner, add or subtract sets of the 7-row pumpkin-band block. Keep the last couple of rows as shell rows to make scallop joining easier.
— Pumpkin Applique (Make 4) :
Info :
Each pumpkin is made in rounds using puff stitches and front-post double crochet ribs to create vertical pumpkin grooves. Work these flat in joined rounds or as a small oval; the following instructions create a 9-10 cm wide applique when using worsted yarn and 4.0mm hook. Make 4 identical pumpkins.
Round 1 :
With Pumpkin Orange: Make a magic ring, ch1, 6 sc in ring (6). Pull ring closed. This forms the small center of the pumpkin bottom.
Round 2 :
Inc in each st around (6 inc) (12). Place marker at first stitch of round for reference.
Round 3 :
(1 sc, 1 inc) x 6 (18). Maintain round join but you may work joined rounds to keep a neat edge.
Round 4 :
(2 sc, 1 inc) x 6 (24). At this point the shape begins to flatten to an oval; we will shape outward for the pumpkin belly.
Info :
Switch to working in joined rounds for a flatter applique (sl st to join at end of each round, ch1 to start next). That helps you create a neat seam for sewing on later.
Round 5 :
(3 sc, 1 inc) x 6 (30). The base of the pumpkin is now broad enough to accept puff stitches at the next stage to create the raised ribs.
Round 6 :
Even round: 1 sc in each st around (30). Keep this round slightly looser so the puff rows above can sit nicely.
Round 7 :
Puff row setup: *Ch1, puff stitch in next st (yarn over, insert hook, pull up loop, yarn over, insert hook in same st, pull up loop, yarn over and pull through all loops on hook) - count each puff as 1 st; ch1 between puffs; rep across for 10 puff stitches total. Sl st to join (10 puffs).
Info :
Adjust number of puff stitches to match the width you desire. In the pictured runner each pumpkin has about 9-11 puffs forming vertical ribs. The puff stitch is worked tightly to give dimension; keep tension slightly firm for puffs so they sit up from the background.
Round 8 :
Placement round: Ch1, sc in each ch1 space and around each puff base to create a narrow ridge (approx 30 sc). This anchors the puffs and evens out the applique edge.
Round 9 :
Rib creation: Working from the back side, make fpdc ribs: *fpdc around post of the next puff group's base st, bpdc around the next st between puffs; rep across to create 10 distinct ribs. The fpdc creates a raised vertical line. End with sl st to join. (Approx total post sts = 20 alternating fpdc/bpdc)
Round 10 :
Repeat Round 9 to deepen ribs: *fpdc around the same post as previous fpdc row, sc between ribs in FLO to hold shape (this gives pronounced vertical grooves). End with sl st to join.
Round 11 :
Decrease round for subtle top taper: Working in sc, dec evenly around to bring count from approx 30 to 26 (work (3 sc, dec) x 6 = 24 or adjust to 26 for shape). Fasten off leaving long tail for sewing and shaping. Optionally add a tiny amount of polyfill in center to give slight dome, then flatten to desired pumpkin profile.
Info :
If you prefer a flatter pumpkin, skip stuffing and keep applique thin. For a plump pumpkin like the photo, add a small pinch of stuffing under the puff ribs before fully closing or tacking down.
Round 12 :
Stem start (in Olive Green): Join yarn to top center: ch1, 6 sc in magic ring or 6 sc into top stitches across the center (6). This creates a short squat stem.
Round 13 :
(1 sc, inc) x 3 (9). Sl st to finish, fasten off leaving long tail for sewing. Roll the stem slightly and sew to pumpkin top so it sits proud; you can stitch in a corkscrew shape for realism.
Info :
Use contrasting olive or moss green for the stem. Securely tack the stem down with several passes through the pumpkin base so it does not come loose on a frequently used table runner.
— Small Maple Leaf Appliques (Make 8-12 assorted) :
Info :
These little leaves are small flat appliques in two sizes and two colors (rust and mustard). Make enough to scatter between pumpkins as shown in the photo. Below are two sizes; make 3-4 of each color in the desired number.
Round 1 :
Leaf Small (Mustard/Rust): Ch6, sl st into 2nd ch from hook to create tiny loop base, ch1, 1 sc in same st, ch2, sl st into next st to form pointed tip, rotate and work tiny picot points: (sl st, ch3, sl st into base) across to shape leaf lobes. Fasten off leaving tail for sewing. Approx width 2-3 cm.
Round 2 :
Leaf Large (Mustard/Rust): Ch8, 1 sc in 2nd ch from hook across to last ch, into last ch work (3 sc, ch2, 3 sc) to form a tip, working down the other side sc across, then sl st to base. Add 1 sc along the center to create a raised midrib. Fasten off and press lightly to set shape.
Info :
Alternatively, you can embroider leaf veins on raw sc appliques using surface slip stitch or duplicate stitch. Tacking leaves on with a contrasting colored thread helps them read visually against the cream background.
— Maple Leaf Relief (Alternative Detailed Leaf for Center) :
Round 1 :
Detailed leaf: With rust yarn, ch6, sc in 2nd ch and next ch, hdc in next ch, dc in next ch for tip, then work down other side hdc, sc, sl st to join. Add 1 row of slip stitches around and embroider center vein in olive or darker rust. Fasten off. Make 4-6 for accent positions.
Info :
Arrange leaves around pumpkins before sewing to check balance and spacing. Use pins or basting stitches to hold them while you sew with matching yarn.
— Scalloped Border (Two-Color Scallop, Make 1 Long Border and 2 Short Ends) :
Info :
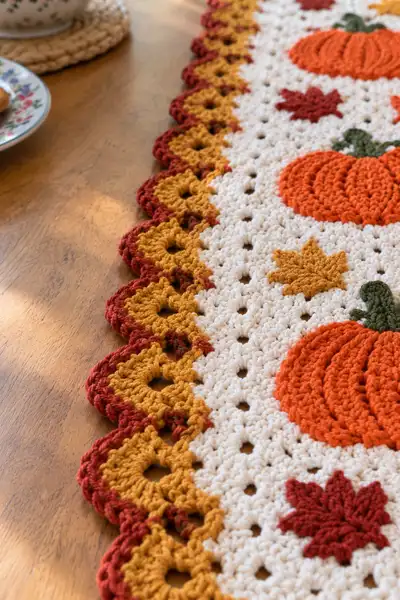
The scalloped border is worked around the entire perimeter as a two-color decorative finish. First work a single round of sc to even the edge, then add a golden scallop round, finish with a rust picot edge for contrast. Work starting at one short end and join seamlessly.
Round 1 :
Edge prep (Cream): With main background color, sc evenly around the panel edge, placing 3 sc into each shell space along the sides to prevent pulling. For the sample width and length, expect to make approx 180-200 sc around the full perimeter (count your panel to find exact number). Join with sl st. Fasten off.
Info :
Adjust counts to your piece. When placing sc evenly, add extra stitches into the shell clusters on the shorter edges to avoid puckering when adding scallops.
Round 2 :
Golden Scallop Round: Join Golden Mustard in any stitch. *Skip 1 sc, (5 dc all in next sc), skip 1 sc, sl st in next sc; rep from * around to create repeated 5-dc scallops. At corners, work (5 dc, ch2, 5 dc) to form a rounded corner shell. Join with sl st to first scallop peak. Total scallops depends on panel length; the sample has approx 52 scallops along the long edges and 6 scallops on the short ends.
Round 3 :
Rust Outer Edge: Join Rust color to the peak of any scallop, ch1, sc around the outer ridge of each 5-dc group to define the scallop, finishing each scallop with a small picot at the tip for contrast: (sc in each dc across, ch3, sl st into base to form picot). Repeat around. Join and fasten off, weave in ends neatly on the wrong side.
Info :
For a double-color scallop like photo, you will see the golden scallops framed by a narrow rust edge. If your runner is puckering, block gently with warm water and pins then let dry flat before final weave-in.
— Assembly & Applique Placement :
Info :
Before sewing appliques, lay the main panel flat and mark centers and bands where pumpkins will go. For a panel of 44 rows, mark rows 16, 26, 36, and 46 (approx) for centers of each pumpkin band. Use pins to arrange pumpkins and leaves to taste.
Round 1 :
Positioning: Place the first pumpkin centered across the width and centered vertically in the first pumpkin band (use the solid sc transition row as a center anchor). Pin pumpkin in several places to hold.
Round 2 :
Sewing: Using a length of Pumpkin Orange yarn and a yarn needle, use whip stitch or ladder stitch to sew the pumpkin edge to the panel. Stitch in the foundation sc or shell base to ensure the applique is anchored. Make small, even stitches so they are not visible on the front. Work all the way around the pumpkin, then weave in ends on the wrong side.
Info :
Sew the stem with olive yarn last, using the long tail left from the stem rounds. Make several passes through the stem base and into the pumpkin top for a stable attachment. If you used a tiny bit of stuffing inside the pumpkin, be careful not to over-distort it while sewing.
Round 3 :
Attach small leaves using matching colored yarn. Pin each leaf in the desired position and use a few small stitches in matching yarn to anchor them, then weave in ends. Place leaves asymmetrically around pumpkins to mimic a natural fall arrangement.
Round 4 :
Final checks: Once all appliques sewn, check both sides for loose tails and secure them. Trim ends close to work after weaving in securely.
Info :
For a polished look, press gently from the wrong side with a damp cloth and low heat, or wet block the entire runner by pinning it to a blocking board and allowing it to dry flat. Blocking smooths shell rows and flattens any uneven scallops.
— Variation & Sizing Notes :
Info :
To make the runner longer, repeat additional pumpkin-band blocks in the main panel sequence before finishing with scalloped edges. To make it shorter, reduce the number of pumpkin bands and adjust scallops accordingly. Swap colors to suit any season by changing the pumpkin and border hues. Use DK yarn and a smaller hook for a smaller delicate runner, or bulky yarn and a larger hook for a chunky, bold runner.
Round 1 :
Care instructions: Hand wash gently in cool water and lay flat to dry to preserve shape. Avoid the dryer to prevent stretching or color fading.
Bringing this runner to life is such a satisfying project — the textured pumpkin ribs and layered scallop edge make it feel special and seasonal. The colors pop against a soft cream background and the appliques invite touch and attention. Whether you display it on your dining table or a sideboard, this runner will bring cozy autumn charm to your home. 🍁🧶