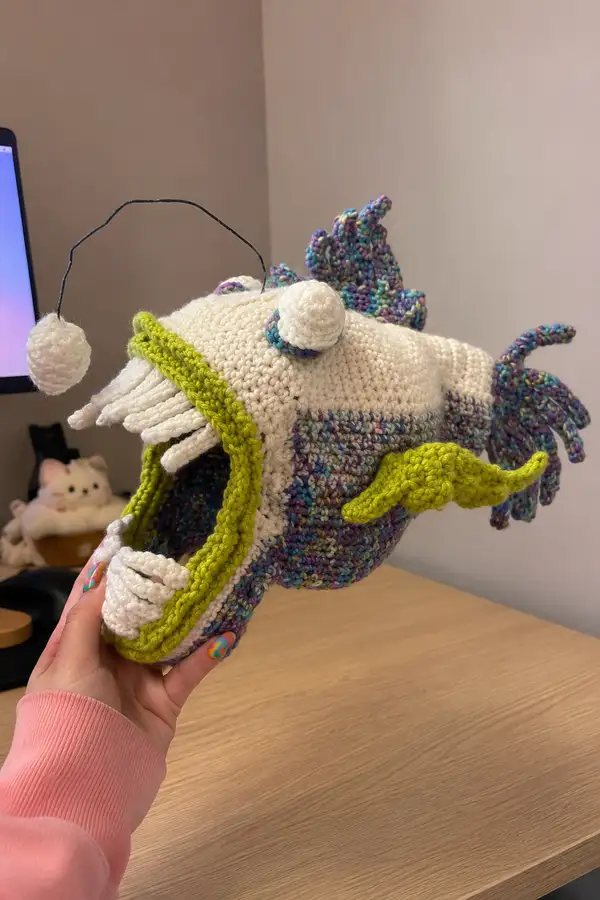
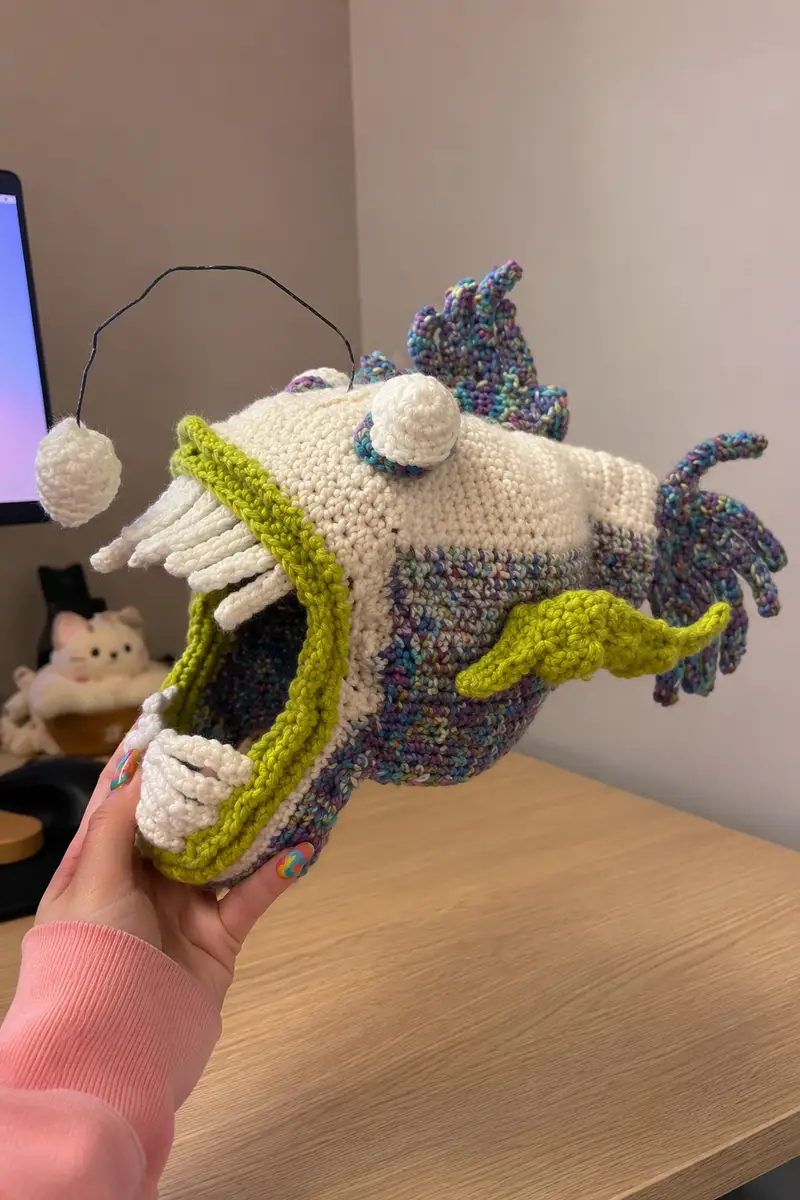
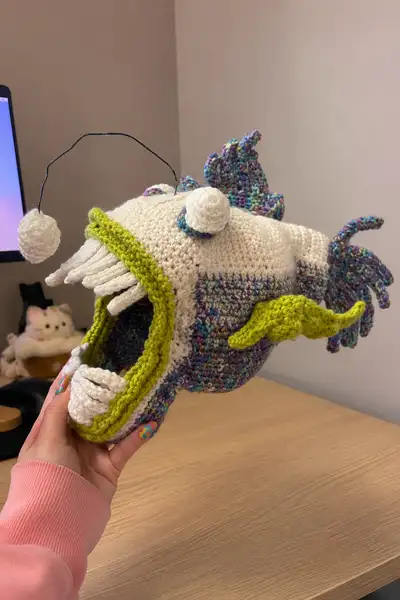
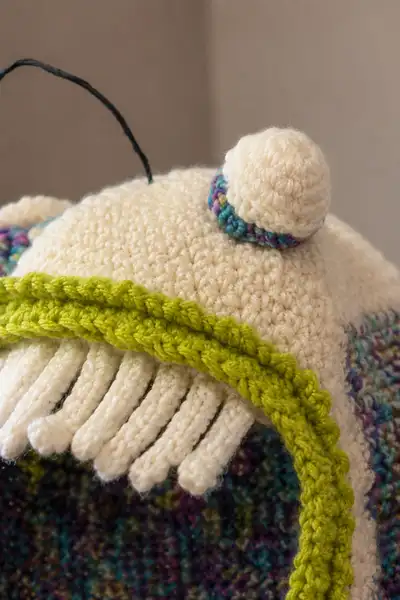
This oversized angler fish open-mouth mask captures the dramatic silhouette of a deep-sea creature with a wide, gaping jaw and textured fins. Worked in warm cream for the head and a variegated teal/purple yarn for the body and fins, the piece has lime-green trim around the mouth and lively 3D details: bulging eyes, ruffled dorsal fin, curled tail, and a wired lure with a pom-pom lure light. Designed to slip over the head as a dramatic Halloween mask or display piece.
Progress Tracker
0% Complete
— Head (Top Hood) :
Round 3 :
(1 sc, inc) x 6 (18)
Round 4 :
(2 sc, inc) x 6 (24)
Round 5 :
(3 sc, inc) x 6 (30)
Round 6 :
(4 sc, inc) x 6 (36)
Round 7 :
(5 sc, inc) x 6 (42)
Round 8 :
(6 sc, inc) x 6 (48)
Round 9 :
1 sc in each st (48)
Round 10 :
1 sc in each st (48)
Info :
Use cream/ivory yarn. Place a stitch marker at the first stitch of each round. The head top is worked as an oval dome that will later taper towards the back; maintain tension for even stitches.
Round 11 :
1 sc in each st (48)
Round 12 :
1 sc in each st (48)
Round 13 :
1 sc in each st (48)
Round 14 :
1 sc in each st (48)
Round 15 :
(6 sc, dec) x 6 (42)
Round 16 :
1 sc in each st (42)
Round 17 :
(5 sc, dec) x 6 (36)
Info :
Now is a good time to add the base for eyes and the lure insertion point. For the wired lure, leave a small gap at the very front where you'll insert the wire later and secure it from the inside.
Round 18 :
1 sc in each st (36)
Round 19 :
(4 sc, dec) x 6 (30)
Round 20 :
1 sc in each st (30)
Round 21 :
(3 sc, dec) x 6 (24)
Round 22 :
1 sc in each st (24)
Round 23 :
(2 sc, dec) x 6 (18)
Info :
Stuff the head lightly in these rounds to keep it dome-shaped but slightly flexible for mask fitting. Add fiberfill gradually so the dome remains smooth.
Round 24 :
(1 sc, dec) x 6 (12)
Round 26 :
Fasten off leaving long tail for sewing to body (head top complete). (6)
Info :
We will later sew this dome to the top front of the body shell. Keep tail long for a secure whip stitch around the neck opening.
— Head Eye Domes (Make 2) :
Round 3 :
(1 sc, inc) x 6 (18)
Round 4-6 :
1 sc in each st (18)
Round 7 :
(1 sc, dec) x 6 (12)
Info :
Stuff lightly and fasten off leaving long tail. Sew each dome to the head top between rounds 12-15 of the head so they sit slightly bulging as in the photographs. Add a 1-round multicolor collar (variegated yarn) under each eye using 12 sc around if desired for the color ring.
— Body Shell (Main Body Lower) :
Round 3 :
(1 sc, inc) x 6 (18)
Round 4 :
(2 sc, inc) x 6 (24)
Round 5 :
(3 sc, inc) x 6 (30)
Round 6 :
(4 sc, inc) x 6 (36)
Round 7 :
(5 sc, inc) x 6 (42)
Round 8 :
(6 sc, inc) x 6 (48)
Info :
Switch to variegated teal/purple yarn before Round 9. This creates the multi-hued body seen in the photos. Carry cream yarn inside or fasten off and weave in tail as preferred.
Round 9 :
1 sc in each st (48)
Round 10-12 :
1 sc in each st (48)
Round 13 :
(6 sc, inc) x 6 (54)
Round 14-16 :
1 sc in each st (54)
Round 17 :
(7 sc, inc) x 6 (60)
Round 18-22 :
1 sc in each st (60)
Info :
The body is shaped broad at the midsection; you may add subtle texture by alternating 1-2 rows in BLO to create faint ridges. Keep the body slightly flexible so it can curve around a face when worn.
Round 23 :
(7 sc, dec) x 6 (54)
Round 24 :
1 sc in each st (54)
Round 25 :
(6 sc, dec) x 6 (48)
Round 26 :
1 sc in each st (48)
Round 27 :
(5 sc, dec) x 6 (42)
Round 28 :
1 sc in each st (42)
Round 29 :
(4 sc, dec) x 6 (36)
Info :
Begin stuffing lower body moderately at round 26-29 to give bulk while leaving rear opening for tail attachment. The body will be roomy to create a large mouth cavity.
Round 30 :
1 sc in each st (36)
Round 31 :
(3 sc, dec) x 6 (30)
Round 32 :
(2 sc, dec) x 6 (24)
Round 33 :
(1 sc, dec) x 6 (18)
Round 35 :
Fasten off and leave long tail for attaching tail fin. (6)
Info :
This body shell will be sewn to the head hood along a large oval opening to make the mouth. Keep counting accurate; we will create the mouth opening in a separate rim piece for a neat finish.
— Mouth Rim / Upper Hood (Make Hood Rim for Wide Open Mouth) :
Info :
We create a wide oval rim to join head hood and body shell. Work a long oval made in rounds; this rim will be in cream then edged with lime-green scallop. Measure your head opening to match the seam circumference between head and body. The example uses a rim that ends up being approximately 42-48 stitches around the base before scallop.
Round 1 :
With cream, ch 40, join to form a ring being careful not to twist (40)
Round 2 :
Working in BLO, 1 sc in each ch around, join (40)
Round 3 :
1 sc in each st around (40)
Round 4 :
1 sc in each st around (40)
Info :
Now begin short vertical tubes that form the fringe teeth and inner top skirt — these will be created separately as 'fringe tubes' and attached adjacent to this rim. The rim should remain flexible to be sewn to head and body.
Round 5 :
Slip stitch around and fasten off leaving tail for sewing (40)
— Top Fringe Tubes (Inner Upper Teeth/Fringe) Make 10-12 Tubes :
Info :
For the top mouth fringe, make 12 identical tubes that are short and cylindrical. Use cream yarn, smaller hook (3.5mm) for tighter tubes. Tubes in the photo are about 10-12 rounds tall — they create a comb-like fringe inside the upper mouth.
Tube Round 1 :
6 sc in mr (6)
Tube Round 2-11 :
1 sc in each st (6) — repeat for 10 rounds total to reach desired length (6)
Tube Round 12 :
Fasten off leaving long tail for slip-stitching to rim. Make 12 tubes total (6)
Info :
Sew tubes evenly spaced along the inside of the cream rim created earlier. Slightly angle tubes downward toward mouth opening for natural hang. Use the long tail to ladder stitch or whip stitch the base securely to the rim; stuff lightly if you prefer a fuller tooth.
— Bottom Jaw & Teeth Base :
Round 1 :
With cream, ch 36, join to ring (36)
Round 2 :
1 sc in each st around (36)
Round 3 :
1 sc in each st (36)
Round 4 :
1 sc in each st (36)
Info :
The bottom jaw is worked as a short cup that will attach to the lower edge of the mouth opening. Leave an edge row to attach teeth tubes and the lime-green scallop trim.
Round 5 :
1 sc in each st (36)
Round 6 :
Fasten off leaving long tail for sewing (36)
— Bottom Teeth Tubes (Make 6 Large Teeth) :
Info :
Make 6 larger teeth for the lower jaw that are chunkier and curved slightly outward. Use cream yarn and 3.5mm hook. These will be slightly longer than upper fringe tubes.
Tube Round 1 :
6 sc in mr (6)
Tube Round 2-14 :
1 sc in each st (6) for 13 rounds total (6)
Tube Round 15 :
Fasten off leaving long tail for sewing. Make 6 (6)
Info :
Sew lower teeth evenly along the front of the bottom jaw cup. Offset them so between each larger tooth there is a top fringe tube when assembled for a layered, menacing look.
— Lip Trim (Lime-Green Scallop) :
Info :
This bright scallop frames the mouth and is worked in a lime-green color in two rounds: a joining round of sc and a scalloped picot/cluster row for texture. Work around rim and bottom jaw edge after both are joined to create a continuous lip.
Round 1 :
With lime-green, join to any st on rim with sl st, ch1, 1 sc in each st around (40)
Round 2 :
*sk next st, 5 dc in next st, sk next st, sl st in next st* repeat around to form scallops (approx 10 scallops)
Round 3 :
Fasten off and weave ends. If needed, work a second round of 5 dc scallops offset for a thicker lip.
Info :
Sew the completed lime lip to join the head hood and body shell neatly if you prefer. Alternatively, sew both rim pieces together first then add scallop edge for cleaner finish.
— Eyes Base Collar (Make 2) :
Round 1 :
With variegated yarn, 6 sc in mr (6)
Round 3 :
1 sc in each st (12)
Round 4 :
Fasten off leaving long tail for sewing under eye domes (12)
Info :
These collars sit under the eye domes and give the colorful ring you see between eye and cream head. Sew them flat against the head at rounds 12-14 of the hood before attaching domes.
— Dorsal Fin (Make 1 Large Ruffled Fin) :
Round 1 :
With variegated yarn, ch 20, join to make a ring (20)
Round 2 :
1 sc in each st around (20)
Round 3 :
(1 sc, inc) x 10 (30)
Round 4 :
1 sc in each st (30)
Round 5 :
*sc in next 2 sts, 5 dc in next st, sc in next 2 sts* repeat across to create ruffles
Round 6 :
Turn work and sc across the back edge to make a secure base (30)
Round 7 :
Fasten off leaving long tail for sewing
Info :
Sew dorsal fin to the top midline of the body along rounds 10-16. Fan out ruffles for a dramatic silhouette. Add 1-2 rows of extra ruffles if you want a fuller fin like the example.
— Tail Fin :
Round 1 :
With variegated yarn, ch 30, join to ring (30)
Round 2 :
1 sc in each st (30)
Round 3 :
(3 sc, inc) x 6 (36)
Round 4 :
1 sc in each st (36)
Round 5 :
Work scalloped edge: *skip 1, 5 dc in next, skip 1, sl st* around to create lobed tail edge
Round 6 :
Fasten off leaving long tail and sew to back opening of body shell at last rounds. (36)
Info :
When sewing, align the tail so it curves slightly upward; this gives the finished mask a dynamic pose similar to the photo.
— Side Fins (Make 2) :
Round 1 :
With lime-green, ch 10, join to ring (10)
Round 2 :
1 sc in each st (10)
Round 3 :
(2 sc, inc) x 2, sc in remaining (12)
Round 4 :
1 sc in each st (12)
Round 5 :
Work Ruffled Edge: *sc, 4 dc, sc* along one long side to create wavy fin shape (approx 6 waves)
Round 6 :
Fasten off leaving long tail for sewing. Make 2 (12)
Info :
Sew the side fins to each side of body at the widest point (rounds ~12-16 of body). Pin them angled slightly forward so they read like pectoral fins in the photo.
— Tail Spikes / Extra Ruffles (Optional Small Fins) :
Round 1 :
With variegated yarn, 6 sc in mr (6)
Round 2-4 :
1 sc in each st (6) for 3 rounds, fasten off. Make 3-4 and sew along tail base for extra texture.
Info :
These small spikes add fullness to the tail and dorsal area. Space them evenly and attach stacked for a layered look.
— Eyes (Make 2 - Mounted Domes Already Secured) :
Info :
We created eye domes earlier. If you prefer safety eyes, add them before stuffing the domes. Alternatively, embroider a pupil with black yarn: insert needle through center and create a tight circle.
Round 1 :
Optional embroidered pupil: with black, embroider centered stitches to form a small circle roughly 6mm diameter (no stitch count)
Info :
Sew domes onto top of the head at rounds 12-14 of the hood. Use the variegated collar under each dome for the color ring. Make sure both sit symmetrically; measure 8-10 stitches apart across the dome for balanced placement.
— Lure Antenna and Bobble :
Info :
We recreate the classic glowing bobble on a wired arm. Use craft wire folded into shape and capped into the head via a small opening. Secure the wire by wrapping and anchoring into the head with yarn and glue if desired. The bobble is crocheted as a small sphere.
Bobble Round 1 :
6 sc in mr (6)
Bobble Round 2 :
6 inc (12)
Bobble Round 3 :
(1 sc, inc) x 6 (18)
Bobble Round 4 :
1 sc in each st (18)
Bobble Round 5 :
(1 sc, dec) x 6 (12)
Bobble Round 6 :
6 dec (6) — stuff lightly and close, fasten off leaving long tail for securing to wire
Info :
Insert the wire through the head from inside, push to desired height and bend into shape of arc. Slide bobble onto wire and sew or glue to hold in place; secure wire ends inside the head by wrapping with yarn or inserting into extra fiberfill to hold tension.
— Assembly Preparation :
Info :
Block pieces gently with pins if necessary to flatten and position before sewing. Keep tails long for whip stitching. Use matching yarn color for most visible seams to blend in. Pin the hood to the body shell aligning front openings so the rim overlaps slightly and the lime scallop will hide the seam.
— Sewing Head Hood to Body Shell :
Info :
Fold the hood opening to match the body opening; use pins every 6-8 stitches to hold. Begin sewing at center front, working symmetrically toward each side for even seam. Use mattress or whip stitch for strength.
Step :
Sew hood to body using long tail from head top and whip stitch evenly around the ring joining the two pieces. Leave a small gap at top front for wire insertion if not yet added.
Info :
After joining, check mouth opening shape and adjust stuffing so the mouth sits wide and open. The lime-green scallop should be sewn last to cover the seam line for a neat finish. Reinforce seam where teeth will attach.
— Teeth & Fringe Attachment :
Info :
Attach the 12 top fringe tubes evenly to the inside rim of the upper mouth so they hang like comb teeth. Attach 6 larger bottom teeth to the lower jaw cup as shown in the photos. Use the long tails from each tube to securely stitch bases into place through rim and jaw cup.
Step :
Sew top fringe tubes to inner edge of the rim spaced evenly (approx every 3-4 stitches depending on total count). Angle each tube downward and slightly outward for natural arrangement.
Step :
Sew the bottom teeth along the front edge of the bottom jaw cup: place one tooth at center and others spaced evenly to left and right until six are attached.
Info :
Reinforce teeth attachments with extra passes of yarn to ensure they will withstand handling when worn as a mask. Check for symmetry by temporarily placing mask on head or mannequin.
— Final Finishing Touches :
Step :
Sew dorsal fin to top midline and tail to back, as described. Attach side fins to widest body point using strong whip stitches so they remain secure. Weave in and hide remaining tails.
Step :
Add any decorative embroidery along body like faint gill lines using surface slip stitches or contrasting yarn for extra detail.
Info :
Double-check that the wire used for the lure is fully secured inside the head. Tuck wire ends into stuffing or wrap tape to avoid sharp points. If making child-safe version, omit wire and attach lure via crocheted stem stuffed with fiberfill instead.
Step :
Try on mask; if needed, pad inner head areas with additional fiberfill or add a simple inner strap (elastic band) sewn to interior to stabilize on wearer’s head.
Info :
Optional: Lightly spray the lime scallop with fabric stiffener if you want it to hold a firm flared edge; allow to dry fully before wearing. For display, you can insert curved craft foam inside the mouth to keep it rigid.
This dramatic angler fish mask brings theatrical flair to any costume or display—big open mouth, frilled fins, and a glowing lure make it a showstopper! Each textured piece comes together to create depth and personality, and the color contrasts make the facial features pop. You’ll feel proud wearing or gifting this handmade creature. 🧶🦑✨