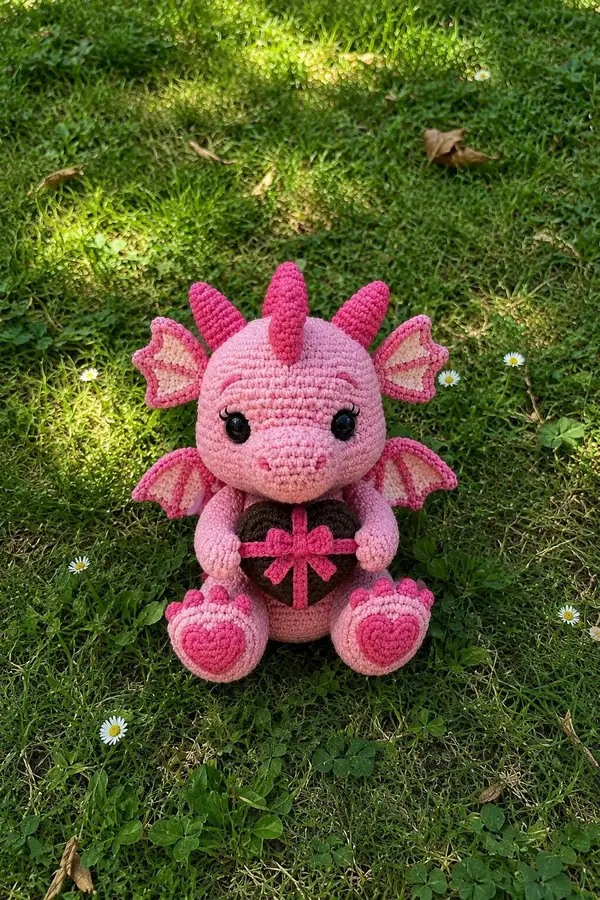
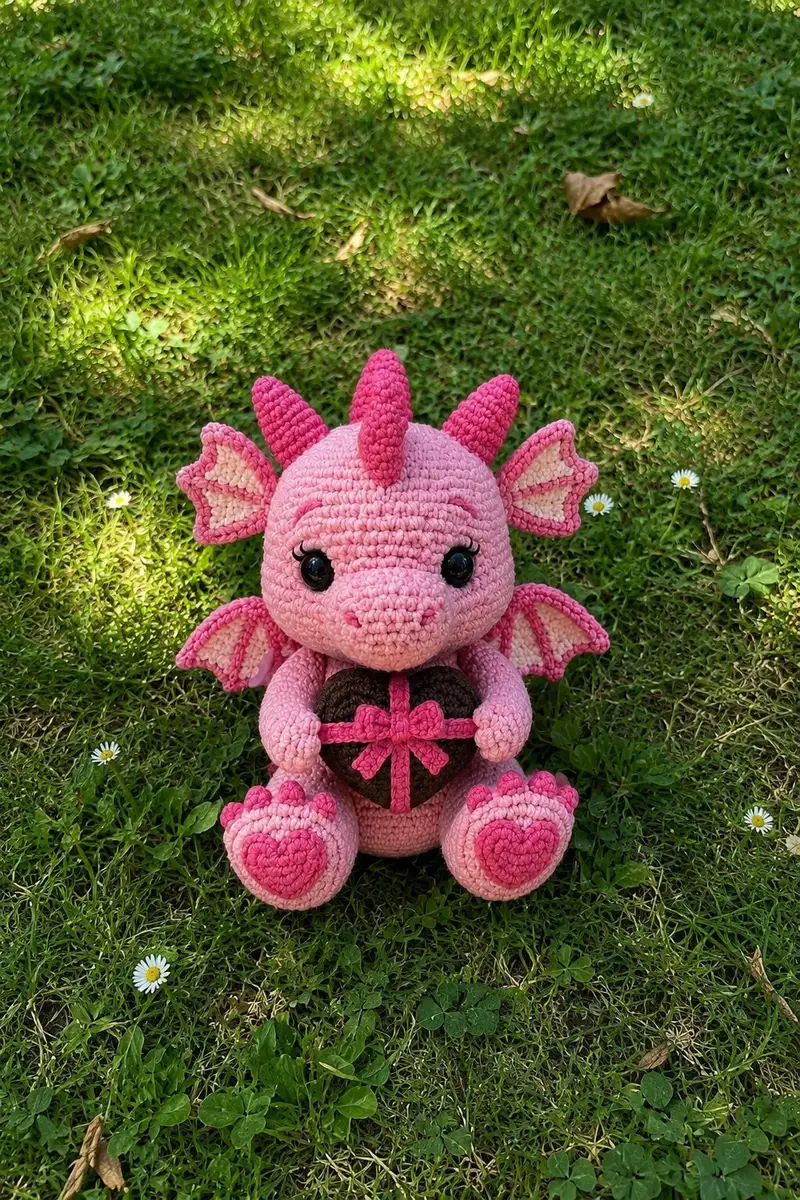
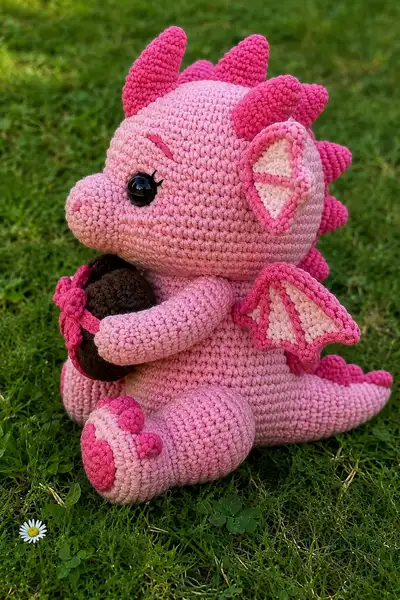
Create an irresistibly cute pink dragon clutching a chocolate heart box — a cuddly, valentine-ready amigurumi with heart-shaped paw pads, delicate wings, and sweet spikes. This pattern includes detailed round-by-round instructions for the head, body, limbs, wings, tail, spikes and the chocolate heart accessory. Designed to be stuffed and posed slightly, the finished dragon is perfect as a handmade gift or a decorative keepsake.
Progress Tracker
0% Complete
— Head :
Round 1 :
6 sc in magic ring (6)
Round 3 :
(1 sc, 1 inc) x 6 (18)
Round 4 :
(2 sc, 1 inc) x 6 (24)
Round 5 :
(3 sc, 1 inc) x 6 (30)
Round 6 :
(4 sc, 1 inc) x 6 (36)
Info :
Maintain a tight gauge. Use a 3.5mm hook and adjust tension so stuffing won't show through stitches. Keep a stitch marker at the start of each round
Round 7 :
(5 sc, 1 inc) x 6 (42)
Round 8 :
(6 sc, 1 inc) x 6 (48)
Round 9 :
1 sc in each st (48)
Round 10 :
1 sc in each st (48)
Round 11 :
1 sc in each st (48)
Info :
Place safety eyes between rounds 12 and 13, spacing approximately 10-12 stitches apart depending on desired expression. Mark the position and reinforce with washers after partially stuffing
Round 12 :
1 sc in each st (48)
Round 13 :
1 sc in each st (48)
Round 14 :
1 sc in each st (48)
Info :
Make the snout from a short tube to attach later: work a separate snout piece (see Snout section). Begin lightly stuffing the head from this point so the eye placement is stable
Round 15 :
(6 sc, 1 dec) x 6 (42)
Round 16 :
(5 sc, 1 dec) x 6 (36)
Round 17 :
1 sc in each st (36)
Round 18 :
1 sc in each st (36)
Round 19 :
(4 sc, 1 dec) x 6 (30)
Round 20 :
(3 sc, 1 dec) x 6 (24)
Info :
Start stuffing the head more firmly. Use small amounts of fiberfill and a stuffing tool or blunt pencil to fill around eyes and cheeks evenly to maintain the round head shape
Round 21 :
(2 sc, 1 dec) x 6 (18)
Round 22 :
(1 sc, 1 dec) x 6 (12)
Round 23 :
1 sc in each st (12)
Round 24 :
(1 sc, 1 inc) x 6 (18)
Round 25 :
(2 sc, 1 inc) x 6 (24)
Round 26 :
1 sc in each st (24)
Round 27 :
(3 sc, 1 inc) x 6 (30)
Info :
This section forms the lower back of the head and upper neck. Keep stuffing as you shape so the head retains a soft but structured curve that will sit nicely on the body.
Round 28 :
1 sc in each st (30)
Round 29 :
1 sc in each st (30)
Round 30 :
(4 sc, 1 dec) x 5 (25)
Round 31 :
(3 sc, 1 dec) x 5 (20)
Round 32 :
(2 sc, 1 dec) x 5 (15)
Round 33 :
(1 sc, 1 dec) x 5 (10)
Round 34 :
Fasten off leaving long tail for sewing. Stuff firmly and shape neck opening for attaching to body (10)
Info :
After closing, pinch and knot securely. Use the long tail to sew the head to the body later, placing it roughly centered and slightly forward to create the dragon's forward-leaning pose.
— Snout :
Round 1 :
6 sc in magic ring (6)
Round 3 :
(1 sc, 1 inc) x 6 (18)
Round 4 :
1 sc in each st (18)
Round 5 :
(1 sc, 1 dec) x 6 (12)
Round 6 :
1 sc in each st (12)
Round 7 :
Fasten off leaving long tail for sewing. Lightly stuff and position on head so nostrils are slightly above center. Use embroidery to add two tiny nostril stitches with darker pink yarn.
Info :
Sew the snout onto the head between rounds 13-16 on the head piece. Use ladder stitch around the base and adjust stuffing so the snout integrates smoothly into the face.
— Body :
Round 1 :
6 sc in magic ring (6)
Round 3 :
(1 sc, 1 inc) x 6 (18)
Round 4 :
(2 sc, 1 inc) x 6 (24)
Round 5 :
(3 sc, 1 inc) x 6 (30)
Round 6 :
(4 sc, 1 inc) x 6 (36)
Info :
We are building a stout, rounded body. Use the same pink yarn for continuity. Keep fabric dense to support the head and accessory weight.
Round 7 :
(5 sc, 1 inc) x 6 (42)
Round 8 :
(6 sc, 1 inc) x 6 (48)
Round 9-12 :
1 sc in each st (48)
Info :
If you want the body to have a slightly tapered top, work the first two rounds after the increase section in BLO to create a subtle shoulder ridge.
Round 13 :
(6 sc, 1 dec) x 6 (42)
Round 14 :
(5 sc, 1 dec) x 6 (36)
Round 15 :
1 sc in each st (36)
Round 16 :
1 sc in each st (36)
Round 17 :
(4 sc, 1 dec) x 6 (30)
Round 18 :
(3 sc, 1 dec) x 6 (24)
Info :
Begin stuffing the body moderately at round 14-18. The body should be firm enough to sit upright but slightly soft so arms can be sewn on and hold the heart accessory.
Round 19 :
(2 sc, 1 dec) x 6 (18)
Round 20 :
1 sc in each st (18)
Round 21 :
(1 sc, 1 inc) x 6 (24)
Round 22 :
(2 sc, 1 inc) x 6 (30)
Round 23 :
1 sc in each st (30)
Round 24 :
1 sc in each st (30)
Round 25 :
(4 sc, 1 inc) x 5 (25)
Round 26 :
(3 sc, 1 inc) x 5 (30)
Round 27 :
1 sc in each st (30)
Round 28 :
1 sc in each st (30)
Round 29 :
(3 sc, 1 dec) x 6 (24)
Round 30 :
(2 sc, 1 dec) x 6 (18)
Round 31 :
(1 sc, 1 dec) x 6 (12)
Round 32 :
Fasten off leaving long tail for sewing. Finish stuffing the body so it sits flat and stable (12)
Info :
Leave an opening large enough to sew in the legs and tail or to add extra stuffing if needed before final assembly. Use the long tail to attach the head later and to stitch seams for security.
— Arms (Make 2) :
Round 1 :
6 sc in magic ring (6)
Round 3 :
(1 sc, 1 inc) x 6 (18)
Round 4 :
1 sc in each st (18)
Info :
This forms the hand/paw. Stuff the hand area quite firmly to give weight for holding the heart. Keep the opening small enough to shape the wrist later.
Round 5 :
(2 sc, 1 dec) x 6 (12)
Round 6 :
1 sc in each st (12)
Round 7 :
1 sc in each st (12)
Round 8 :
(1 sc, 1 inc) x 6 (18)
Round 9 :
1 sc in each st (18)
Round 10 :
1 sc in each st (18)
Info :
For a slightly bent arm, work rounds 9-12 with a small variation: on rounds 11-12 do 6 sc, 1 inc to create a gentle curve toward the palm.
Round 11 :
(5 sc, 1 inc) x 3 (21)
Round 12 :
1 sc in each st (21)
Round 13 :
(5 sc, 1 dec) x 3 (18)
Round 14 :
1 sc in each st (18)
Round 15 :
(2 sc, 1 dec) x 6 (12)
Round 16 :
1 sc in each st (12)
Round 17 :
Fasten off leaving long tail for sewing. Lightly stuff the arm, leaving the shoulder-end slightly open for stitching into body (12)
Info :
Securely stitch the opening of the hand with a running yarn or hidden whip stitch to create a palm curve that fits the chocolate heart snugly. Pin arms in place before sewing.
— Legs (Make 2) :
Round 1 :
6 sc in magic ring (6)
Round 3 :
(1 sc, 1 inc) x 6 (18)
Round 4 :
(2 sc, 1 inc) x 6 (24)
Round 5 :
1 sc in each st (24)
Round 6 :
(3 sc, 1 inc) x 6 (30)
Info :
For a flat sole, work rounds 1-6 more densely and stuff firmly. These wide rounds create the base pad of the foot that sits flat.
Round 7 :
1 sc in each st (30)
Round 8 :
1 sc in each st (30)
Round 9 :
(4 sc, 1 dec) x 5 (25)
Round 10 :
(3 sc, 1 dec) x 5 (20)
Round 11 :
1 sc in each st (20)
Info :
Add a small disk for the heart-shaped paw pad (see Paw Pads section) and sew it to the sole before closing and attaching leg to body.
Round 12 :
(2 sc, 1 dec) x 5 (15)
Round 13 :
(1 sc, 1 dec) x 5 (10)
Round 14 :
1 sc in each st (10)
Round 15 :
(1 sc, 1 inc) x 5 (15)
Round 16 :
1 sc in each st (15)
Round 17 :
(2 sc, 1 inc) x 5 (20)
Round 18 :
1 sc in each st (20)
Round 19 :
(4 sc, 1 inc) x 4 (24)
Round 20 :
1 sc in each st (24)
Round 21 :
(3 sc, 1 dec) x 6 (18)
Round 22 :
(2 sc, 1 dec) x 6 (12)
Round 23 :
Fasten off leaving long tail for sewing. Stuff foot firmly, shaping the heel and toe. Pin legs to body base before sewing for even spacing (12)
Info :
Attach legs to rounds 1-3 of the body bottom area. Space them evenly so the dragon sits upright; reinforce stitches through the body for stability.
— Ears (Make 2) :
Round 1 :
6 sc in magic ring with pale cream yarn (6)
Round 3 :
(1 sc, 1 inc) x 6 (18)
Round 4 :
1 sc in each st (18)
Info :
Switch to bright pink for the ear edge. The ear is worked flat to be folded and sewn to the head for a cupped effect.
Round 5 :
Switch to bright pink: 1 sc in each st around (18)
Round 6 :
Work 1 sc in next 6 sts, sl st to next 6 sts to create scallop and shape (18)
Round 7 :
Fasten off leaving tail to sew. Fold ear slightly and sew inner pale section to outer bright edge, pinning to head between rounds 8-10 on the head (ear opening aligned with top of eye) (18)
Info :
Sew ears so they lean slightly forward; this gives the dragon a more expressive, friendly face. Use small, hidden stitches to anchor them firmly.
— Wings (Make 2) :
Round 1 :
6 sc in magic ring with pale cream yarn (6)
Round 3 :
(1 sc, 1 inc) x 6 (18)
Round 4 :
1 sc in each st (18)
Round 5 :
Switch to bright pink and 1 sc in each st (18)
Round 6 :
Work flap shaping: ch 1, turn, 6 sc across first 6 sts, ch 1, turn, continue to form three small membrane sections: (6 sc), (6 sc) and then use sl st to attach to main body edge to create ridges
Round 7 :
1 sc around entire wing edge in bright pink to form defined outline
Round 8 :
Fasten off leaving long tail for sewing. Repeat for second wing and pin to the upper back of the body between rounds 6-10 in the back curvature before sewing (18)
Info :
Sew wings with a slight outward angle to give a natural spread. Reinforce with a few hidden stitches through the body if the wings will be handled often.
— Back Spikes / Horns (Make 7) :
Info :
Make 7 conical spikes: 3 on head, 4 on tail/back. Work each spike in bright pink and stuff lightly so they keep the cone shape. Sew spikes spaced evenly down the center line.
Round 1 :
4 sc in magic ring (4)
Round 2 :
(1 sc, 1 inc) x 2 (6)
Round 3 :
1 sc in each st (6)
Round 4 :
(2 sc, 1 inc) x 2 (8)
Round 5 :
1 sc in each st (8)
Round 6 :
(1 sc, 1 dec) x 2 (6)
Round 7 :
Fasten off leaving long tail, lightly stuff and shape cone. Repeat to make total 7 spikes.
Info :
Sew the largest spikes near the top of the head and slightly smaller ones down the tail. Use the same spacing on both sides of center line when positioning to maintain symmetry.
— Tail :
Round 1 :
6 sc in magic ring (6)
Round 3 :
(1 sc, 1 inc) x 6 (18)
Round 4 :
1 sc in each st (18)
Round 5 :
(2 sc, 1 inc) x 6 (24)
Round 6-10 :
1 sc in each st (24)
Round 11 :
(4 sc, 1 dec) x 4 (20)
Round 12 :
(3 sc, 1 dec) x 4 (16)
Round 13 :
1 sc in each st (16)
Round 14 :
1 sc in each st (16)
Round 15 :
(2 sc, 1 dec) x 4 (12)
Round 16 :
1 sc in each st (12)
Round 17 :
Attach spikes: sew 4 bright pink spikes along top of tail at even intervals. Fasten off tail end when satisfied and weave in tail (12)
Info :
For a tapered tail tip, reduce stitches gradually and stuff lightly. Sew tail to the back lower portion of the body at around rounds 2-4 of the body base for a secure mount.
— Paw Pads & Heart Applique (Make 2 pads each foot and 2 small toe bumps per foot) :
Round 1 :
6 sc in magic ring using bright pink (6)
Round 3 :
(1 sc, 1 inc) x 6 (18)
Round 4 :
1 sc in each st (18)
Round 5 :
Switch to a slightly darker pink for heart appliques: form heart shape by working a small heart applique separately: Chain 4, join with sl st to form small ring, ch1, 6 sc in ring, sl st to next, then sc into chain to shape heart lobes, fasten off and flatten into heart shape (approx steps)
Round 6 :
Sew heart applique to the center of the paw pad. Add three small toe bumps around the pad by embroidering small bobbles with bright pink yarn and secure inside so they do not come loose.
Info :
Sew paw pads to rounds 1-3 of each foot sole. Make sure pads are centered and symmetrical. Reinforce with back-and-forth stitches to prevent detachment when handled.
— Chocolate Heart Box (Make 1) :
Round 1 :
6 sc in magic ring with dark brown yarn (6)
Round 3 :
(1 sc, 1 inc) x 6 (18)
Round 4 :
(2 sc, 1 inc) x 6 (24)
Round 5-8 :
1 sc in each st (24)
Round 9 :
(2 sc, 1 dec) x 6 (18)
Round 10 :
(1 sc, 1 dec) x 6 (12)
Round 11 :
Fasten off leaving long tail for sewing. Stuff lightly and close to form a rounded heart box. Optionally create a flat bottom with an extra small disc to make the box sit squarely (12)
Round 12 :
Make ribbon: with bright pink yarn, ch 30 (or adjust for width), sl st across to form long flat ribbon, fasten off. Sew across the chocolate heart in a cross and make a small bow with a separate small looped piece and sew to the top center.
Info :
Position the heart accessory between the dragon's hands and anchor it with a few hidden stitches to keep it from slipping. You can also sew a small strap inside the hands for extra security.
— Bow / Ribbon Accent :
Round 1 :
ch 6, starting in second ch from hook: 5 sc, turn (5)
Round 2 :
1 sc in each st (5)
Round 3 :
Fold strip and sew ends in centre, wrap a short chain around to form bow knot. Secure to heart front.
Info :
For the bow, you can increase width by using a longer chain and working a second row of sc for a plumper bow. Use matching bright pink yarn for a pop of color.
— Assembly & Finishing Touches :
Info :
Before assembly, block or shape any flat pieces like wings and ear membranes by pinning them to shape and lightly steaming if your yarn allows. Ensure all parts are securely stuffed and tails are woven in neatly.
Step :
Pin head to body: align head neck opening to body opening (head rounds 29-34 to body rounds 29-32). Sew with ladder stitch through matching rounds for a seamless join.
Step :
Attach arms: position arms so hands sit slightly forward holding the heart; sew through arm round 17 area into body rounds 10-12. Reinforce by stitching through the body twice for stability.
Step :
Sew legs to body bottom: align foot soles so the dragon sits balanced; attach at body rounds 1-3. Use extra reinforcing stitches and test sit before final knotting.
Step :
Sew wings and ears: attach wings to upper back around body rounds 6-10; attach ears to head top around head rounds 7-9. Use pins to achieve symmetrical placement then sew securely.
Step :
Attach spikes: sew head spikes to top center of head aligned from head round 3 to round 9, and tail spikes along tail top from tail rounds 9-16. Use long tails for extra security and weave in.
Step :
Sew chocolate heart into hands: position heart and sew a few invisible stitches through both palms to anchor. Add any final embroidered nose, lashes or blush to cheeks.
Info :
Double-check all seams, trim loose tails and weave ends inside. Use a small dab of fabric glue on knots for extra security if giving to small children (but avoid safety eyes for child-safe toys).
This candy-pink love dragon is a joyful amigurumi project that blends classic shaping with charming details like heart paw pads, layered wings, and a chocolate heart prop. Each step leads to a cuddly, gift-ready companion that will brighten any shelf or lap. I hope you enjoy stitching each little feature as much as I enjoyed designing them! 🧶💕🐲