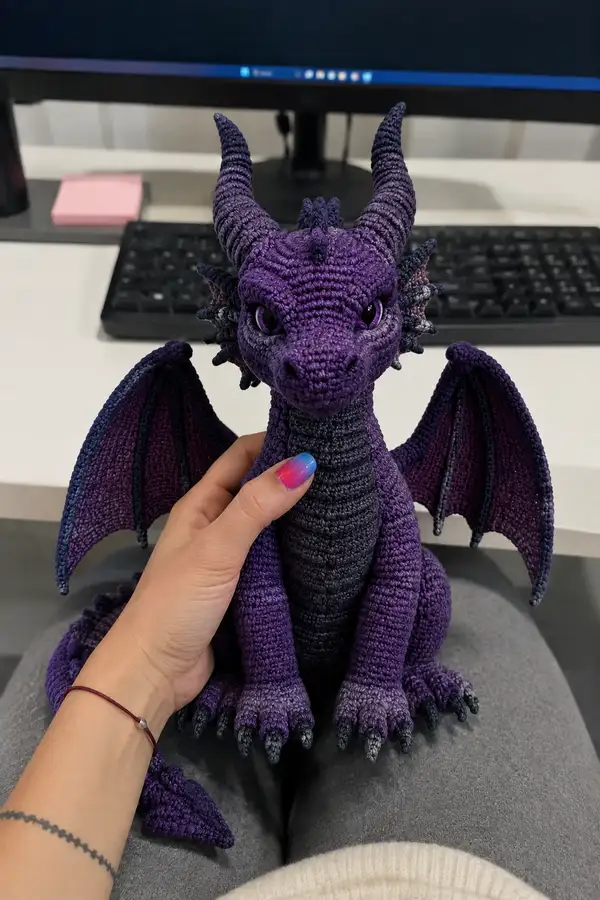
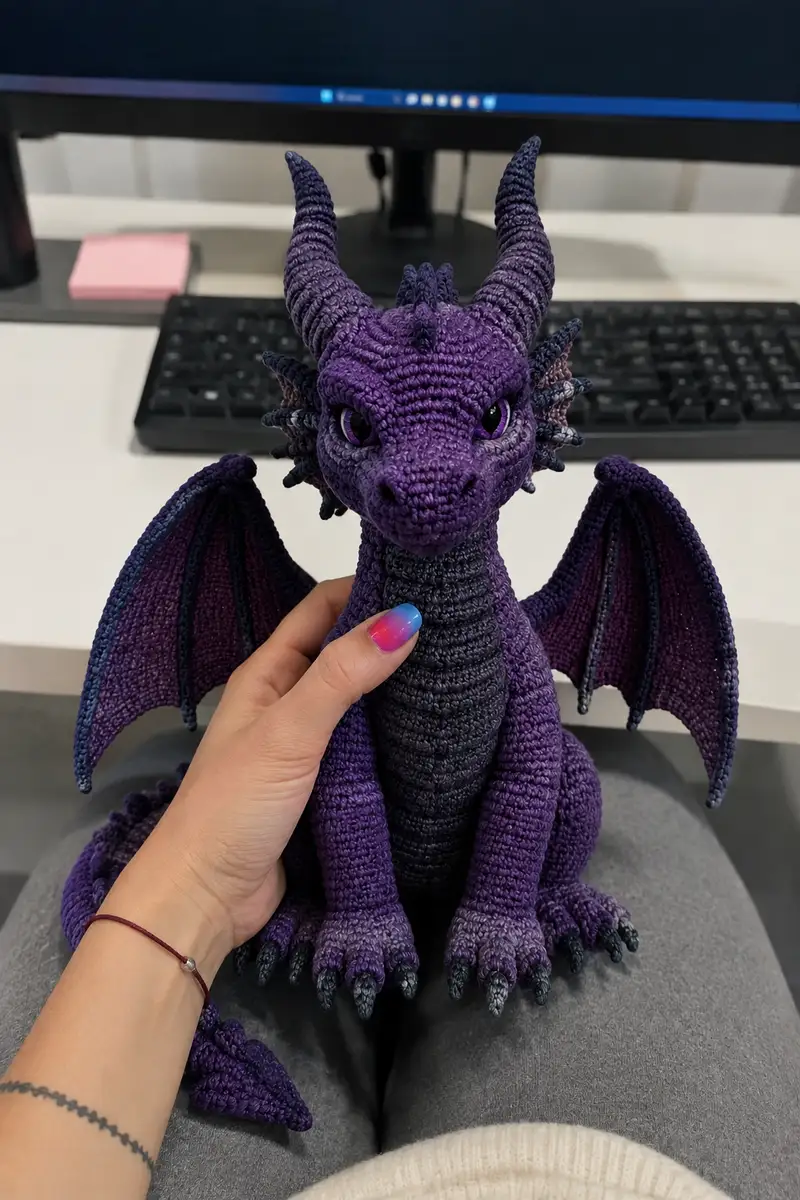
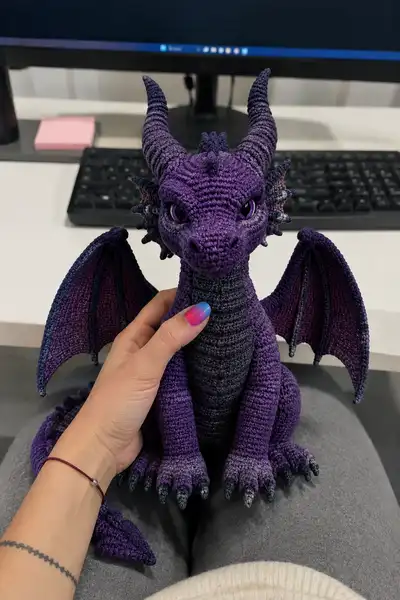
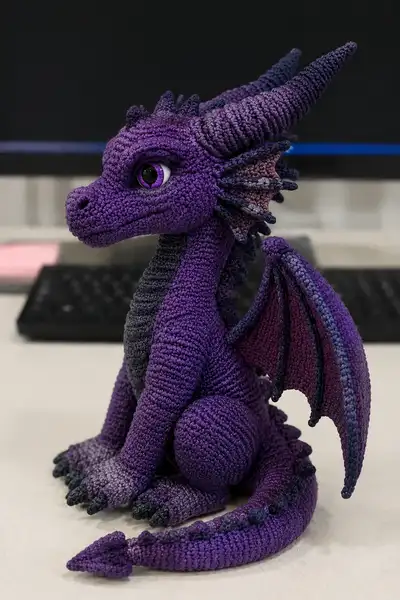
Create a majestic, highly detailed dark purple dragon amigurumi with dramatic bat-style wings, spiraled horns, and textured ridges. This pattern guides you through sculpted head shaping, articulated limbs, and layered wing membranes with complete round-by-round instructions. Finished toy has a sitting posture, gradient claws and spines, and expressive purple eyes for a striking handmade collectible. Ideal for advanced crocheters who love sculptural amigurumi and fantasy creatures.
Progress Tracker
0% Complete
— Head :
Round 1 :
6 sc in magic ring (6)
Round 3 :
(1 sc, 1 inc) x 6 (18)
Round 4 :
(2 sc, 1 inc) x 6 (24)
Round 5 :
(3 sc, 1 inc) x 6 (30)
Round 6 :
(4 sc, 1 inc) x 6 (36)
Round 7 :
(5 sc, 1 inc) x 6 (42)
Round 8 :
(6 sc, 1 inc) x 6 (48)
Round 9-12 :
1 sc in each st (48)
Info :
Decide eye placement now: position safety eyes between rounds 13-14. For the same expression as photo place eyes about 9-12 stitches apart (count from center of snout); use pins to preview spacing.
Round 13-16 :
1 sc in each st (48)
Info :
If using safety eyes, insert washers now before heavy stuffing. For embroidered eyes, mark placement with a pin and embroider later after some stuffing.
Round 17 :
(6 sc, 1 dec) x 6 (42)
Round 18 :
(5 sc, 1 dec) x 6 (36)
Info :
Begin stuffing the head lightly now. Add more stuffing later to define cheek and brow shapes; do not overfill or it will be hard to sculpt the snout.
Round 19 :
(4 sc, 1 dec) x 6 (30)
Round 20 :
(3 sc, 1 dec) x 6 (24)
Info :
To shape the muzzle, use your fingers to press and round the front area while stuffing. If you want a longer snout, add 1-2 extra rounds of 1 sc each before your next decreases.
Round 21 :
(2 sc, 1 dec) x 6 (18)
Round 22-25 :
1 sc in each st (18) (work 4 rounds to make neck base and give a visible neckline)
Info :
Check eye symmetry by looking at the head from the front; adjust stuffing or reposition eyes if necessary before more firm stuffing.
Round 26 :
(1 sc, 1 dec) x 6 (12)
Info :
Fasten off leaving a long tail for sewing. Finish stuffing head firmly but still pliable to allow sewing into the neck opening. If you will attach the neck tube separately, stop at round 25 and fasten off.
— Snout Sculpting & Facial Detail :
Info :
Create sculpted brows and nostrils by working short surface crochet ridges and simple embroidery. A small slit embroidered for nostrils looks natural.
Round 1 :
Working from the underside of the muzzle, surface sc along the nose bridge (approx 8-10 surface sc) to define the ridge
Round 2 :
Embroider two small vertical lines for nostril slits with black embroidery thread; secure ends inside head
Info :
For a smiling mouth, embroider a gentle curve under the snout using matching purple or a slightly darker tone for contrast.
— Neck (tube) :
Round 1 :
6 sc in magic ring (6)
Round 3 :
(1 sc, 1 inc) x 6 (18)
Round 4-12 :
1 sc in each st (18) (work 9 rounds for a tall neck tube that matches head opening)
Info :
Stuff neck lightly, keep it flexible but with enough structure to sew securely into the body. Use mattress stitch to join the neck base to body opening or leave long tail to sew later.
— Body :
Round 1 :
6 sc in magic ring (6)
Round 3 :
(1 sc, 1 inc) x 6 (18)
Round 4 :
(2 sc, 1 inc) x 6 (24)
Round 5 :
(3 sc, 1 inc) x 6 (30)
Round 6 :
(4 sc, 1 inc) x 6 (36)
Round 7 :
(5 sc, 1 inc) x 6 (42)
Round 8 :
(6 sc, 1 inc) x 6 (48)
Round 9 :
(6 sc, 1 inc) x 6 (54)
Round 10-16 :
1 sc in each st (54) (work 7 rounds for torso height)
Info :
Change to charcoal grey yarn for belly panel now if desired. To create ribbed belly texture, work in BLO for the first belly round: 1 sc in each st BLO (54).
Round 17-18 :
1 sc in each st (54)
Info :
Begin gentle stuffing from round 12 onward so the body forms as you add rounds. Keep bottom open for leg attachment; do not close completely until legs and tail are secured.
Round 19 :
(7 sc, 1 dec) x 6 (48)
Round 20 :
(6 sc, 1 dec) x 6 (42)
Round 21 :
(5 sc, 1 dec) x 6 (36)
Round 22 :
(4 sc, 1 dec) x 6 (30)
Round 23 :
(3 sc, 1 dec) x 6 (24)
Round 24 :
(2 sc, 1 dec) x 6 (18)
Round 25 :
(1 sc, 1 dec) x 6 (12)
Info :
Stop here if you plan to sew legs on externally. For an internal-leg-attachment method, fasten off leaving a long tail and use that tail to sew legs into place from the inside.
— Legs (Make 2) :
Foot Round 1 :
6 sc in magic ring (6)
Foot Round 3 :
(1 sc, 1 inc) x 6 (18)
Foot Round 4 :
(2 sc, 1 inc) x 6 (24)
Foot Round 5 :
(3 sc, 1 inc) x 6 (30)
Info :
At this point the foot base is formed. For ridged toes, use a slightly smaller hook for the claw cones later. Mark the center top where the leg tube will start.
Leg Round 6-10 :
1 sc in each st (30) (work 5 rounds to create a solid foot pad)
Info :
Stuff foot firmly to create a stable base. Insert a small flat scrap of felt into the foot if you want extra stability when the dragon sits.
Leg Round 11 :
(3 sc, 1 dec) x 6 (24)
Leg Round 12 :
(2 sc, 1 dec) x 6 (18)
Leg Round 13-20 :
1 sc in each st (18) (work 8 rounds forming lower leg and thigh)
Info :
Make a ball joint if desired by creating a separate thigh sphere to sew to the upper part. For the model pictured, large rounded thighs are made by creating a separate sphere (see 'Upper Thigh Sphere').
Leg Round 21-25 :
Decrease gradually if you are closing the top: (1 sc, 1 dec) x 6 (12) then 6 dec (6) and fasten off leaving long tail for sewing
Info :
Leave long tails for sewing; pin legs to the body at the side openings and ensure the dragon sits balanced before final sewing.
— Upper Thigh Sphere (optional, Make 2) :
Round 1 :
6 sc in magic ring (6)
Round 3 :
(1 sc, 1 inc) x 6 (18)
Round 4 :
(2 sc, 1 inc) x 6 (24)
Round 5-8 :
1 sc in each st (24) (work 4 rounds)
Round 9 :
(2 sc, 1 dec) x 6 (18)
Round 10 :
(1 sc, 1 dec) x 6 (12)
Round 11 :
6 dec (6) - stuff and fasten off leaving tail to sew onto leg
Info :
Sew this sphere to the upper leg area to create the rounded thigh shape seen in the photo; position the seam toward the inner side so it is less visible.
— Claws (Make 10 small cones for toes) :
Round 1 :
4 sc in magic ring (4)
Round 3 :
1 sc in each st (8)
Round 4 :
(1 sc, 1 dec) x 2 (6)
Round 5 :
6 sc (6) - fasten off and leave tail for sewing
Info :
For the gradient seen on claws, use a darker variegated yarn for rounds 1-3, then switch to solid black on the tip round or use a slip-stitch edging with black.
— Tail :
Round 1 :
6 sc in magic ring (6)
Round 3 :
(1 sc, 1 inc) x 6 (18)
Round 4-20 :
1 sc in each st (18) (work 17 rounds to make a long tapered tube; you will taper later)
Info :
Add stuffing as you go, lightly near the tip and firmer near the base. For the spade-shaped tail tip, leave last 6-8 rounds slightly unstuffed and make a flat fin piece to sew on.
Round 21 :
(1 sc, 1 dec) x 6 (12)
Round 22 :
6 dec (6) - fasten off leaving a tail for sewing
Tail Fin :
Make 1 triangular fin: ch10, sc in 2nd ch from hook and across, turn, dec rows back shaping a triangle until 1 sc remains. Fasten off and sew to tail tip
Info :
For the raised ridge running down the tail, crochet 10-12 small oval spikes (see spikes section) and sew along the top center of the tail from base to near the tip.
— Spikes & Back Ridges (Make 10-14) :
Spike Round 1 :
4 sc in magic ring (4)
Spike Round 2 :
1 sc in each st (4)
Spike Round 3 :
(1 sc, 1 inc) x 2 (6) - fasten off leaving long tail for sewing
Info :
Sew larger spikes on the back and smaller ones on the tail. Stagger placement for a natural look and use variegated yarn for subtle color changes.
— Ears/Frilled Side Fins (Make 2 large and 2 small pairs) :
Base Round 1 :
6 sc in magic ring (6)
Base Round 3 :
(1 sc, 1 inc) x 6 (18)
Fan Shape :
Work 3 rows of increasing fan stitches: (sc, hdc, dc) across to make a small curved fin; fasten off leaving tail for sewing
Info :
Attach frills layered behind each ear opening, tacking points for a ruffled look. Use darker yarn on edges for contrast.
— Horns (Make 2) :
Horn Round 1 :
6 sc in magic ring (6)
Horn Round 3 :
(1 sc, 1 inc) x 6 (18)
Horn Round 4-6 :
1 sc in each st (18) (work 3 rounds)
Info :
To create the spiral look, after round 6 begin alternating BLO rounds and full rounds while gradually decreasing every 4-5 rounds; insert thin floral wire through the core to shape curvature if desired.
Horn Round 7 :
(4 sc, 1 dec) x 3 (15)
Horn Round 8 :
1 sc in each st (15)
Horn Round 9 :
(3 sc, 1 dec) x 3 (12)
Horn Round 10 :
1 sc in each st (12)
Horn Round 11 :
(2 sc, 1 dec) x 3 (9)
Horn Round 12 :
(1 sc, 1 dec) x 3 (6) - tighten, leave long tail and insert wire then sew to head
Info :
Wrap the base inside with a small bit of stuffing and secure wire by wrapping yarn around it between rounds 5-8 for extra hold. Shape the horn to curve backward like in the photo.
— Wing Membrane (Make 2 large membranes) :
Round 1 :
6 sc in magic ring (6)
Round 3 :
(1 sc, 1 inc) x 6 (18)
Round 4 :
(2 sc, 1 inc) x 6 (24)
Round 5 :
(3 sc, 1 inc) x 6 (30)
Round 6 :
(4 sc, 1 inc) x 6 (36)
Round 7 :
(5 sc, 1 inc) x 6 (42)
Round 8 :
(6 sc, 1 inc) x 6 (48)
Round 9-14 :
1 sc in each st (48) (work 6 rounds to create a broad membrane)
Info :
Switch to inner membrane color (charcoal grey) on round 12 for subtle two-tone wings. Work the next two rounds in FLO to create a slightly ruffled inner edge.
Round 15 :
Continue increasing on the outer edges: 1 sc in first 18, (1 sc, inc) x 6, 1 sc in last 18 (54)
Round 16-20 :
1 sc in each st (54) (work 5 rounds)
Info :
Create defined wing ribs by crocheting thin tubes (see 'Wing Bones') and sewing them along the membrane. These ribs create the bat-wing shape and the dark ribbing on the photo.
Round 21-24 :
Work a scalloped edging if desired: *skip 1, 5 dc in next st, skip1, sl st in next* around for a decorative border, or finish with single crochet rounds for a plain edge
Info :
Block the membrane flat using pins to shape the curve before sewing rib tubes. Use a little starch or textile stiffener if you want the wings to hold firm poses.
— Wing Bones / Ribs (Make 4-6 per wing) :
Round 1 :
6 sc in magic ring (6)
Round 2-20 :
1 sc in each st (6) (work 19 rounds to create thin tubular bones of desired length)
Info :
Insert thin floral wire down the tube for sturdiness; sew these ribs to the internal side of the membrane, spacing evenly to create the scalloped wing segments. Stitch firmly to attach.
— Wing Edge Ridges (Make 2 per wing) :
Round 1 :
Ch 2, 1 sc in base stitch across outer edge of membrane working 1 sc per stitch to form a firm edge
Round 2-4 :
Work in BLO for visible ridged texture: 1 sc in each st BLO (work 3 rounds)
Info :
Use variegated yarn to create the darker edge highlight seen in the pictures. Seam edges to ribs and tack down wing tips with a few invisible stitches.
— Eye Detailing :
Info :
Use 14mm safety eyes. For a wide expressive look, place eyes between rounds 13-14 of the head, about 10 stitches apart center-to-center. Stitch embed with washers and cover washer inside with a scrap of felt if needed.
Optional Embroidery :
Stitch a ring of slightly darker purple around the eye with single crochet stitches or surface slip stitches to simulate eyelids and give depth.
— Small Decorative Hornlets & Frill Spikes (Make 12-18) :
Round 1 :
4 sc in magic ring (4)
Round 2 :
1 sc in each st (4)
Round 3 :
(1 sc, 1 inc) x 2 (6) - fasten off leave tail for sewing
Info :
Sew these along the top of the head and down the neck to form the layered frilled seam. Alternate sizes to avoid a factory-symmetric look; stagger them for personality.
— Assembly Instructions :
Step 1 :
Attach head to body by inserting the neck portion into the body opening. Pin in place first, then sew securely using whip stitch all around, ensuring even attachment
Step 2 :
Position arms on sides of body at rounds corresponding to body rounds 14-18 for a natural look. Sew through both arm and body using ladder stitch for an invisible seam
Step 3 :
Attach legs to bottom of body at rounds 1-3, spacing them evenly. Sew securely, adding extra stitches for stability if character will be posed
Step 4 :
Sew ears/frills to top-sides of head at rounds 4-6, spacing them roughly 12 stitches apart. Curve slightly forward for natural appearance
Step 5 :
Attach wing membranes to the back at body rounds 10-12. Sew wing bones to the membranes and tack ribs to the body. Reinforce stitches where ribs meet the back for strength
Step 6 :
Sew horns onto head at the top-back crown, between head rounds 6-8. Use the inserted wire to bend horns into the backward spiral and secure base with extra stitches
Step 7 :
Sew tail to the rear bottom of the body at the central base. Secure spikes along the tail top with small even stitches
Step 8 :
Add facial embroidery: stitch nostrils, mouth curve and eyelid definition. Weave all tails securely through multiple rounds and trim close
Info :
Pin all parts in position before sewing to ensure symmetry. Use contrasting thread temporarily to mark positions if needed, then remove after final sewing.
— Final Details & Finishing Touches :
Step 1 :
Weave in all ends by threading tails through several stitches inside parts and trimming close. Hide knots inside stuffing.
Step 2 :
Optional: gently brush yarn surface with a soft toothbrush to bloom fibers slightly for a plush finish
Step 3 :
Add light shading to cheeks and eyebrow ridges with fabric-safe pastel chalks if desired and fix with textile medium
Info :
Check joints for durability; reinforce any area that may see stress, especially wing bases and leg attachments. Add a few securing stitches through multiple body rounds for longevity.
This big dark purple dragon is a delightful sculptural amigurumi that brings fantasy to life. Each stitch sculpts its proud horns, expressive eyes and graceful wings into a collectible piece you will love displaying. The combination of textured ridges, subtle color shifts and layered details rewards patience with a striking finished result. 🧶🦖 Share your creation with pride — every dragon tells a story!