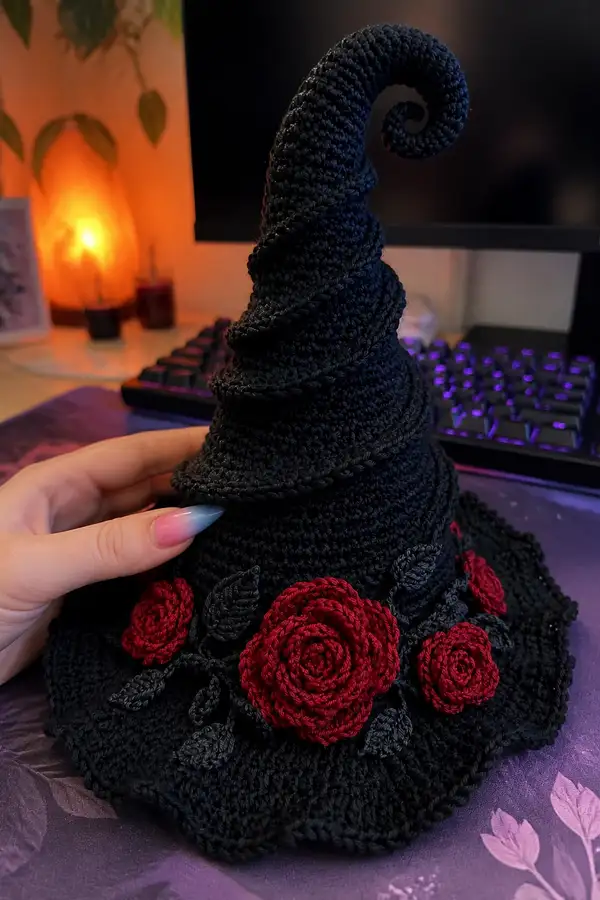
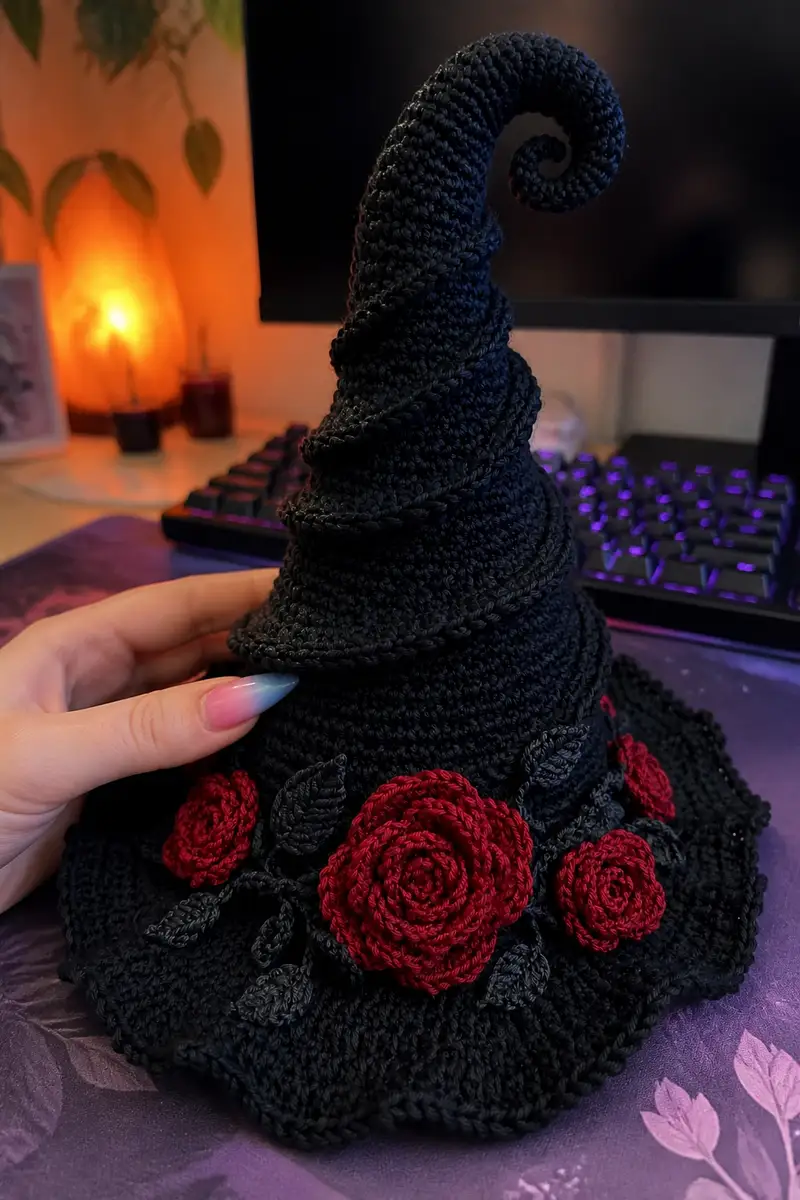
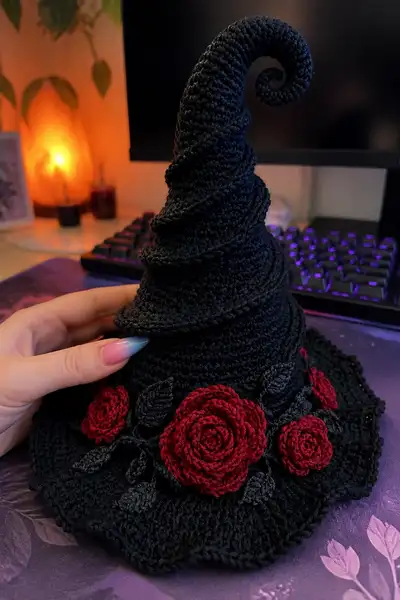
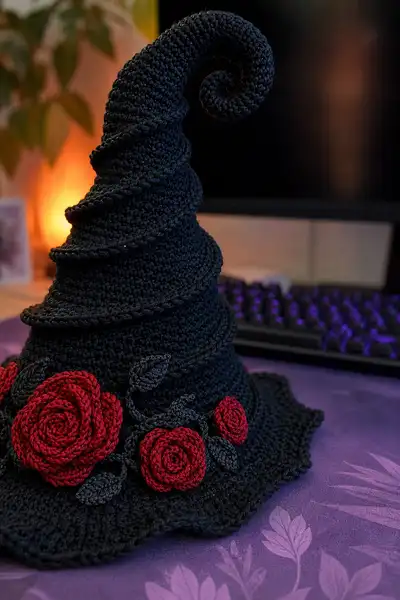
A dramatic, structured witch hat with a tall curled spiral tip and a scalloped brim, decorated with deep red crocheted roses and dark leaves. Worked in a tight single crochet to keep shape, this hat features raised spiral ridges, a decorative band, and layered scalloped edging. The finished piece is lightweight, holds its curl, and makes a bold gothic accessory for costumes or decor.
Progress Tracker
0% Complete
— Crown (hat base that sits on the head) :
Round 1 :
6 sc in magic ring (6)
Round 3 :
(1 sc, inc) x 6 (18)
Round 4 :
(2 sc, inc) x 6 (24)
Round 5 :
(3 sc, inc) x 6 (30)
Round 6 :
(4 sc, inc) x 6 (36)
Round 7 :
(5 sc, inc) x 6 (42)
Round 8 :
(6 sc, inc) x 6 (48)
Round 9 :
(7 sc, inc) x 6 (54)
Round 10 :
(8 sc, inc) x 6 (60)
Info :
At this point your crown diameter is roughly the top of a head. Measure across the flat circle - you should have about 6.5 - 7 inches in diameter if using worsted yarn and 3.5mm hook. Adjust increases one round earlier or later to match a smaller or larger head.
Round 11-16 :
1 sc in each st around (60)
Info :
Work evenly to create the height of the crown. Try on the crown on your head or a head form as you go (or measure height) to ensure the fit is comfortable. The pattern here produces about 2.25-2.75 inches of straight crown height after these rounds; add or remove even rounds to fit.
Round 17 :
1 sc in each st BLO (60)
Round 18-20 :
1 sc in each st (60)
Info :
Round 17 worked in BLO creates a subtle ridge that will help the brim sit neatly. Keep consistent tension; the fabric should be firm but slightly flexible.
Round 21 :
1 sc in each st (60)
Round 22 :
1 sc in each st (60)
Info :
If you'd like a slimmer crown, omit one of the even rounds (21-22). If you want a taller crown, add more even rounds here. Try to keep crown circumference constant until you begin the spiral extension.
Round 23 :
1 sc in each st (60) - place marker at last stitch to keep track of orientation for spiral ridges
Info :
Bookmark or write down the round number and the stitch position where you want the spiral seam to start — the spiral cone will be worked up from the center/top of the crown; keeping orientation consistent makes joining easier.
— Brim (scalloped brim and base increases) :
Round 1 :
Join yarn at the base of the crown and work 1 sc in each st around (60) - this forms the brim foundation (60)
Info :
When joining to work the brim, work into the bottom loop and chainless start as needed to keep join tidy. This round gives a firm connection from crown to brim.
Round 2 :
(4 sc, inc) x 12 (72)
Round 3 :
(5 sc, inc) x 12 (84)
Round 4 :
(6 sc, inc) x 12 (96)
Round 5 :
(7 sc, inc) x 12 (108)
Round 6 :
(8 sc, inc) x 12 (120)
Info :
These gradual increases create a flat-concave brim that flares outward. The number of increases is calibrated to keep the curve smooth; if you prefer an even wider brim, add an extra increase round in the same scheme (e.g., (9 sc, inc) x 12 → 132).
Round 7-12 :
1 sc in each st around (120)
Info :
Work even rounds to establish the brim's width. After Round 12 the brim will be stable and approximately 4.5-5 inches from crown base to outer edge depending on yarn and tension.
Round 13 :
To make a scalloped edge: *skip 1 st, 5 dc in next st, skip 1 st, sl st in next st* - rep across to end. If the pattern ends unevenly, adjust by adding or removing 1 sc in the previous round to maintain full scallops (approx 20 scallops)
Info :
Use a stitch count check to make sure you have an integer number of scallops. The shell of 5 dc creates a pretty wavy edge. Substitute picots for a subtler edge if desired: (ch3, sl st in 3rd ch) inside shell rows.
Round 14 :
Fasten off and weave in ends of brim base. If you prefer a firmer brim, you can lightly block the brim now by pinning scallops into the desired shape and misting or spraying steam carefully.
Info :
Blocking is strongly recommended for clean scallops. Pin to shape on a flat surface and allow to dry completely. This also helps the roses sit flat when attached.
— Spiral Cone / Tall Curled Tip (worked up from center of crown) :
Info :
We'll create the tall spiral tip by continuing from the crown top center and working a tapered cone that we curl at the end. For a seamless look, do not cut yarn at top of crown; instead, insert hook into the center stitch at the top of the crown and begin the cone.
Round 1 :
From the top center stitch, work 6 sc in one stitch or in a small magic ring to start the cone (6)
Round 3 :
(1 sc, inc) x 6 (18)
Round 4 :
(2 sc, inc) x 6 (24)
Round 5 :
(3 sc, inc) x 6 (30)
Info :
We purposely start small and increase to create a tight junction point that will smoothly blend into the crown. If you started cone from the crown top stitch directly, stitch counts will flow into each other; keep your first stitch of the cone aligned with the crown's marked seam to maintain orientation.
Round 6 :
1 sc in each st around (30)
Round 7 :
(4 sc, inc) x 6 (36)
Round 8 :
1 sc in each st around (36)
Round 9 :
(5 sc, inc) x 6 (42)
Round 10 :
1 sc in each st around (42)
Round 11 :
(6 sc, inc) x 6 (48)
Round 12-20 :
1 sc in each st around (48) - work 9 rounds even to build vertical height (48)
Info :
These even rounds create the straight segment of the cone; if you want a taller cone, add more even rounds here. The hat in the photo has a long tapered top — plan for about 12-16 even rounds before tapering begins.
Round 21 :
(6 sc, dec) x 6 (42)
Round 22 :
1 sc in each st around (42)
Round 23 :
(5 sc, dec) x 6 (36)
Round 24 :
1 sc in each st around (36)
Round 25 :
(4 sc, dec) x 6 (30)
Round 26 :
1 sc in each st around (30)
Round 27 :
(3 sc, dec) x 6 (24)
Round 28 :
1 sc in each st around (24)
Round 29 :
(2 sc, dec) x 6 (18)
Round 30 :
1 sc in each st around (18)
Round 31 :
(1 sc, dec) x 6 (12)
Round 32 :
1 sc in each st around (12)
Info :
At this point you have a tapered cone. Do not fasten off — we will shape the final curl by working a short spiraled strip along the outside of the cone, then stuffing lightly and curling.
Round 34 :
Fold the cone outward slightly to determine the curl direction. Beginning at the cone tip, join yarn and work 1 sc in each st around the tip (6) to reinforce the end.
Round 35 :
Work an outer spiral cord: ch 30 (or length to reach from tip to where you want the spiral to begin), sl st back along the chain to form a rope. Sew this cord around the outside of the cone in a spiral line using matching yarn and a tapestry needle to hold placement. Repeat two more cords spaced evenly to form raised spiral ridges down the cone.
Info :
Alternatively, you can crochet the spiral ridges in place by working 1 sc in a short chain and attaching with slip stitches to the cone every 6-8 stitches; both methods create raised ridges. The hat in the photo shows two distinct recessed bands; cords sewn on are easiest and durable.
Round 36 :
To create the curled tip, with cone free and yarn attached at the tip, work 8 sc evenly around the last 6 stitches by placing 2 sc in some stitches to form a tiny, dense disk; then stuff very lightly and coil the cone end into a tight spiral. Sew the coil into place through successive rounds of the cone where the spiral meets the shaft.
Info :
If you want a very neat and permanent curl, insert a thin piece of craft wire along the inside of the last 3-4 inches of the cone before final stuffing, then coil the wire to form the spiral and crochet around it. Be sure to fold wire ends down and wrap in tape to prevent poking.
— Decorative Raised Ridges Around the Cone (worked as cords and sewn on) :
Round 1 :
Make 3 braided or crocheted cords: ch 40, sl st back along chain to form a rope — make one long enough to spiral from base to tip (approx 40 ch), and two shorter cords of 30 and 20 ch for middle and outer ridges respectively.
Round 2 :
Using a yarn needle, position the longest cord at the base of the cone and sew it in a spiral, spacing turns about 8-12 stitches apart depending on desired ridge spacing. Secure both ends with several stitches to the inside of the cone to hide tails.
Round 3 :
Sew the medium cord above the longest spiral, then the shortest cord near the tip to mimic the photo's layered spiral look. Tension the cords slightly as you sew to form raised ridges that catch the light.
Info :
Alternatively, create ridges by crocheting 1 round of 1 sc BLO every 3-4 rounds as you work the cone, producing a built-in rib. The sewn cords offer a cleaner, pronounced ridge similar to the sample hat.
— Decorative Band (to attach roses and leaves) :
Round 1 :
Join dark charcoal yarn at the base of the crown where the brim meets the crown. Ch 2, *1 hdc in next 2 sts, ch1* around for approximately 60 stitches to create a narrow textured band. Adjust repeats to match crown circumference (approx 60 hdc).
Round 2 :
1 hdc in each st around, sl st to join (60)
Round 3 :
Work 1 round of 1 sc in each st BLO to create an inward ridge and secure the band (60)
Info :
This narrow band acts as the mount for roses and leaves. You can make it wider by adding more rounds of hdc or sc, or use a ribbon underneath to secure heavy decorations.
— Large Rose (make 1) :
Info :
Roses are made as ruffled strips then rolled into a spiral. Work with red worsted yarn using a 2.75mm hook for tight, dense petals.
Round 1 :
Ch 50 (foundation chain — adjust if you want a larger or smaller rose)
Round 2 :
Row 1: in 3rd ch from hook, *1 sc in next 3 ch, 1 hdc in next 2 ch, 5 dc in next 3 ch* - repeat across to create an alternating ruffle (this is a guideline; make petals denser for a fuller rose)
Round 3 :
Row 2: Turn and work another row of increased stitches into the peaks: *2 sc in next st, 2 hdc in next st, 6 dc in next st* across — this forces the strip to frill strongly
Round 4 :
Fasten off leaving a long tail for sewing. Starting at one end, roll the strip tightly to form the rose center, then continue rolling outward, tacking the base of the rolled rose to itself every 3-5 mm with whip stitches until the entire strip is secured. Weave in tail under the rose base.
Info :
Adjust the initial chain length to alter rose diameter: 40-50 ch yields a medium rose (approx 2-2.5 inches), 60-80 ch yields a large dramatic rose (3-4 inches). Keep the same frill density for consistent petal layering.
— Medium Rose (make 2) :
Round 2 :
Row 1: in 3rd ch from hook *1 sc in next 2 ch, 1 hdc in next 2 ch, 4 dc in next 2 ch* - rep across
Round 3 :
Row 2: Repeat a second ruffle row with slight increases at peaks: *2 sc in next, 2 hdc in next, 5 dc in next* across. Finish and roll as for large rose. Fasten and weave in ends.
Info :
Make two of these and vary their placement to the sides of the large rose for a clustered look. Pin before sewing to ensure spacing is visually pleasing (photo shows one large rose with two smaller roses spaced around).
— Small Rose (make 2-3) :
Round 2 :
Row 1: in 3rd ch from hook, *1 sc in next ch, 1 hdc in next ch, 3 dc in next ch* repeat across
Round 3 :
Fasten off leaving long tail. Roll and secure as previous roses to create small accent buds (approx 1 inch diameter)
Info :
Small roses are perfect fillers. Use fewer frill rows for very tight buds and more for open blossoms. Keep tails long for sewing into the band securely.
— Leaves (make 6-10) :
Round 1 :
Using dark charcoal yarn and 2.75mm hook: ch 8
Round 2 :
Row 1: sc in 2nd ch from hook, hdc in next, dc in next 2 ch, hdc in next, sc in next (create a tapered leaf shape). Sl st into base and fasten off. Make 6-10 leaves of different sizes by changing the base chain length (ch6 for small, ch10 for larger).
Round 3 :
Optional: Embellish leaf center with 1 row of surface sl st or single crochet along the midline to simulate veins. Block flat if required.
Info :
Leaves look best when slightly flattened. Use a tapestry needle to add a single running stitch down the center of each leaf with matching yarn to stiffen the vein if needed.
— Decorative Cord (optional extra for band) :
Round 1 :
Make a twisted or crocheted cord: ch 60, sc in 2nd ch back to start to form a thicker cord. Make two, then sew around band just above brim for extra textural contrast.
Info :
Twisted cords can be made by chaining, then making a long slip stitch rope with a smaller hook for a neat twisted look. Cords help visually anchor roses when sewn onto the band.
— Assemble and Finishing Touches :
Info :
Arrange roses and leaves on the decorative band and base of the crown exactly how you want them before sewing — use pins to trial placements. The design in the photo shows a large rose centered at front with two medium roses flanking and small buds in between, leaves tucked under and behind each bloom.
Step 1 :
Lay the hat flat and position the roses around the band. For the pictured layout: place the large rose centered at the forward-most brim scallop, two medium roses on either side, and small buds spaced to fill gaps. Balance left and right so brim hangs evenly.
Step 2 :
Sew each rose securely by stitching across the base spiral with a yarn needle, anchoring through the band and brim base where possible. Use several passes and knot yarn ends inside the band for stability; weave ends at least 2 inches into the fabric.
Step 3 :
Position leaves under and behind each rose cluster; tack them down with small stitches so the leaf tips peek out naturally. If leaves are floppy, add a few surface stitches under each leaf to secure to the brim edge.
Step 4 :
If you used craft wire for the tip, tuck the wire ends into the inside of the cone and wrap with yarn or tape to prevent any sharp edges. Close and secure with several whip stitches into the cone’s body to hide the wire.
Step 5 :
Weave in and hide all ends. Trim excess yarn tails. Optionally add a lightweight fabric stiffener sprayed lightly on the brim underside if you want a more rigid brim.
Info :
For long-term durability, consider stitching a thin felt circle inside the crown base to distribute the weight of the flowers and prevent distortion of the brim. Felt also helps keep the band firmly in place and prevents slipping if the hat is worn.
Round - Final :
Give the hat a final steam-blocking if desired to set the curl and brim shape. Shape the spiral with your hands, pin if necessary, and allow to dry fully before wear or display.
Info :
Your completed hat should measure approximately 11-12 inches tall (from brim to tip before curl), with an outer brim diameter of about 11-13 inches depending on blocking and yarn tension. Adjust chain counts and rounds for different sizes.
Finishing this gothic spiral witch hat is such a satisfying project — the tall curled tip, layered ridges, and red rose cluster create a stunning statement piece. Each section builds on the last so you see dramatic shape emerge quickly. Add your own touches and watch the hat transform into a piece of wearable art. 🖤🌹✨