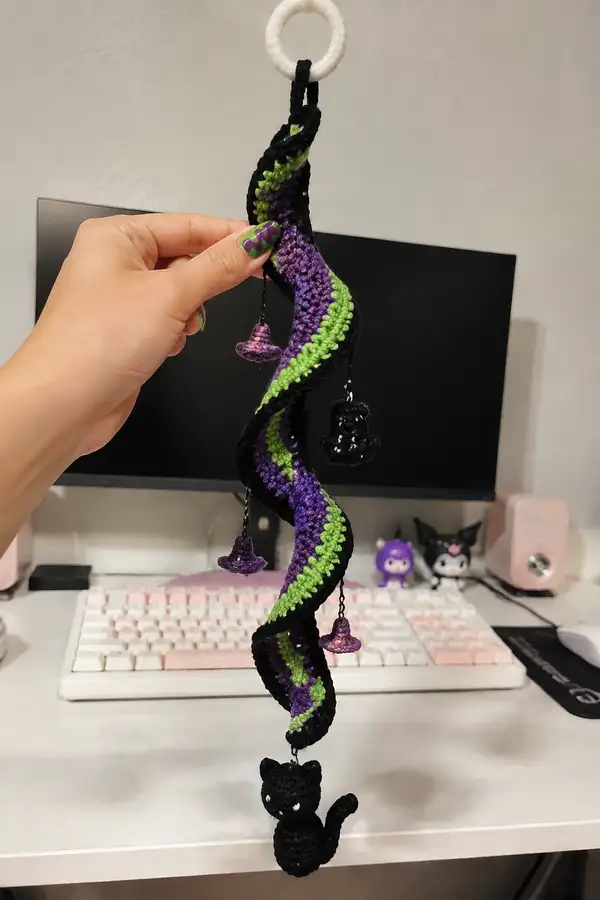
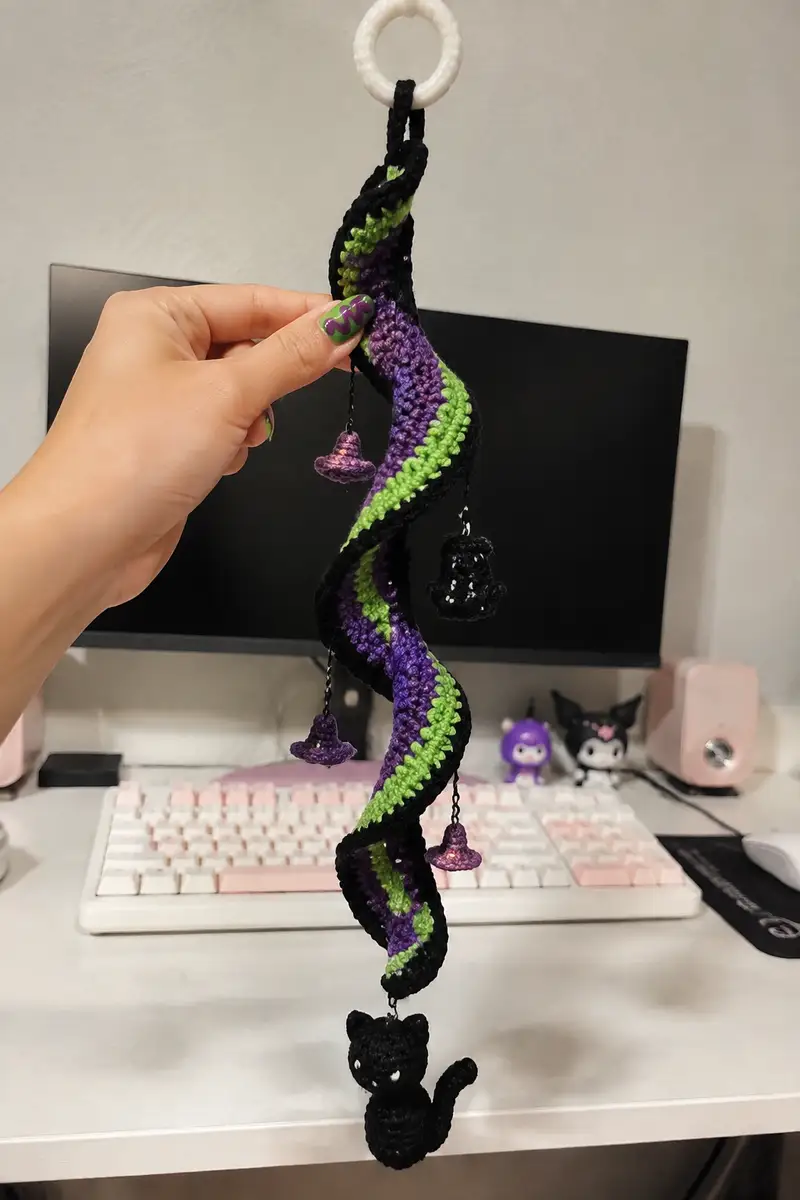
Create a bewitching hanging spiral mobile with a tiny amigurumi black cat, three little witch hats, and a twisted ribbon of black, purple, and lime green. This pattern includes clear step-by-step instructions for crocheting the long spiral, the small charms, and the kitty, with tips for assembly and finishing. A perfect seasonal decoration or a spooky-cute gift — lightweight, sturdy, and eye-catching when it twirls.
Progress Tracker
0% Complete
— Spiral Ribbon (work one long tube that will be twisted into a spiral) :
Info :
This long spiral is created as a continuous tube worked in rounds. I recommend a final circumference of 36 stitches (comfortable thickness for twisting) and then work 64-80 rounds to get a graceful length (~25-35 cm before adding cat). The spiral stitch counts are provided to 36 sts circumference. Keep tension tight so the tube holds form. Change colors according to the stripes sequence (black border, purple body, green narrow stripe) every few rounds. Carry color inside where possible and weave ends later. If you want a stiffer spiral you can insert a light flexible wire through the tube before closing seams, or stitch a wire inside after crocheting.
Round 1 :
6 sc in magic ring (6)
Round 3 :
(1 sc, inc) x 6 (18)
Round 4 :
(2 sc, inc) x 6 (24)
Round 5 :
(3 sc, inc) x 6 (30)
Round 6 :
(4 sc, inc) x 6 (36)
Info :
Rounds 1-6 set the tube circumference to 36 sts. From here onward, work 1 sc in each stitch in continuous rounds to form a long tube. Plan color changes every 3-6 rounds to create the spiral stripe effect shown in the photos (black edge, purple main, thin green stripe; repeat sequence along length).
Round 7-12 :
1 sc in each st (36) — work 6 rounds in main edge color (black) to form a stout edge border (36)
Info :
Change to purple yarn at the start of the next round. Carry black inside tube if you'd like to avoid many tails. Use a stitch marker to track round starts — color changes can be done at the round start for neat join lines.
Round 13-16 :
Change to purple. 1 sc in each st for 4 rounds (36)
Round 17-18 :
Change to lime green. 1 sc in each st for 2 rounds (36)
Round 19-22 :
Change to purple. 1 sc in each st for 4 rounds (36)
Round 23-26 :
Change to black. 1 sc in each st for 4 rounds (36)
Info :
These color blocks produce the visual stripes: a wide black border area, wide purple panels and slimmer green bands. Repeat the color block sequence (purple 4 rounds, green 2 rounds, purple 4 rounds, black 4 rounds) down the length of your tube until you approach desired finished length. Each 14-round sequence is ~1.5 - 2 cm depending on yarn. Aim for 64-80 total rounds to achieve the pictured length (about 25-30 cm).
Round 27-40 :
Repeat purple 4 rounds and green 2 rounds pattern and then black 4 rounds as per preceding sequence — maintain 1 sc in each st (36)
Info :
After about 48-56 rounds, start testing the spiral twist by pinching and twisting the tube. If you prefer a deeper twist, you can increase the number of rounds to 72-80. Mark the round that will be the top (for ring attachment) and the round roughly 10 rounds from bottom for charm placement reference.
Round 41-64 :
Continue repeating color stripes down the tube to the desired length. Keep stitch count constant at 36 each round. If you reach 64 rounds and are happy with length, proceed to final black edging rounds below (36)
Round 65-68 :
Change to black again and work 4 final rounds of 1 sc in each st BLO for a slightly defined border edge (36)
Info :
Working the last rounds in BLO creates a subtle ridge that helps the spiral edge sit crisply when twisted. If you want a sharper black brim on each edge, add an extra round of slip stitches into the back loops for a firm finish.
Round 69 :
Fold the tube flat and slip stitch through both loops across the seam to close the tube lengthwise if you prefer a flattened spiral strip (optional). Alternatively, leave as a closed tube and insert optional wire.
Info :
If you left the tube closed and intend to insert wire for structure, weave in one end of a 24-28 cm lightweight flexible wire (the wire should be slightly shorter than the tube). Bend both ends into small loops and cover with duct tape or use a dab of hot glue to avoid wire poking. If you do not want wire, you can stiffen the tube with diluted fabric stiffener after blocking the twist in place.
Round 70 :
Fasten off leaving a long tail for attaching to the top ring; weave in loose ends but leave tails near charm placement points for sewing chain links later.
Info :
To create the spiral look: wet-block the tube lightly by misting and wrap around a cone or spiral form. Pin into a soft spiral and allow to dry. Alternatively, attach the top to the ring and hang the tube; the weight of the charms and the cat will naturally create a spiral twist. For a tighter spiral, sew a few strategic stitches through adjacent rounds in a helical path to hold the twist.
— Tiny Witch Hat Charms (make 3 — small brimmed hats) :
Info :
Each hat is worked bottom-up from a small brim to a tapered cone. Use a 3.0-3.25 mm hook and work tightly so brims hold shape. You may use a tiny touch of stiffener or hot-glue a small bead inside the tip for weight. Each hat is only 10-14 rounds in total.
Round 1 :
6 sc in magic ring (6)
Round 3 :
(1 sc, inc) x 6 (18)
Round 4 :
1 sc in each st (18)
Round 5 :
Change to contrasting brim color or sparkly yarn if desired. 1 hdc in each st around for a slightly raised brim base (18)
Round 6 :
(2 sc, dec) x 6 (12)
Round 7 :
(1 sc, dec) x 4 (8)
Round 8 :
Sc in each st (8)
Round 9 :
Work 6 dc evenly into the outer edge of the brim round (through both loops) to form a small flared brim. Slip stitch to join. (6 wide flared points — this creates the little brim frill)
Round 10 :
Fasten off leaving long tail for sewing. If you want a slightly larger brim, work an additional round of dc increases evenly spaced (optional).
Info :
Attach a small chain or jump ring to the top of the hat using a sewn-in yarn tail or a loop of thread. You can add a tiny bead or a small bell inside the hat for weight so it hangs downward. Make 3 hats — vary color placement for charm variety.
— Amigurumi Black Cat (one small cat) :
Info :
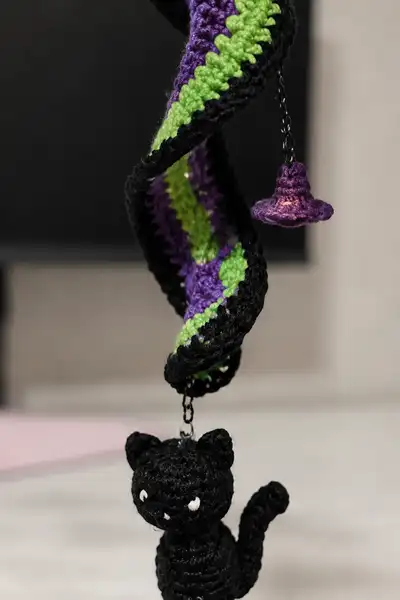
The cat is worked from head then body (or bottom-up); pattern below is head-first then body attached. Final height of cat ~6-9 cm depending on yarn/hook. Work tightly and stuff lightly but firmly. Embroider white eye slits and two small fang marks as in the image.
Head Round 1 :
6 sc in magic ring (6)
Round 3 :
(1 sc, inc) x 6 (18)
Round 4 :
(2 sc, inc) x 6 (24)
Round 5 :
(3 sc, inc) x 6 (30)
Round 6 :
(4 sc, inc) x 6 (36)
Round 7 :
(5 sc, inc) x 6 (42)
Round 8 :
(6 sc, inc) x 6 (48)
Round 9-12 :
1 sc in each st (48) — work 4 rounds even to create head height
Info :
Eye placement: embroider two small white slits or attach small white french knots between rounds 10-11, spaced ~10-12 stitches apart across the front of the head for the sleepy-eyed look in the photo. If using safety eyes (not shown in photo), position them between rounds 10-11 about 6-8 sts apart.
Round 13 :
(6 sc, dec) x 6 (42)
Round 14 :
(5 sc, dec) x 6 (36)
Info :
Begin stuffing head lightly but firmly now. Use small pieces of polyfill added gradually to avoid lumps. Make the forehead slightly firm for a cute, rounded shape.
Round 15 :
(4 sc, dec) x 6 (30)
Round 16 :
(3 sc, dec) x 6 (24)
Round 17 :
(2 sc, dec) x 6 (18)
Round 18 :
(1 sc, dec) x 6 (12)
Round 20-22 :
1 sc in each st (6) — these rounds form a short neck tube (6)
Info :
Leave a long tail emerging from Round 22 for joining the head to the body later. Finish stuffing the head fully but do not overstuff; the face needs a smooth surface for embroidery.
— Cat Ears (make 2) :
Round 1 :
4 sc in magic ring (4)
Round 3 :
(1 sc, inc) x 4 (12)
Round 4 :
1 sc in each st (12)
Round 5 :
(1 sc, dec) x 4 (8)
Round 6 :
Fold ear flat, sc through both layers around base to close slightly (approx 8 sc) and fasten off leaving tail for sewing to head
Info :
Sew ears to top of head at rounds 7-8, spacing them ~8-10 stitches apart depending on your preference. Curve the ears slightly forward when sewing for natural posture.
— Cat Body :
Round 1 :
6 sc in magic ring (6)
Round 3 :
(1 sc, inc) x 6 (18)
Round 4 :
(2 sc, inc) x 6 (24)
Round 5 :
(3 sc, inc) x 6 (30)
Round 6-11 :
1 sc in each st (30) — work 6 rounds even for torso height (30)
Info :
To create ribbing on the body as seen in the photo, work rounds 9-11 in BLO (back loops only) to create horizontal ridges. If you want deeper ribs, alternate one round BLO then one round regular sc for two cycles.
Round 12 :
(3 sc, dec) x 6 (24)
Round 13 :
(2 sc, dec) x 6 (18)
Round 14 :
(1 sc, dec) x 6 (12)
Round 16 :
1 sc in each st (6) — small base (6)
Info :
Stuff the body firmly but leave about 1/3 of the opening near the top unstuffed so you can join it to the head. The body is fairly small — do not overstuff or the neck join will be bulky.
Round 17 :
Fasten off leaving long tail for sewing to the head. We will sew the head's bottom (Round 22 tail) to the body's top opening. Use the mattress or whip stitch to join evenly.
— Cat Tail :
Round 1 :
6 sc in magic ring (6)
Round 3-8 :
1 sc in each st for 6 rounds (12) — lengthen to desired curl length (12)
Round 9 :
(1 sc, dec) x 4 (8)
Round 10 :
Sc in each st (8)
Round 11 :
Fasten off leaving long tail for sewing. Slightly stuff the base of the tail and then sew to lower back of body with a slight curve so it curls upward as in the photo.
Info :
If you prefer a curly tail, you can crochet an i-cord or make the tail with a little wire inside to pose it. Sew securely and add a few anchoring stitches into the body for stability.
— Small Details and Embroidery :
Info :
Using white yarn or embroidery floss, stitch two narrow eye slits (white) on the head between Rounds 10-11. Use small satin stitches or french knots for eye highlights and two tiny inward-pointing stitches for the teeth (two small vertical stitches at the lower center of the face). Keep stitches small to match the photographed expression.
Round :
Weave in all tails: secure inside the body or spiral tube. For the cat, weave main body join tail through 8-10 stitches and knot inside body to secure. Trim close and hide ends.
— Final Assembly (spiral, charms, cat) :
Info :
Gather the plastic/wooden hanging ring. Attach the top of the spiral tube to the ring by sewing through the long tail left at the spiral top. Use several passes around the ring for security. If you inserted wire, wrap the wire loop around the ring and secure by wrapping with yarn and stitching over it. Position charm placements measured approximately every 10-12 rounds along the tube.
Round :
Attach each witch hat charm to a short length (approx 6-8 cm) of lightweight chain or jump rings. Sew the tail of the hat into a jump ring or loop of thread and close jump ring. Sew or clip the other end of chain to the spiral through the tube wall: use a yarn tail and stitch the chain loop into the tube seam at the chosen round number.
Info :
Hang the cat at the bottom: attach a short chain or jump ring to the top of the cat body (where you left a sewing tail after closing R16). Sew the chain into the tube's bottom seam using a few stitches or attach via a sturdy jump ring and close securely.
Round :
Balance the charms: attach the three hats at different heights around the spiral circumference so they dangle in different planes and encourage gentle twirling. Position one hat near the upper third, one mid, and one lower mid, leaving the cat at the bottom to provide weight.
Info :
If any charm hangs lopsided, re-adjust chain lengths or relocate the attachment by sewing to a different round. Pin and test hang several times — even small adjustments make the final mobile balance better.
Round :
Final weave-in: weave all loose ends into the inside of the spiral tube and inside the cat. Use a little fabric glue at main attachment points if desired for longevity. Make sure all metal jump rings are closed tightly so nothing slips off.
Info :
Optional: apply a thin layer of spray starch or fabric stiffener to the spiral if you want a permanently held twist. Allow to dry fully while hanging to preserve the spiral shape.
Round :
Trim excess threads and give the mobile a final gentle steam or blocking to tidy the shape. Hang somewhere with light airflow so you can enjoy the gentle twirling effect!
This spooky-cute spiral mobile brings a playful Halloween vibe to any corner of your home. The twisting ribbon and dangling charms create dynamic movement and charm, while the tiny black cat adds character and personality. With easy colorwork and assembly, you can quickly make a decorative keepsake that twirls with the breeze. 🧶🖤✨