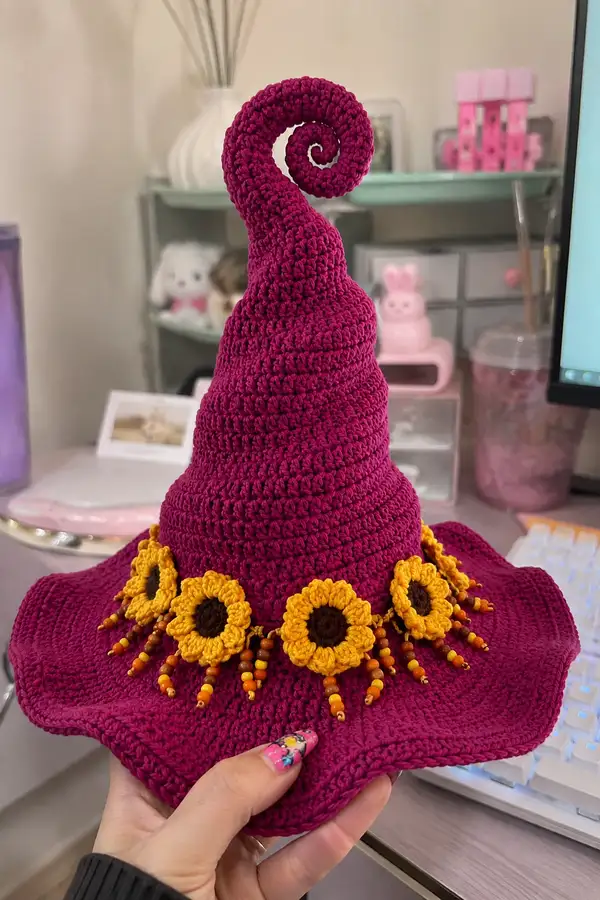
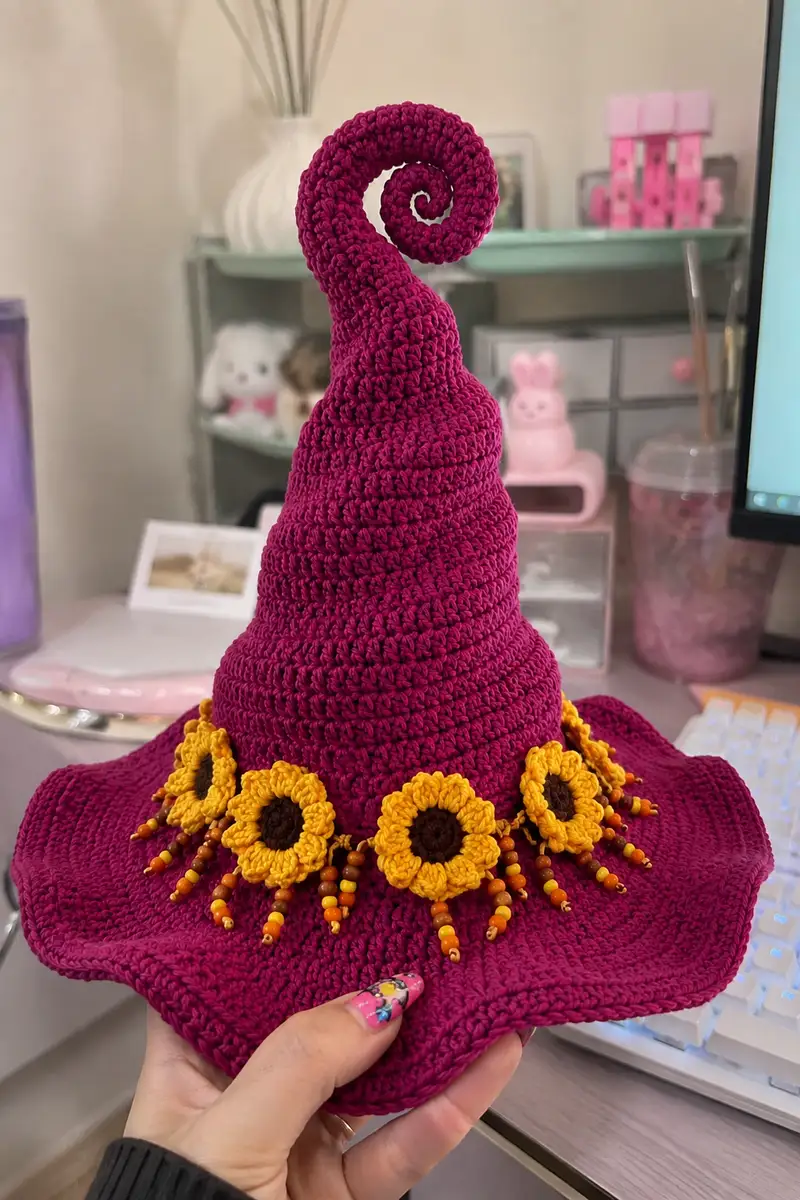
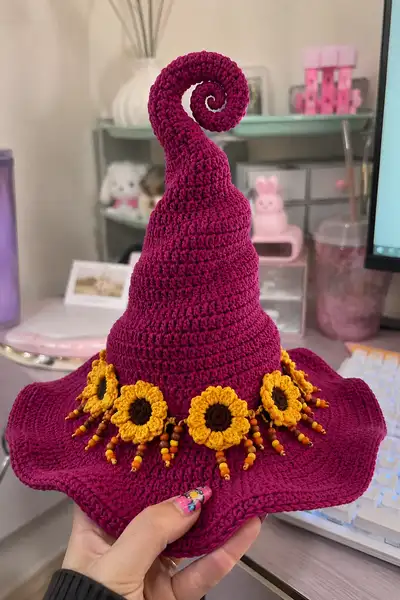
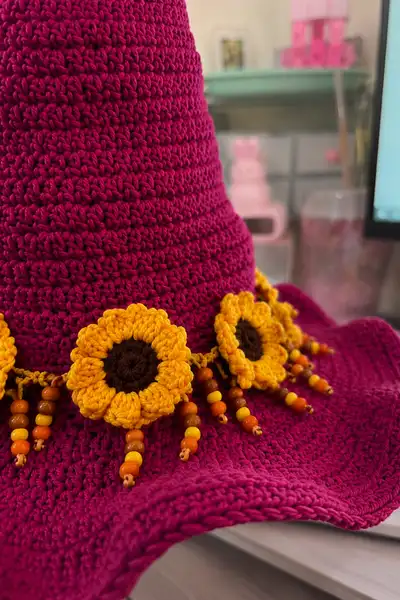
A whimsical tall witch hat worked in rich magenta with a dramatic curled spiral tip and a wide wavy brim. The hat is decorated with a sunflower garland of bright yellow petals and brown centers and dangling orange/yellow beaded tassels. This pattern covers every stitch and placement so you can recreate the structured cone, the spiral curl, the flared brim, and the decorative sunflower band.
Progress Tracker
0% Complete
— Hat Crown (Base Cone) :
Round 3 :
(1 sc, inc) x 6 (18)
Round 4 :
(2 sc, inc) x 6 (24)
Round 5 :
(3 sc, inc) x 6 (30)
Round 6 :
(4 sc, inc) x 6 (36)
Round 7 :
(5 sc, inc) x 6 (42)
Round 8 :
(6 sc, inc) x 6 (48)
Info :
These increases create the base diameter of the crown. For adult-sized fit, work through rounds 1-8 exactly using 4.0mm hook. If you prefer a tighter fabric use 3.75mm; for a slightly larger hat use 4.5mm.
Round 9 :
1 sc in each st (48)
Round 10 :
1 sc in each st (48)
Round 11 :
1 sc in each st (48)
Info :
Work several even rounds to build height. Begin placing a stitch marker at the first stitch of round 9 and move it each round. The number of rounds before tapering will control the height of the cone — pictured hat uses many even rounds for a tall hat.
Round 12 :
1 sc in each st (48)
Round 13 :
1 sc in each st (48)
Round 14 :
1 sc in each st (48)
Round 15 :
1 sc in each st (48)
Info :
If you want a shorter crown reduce the number of even rounds here. For the photographed tall cone continue to round 20 before beginning tapering shaping.
Round 16 :
1 sc in each st (48)
Round 17 :
1 sc in each st (48)
Round 18 :
1 sc in each st (48)
Round 19 :
1 sc in each st (48)
Round 20 :
1 sc in each st (48)
Info :
At the end of round 20 your cone should measure roughly 14-17cm tall (depending on yarn and gauge). Check fit by placing on your head or mannequin. From this point we will create a gradual taper and then the spiral tip.
Round 21 :
(6 sc, dec) x 6 (42)
Round 22 :
(5 sc, dec) x 6 (36)
Info :
Begin decreasing to taper the cone smoothly. Use invisible decreases (sc2tog) for a neat look. Continue stuffing lightly if you prefer the crown to keep a soft shape — the crown is mostly unstuffed; do not overstuff or the brim will not sit correctly.
Round 23 :
(4 sc, dec) x 6 (30)
Round 24 :
(3 sc, dec) x 6 (24)
Round 25 :
(2 sc, dec) x 6 (18)
Round 26 :
(1 sc, dec) x 6 (12)
Info :
Close to a small nub for the base of the spiral. Do NOT fasten off — instead, continue adding rounds that will form the spiral column (we will not fully close this point because the spiral builds from these stitches).
Round 30 :
(1 sc, inc) x 6 (18)
Info :
We have now transitioned into the spiral tip column. These increases create a small tube that will be worked into a long tapered spiral. If you prefer a slimmer spiral start decreases sooner; for a chunkier spiral allow more increases.
Round 31 :
(2 sc, inc) x 6 (24)
Round 32 :
1 sc in each st (24)
Round 33 :
1 sc in each st (24)
Round 34 :
(3 sc, dec) x 6 (18)
Round 35 :
(2 sc, dec) x 6 (12)
Info :
We are shaping the start of the spiral. Keep track of the front/back of the spiral and mark the stitch that will later be worked into to create the horizontal curve. If you plan to add a wire core, insert it now through the small tube before you continue adding rounds; leave 3-4cm of wire extending into the cone to help secure the spiral shape.
Round 36 :
1 sc in each st (12)
Round 37 :
1 sc in each st (12)
Round 38 :
(1 sc, inc) x 6 (18)
Round 39 :
(2 sc, inc) x 6 (24)
Info :
We will now start spiraling the column by working partial rounds and leveraging slip stitches and short-rowing to curl the tip. Place a marker at the beginning of the spiral row to keep track of the turning point.
Round 40 :
Work 8 sc, turn (do not join), sc back along those 8 sts (8 worked front-to-back), sl st to next unworked st on tube to rotate and continue working 8 sc along next section, repeat to work across the 24 stitches in three 8-st segments (24)
Round 41 :
In each 8-st segment work 1 sc in each of first 6 sts, then (sc2tog) across last 2 sts of the segment to create a gentle curl; repeat for all three segments (18)
Round 42 :
1 sc in each st (18)
Round 43 :
(4 sc, dec) x 3 (15)
Info :
These short-rowing and segment decreases start the spiral curl. The idea is to reduce one portion of the tube slightly while leaving the opposite side longer which creates a natural forced curl when the tube is later coiled.
Round 44 :
1 sc in each st (15)
Round 45 :
(2 sc, dec) x 5 (10)
Round 46 :
1 sc in each st (10)
Round 47 :
(1 sc, dec) x 3, sc (4) [work carefully to reduce tip]
Round 48 :
Slip stitch around the small nub to form a neat rounded end; fasten off leaving long tail for sewing to cone if required (4)
Info :
Do not stuff the tip heavily — a little fiberfill will help keep the spiral rounded but too much will prevent the spiral from lying flat. If you inserted wire, use it now to gently shape the spiral.
— Forming the Spiral Curl :
Round 49 :
Rejoin magenta at base of the spiral column where the tube meets the cone. Work 1 sc evenly around that join (24) [this secures the tube to the cone]
Round 50 :
Work BLO 1 sc in each st around the base of the spiral for a firm ridge (24)
Round 51 :
To begin coiling the tube, with the cone laid flat, bring the tip around and position where the spiral should start; working into the outer side of the tube only, sl st to tack the tube to the cone every 3-4 stitches for the first coil (8 tacks)
Info :
Coiling is mostly assembly — work slowly, tacking the spiral in place with small slip stitches or hidden whip stitches. If using wire, bend the wire to hold the spiral tightly before tacking. Aim for about 3-4 tacks per coil turn depending on coil tightness.
Round 52 :
Work one round of 1 sc in each st around the cone just below where the spiral meets to tidy the join (48)
Round 53 :
Optional: Work FLO 1 sc in each st for texture around the join (48)
Round 54 :
Fasten off and weave in ends for the spiral join area; if you used wire, ensure ends are wrapped and tucked inside the cone for safety
Info :
At this point the crown and spiral are formed. The cone's lower edge will be used to attach the brim. Block the cone gently if needed to make the lower circumference even before adding the brim.
— Brim (Wide Wavy Brim) :
Info :
We will work the brim joined to the base of the cone in rounds. The wavy look is achieved by alternating rounds of increases and even rounds; the brim pictured has a soft waved edge made by working large increases at regular intervals.
Round 55 :
Hold cone so the lower edge is ready; join yarn at any stitch at base with sl st, ch1, work 1 sc evenly around base into each st (48) (this is the first brim round)
Round 56 :
(3 sc, inc) x 12 (60)
Round 57 :
1 sc in each st (60)
Round 58 :
(4 sc, inc) x 12 (72)
Info :
These rounds progressively flare the brim. The pattern alternates increase rounds with even rounds to keep the fabric balanced. The more increases, the more dramatic the wave.
Round 59 :
1 sc in each st (72)
Round 60 :
(5 sc, inc) x 12 (84)
Round 61 :
1 sc in each st (84)
Round 62 :
(6 sc, inc) x 12 (96)
Info :
At this point the brim is wide. If you prefer a smaller brim stop increasing earlier (at round 58 or 60). For the pictured wavy scalloped edge we will now add shaping stitches to create soft undulations.
Round 63 :
*sc in next 6 sts, (2 sc, ch1, 2 sc) in next st (shell made), sc in next 6 sts; rep from * around to create shell spaced waves (96 shells counted as part of repeats)
Round 64 :
1 sc in each st around working into both loops and over shell posts to secure (96)
Round 65 :
Work an edging round: *sl st in next 3 sts, (3 sc in next st) to make a small puff, sl st in next 3 sts; rep around (keeps waves defined) (96)
Info :
Blocking the brim lightly while still damp will help the waves set exactly as you like. Pin the edge into the wavy shape you prefer and allow to dry for best results.
Round 66 :
Optional extra firmness: work 1 round of sc in BLO around entire brim (96) - this slightly ridged round helps the brim hold its shape
Round 67 :
Fasten off and weave in ends. If you want a stiffer brim, add light interfacing or a plastic brim between rounds before finishing the edge using ladder stitch; otherwise leave flexible.
— Sunflower Motifs (Make 6) :
Info :
The sunflower is a small layered motif with a brown central disc and a ring of golden petals. Make 6-7 flowers to fit around the crown; spacing will be determined by your crown circumference. Use a smaller hook (3.5mm) for denser petals if desired.
Round 1 :
With brown yarn: mr, 6 sc in mr (6)
Round 3 :
1 sc in each st (12)
Round 4 :
Slip stitch to next st, fasten off brown and join yellow in next st. Ch1, *(sc, ch2, sc) all in same st to form petal base; skip next st; rep * around to create 6 petal bases (6 petals)
Round 5 :
Working into each ch-2 loop: (sc, hdc, dc, hdc, sc) in each loop to form a fuller petal; rep around (6 petals)
Round 6 :
Fasten off leaving long tail for sewing, weave tail to the back of the motif and flatten slightly for a sunflower shape
Info :
Make 6 identical sunflowers. For a more textured center you can add an extra brown round (Round 3 alternate: (sc, inc) around to make diameter larger). Block petals gently for better curve.
— Beaded Tassels (Make 6–8 per sunflower) :
Info :
Tassels pictured have 4-6 beads each in warm oranges and yellows. Use cotton cord trimmed to roughly 6-9cm length per tassel, or use a short crocheted chain.
Round 1 :
Cut a 12cm length of contrasting yarn; attach it behind a sunflower with a knot. Thread beads onto the yarn using a small needle if needed in the order desired (brown, orange, yellow sequence shown).
Round 2 :
String 4-6 beads per tassel then knot the yarn close to the last bead to stop slippage. Trim ends to leave a short tassel. Make 4-6 tassels per flower for the pictured look.
Info :
Alternatively, make short crocheted chains (ch6) and add beads by sewing them on afterwards. Secure bead bases with a dab of fabric glue for extra security if hat will be handled by children.
— Sunflower Band (Braided Base and Attachment) :
Round 1 :
Make a three-strand braid using 3 lengths of magenta yarn each about 50cm. Braid to desired circumference of crown and tie off. This forms a base for sewing the sunflowers.
Round 2 :
Wrap a small chain (ch60) in magenta or a matching yellow to create a tidy seam edge and whipstitch the braid to the crown at the base of the cone where the brim begins, spacing evenly.
Info :
Pin the braid in place around the crown before sewing to ensure even sit. Space 6 sunflowers evenly around the crown — measure crown circumference and divide by number of flowers to get spacing in stitches (e.g., 48 sts circumference / 6 flowers = every 8 stitches).
Round 3 :
Sew each sunflower onto the braid: position sunflower, tack at top and bottom with long-tail yarn, then sew around inner circle to secure. Add bead tassels by tying or sewing tassel bases to the braid beneath each flower.
Round 4 :
Weave in all ends and trim any tails. If you prefer a removable band, sew on small snaps behind the braid to make it removable for washing.
Info :
If you want the sunflowers to face outward at a slight angle, sew only along the inner bottom of each flower leaving top stitches slightly free so the petals tilt forward.
— Finishing Touches and Stabilizing :
Round 1 :
Check all bead knots and sew through the braid and to the crown in at least two directions for security.
Round 2 :
Use a few long hidden stitches to anchor the braid at 4-6 equidistant points so it does not shift. Use a matching yarn and yarn needle.
Round 3 :
Optional: For extra brim stiffness insert a plastic brim support or interfacing sandwiched between last two brim rounds before final edging. Secure with whipstitch and trim excess material to avoid bulky edges.
Info :
Block hat lightly on a form or bowl to make brim even and to set the spiral coil. Allow to dry completely before final attachments. If you used wire, check that wire ends are encased and not poking through the fabric.
— Alternate Sizes and Adjustments :
Info :
To size the hat for a smaller head reduce rounds 9-20 and brim increase rounds accordingly. To size for a larger head add extra rounds of 1 sc around before tapering, and add more increase rounds in the brim section.
Round 1 :
For child size: stop crown even rounds at round 14 instead of 20, then follow tapering; reduce brim increases by one increment round (skip round 60).
Round 2 :
For large sizes: add 2-4 even rounds between rounds 12-20 and add one extra increase round in brim steps (add a (7 sc, inc) round before shell edging).
Info :
Changing hook sizes will adjust the hat's final proportions: smaller hook = denser and slightly smaller; larger hook = looser and larger. Remember to adjust number of flowers and braid length to match new circumference.
— Care and Storage :
Info :
Spot clean the hat with damp cloth; for full wash, hand wash gently and reshape while damp. Remove any removable band before washing. Store on a hat stand or stuffed with tissue to maintain form.
Info :
Repair notes: If a bead comes loose, re-thread with a needle and knot securely, then apply a tiny drop of fabric glue. For loose petals, sew through the petal base into the braid to anchor.
This cheerful witch hat combines sculptural shaping with playful details: a tall spiral tip and a sunflower-and-bead band for a touch of sunny charm. It’s a joyful project that mixes simple single crochet construction with decorative finishing techniques. Whether for a Halloween costume or a whimsical accessory, you’ll enjoy shaping the cone, coiling the spiral, and stitching on the floral garland. 🧶🌻 Transform yarn into a statement piece with every stitch — have fun and share your creation! ✨