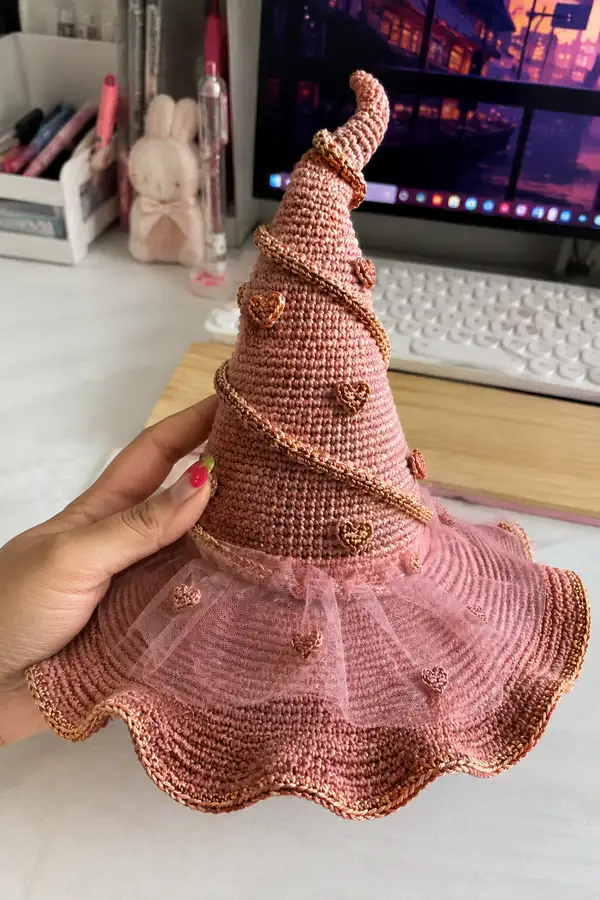
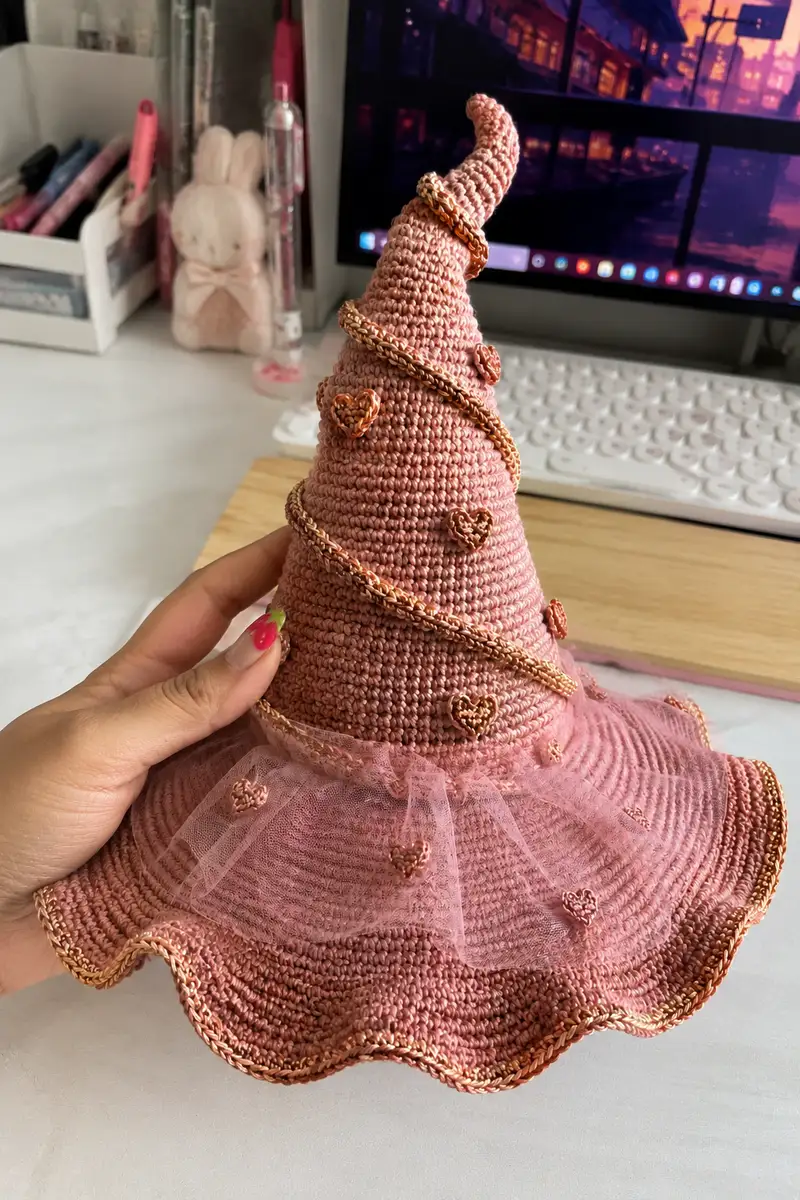
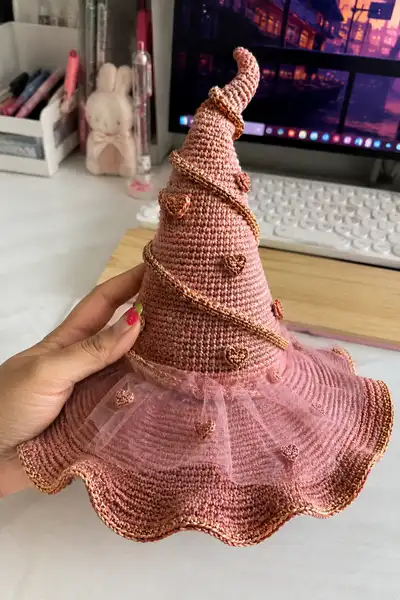
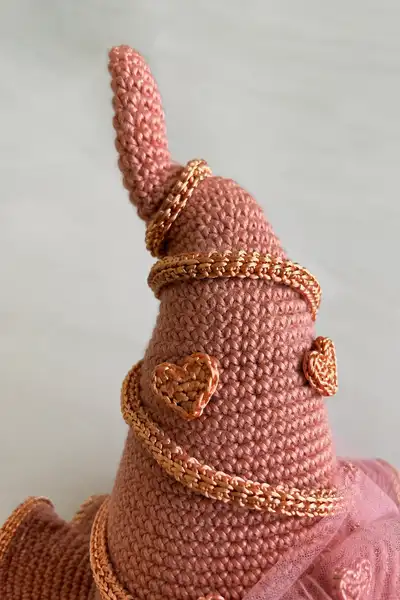
A romantic rose-gold spiral witch hat with a flared ruffled brim, tiny crocheted hearts and a soft tulle veil. Worked in a smooth cotton-blend yarn with metallic trim, it features a gently twisted cone top and decorative spiral cord. The finished hat stands tall with a curled tip and delicate heart appliques—perfect as a décor piece, costume accent, or a whimsical gifting project.
Progress Tracker
0% Complete
— Cone (Top of Hat) :
Round 1 :
6 sc in magic ring (6)
Round 3 :
(1 sc, 1 inc) x 6 (18)
Round 4 :
(2 sc, 1 inc) x 6 (24)
Round 5 :
(3 sc, 1 inc) x 6 (30)
Round 6 :
(4 sc, 1 inc) x 6 (36)
Round 7 :
(5 sc, 1 inc) x 6 (42)
Round 8 :
(6 sc, 1 inc) x 6 (48)
Info :
These first 8 rounds form a tight cone base. Use a stitch marker to mark the first stitch of every round. Work tightly; the fabric should be dense enough so stuffing does not show through.
Round 9-16 :
1 sc in each st (48) - work 8 rounds even to start building cone height (48)
Info :
At this stage the cone is growing in height. Keep tension consistent; count occasionally to ensure 48 sts each round. If you are adjusting size, add or remove even rounds here to change height.
Round 17 :
(5 sc, 1 inc) x 6 (54)
Round 18-26 :
1 sc in each st (54) - work 9 rounds even (54)
Info :
These even rounds lengthen the cone. If you want a taller hat tip, add more even rounds here. This hat's cone maintains a gentle taper because increases are spaced out.
Round 27 :
(6 sc, 1 inc) x 6 (60)
Round 28-38 :
1 sc in each st (60) - work 11 rounds even (60)
Info :
By round 38 the crown has reached full circumference for the hat body. Measure width if you need to match a specific head size - 60 sts at this hook/yarn combination yields a crown circumference of approximately 35-38 cm. Adjust with +/− 6 stitches per increase round.
Round 39 :
(7 sc, 1 inc) x 6 (66)
Round 40-46 :
1 sc in each st (66) - work 7 rounds even (66)
Info :
Start thinking about stuffing: you will add a light amount of polyester fiberfill when the cone begins to narrow near the tip. Avoid overstuffing the base; base should remain slightly soft so brim can be stitched on later.
Round 47 :
(6 sc, 1 dec) x 6 (60)
Round 48 :
(5 sc, 1 dec) x 6 (54)
Info :
Begin stuffing the cone lightly at round 48. Use small amounts of fiberfill and shape with your fingers so the cone tapers naturally. The cone needs enough body to hold a gentle curl at the tip later.
Round 49 :
(4 sc, 1 dec) x 6 (48)
Round 50 :
(3 sc, 1 dec) x 6 (42)
Round 51 :
(2 sc, 1 dec) x 6 (36)
Info :
Continue stuffing as you decrease; focus on shaping the tip so it retains a slender point but still has some body. If making a notably floppy or stiff tip, consider inserting a short piece of craft wire before completing the final rounds for shaping control.
Round 52 :
(1 sc, 1 dec) x 6 (24)
Round 54 :
Fasten off leaving a long tail for closing. Weave tail through remaining sts and pull closed. Secure and weave in tail inside cone (6)
Info :
If you prefer a curled tip, before closing the final 6, bend the tip gently into the desired curl and insert a short length of wire or place a small stuffing 'plug' in the tip; then close around it. For a slightly slouched tip, leave the top lightly stuffed and shape with your hands.
— Brim :
Info :
Work the brim as a separate flared circle attached to the base of the cone. Join the main cone at the last even round where the crown circumference is stable (we used the round where the crown measured 66 sts). The brim will be worked in joined rounds outward from that join point.
Round 1 (join) :
Join rose yarn at any stitch on the base round where you want brim to start, ch1, sc in same st and in each stitch around (66) - join with sl st to first sc
Round 2 :
(1 sc, inc) x 22 (88)
Round 3 :
(2 sc, inc) x 22 (110)
Info :
Increasing in every round expands the circle quickly to form a flared brim. Count repeats to ensure correct stitch counts; using a repeat count of 22 keeps calculations consistent for this brim size.
Round 4 :
(3 sc, inc) x 22 (132)
Round 5 :
(4 sc, inc) x 22 (154)
Round 6 :
(5 sc, inc) x 22 (176)
Info :
After round 6 you should have a generous flared brim foundation. If you want a wider brim, continue the increase sequence (6 sc, inc) x 22 to add 22 stitches (198 total).
Round 7-10 :
1 sc in each st (176) - work 4 rounds even to create brim depth
Info :
These even rounds build thickness to help the brim hold a wave. Keep tension even. If your brim is curling upward, add another even round or reduce the next increase sequence slightly.
Round 11 :
(4 sc, inc) x 22 (198)
Round 12 :
1 sc in each st (198)
Round 13 :
Work scalloped/ripple edge row: *skip 1 st, 5 dc in next st, skip 1 st, sl st in next st* repeat around to create even waves (approx 66 shells)
Info :
The scalloped shell row creates the wavy brim edge seen in the photos. If you prefer a subtler wave, use 4 dc shells instead of 5 dc. Keep shells evenly spaced for a balanced ruffle.
Round 14 (edge trim) :
Join metallic accent yarn; sc around in BLO for one round to create a defined edge (198)
Round 15 :
With metallic yarn, work 1 round of sl st around the outer edge of each shell and along the cast-off edge to form a neat metallic border (work approx 198 sl sts)
Info :
Work metallic trim loosely to maintain a soft edge. If using metallic ribbon yarn that is thicker, consider one round only. Sew ends of metallic yarn securely on the underside of the brim.
Round 16 :
Fasten off main rose yarn; weave in ends. Turn brim slightly and press gently if needed. The scalloped edge will form the finished wavy brim seen in the image.
Info :
Optional: To make the brim more structured, you can block it lightly with steam or tack a thin piece of interfacing to the underside before attaching veil. If you added wire, ensure it is fully encased and safe.
— Spiral Cord (Decorative Band) :
Info :
The spiral cord that wraps around the cone is worked in metallic yarn as a tight chain-and-slipset rope. It is decorative and also helps define the spiral on the crown.
Round 1 :
Make a chain of 100 (or desired length to wrap cone 3 times). Ch100; turn (100)
Round 2 :
Starting in 2nd ch from hook, sc in each ch across to end. (99) Fasten off leaving long tail for sewing.
Info :
For a rounded rope effect, you may instead crochet in the round: make a magic ring and 6 sc, then sc in spiral to create a tube until desired length. The flat chain-stitched rope is what is pictured—slightly flattened with a metallic sheen.
Round 3 :
Optional: Using the long tail, coil the cord around the cone from tip toward brim, pinning in place every 4-6 cm to shape a spiral. Sew down with matching metallic yarn through back loops of cord and cone fabric.
Info :
Arrange spiral spacing to match photo: top coil close to tip, mid coil across the crown, lower coil resting near where veil begins. Secure both ends and any points of intersection with a few tidy stitches on the inside of the hat so they are not visible.
— Tiny Heart Appliques (Make 9-12) :
Info :
Tiny hearts are crocheted separately and sewn onto the hat crown and brim. Use a finer hook (2.25-2.5mm) with the same or slightly finer yarn for crisp detail. Each heart is small and worked flat.
Heart Round 1 :
ch 4, sl st to first ch to make a ring, ch 1, 6 sc in ring (6)
Heart Round 2 :
ch 1, *2 sc in next st, sc in next st, hdc in next st, dc in next st, tr in next st, sl st in next st* - forming a curved heart top. Fasten off leaving tail for sewing.
Info :
Alternate heart pattern for a fuller look: ch 3, in ring sc6, then ch 2, 3 dc in next st, ch 2, sl st to form tiny lobes. Adjust counts slightly to produce hearts approximately 1.5-2 cm wide when using finer yarn.
Heart Round 3 :
For raised texture, use a contrasting thin metallic thread to outline heart edge with sl sts; then tack onto the cone and brim using small whip stitches. Make 9 to 12 hearts to scatter around crown and brim.
Info :
Place hearts visually before sewing: cluster a few on one side and space others evenly. Sew through the inside only so stitches are invisible on the outside of the heart.
— Tulle Veil & Ruffle Skirt :
Info :
The tulle veil sits at the base of the cone where the brim begins; it is a gathered strip of tulle attached around the inner brim edge to create the soft skirt shown in the images.
Step 1 :
Cut a strip of tulle approx 10-12 cm wide and long enough to wrap around brim with slight overlap (use approx 0.5 m). Fold the strip in half lengthwise to double the volume if desired.
Step 2 :
Gather the top edge by running a long running stitch with matching thread/yarn and pulling to gather evenly to match inner circumference of brim (approx 176-198 cm circumference depending on your brim). Tie off securely.
Step 3 :
Pin gathered tulle to inside of brim at the join where the crown meets the brim (on the under-side). Using small whip stitches, sew the tulle to the brim underside. Secure thread ends neatly.
Info :
To create little tulle ruffles visible from the top as in the photo, stitch tulle closer to the brim edge and allow the gathered edge to peek out above the rim. Trim excess tulle and neaten all raw edges.
— Decorative Metallic Trim Around Brim Edge :
Round 1 :
Using metallic yarn, join at brim edge and sc evenly around the underside edge where you want the metallic rope to sit (work approx 198 sts); pick up both top and bottom loops if necessary to create a neat fold.
Round 2 :
Work sl st around each st of the metallic chain to create a clean rope-like edge. Fasten off and weave ends on the underside.
Info :
To achieve the raised metallic coil seen on the hat, you can also crochet a thin metallic chain (in the same style as the spiral cord) and stitch it around the outer edge of the scallop, overlapping shells slightly for a continuous metallic border.
— Assembly & Final Shaping :
Info :
Before final sewing, block the brim gently (pin the scallops into a gentle wave and steam lightly from a distance) and allow to dry to set the shape. Attach spiral cord and hearts after blocking so placements are accurate.
Step 1 :
With the cone finished and the brim made, sit the cone inside the brim opening. Use pins to position the cone so it is centered and sits at the desired depth (approx 1.5-2 cm inserted into brim on the inside).
Step 2 :
Sew the cone to the inner brim using a yarn needle and matching rose yarn. Use small whip stitches through the last round of the cone and the first round of the brim to create a neat invisible join. Work evenly around until the brim sits flush.
Info :
Check the outside silhouette frequently as you sew; if the join pulls or distorts the brim, remove a few stitches and redistribute. Keep stitches small and taut, not tight, to preserve the neat edge.
Step 3 :
Sew hearts onto the crown and brim in your chosen arrangement. Attach the spiral cord by sewing at several anchor points on the inside of the cone so it appears wrapped naturally around the hat.
Step 4 :
Attach the gathered tulle veil to the inside brim as described. Add any additional metallic accents with small stitches or a drop of fabric glue for security.
Info :
Final shaping: gently bend the tip into a curl to match the image. If using wire, wrap the wire fully and tuck the ends into the seam inside the cone. If no wire, pressing and shaping with your hands and a bit of steam will encourage the curl.
Finishing :
Weave all ends into the inside of the cone and brim, trim flush. If desired, add a light dusting of shimmer fabric spray or a few fabric glue-secured sequins to enhance the rose-gold gleam.
Final Info :
Wear or display your hat on a headform, mannequin, or as a whimsical shelf accent. For gifting, place tissue inside to support the cone tip during transport. Congratulations — your rose-gold spiral witch hat is complete!
Completing this rose-gold spiral witch hat is such a joyful craft adventure — from building the tall cone to adding the metallic trim and little hearts. Each small applique and carefully sewn spiral brings the hat to life, and the tulle veil gives it a soft, magical finish. 🧶✨ Place it on display or wear it for a whimsical touch. Happy stitching and enjoy your charming creation! 🎀