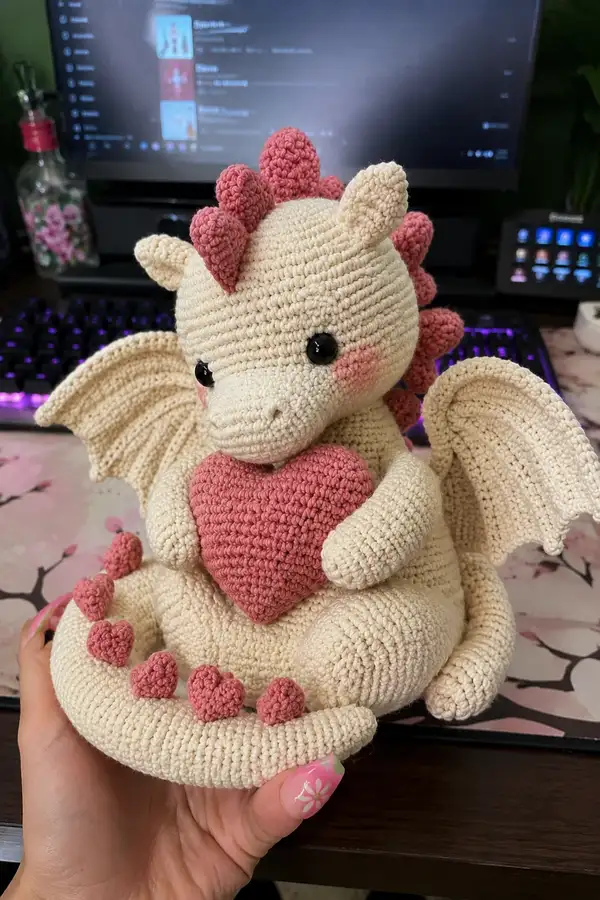
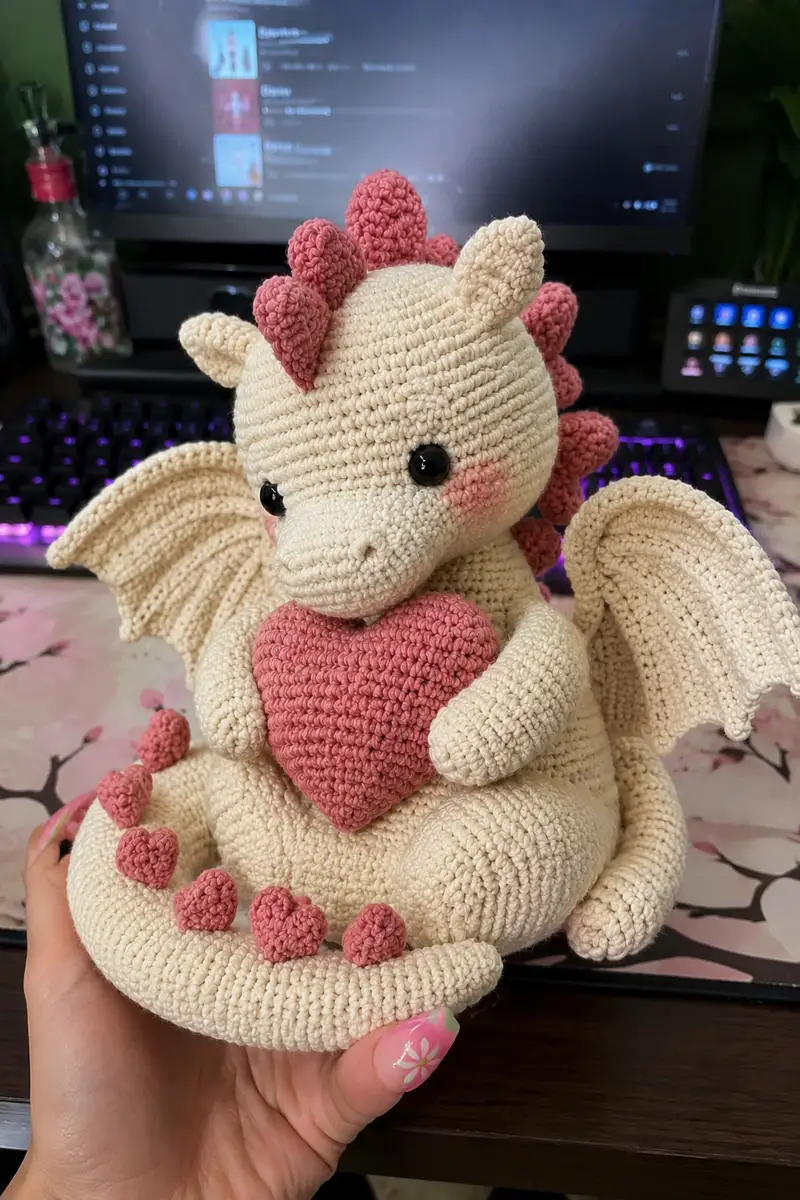
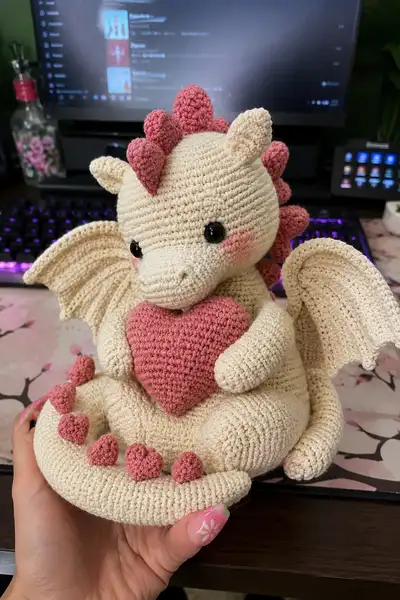
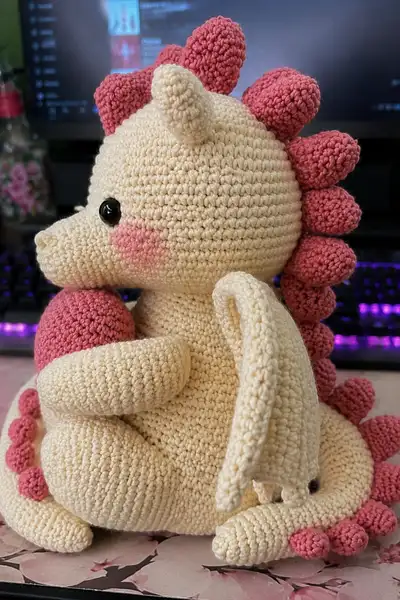
This sweet amigurumi dragon sits cuddly and proud, crocheted in soft cream with rose-pink spikes, hearts and blush details. Features include a rounded head with a long snout, floppy wings, curled tail with tiny heart mounds, and a large heart held between its arms. Perfect as a handmade gift or nursery cuddle companion, this pattern walks you through every round and assembly step for a polished finish.
Progress Tracker
0% Complete
— Head :
Round 1 :
6 sc in magic ring (6)
Round 3 :
(1 sc, 1 inc) x 6 (18)
Round 4 :
(2 sc, 1 inc) x 6 (24)
Round 5 :
(3 sc, 1 inc) x 6 (30)
Round 6 :
(4 sc, 1 inc) x 6 (36)
Round 7 :
(5 sc, 1 inc) x 6 (42)
Round 8 :
(6 sc, 1 inc) x 6 (48)
Round 9-12 :
1 sc in each st (48)
Info :
Place safety eyes between rounds 13-14 after round 12; for this head size mark the eye positions roughly 10-12 stitches apart (count across front). Insert eyes before adding more stuffing. If using embroidered eyes wait until later rounds described for embroidery.
Round 13-16 :
1 sc in each st (48)
Info :
If you prefer slightly higher eyes, place them between rounds 12-13; for a softer expression keep them lower by one round. After inserting eyes, continue working but do not overstuff — leave room for snout attachment later.
Round 17 :
(6 sc, 1 dec) x 6 (42)
Round 18 :
(5 sc, 1 dec) x 6 (36)
Info :
Begin stuffing head moderately firm, focusing around the eye area to keep shape. Add small amounts of fiberfill at a time to avoid lumps. Continue stuffing as you progress through decreases.
Round 19 :
(4 sc, 1 dec) x 6 (30)
Round 20 :
(3 sc, 1 dec) x 6 (24)
Round 21 :
(2 sc, 1 dec) x 6 (18)
Round 22 :
(1 sc, 1 dec) x 6 (12)
Info :
Fasten off leaving long tail for sewing to neck. Finish stuffing head so it is firm but squeezable; the neck opening will be joined to the body later. We will attach snout separately under the eye line.
— Snout (Make 1) :
Info :
The snout is worked separately and sewn onto the head between rounds 11-16, centered under eyes. Work in cream. Stuff the snout fairly firmly to retain the long nose shape.
Round 1 :
6 sc in magic ring (6)
Round 3 :
(1 sc, 1 inc) x 6 (18)
Round 4-7 :
1 sc in each st (18)
Info :
These rounds form the long tube of the snout. After round 7 start slight shaping toward the tip to form the nostril area. Keep the tube slightly tapered by using smaller stuffing amounts as you progress.
Round 8 :
(4 sc, 1 dec) x 3 (15)
Round 9 :
(3 sc, 1 dec) x 3 (12)
Round 10 :
(2 sc, 1 dec) x 3 (9)
Round 11 :
(1 sc, 1 dec) x 3 (6)
Round 12 :
6 dec (3) - if you prefer a rounded tip stop at 6 sc and close to 6
Info :
Fasten off leaving long tail for sewing. Position the snout so it aligns under the eyes and sew with ladder stitch. Embroider two small nostrils with matching dark yarn or make two very small surface stitches to suggest nostrils.
— Ears / Horns (Make 2 small ears + 1 small top horn) :
Info :
Ears are small rounded cones that sit to the sides above the eye line; a short horn is centered on top between the first two spikes. Work in cream and stuff very lightly.
Ear Round 1 :
5 sc in magic ring (5)
Ear Round 3 :
(2 sc, 1 inc) x 3 + 1 sc (13)
Ear Round 4-6 :
1 sc in each st (13)
Ear Round 7 :
(2 sc, 1 dec) x 3 + 1 sc (10)
Ear Round 8 :
1 sc in each st (10)
Info :
Fasten off leaving long tail for sewing. Fold the base slightly when positioning to create a curved ear; sew to head between rounds 8-10 with base tucked slightly forward for a natural placement.
Horn Round 1 :
4 sc in magic ring (4)
Horn Round 3-5 :
1 sc in each st (8)
Horn Round 6 :
(2 sc, 1 dec) x 2 (6)
Info :
Stuff lightly and sew horn centered on top of head between the first and second spike positions; angle it forward slightly. Fasten off and weave in ends.
— Body :
Round 1 :
6 sc in magic ring (6)
Round 3 :
(1 sc, 1 inc) x 6 (18)
Round 4 :
(2 sc, 1 inc) x 6 (24)
Round 5 :
(3 sc, 1 inc) x 6 (30)
Round 6 :
(4 sc, 1 inc) x 6 (36)
Round 7 :
(5 sc, 1 inc) x 6 (42)
Round 8 :
(6 sc, 1 inc) x 6 (48)
Round 9 :
(7 sc, 1 inc) x 6 (54)
Round 10-15 :
1 sc in each st (54)
Info :
If you prefer a slightly squatter body, stop even rounds earlier. Begin marking the front center of the body at round 12 to help attach head and heart pieces symmetrically. Work in continuous rounds for a seamless shape.
Round 16 :
(7 sc, 1 dec) x 6 (48)
Round 17 :
(6 sc, 1 dec) x 6 (42)
Round 18-22 :
1 sc in each st (42)
Info :
Begin stuffing body moderately from round 18 onwards; keep it soft enough to sit but firm enough to hold its shape. Leave the top opening wide enough for head insertion; we will join head later using the tail or neck joining technique described in assembly.
Round 23 :
(4 sc, 1 dec) x 6 (36)
Round 24 :
(3 sc, 1 dec) x 6 (30)
Round 25 :
(2 sc, 1 dec) x 6 (24)
Round 26 :
(1 sc, 1 dec) x 6 (12)
Info :
Leave a long tail and do not completely close; keep this opening large enough to insert the tail or to sew closed after the head is attached depending on your preference. If you wish to create a flat base, stuff heavier at the bottom rows.
— Arms (Make 2) :
Info :
Arms are worked from hand/paw upward. They are slightly curved so sew onto body in a hugging position to hold the large heart. Work in cream and stuff the paw portion more firmly than the arm tube.
Arm Round 1 :
6 sc in magic ring (6)
Round 3 :
(1 sc, 1 inc) x 6 (18)
Round 4-5 :
1 sc in each st (18)
Info :
Round 1-5 form the rounded paw. At the end of round 5 flatten the paw slightly and place a few mattress stitches across the base if you want indentations for 'fingers'. Stuff firmly now to hold shape.
Arm Round 6-12 :
1 sc in each st (18)
Info :
These rounds create the lower arm. For a natural hug curve, slightly stuff the lower part firmer and leave the upper arm lighter. You can curve the arm by slanting stitches when sewing in place later.
Arm Round 13 :
(2 sc, 1 dec) x 6 (12)
Arm Round 14-16 :
1 sc in each st (12)
Arm Round 17 :
(1 sc, 1 dec) x 4 (8)
Arm Round 18 :
1 sc in each st (8)
Info :
Fasten off leaving long tail for sewing. Position arms on body so palms face inward holding the big heart piece; pin in place across body rounds around 14-18 for a natural hugging height. Sew securely with ladder stitch around the base.
— Legs (Make 2) :
Info :
Legs are worked from foot upward and shaped to allow the dragon to sit. Work in cream, stuffing foot firmly and leg moderately. The leg seam attaches at the bottom sides of the body to create a seated pose.
Leg Round 1 :
6 sc in magic ring (6)
Leg Round 3 :
(1 sc, 1 inc) x 6 (18)
Leg Round 4 :
(2 sc, 1 inc) x 6 (24)
Leg Round 5-7 :
1 sc in each st (24)
Info :
These rounds build the foot. Flatten slightly and add a few surface mattress stitches across the toe area to suggest toes if desired. Stuff the foot firmly to provide a stable base for sitting.
Leg Round 8 :
(2 sc, 1 dec) x 6 (18)
Leg Round 9-14 :
1 sc in each st (18)
Leg Round 15 :
(1 sc, 1 dec) x 6 (12)
Leg Round 16-18 :
1 sc in each st (12)
Leg Round 19 :
(1 sc, 1 inc) x 4 (16)
Leg Round 20-22 :
1 sc in each st (16)
Info :
Fasten off leaving long tail for sewing. When attaching, place legs so that the feet are visible from the front and the knees tuck slightly inward to create the seated shape. Sew around the hip area firmly to the body at body rounds 1-6 depending on your height preference.
— Tail :
Info :
The tail is a slightly flattened tube that curls around the body with small heart spikes sewn along the top. Work in cream; start with a smaller circumference and increase slightly for the middle section before tapering to the tip. Stuff lightly to maintain flexibility.
Round 1 :
6 sc in magic ring (6)
Round 3 :
(1 sc, 1 inc) x 6 (18)
Round 4-6 :
1 sc in each st (18)
Round 7 :
(1 sc, 1 inc) x 6 (24)
Round 8-14 :
1 sc in each st (24)
Info :
At this larger section add slightly firmer stuffing to give the tail weight so it can sit curled. Start planning spike/heart spacing — the sample shows six small hearts across the top curve and one larger cluster toward the tip.
Round 15 :
(3 sc, 1 dec) x 6 (18)
Round 16-20 :
1 sc in each st (18)
Round 21 :
(2 sc, 1 dec) x 4 (12)
Round 22 :
(1 sc, 1 dec) x 4 (8)
Round 23 :
1 sc in each st (8)
Round 24 :
1 sc in each st (8) - finish with light stuffing at tip
Info :
Fasten off leaving long tail for sewing. Coil tail gently into desired shape and sew along the inside of curve to secure position on the base rounds of the body. Sew small pink hearts or spikes along the outer ridge as shown.
— Back Spikes (Make 8 medium spikes) :
Info :
Work each spike in rose-pink. Spikes are small rounded cones that are slightly taller than the ear cones. They will be sewn along the center back from head crown to tail base; space evenly and stitch securely through body rounds.
Spike Round 1 :
6 sc in magic ring (6)
Spike Round 2 :
6 inc (12)
Spike Round 3 :
(1 sc, 1 inc) x 6 (18)
Spike Round 4-6 :
1 sc in each st (18)
Spike Round 7 :
(2 sc, 1 dec) x 6 (12)
Info :
Stuff each spike lightly. Fasten off leaving a tail long enough to sew securely along the head and body seam. For a row of spikes space the first spike centered on the head crown, then place remaining spikes down the spine about 6-10 stitches apart depending on your body stitch count.
— Tail Heart Mounds (Small hearts / bumps - Make 6 small hearts) :
Info :
These tiny hearts are worked flat in the round and then seamed to become slightly 3D pillows. Work in rose-pink and attach to the outer curve of the tail as decorative bumps.
Small Heart Round 1 :
6 sc in magic ring (6)
Small Heart Round 2 :
6 inc (12)
Small Heart Round 3 :
(1 sc, 1 inc) x 6 (18)
Small Heart Round 4 :
1 sc in each st (18)
Small Heart Round 5 :
(1 sc, 1 dec) x 6 (12)
Small Heart Round 6 :
6 dec (6) - fasten off leaving long tail for sewing; position along tail ridge
Info :
Sew these hearts pointing outward from the tail curve using the long tail; place five evenly across the outer arc and one near the tip for balance. Stuff lightly before closing if you want them puffier.
— Big Heart (Held by Dragon) :
Info :
The large heart held by the dragon is worked in rose-pink and is made by crocheting two identical heart halves then sewing them together with stuffing inside to make a thick pillow heart. The arms are positioned to hold this piece; attach before final arm sewing if desired.
Heart Half Round 1 :
6 sc in magic ring (6)
Heart Half Round 2 :
6 inc (12)
Heart Half Round 3 :
(1 sc, 1 inc) x 6 (18)
Heart Half Round 4 :
1 sc in each st (18)
Heart Half Round 5 :
(1 sc, 1 dec) x 6 (12)
Heart Half Round 6 :
6 dec (6) - fasten off and make a second identical half
Info :
Sew the two halves together leaving an opening to stuff. Stuff firmly but slightly squishy so the heart sits nicely in the dragon's embrace. Close and hide the seam with invisible ladder stitch. Optionally embroider a small 'X' or simple stitch on the front for extra charm.
— Tiny Decorative Hearts (Optional - Make 3-4 for tail or body) :
Info :
These extra mini hearts are worked similarly to the small tail hearts but with fewer rounds for a tiny accent. Useful to decorate the dragon base or the desk next to the toy.
Tiny Heart Round 1 :
6 sc in magic ring (6)
Tiny Heart Round 2 :
6 inc (12)
Tiny Heart Round 3 :
(1 sc, 1 dec) x 4 (8) - fasten off leaving tail for sewing
Info :
Attach mini hearts anywhere — along the tail, on a wing tip, or placed around as tiny decorations. Stuff minimally or not at all depending on how flat you want them.
— Wings (Make 2) :
Info :
Wings are worked flat to create the scalloped, veined look. Work in cream; use BLO on some rounds to create visible ridges that emphasize wing bones. Wings are then stuffed lightly along the base and sewn to the back sides of the body between body rounds 10-16 for the sample placement.
Wing Round 1 :
Ch 21, sc in 2nd ch from hook and across (20) - foundation chain row to set width
Wing Round 2 :
Turn, ch1, 2 sc in first st, 1 sc in next 16, 2 sc in last st (22)
Wing Round 3 :
Turn, ch1, 1 sc in each st (22)
Wing Round 4 :
Turn, ch1, 1 sc in first 2, (1 sc, 1 inc) x 9, 1 sc in last 2 (31)
Wing Round 5 :
Turn, ch1, 1 sc in each st BLO (31) - creates a ridge at the base
Wing Round 6-8 :
Turn, ch1, 1 sc in each st (31)
Wing Round 9 :
Turn, ch1, (3 sc, 1 dec) across until end to taper outer edge (24)
Wing Round 10 :
Turn, ch1, 1 sc in each st (24)
Wing Round 11 :
Fasten off leaving long tail for sewing and a small amount to lightly stuff base
Info :
Edge the wing with a neat row of sc or slip stitches after attaching for a finished look if desired. Sew wings with base aligned at body rounds 12-15 and angle them outward slightly. Sew several stitches into the body to anchor firmly; reinforce with a second pass if the toy will be handled often.
— Assembly & Final Sculpting :
Info :
Before sewing pieces together, pin everything in place to check proportions and symmetry. Use photos as a guide — head sits centered on top of the body, arms should meet at front to cradle the heart, legs create a seated base, wings attach at mid-back, tail wraps around base with decorative hearts on outer edge.
Step 1 :
Attach head to body by placing head opening over the top of the body opening and whip stitch or ladder stitch around the seam. Use the long tail from the body to stitch through the head rounds 21-24 for a secure join. Make sure the face is centered above the front of the body (use the marked front center from body rounds).
Step 2 :
Sew the snout to the underside of the head centered between the eyes and use a couple of tiny stitches through the head to shape the top of the snout for a smooth join. Embroider nostrils with two short vertical stitches using dark yarn.
Step 3 :
Pin arms so they cradle the big heart and align arm base with body rounds 12-16. Sew through both arm and body rounds with several passes for stability. Before closing final stitches, ensure heart fits comfortably between arms and doesn’t shift when sewn.
Step 4 :
Sew legs to lower sides of the body. Position the legs so the dragon sits with feet forward; attach leg tops to body rounds 1-6 and reinforce seams to support sit weight. Adjust angle to ensure balance.
Step 5 :
Sew wings in place at body rounds 12-15 on either side. Anchor the base of the wing well with numerous small stitches. Lightly stuff the base of wings before final stitching to keep them from flopping.
Step 6 :
Sew spikes down the center of the head and back. Start with a central spike at the crown, then stitch subsequent spikes down the back and continue onto the tail. Space evenly; use the sample spacing of approximately every 8-10 stitches along the spine for a balanced look.
Step 7 :
Attach small heart mounds to the top curve of the tail using long tails left when fastening off. Sew through tail stitches and secure tightly. Fasten off and weave in ends through several stitches.
Step 8 :
Embroider any facial details: small eyebrows or mouth if desired. Add blush to cheeks using fabric-safe pastel or embroidery floss whipped across a few stitches for soft effect. Secure safety eyes with washers and/or fabric glue for extra safety when gifting.
Info :
Weave in all tails and trim close. Use a small dab of fabric glue on knots inside the head or body if you want extra security. Double-check that all small parts are firmly sewn when making gifts for small children.
This adorable Love Dragon brings cozy charm and a lot of heart to any shelf or nursery — a perfect handmade companion to gift or keep. Each section builds into a lovable, huggable character with sweet details like pink spikes, a cushy heart, and gentle rosy cheeks. Working through the rounds is a satisfying journey from little magic ring beginnings to a finished friend you can be proud of. 🧶💖✨