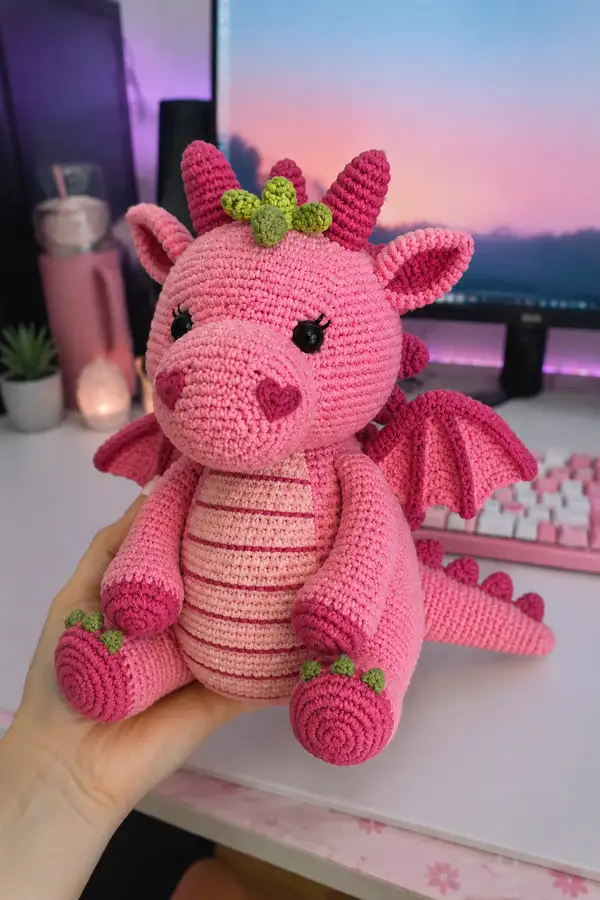
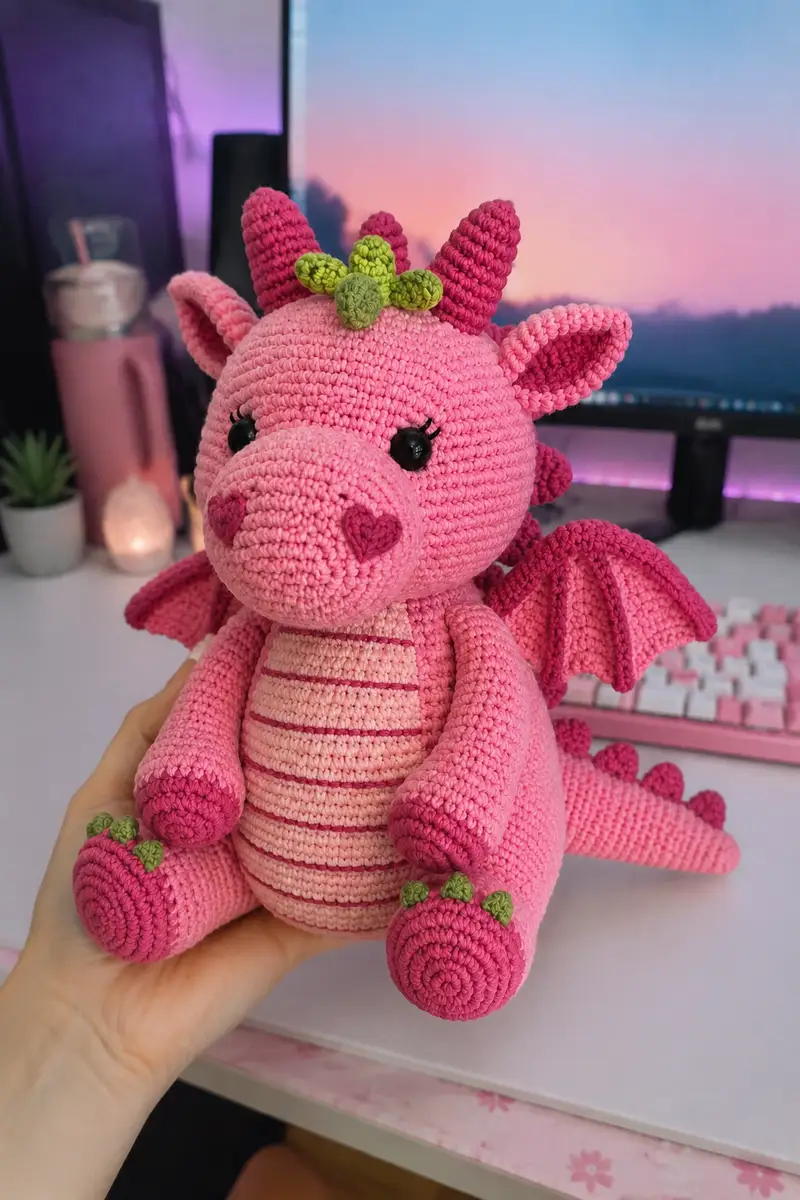
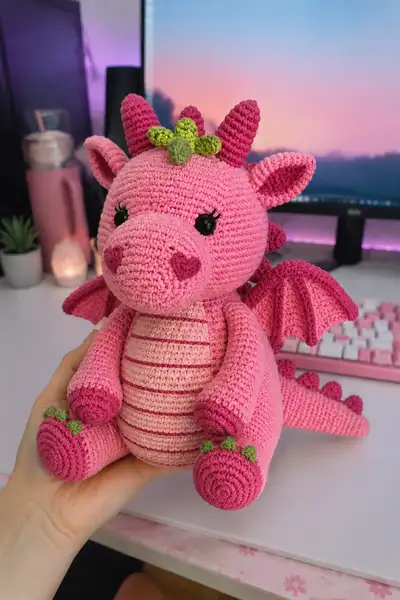
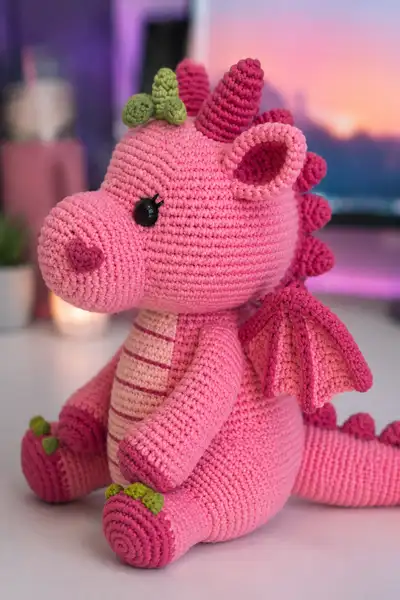
Create a cuddly strawberry-pink dragon with heart-shaped cheeks, scalloped wings, and leafy green accents. This pattern recreates the large, plush amigurumi pictured — tall snout, rounded head, curled tail with spikes, and striped pale-pink belly. Worked mostly in continuous rounds with color accents, this project is playful, tactile, and perfect as a gift or centerpiece.
Progress Tracker
0% Complete
— Notes :
Info :
All parts are worked in continuous (spiral) rounds unless otherwise stated. Use a stitch marker to mark the first stitch of each round. Numbers in parentheses at the end of rounds show the total stitch count. Work tightly enough to hide stuffing.
Info :
Color key: MAIN PINK = strawberry pink (body), DARK PINK = hot pink (horns, paw tips, spikes, wing edges), PALE PINK = pale peach pink (belly panel), GREEN = leaf green (toes, head leaves), CHEEK PINK = darker accent for heart cheeks. When changing colors, fasten off neatly and weave tails inside.
— Head :
Round 1 :
6 sc in magic ring (6)
Round 3 :
(1 sc, inc) x 6 (18)
Round 4 :
(2 sc, inc) x 6 (24)
Round 5 :
(3 sc, inc) x 6 (30)
Round 6 :
(4 sc, inc) x 6 (36)
Round 7 :
(5 sc, inc) x 6 (42)
Round 8 :
(6 sc, inc) x 6 (48)
Round 9-15 :
1 sc in each st (48)
Info :
Place safety eyes between rounds 13-14 about 11-13 sts apart (measure center-to-center) depending on desired look. Use stitch marks to reserve placement. Eyes in photos sit around 13 sts apart on a 48-48 head circumference.
Round 16 :
(6 sc, inc) x 6 (54) - subtle round to slightly widen crown for cheek shaping
Round 17-22 :
1 sc in each st (54)
Info :
Before starting round 23, position the muzzle opening area: the muzzle will be attached centered on the lower front of the head between rounds 18-22. Mark the bottom center stitch to align muzzle perfectly.
Round 23 :
(6 sc, dec) x 6 (48)
Round 24 :
(5 sc, dec) x 6 (42)
Round 25 :
(4 sc, dec) x 6 (36)
Info :
Begin stuffing head firmly but not overstuffing—aim for a smooth oval. Add small amounts of stuffing as you go so the head remains even. Continue stuffing between rounds 25-28.
Round 26 :
(3 sc, dec) x 6 (30)
Round 27 :
(2 sc, dec) x 6 (24)
Round 28 :
(1 sc, dec) x 6 (18)
Info :
Fasten off leaving long tail for sewing neck to body later. Finish closing the top opening and weave tail inside head. Do not close completely if you prefer to stuff a bit more later through neck before assembly.
— Snout / Muzzle :
Round 1 :
6 sc in magic ring (6)
Round 3 :
(1 sc, inc) x 6 (18)
Round 4 :
(2 sc, inc) x 6 (24)
Round 5 :
(3 sc, inc) x 6 (30)
Round 6-11 :
1 sc in each st (30) - create a long cylinder for the snout length
Info :
Position muzzle so its top aligns with the lower half of the head front (between rounds 18-22 on head). Stuff the muzzle firmly to keep the rounded nose shape. Securely hold alignment when sewing.
Round 12 :
(3 sc, dec) x 6 (24)
Round 13 :
(2 sc, dec) x 6 (18)
Round 14 :
(1 sc, dec) x 6 (12)
Info :
Leave a long tail for sewing. Fold the last small opening closed or leave a small hole if you prefer to sew into the head and finish stuffing from the inside for a smoother join.
— Cheek Hearts (Make 2) :
Round 1 :
Magic ring, 6 sc in ring (6)
Round 3 :
(1 sc, inc) x 6 (18)
Round 4 :
Work 6 sc, ch 1, sl st into next 2 sts to create heart indent, then 6 sc (18) - shape heart by arranging stitches when sewing
Info :
Use dark pink CHEEK PINK. These are flat appliques; do not stuff. Use mattress stitch or whip stitch to attach one on each side of muzzle, slightly above the nostril area, symmetric to eyes.
— Belly Panel (PALE PINK) :
Round 1 :
6 sc in magic ring (6)
Round 3 :
(1 sc, inc) x 6 (18)
Round 4 :
(2 sc, inc) x 6 (24)
Round 5 :
(3 sc, inc) x 6 (30)
Round 6 :
(4 sc, inc) x 6 (36)
Round 7 :
(5 sc, inc) x 6 (42)
Round 8-14 :
1 sc in each st (42) to create slightly elongated oval panel that covers the front of the body
Info :
After completing the panel, embroider darker pink stripes across the panel using surface slip stitch or thin yarn—space stripes 4 rounds apart (or 6-7 stitches height). See assembly notes for alignment on body.
— Body :
Round 1 :
6 sc in magic ring (6)
Round 3 :
(1 sc, inc) x 6 (18)
Round 4 :
(2 sc, inc) x 6 (24)
Round 5 :
(3 sc, inc) x 6 (30)
Round 6 :
(4 sc, inc) x 6 (36)
Round 7 :
(5 sc, inc) x 6 (42)
Round 8 :
(6 sc, inc) x 6 (48)
Round 9 :
(7 sc, inc) x 6 (54)
Round 10-18 :
1 sc in each st (54) for the widest part of the body
Info :
At the end of round 14, leave a long tail and pin the belly panel (PALE PINK) centered on the front of the body to check placement. The belly panel should reach from about round 6 down to round 16 on the front.
Round 19 :
(7 sc, dec) x 6 (48)
Round 20 :
(6 sc, dec) x 6 (42)
Round 21 :
(5 sc, dec) x 6 (36)
Round 22 :
(4 sc, dec) x 6 (30)
Round 23 :
(3 sc, dec) x 6 (24)
Round 24 :
(2 sc, dec) x 6 (18)
Round 25 :
(1 sc, dec) x 6 (12)
Info :
Begin stuffing the body from the bottom up at round 20-22. Fill firmly around the lower belly so the finished toy sits upright. Leave the top opening (neck area) open for sewing the head in later; do not fasten off yet — leave long tail for sewing the head on securely.
— Neck Join (Optional shaping rounds if needed) :
Round 26 :
Work 1 sc in each of the 12 sts (12) to create a short neck tube if you prefer a visible neck (this can be length 1-3 rounds)
Info :
If you prefer a flush join, skip adding a neck tube and sew head directly to the top opening, matching decreases on head to the body top opening. Use whip stitch to sew evenly and weave ends inside for a clean finish.
— Arms (Make 2) :
Round 1 :
6 sc in magic ring (6)
Round 3 :
(1 sc, inc) x 6 (18)
Round 4 :
(2 sc, inc) x 6 (24)
Info :
The arms in the photo are tapered cylinders ending with darker paw tips. Start stuffing the hand/paw area relatively firmly here to keep the arms plump.
Round 5-9 :
1 sc in each st (24) - lengthen arm
Info :
Change to DARK PINK for paw tips: Switch to DARK PINK at the beginning of round 10 and carry color across rows or fasten off and join later.
Round 10-12 :
1 sc in each st (24) in DARK PINK to form paw tip (3 rounds of darker color)
Round 13 :
(3 sc, dec) x 6 (18) - tapering slightly toward elbow
Round 14-16 :
1 sc in each st (18)
Round 17 :
(2 sc, dec) x 6 (12)
Round 18 :
1 sc in each st (12) for shoulder tube
Info :
Stuff hands firmly, arms moderately. Leave a long tail for sewing the arm to the body. For a slightly poseable arm, insert thin wire inside the arm before final stuffing and securely fold ends back and cover with a small bit of stuffing.
— Legs / Feet (Make 2) :
Round 1 :
6 sc in magic ring (6)
Round 3 :
(1 sc, inc) x 6 (18)
Round 4 :
(2 sc, inc) x 6 (24)
Round 5 :
(3 sc, inc) x 6 (30)
Round 6-10 :
1 sc in each st (30) - foot spiral to form round sole area
Info :
At the bottom rounds, you can work in FLO for a slight ridge if you want a foot demarcation. In the photos the feet have visible spiral texture and darker toe pads at the top.
Round 11 :
Change to DARK PINK and work 1 sc in each st for 3 rounds (30) to create toe/paw top
Round 12-15 :
Switch back to MAIN PINK and work 1 sc in each st (30) to build ankle and lower leg
Round 16 :
(4 sc, dec) x 6 (24)
Round 17 :
(3 sc, dec) x 6 (18)
Round 18 :
(2 sc, dec) x 6 (12)
Round 19 :
1 sc in each st (12) - leg tube for hip attachment
Info :
Stuff feet firmly, legs moderately. Leave a long tail for sewing to the bottom of the body. Position toes: add 3 small green leaf stitches (see toes below) to the front of each foot.
— Toes / Leaf Toes (Make 6 small leaves for toes total) :
Round 1 :
Ch 3, 1 sc in 2nd ch from hook, 1 sc in next (2) - or work 4 sc in magic ring and flatten
Round 2 :
Turn, 1 sc in each st, sl st to join making a small teardrop (2-4 sts dependent on method)
Info :
Use GREEN yarn. Make 3 for each foot and sew to front of paw in a row near the toe area (centered on the darker paw tip). These are tiny and flattened; no stuffing required.
— Tail :
Round 1 :
6 sc in magic ring (6)
Round 3 :
(1 sc, inc) x 6 (18)
Round 4 :
(2 sc, inc) x 6 (24)
Round 5-20 :
1 sc in each st (24) - extended rounds to create tapered tail length
Info :
Attach small spikes along the top of the tail at even intervals starting at round 6 of the tail. In the photos, spikes are spaced approximately every 3-4 rounds along the tail and are DARK PINK cones sewn on separately.
Round 21 :
(2 sc, dec) x 6 (18)
Round 22 :
(1 sc, dec) x 6 (12)
Info :
Do not completely close. Leave a long tail for attaching to the back of the body. Stuff the tail lightly for a cuddly curve.
— Spikes (Make 8-10) :
Round 1 :
5 sc in magic ring (5)
Round 3-6 :
1 sc in each st (10) - work to desired height
Round 7 :
(2 sc, dec) x 2, 1 sc (8) - taper slightly
Info :
Use DARK PINK. Make 8-10 spikes: place 3-4 along the tail, 4-5 along the back and 1-2 near the upper neck. Sew into place to create the distinct ridge on the back.
— Horns (Make 2) :
Round 1 :
6 sc in magic ring (6)
Round 3 :
(1 sc, inc) x 6 (18)
Round 4-14 :
1 sc in each st (18) - work straight to build a tall cone for the horn
Round 15 :
(1 sc, dec) x 6 (12) - slight taper
Round 16 :
1 sc in each st (12)
Info :
Stuff lightly so horn keeps shape. Use spiral seam while sewing on to avoid visible gap. Position horns on top of the head slightly toward the back and angle them slightly outwards like in the photo.
— Ears (Make 2) :
Round 1 :
6 sc in magic ring (6)
Round 3 :
(1 sc, inc) x 6 (18)
Round 4 :
(2 sc, inc) x 6 (24)
Round 5 :
1 sc in each st (24)
Round 6 :
Fold ear in half and sc through both layers along straight edge to create a slight cupped ear shape (approx 10-12 sc across folded edge)
Info :
Sew ears to upper sides of the head between rounds 10-14 so they tilt forward slightly. The inner ear in the photo looks slightly indented and darker; you can add a row of DARK PINK inside the ear rim for contrast.
— Wings (Make 2) :
Wing Base Round 1 :
Ch 10, ss to form ring, 1 sc in each ch (10)
Round 2 :
Inc in last st, 1 sc across opposite side of chain, inc in last st to build rounded oval (14) - work evenly
Round 3-6 :
1 sc in each st (14) - extend to desired wing length
Wing Edge & Membrane :
Switch to BLO on the next row and work 2-3 rows BLO to create a ridge where the membrane meets the arm. Then switch back to MAIN PINK and work 3 rows for membrane shape with slight increases at the outer curve.
Info :
Use DARK PINK for the outer wing edge by working a round of DARK PINK sl st or sc around the outer edge of the wing to create the defined darker border seen in the photo. Sew closely to the body between rounds 10-12 on the side of the torso.
Wing Ridges (Make 3 per wing) :
Work short tubes: 6 sc in magic ring, inc round to 12, 3-4 rounds 1 sc (12), fasten off leaving tail to sew these vertically into the wing to create the segmented ribs. Sew each ridge at even spacing.
— Back Leaves (Head Top) :
Leaf 1 :
Ch 4, sc in 2nd ch from hook, hdc next, sl st next; fasten off. Flatten and shape. Make 3 small leaves in GREEN and arrange at top center of head between horns.
Info :
These small green leaves are purely decorative and sewn on with a few secure stitches at the base. They should be small and flattened like the image; place one central and two slightly below or aside for a cluster effect.
— Assembly & Final Details :
Info :
Sew the muzzle to the head first. Align center of muzzle with marked center stitch on head that was noted earlier. Use matching MAIN PINK yarn and ladder stitch or whip stitch to sew, making sure the seam is tight and invisible. Stuff muzzle firmly before finishing the join.
Info :
Attach cheeks: position heart appliques symmetrically on each side of the muzzle slightly below the eyes; stitch around edges carefully and weave tail to the inside to hide ends.
Info :
Sew head to body: pin head on top opening of body, making sure center points match. Sew through the neck rounds evenly distributing stitches around the seam—use 20-30 passes depending on your yarn thickness to secure.
Info :
Attach arms to body between rounds 12-16 on the sides, slightly in front so they rest naturally on the belly. Sew legs at the bottom opening with spacing so the dragon can sit upright; place them approximately 10-12 sts apart center-to-center depending on body circumference.
Info :
Sew tail to the back center of the body at the lower back opening aligning spikes along the top. Add extra stitches at the join for stability so tail supports the toy when seated.
Info :
Sew the horns to the top of the head slightly behind the eyes; angle them outward. Sew spikes on back and tail. Sew wings to the sides at rounds 10-12 of the body with the darker edge outward. Add small green leaves to toes and head cluster last for neatness.
Info :
Embroider eyelashes or detach tiny fringe lashes with thin black yarn near the top of safety eyes if desired. Use craft glue to help secure knots if making a gift for a small child, but avoid loose parts for very young children.
Round Summary Count :
This pattern contains many subcomponents. Total rounds across primary pieces approximate 180-220 rounds depending on how long you make appendages and how many ribs/spikes you add. Keep a row counter for each piece to ensure symmetrical parts.
Info :
Weave in all ends into inner seams for a clean finish. If using safety eyes, ensure washers are secure and glued if necessary. Add a little blush to cheeks with soft pastel or fabric paint if desired.
Finishing this big strawberry-pink dragon is such a lovely reward—each stitch brings the plush friend to life! The heart-shaped cheeks, scalloped wings, and tiny green leaves add character and charm. This pattern encourages creativity while giving clear, structured steps for neat construction. Enjoy the process and share your plush dragon with someone special when it’s done! 🧶💖