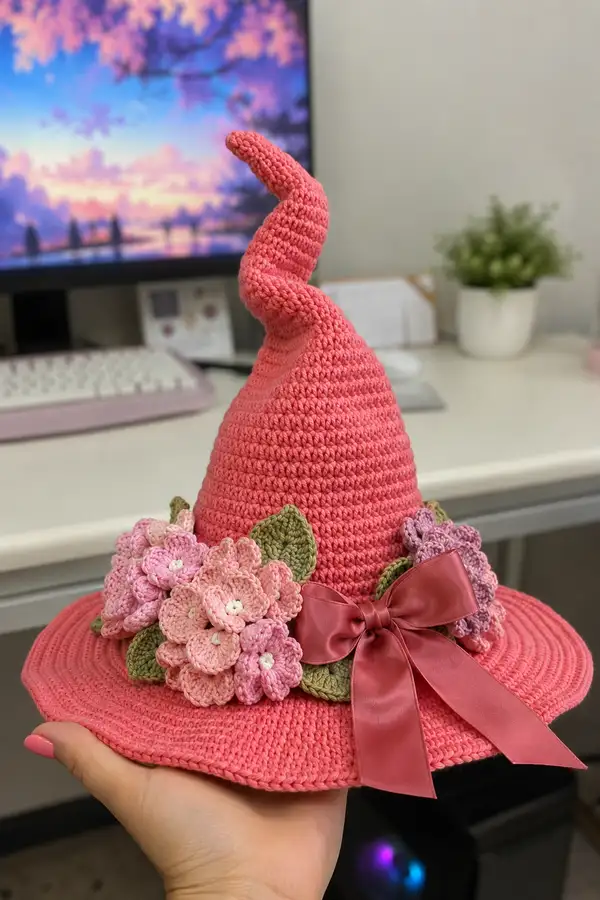
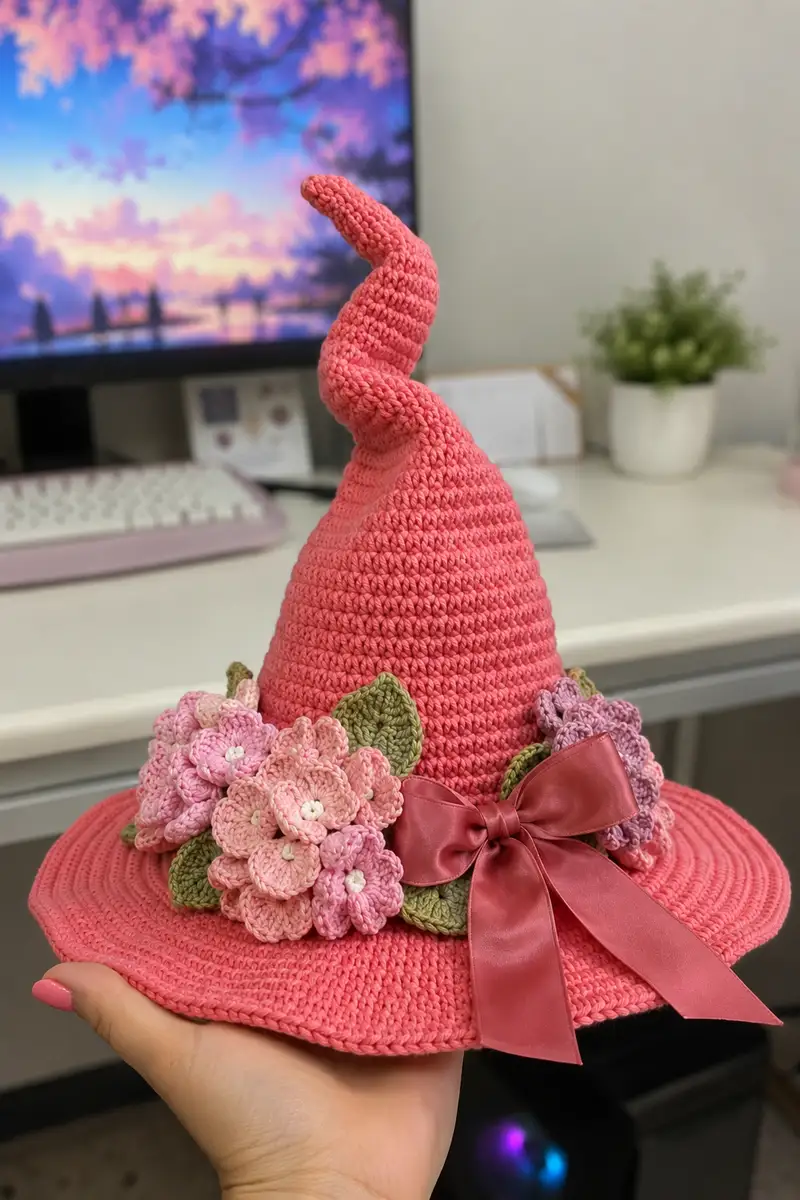
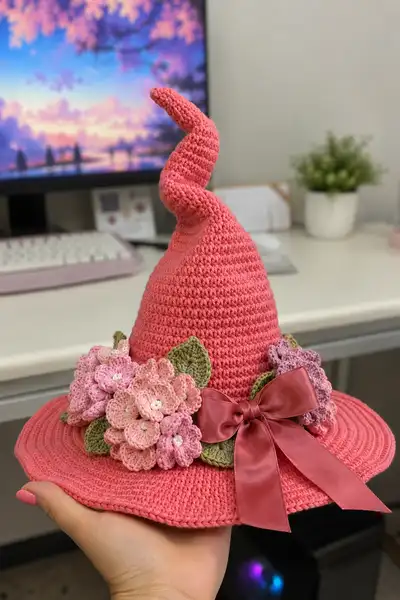
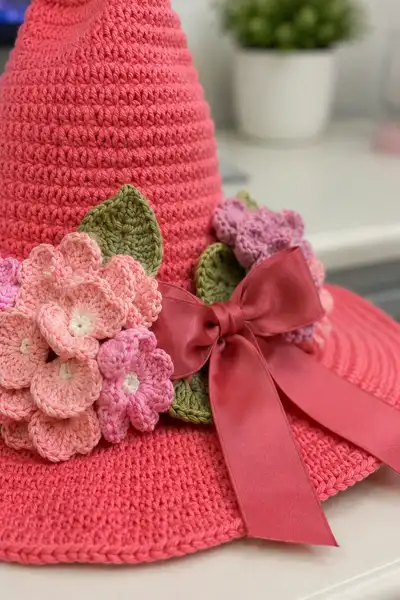
A whimsical tall coral-pink spiral witch hat with a wide brim, crafted in smooth cotton yarn and finished with layered hydrangea clusters, olive-green leaves and a satin bow. This decorative accessory is structured for shape and stability with a gently twisted tip and a graceful flared brim. Perfect as a statement accessory, photo prop, or tabletop decoration — feminine, floral and full of personality.
Progress Tracker
0% Complete
— Overview & Gauge :
Info :
Gauge isn't critical for this decorative hat, but consistent tension is essential for shape. Using worsted cotton and a 3.5mm hook gives a firm fabric with good structure. Finished hat (as photographed) measures approximately 11" tall (to tip before twist) and the brim is approximately 11-12" across. Adjust hook size for tighter or looser fabric.
Info :
This pattern is modular: you will make the crown (cone), a spiral tip extension, the brim, multiple hydrangea flower motifs, leaves, and attach a satin bow. I recommend working in continuous rounds (spiral) for the crown to avoid visible seam lines unless you prefer joined rounds; where rounds are joined, instructions indicate so.
— Crown (Tall Cone) :
Round 1 :
6 sc in magic ring (6)
Round 3 :
(1 sc, inc) x 6 (18)
Round 4 :
(2 sc, inc) x 6 (24)
Round 5 :
(3 sc, inc) x 6 (30)
Round 6 :
(4 sc, inc) x 6 (36)
Round 7 :
(5 sc, inc) x 6 (42)
Round 8 :
(6 sc, inc) x 6 (48)
Round 9 :
(7 sc, inc) x 6 (54)
Round 10 :
(8 sc, inc) x 6 (60)
Round 11 :
(9 sc, inc) x 6 (66)
Round 12 :
(10 sc, inc) x 6 (72)
Round 13 :
(11 sc, inc) x 6 (78)
Info :
By Round 13 you have reached the maximum circumference for the crown base. This circumference creates the head opening and will determine brim starting point. If you prefer a smaller or larger fit, add or omit increase rounds by increments of 6 stitches (one full repeat).
Round 14-28 :
1 sc in each st around (78)
Info :
Work rounds 14-28 as continuous rounds to build the tall cone body. Place a stitch marker at the start of round 14 and move it up each round. At the end of round 18 consider trying the hat on or measuring height — the crown height can be adjusted by adding or subtracting even rounds (78).
Round 29 :
(11 sc, 1 dec) x 6 (72)
Round 30 :
(10 sc, 1 dec) x 6 (66)
Info :
Begin gradual narrowing to shape the upper cone. Stuffing is optional at this stage; we will optionally insert a light cone reinforcement later. Keep the fabric firm but not overstuffed.
Round 31 :
(9 sc, 1 dec) x 6 (60)
Round 32 :
(8 sc, 1 dec) x 6 (54)
Round 33 :
(7 sc, 1 dec) x 6 (48)
Round 34 :
(6 sc, 1 dec) x 6 (42)
Info :
At the end of Round 34 the crown is tapered for the transition to the spiral tip. If you want a taller cone, add more even rounds earlier. For a more dramatic narrowing, continue decreasing one or two more rounds. Fasten off leaving a long tail only if you plan to sew the spiral tip on; otherwise continue to the spiral tip section without fastening.
— Spiral Tip Extension (worked onto crown top) :
Info :
We will work the spiral extension in continuous rounds attached to the crown top. This section is worked in smaller repeated decreases and occasional BLO rounds that bias the fabric and naturally form the spiral. Optionally insert a thin wire into the extension as you work (wrap ends) to pose the twist.
Round 1 :
Join coral-pink to any stitch at the crown top. 1 sc in each st around (42)
Round 2 :
(5 sc, inc) x 6 (48)
Round 3 :
1 sc in each st BLO (48)
Round 4 :
(6 sc, inc) x 6 (54)
Round 5 :
1 sc in each st BLO (54)
Round 6 :
(7 sc, inc) x 6 (60)
Info :
Alternate regular rounds and BLO rounds to create a subtle bias; this will help the tip curve as you taper. If adding wire, insert it now through the center of the extension and continue working around it, covering the wire with yarn and stuffing for a clean finish. Be careful to fold or cap wire ends.
Round 7 :
(8 sc, inc) x 6 (66)
Round 8 :
1 sc in each st BLO (66)
Round 9 :
(8 sc, 1 dec) x 6 (54)
Round 10 :
(7 sc, 1 dec) x 6 (48)
Round 11 :
(6 sc, 1 dec) x 6 (42)
Round 12 :
(5 sc, 1 dec) x 6 (36)
Info :
As you decrease, gently twist the work with your non-hook hand in the direction you want the spiral to face. Work evenly and try on frequently so the spiral tapers and curves pleasingly. Add small amounts of stuffing inside the spiral tip if you want a firmer bend.
Round 13 :
(4 sc, 1 dec) x 6 (30)
Round 14 :
(3 sc, 1 dec) x 6 (24)
Round 15 :
(2 sc, 1 dec) x 6 (18)
Round 16 :
(1 sc, 1 dec) x 6 (12)
Info :
Fasten off leaving a long tail to weave inside the spiral tip and secure. If you inserted wire, gently bend to desired spiral and sew through a few stitches to lock shape. Weave tail to interior and hide securely. If you prefer a longer extended tip, stop decreases earlier and continue rounds of 1 sc around until desired length before decreasing.
— Brim (Flared Disk) :
Info :
Attach to crown base where the cone met its largest circumference (the R13/R14 area where you established 78 sts). The brim is worked in rounds with gradual increases to lie flat and flare. For extra stiffness, you can add a lightweight plastic canvas insert or interfacing between two brim layers during assembly.
Round 1 :
Join coral-pink at the base of crown (78) *mark this stitch as brim round 1*
Round 2 :
(11 sc, inc) x 6 (84)
Round 3 :
1 sc in each st around (84)
Round 4 :
(12 sc, inc) x 6 (90)
Round 5 :
1 sc in each st around (90)
Round 6 :
(13 sc, inc) x 6 (96)
Round 7 :
1 sc in each st around (96)
Info :
Alternate increase rounds and even rounds to help the brim expand gently. If brim begins to ripple, reduce the frequency of increases. If brim cups upward, add another increase round to flatten it.
Round 8 :
(14 sc, inc) x 6 (102)
Round 9 :
1 sc in each st around (102)
Round 10 :
(15 sc, inc) x 6 (108)
Round 11 :
1 sc in each st around (108)
Round 12 :
(16 sc, inc) x 6 (114)
Round 13 :
1 sc in each st around (114)
Round 14 :
(17 sc, inc) x 6 (120)
Info :
At this stage the brim is quite broad. If you prefer a narrower brim, stop increasing earlier. For the hat in the photo the brim totals 12 rounds of expansion then 6 finishing rounds; adjust to taste.
Round 15-20 :
1 sc in each st around (120)
Round 21 :
1 sc in each st BLO around (120) — creates subtle ridge along brim edge
Round 22 :
1 hdc in each st around (120)
Round 23 :
1 sc in each st around (120)
Round 24 :
1 sc in each st BLO (120)
Round 25 :
1 sl st in each st around to tidy edge; fasten off and weave in ends
Info :
For extra stability, sandwich a round of very lightweight plastic canvas or interfacing between rounds 18 and 19 by making two brim layers and sewing together around the edge. Alternatively, block the brim while wet and pin to shape until dry.
— Hydrangea Flower Motif (Make 6 clusters; mix sizes) :
Info :
Hydrangea clusters are made from many small petal motifs joined into layered rounds. Below is a single petal cluster (one 6-petal flower). Make a variety of sizes by changing yarn shade and blocking lightly. For the hat shown, make 3 larger 6-petal flowers and 3 small 5-petal fillers (total 6 clusters).
Petal Cluster Round 1 :
Ch 2, 6 sc in 2nd ch from hook, sl st to join (6) — small center ring
Petal Cluster Round 2 :
*Ch 2, (1 hdc, 1 dc, 1 hdc) in next st, sl st to next st to anchor*; rep from * to * around to make 6 petals (6 petals)
Petal Cluster Round 3 :
Fasten off and weave tail to center or leave long for sewing. For slightly larger petals, use (1 hdc, 2 dc, 1 hdc) in each petal base. Make 3 of these larger clusters in light-variegated pink.
Info :
To make smaller filler flowers, reduce rounds by using (1 hdc, 1 dc, 1 hdc) and use a smaller hook (3.0mm). Block petals outward gently to create dimensional clusters. Mix shades for realistic hydrangea look.
Layered Flower (optional) Round 1 :
To get a fuller hydrangea, sew two petal clusters together offsetting petals so they nest. Center sew using a yarn needle through the base of each petal and secure with a few stitches.
Petal Center Embroidery :
With cream yarn and a fine needle, stitch a small French knot or a tiny stitched dot into the center of each petal cluster for subtle highlights; tie and hide ends underneath the cluster.
Info :
Make 3 larger petal clusters (6-petal) and 3 smaller clusters. You can also create extra tiny single-petal motifs to fill gaps; they can be made by chaining 3 and making a mini shell (sc, hdc, sc) in a single stitch and finishing.
— Leaves (Make 6–8) :
Round 1 :
Ch 10, sc in 2nd ch from hook, hdc in next, dc in next 3, hdc in next, sc in next, sl st in last ch to turn working along opposite side; sc in next, hdc in next, dc in next 3, hdc in next, sc in last, sl st to join. Fasten off (approx 18-20 sts depending on tension)
Round 2 :
Rejoin at base, *ch1, sc around leaf edge in each st, increasing slightly at the two widest points with (2 sc) to create a gentle bulge; sl st to join*; fasten off (edge row)
Round 3 :
Using leaf green, embroider a central vein with surface slip stitch or back stitch using tapestry needle. Optionally work 1 sc into center back to create slight curve.
Info :
Make 6–8 leaves in two sizes (larger and medium). Block leaves lightly to shape. Leaves will be sewn under and between clusters to create fullness and hide bowl edges of floral placements.
— Small Filler Flowers (Make 6-8) :
Round 1 :
Ch 2, 5 sc in 2nd ch from hook, sl st to join (5)
Round 2 :
*Ch 2, (1 hdc, 1 dc, 1 hdc) in next st, sl st to next*; repeat to make 5 petals, fasten off (5 petals)
Info :
Use these small filler flowers to build depth around larger clusters. Work them in a slightly darker or lighter pink to create natural shading.
— Assembly of Floral Band :
Info :
Decide placement around the base of the crown where the crown meets the brim (this band is centered on the front third of the hat in the photo). Arrange clusters, leaves, and filler flowers until you like the composition, then pin securely. Layer clusters where needed: larger clusters on bottom/back and smaller clusters on top/front for depth.
Step 1 :
Position 3 large hydrangeas on the left front, 2 medium/small on the right front, with leaves poking out between clusters. Use pins to hold in place.
Step 2 :
Sew each cluster to the crown with matching yarn using a strong overcast or ladder stitch; pass the needle through the crown and flower base several times to secure. Sew leaves underneath and in between clusters to hide stitches and support shapes.
Info :
For a flatter look, sew only through the outermost brim fabric and the flower base. For a 3D look, sew more securely into the crown so clusters sit away from brim slightly. Weave in ends thoroughly under leaves so nothing shows on the surface.
— Satin Bow (Fabric Bow Attach) :
Info :
In the photographed hat, a wide coral satin ribbon bow is used and pinned/sewn over the center of the floral band. You can make a bow from ribbon or crochet one from yarn. The instructions below assume a pre-made satin ribbon (1.5-2" wide).
Step 1 :
Tie or form a satin bow approximately 6-7" across with tails approx 6-8" long. Secure knot tightly and add a small piece of matching yarn around the center to hide the knot if desired.
Step 2 :
Pin the bow centered on the floral assembly, with the knot overlapping a central flower. Sew through the back of the ribbon into the hat crown (not visible on the surface) using a yarn needle and strong thread. Use several secure stitches to prevent slippage. Hide thread under a leaf.
Info :
If the ribbon is slippery, apply a small dab of fabric glue under the bow (on inside of crown) and allow to dry before final sewing. This prevents movement and reduces the need for heavy stitching which might distort the ribbon.
— Optional Brim Reinforcement & Lining :
Info :
For wearable hats, create a lightweight lining using thin felt or cotton to protect hair from yarn and to hide seam allowances. For stability, cut a circle of plastic canvas to fit between brim rounds and glue or hand-stitch into place before finishing the outer edge.
Step 1 :
Cut a circle of interfacing/plastic canvas slightly smaller than the brim outer edge. Insert between two brim layers if you made a double brim, or slip in by working a few hand-stitches to hold in place along inner brim perimeter.
Info :
The hat photographed is stiff enough to keep its shape without a full interfacing insert because of the dense cotton and stitch selection. If your fabric is softer, reinforcement is recommended for wearable usage.
— Final Finishing Touches :
Round 1 :
Trim any long yarn tails, secure with knots if necessary, and weave ends at least 2" into the inner crown to hide. Check all flower and leaf attachments for security.
Round 2 :
Shape the spiral tip by gently bending and stitching down a few interior stitches to lock the desired curve. If you installed wire, bend the wire to create the pictured spiral and cover ends with a few stitches.
Info :
Block the entire hat by lightly misting with water and pinning to form desired brim curvature. Allow to dry completely. Avoid heavy steam with synthetic ribbons; protect ribbon with cloth if steaming near it.
Round 3 :
Admire your hat and adjust the placement of flowers or bow as desired. The hat can be made larger or smaller by changing hook, yarn weight, or by increasing/decreasing early crown rounds (in increments of 6 stitches).
Info :
Care instructions: Hand wash in cool water with mild detergent and reshape while damp. Avoid wringing or tumble-drying. Spot clean satin ribbon if needed.
This coral spiral witch hat brings together sculptural crochet shaping and romantic floral detail for a standout accessory! The tall twisted crown, wide flared brim, layered hydrangeas and satin bow combine to create a vintage-feminine piece you’ll love styling. Each section is carefully constructed and assembled for a lasting, display-ready result. 🧶🌸 Enjoy making and customizing this charming hat — it’s as delightful to give as it is to receive! 🎀