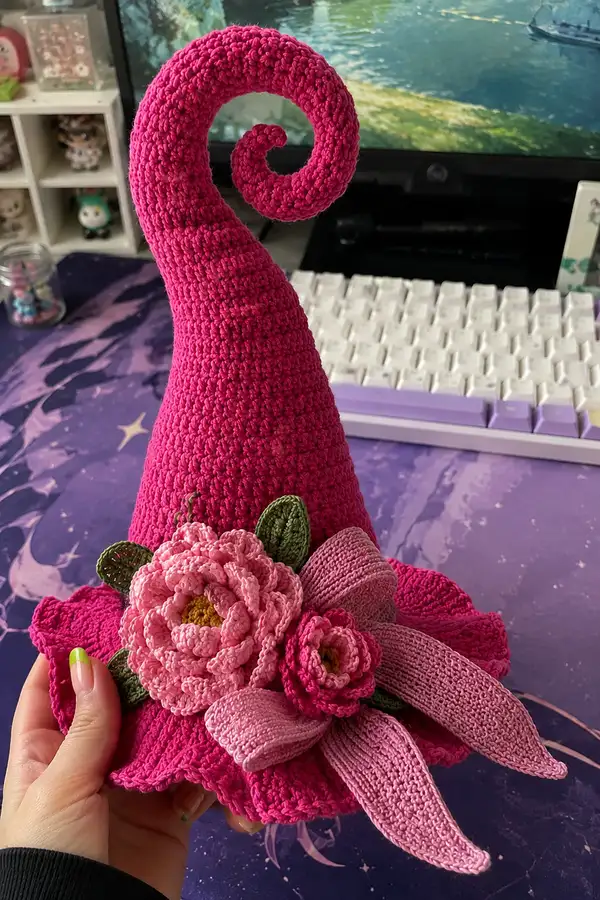
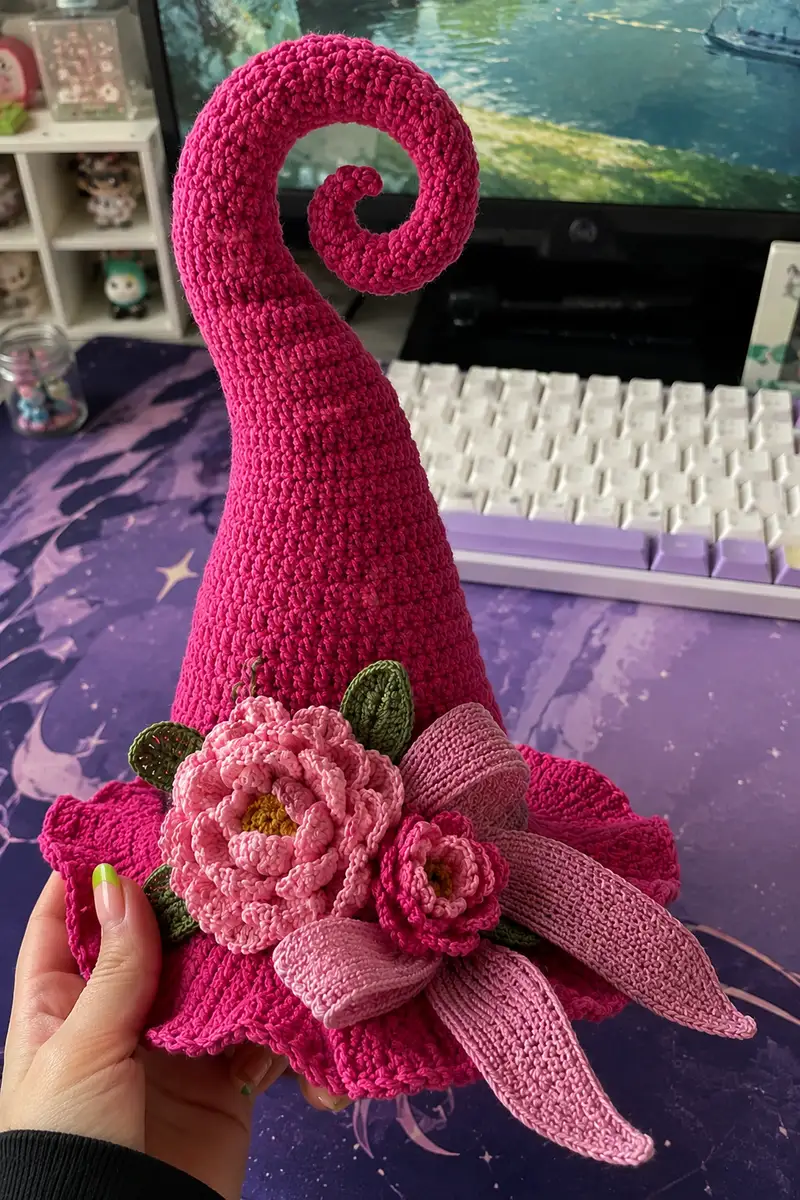
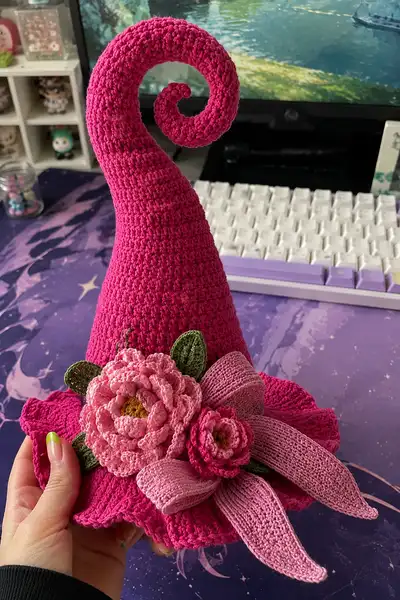
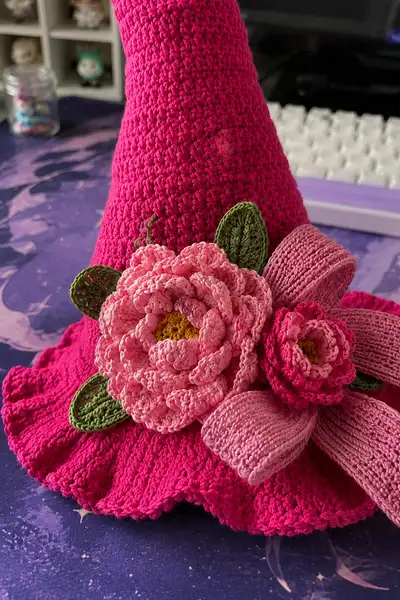
A bold, tall witch hat crocheted in a vibrant hot pink with a whimsical curled tip, wide ruffled brim, and layered peonies with a soft ribbon bow. This decorative accessory features textured ridges, sculpted petals in blush and rose tones, and leafy accents for a feminine, magical finish. Designed to be displayed or worn as a statement accessory, the pattern breaks the construction into clear sections so you can assemble each piece with confidence.
Progress Tracker
0% Complete
— Crown (worked top-down, tip to brim) :
Round 1 :
6 sc in magic ring (6)
Round 3 :
(1 sc, 1 inc) x 6 (18)
Round 4 :
(2 sc, 1 inc) x 6 (24)
Round 5 :
(3 sc, 1 inc) x 6 (30)
Info :
Work tightly and keep your hook size small relative to the yarn to ensure no stuffing shows through and crisp shaping. Place a stitch marker in first stitch of each round.
Round 6 :
(4 sc, 1 inc) x 6 (36)
Round 7 :
(5 sc, 1 inc) x 6 (42)
Round 8 :
(6 sc, 1 inc) x 6 (48)
Round 9 :
(7 sc, 1 inc) x 6 (54)
Info :
By round 9 you will have established the taper near the tip. Continue to place markers every 10 rounds to track your progress for a tall crown.
Round 10 :
(8 sc, 1 inc) x 6 (60)
Round 11-20 :
1 sc in each st (60)
Info :
Work rounds 11-20 evenly to build the tall cone. Keep tension consistent. If you want a slightly slimmer cone, work 2 rounds with BLO to create a faint ridge and slightly contract the fabric.
Round 21 :
1 sc in each st (60)
Round 22 :
1 sc in each st (60)
Round 23 :
1 sc in each st (60)
Round 24 :
1 sc in each st (60)
Info :
At round 20-24 check the height against reference—this crown is tall; if you prefer a shorter hat, stop after round 16-18. For a dramatic spiral you will add the spiral extension next.
Round 25 :
1 sc in each st (60)
Round 26 :
1 sc in each st (60)
Round 27 :
1 sc in each st (60)
Round 28 :
1 sc in each st (60)
Info :
Now we'll begin the spiral extension that creates the curled tip; you can optionally insert a thin wire later for a firm curl—see the Spiral Tip section. When changing shaping, maintain markers and ensure top rows remain centered.
— Spiral Tip (worked as a tapered tube extension, then curled) :
Round 1 :
Change to same main color if you had changed; join yarn to any stitch at top front of crown and ch 1. Work 1 sc in same st and continue around top 18 sts to form the base of the tube (18)
Info :
We pick up 18 stitches to build a narrow tube that will taper to a curl. If your crown top feels small, pick up 20 sts instead and adjust subsequent rounds accordingly.
Round 2 :
(1 sc, 1 inc) x 6 (24)
Round 3 :
(2 sc, 1 inc) x 6 (30)
Round 4 :
(3 sc, 1 inc) x 6 (36)
Round 5 :
1 sc in each st (36)
Round 6 :
1 sc in each st (36)
Info :
These rounds create a short flared section that transitions smoothly from crown to tube. If you want a longer spiral leg, work more even rounds before tapering.
Round 7 :
(4 sc, 1 inc) x 6 (42)
Round 8 :
1 sc in each st (42)
Round 9 :
1 sc in each st (42)
Round 10 :
(4 sc, 1 dec) x 6 (36)
Round 11 :
(3 sc, 1 dec) x 6 (30)
Info :
Begin to taper the spiral so it can curl inward. At this stage secure a short length of craft wire (optional) inside the center of the tube if you want the tip to hold a strict curl. Fold the wire so its ends are wrapped and padded by stuffing.
Round 12 :
(2 sc, 1 dec) x 6 (24)
Round 13 :
(1 sc, 1 dec) x 6 (18)
Info :
Close the very tip slightly leaving a small opening for stuffing. For a spiraled shape leave the last 6 sts open and do not fasten off—we'll continue working outward along one edge to create the curled spiral turn.
Round 15 :
Reopen by attaching yarn to the outer edge of the last row and work in continuous spiral along the outer edge: 1 sc in next 12 sts, 2 sc in next st, then turn 1 sc in each to form a narrow ridge (13)
Round 16 :
Work in spiral along outer edge: (1 sc, inc) x 4 then 1 sc in following 5 sts (17)
Round 17 :
(2 sc, inc) x 4 then 1 sc in following 9 sts (21)
Round 18 :
1 sc in each st (21)
Info :
As you extend this narrow curling strip, gently curve it with your fingers to set the shape. Add fiberfill sparsely inside the inner tube to give the curl structure; do not overstuff or it will resist curling.
Round 19 :
(3 sc, inc) x 4 then 1 sc in next 5 sts (25)
Round 20 :
(4 sc, inc) x 4 then 1 sc in next 9 sts (29)
Round 21 :
(5 sc, inc) x 4 then 1 sc in next 9 sts (33)
Round 22 :
1 sc in each st (33)
Info :
Continue to work the curling strip until you reach the desired spiral depth. The inner end should be small and tight; the outer end wider. If using wire, gently coil the wire inside and wrap with leftover yarn tails before finishing the outermost rows.
Round 23 :
(3 sc, dec) x 6 (27)
Round 24 :
(2 sc, dec) x 6 (21)
Round 25 :
(1 sc, dec) x 6 (15)
Round 26 :
5 dec (5) then fasten off leaving long tail for seam and shaping
Info :
After finishing the spiral, steam or gently shape with hands to coax it into a tight curl. Use a needle and the long tail to sew the outer curling strip to the crown at several points so it appears to grow naturally from the cone.
— Brim (worked flat, then ruffled edge) :
Round 1 :
6 sc in magic ring (6)
Round 3 :
(1 sc, inc) x 6 (18)
Round 4 :
(2 sc, inc) x 6 (24)
Round 5 :
(3 sc, inc) x 6 (30)
Round 6 :
(4 sc, inc) x 6 (36)
Round 7 :
(5 sc, inc) x 6 (42)
Round 8 :
(6 sc, inc) x 6 (48)
Round 9 :
(7 sc, inc) x 6 (54)
Info :
Continue increasing evenly each round to maintain a flat disk. The brim is large; to reach a wide ruffle you will increase for many rounds. Keep the disk flat by distributing increases evenly and checking for cupping (add an extra increase round if cup forms).
Round 10 :
(8 sc, inc) x 6 (60)
Round 11 :
(9 sc, inc) x 6 (66)
Round 12 :
(10 sc, inc) x 6 (72)
Round 13 :
(11 sc, inc) x 6 (78)
Round 14 :
(12 sc, inc) x 6 (84)
Round 15 :
(13 sc, inc) x 6 (90)
Round 16 :
(14 sc, inc) x 6 (96)
Info :
Stop increasing when the brim diameter reaches your desired width. This brim yields a generous flared circumference; if you prefer smaller brim, stop at round 12-14. After reaching diameter, work two rounds in BLO to create a slight raised seam line for attaching the crown.
Round 17 :
1 sc in each st BLO (96)
Round 18 :
1 sc in each st BLO (96)
Info :
To create the ruffle edge, we will work a shell stitch round; the shell density controls the ruffle depth. Adjust shells spacing to make deeper or softer ruffles.
Round 19 :
*Skip next st, 5 dc in next st, skip next st, sl st in next st; rep from * around (24 shells) — adjust spacing to fit round count
Round 20 :
Optional deeper ruffle: Into each shell: ch 1, (sc, hdc, 3 dc, hdc, sc) across each shell for fuller ruffle. Fasten off and weave ends
Info :
Block the brim flat and pin the ruffle into shape. If the brim feels floppy, spray lightly with fabric stiffener and pin to dry. When attaching the crown, sew the BLO rounds of brim to crown base evenly with mattress stitch for a neat join.
— Crown-to-Brim Join :
Info :
Match 96 sts at crown base to 96 sts at brim top (BLO round). If your crown count is different, evenly space the brim stitches to match the crown circumference. Pin crown to brim first before sewing.
Round 1 :
Sew crown to brim using whip stitch or mattress stitch through BLO row, spacing evenly. Start at the back and work around until seam is secure. Fasten off and weave tail inside brim (no numeric stitch count).
Info :
Ensure the seam lies flat by pulling slightly as you sew; secure at 8-10 evenly spaced points and then fill in the rest of the seam. Reinforce the seam more on one side if you plan to hang the floral bouquet there for weight balance.
— Large Layered Peony (Make 1 major bloom) :
Center Round 1 :
Using golden yellow, 6 sc in mr (6)
Center Round 2 :
6 inc (12)
Center Round 3 :
1 sc in each st (12)
Info :
This forms the dense yellow center of the peony. Fasten off yellow and join blush pink for petals. Keep the center slightly domed with a tiny bit of stuffing if desired.
Petal Round A (foundation row) :
Join blush pink to any st on center and ch 3, *skip 1 st, sc in next st, ch 3; rep around to make petal anchors. You should have 12 ch-3 loops to form petal bases (12 loops)
Petal Round B :
Work into each ch-3 loop: sl st, ch 2, (2 dc, tr, 2 dc), ch 2, sl st into same loop; rep around to make full petals (12 large petals)
Info :
These first petals are the innermost small ruffled petals. Keep them slightly released and round; block them gently with fingers to lift the petals from the center.
Petal Round C :
Work a second petal layer attaching to the base row between first petals: *sl st in space between petals, ch 4, (3 dc, tr, 3 dc), ch 4, sl st; rep 12 times (12 larger petals)
Petal Round D :
Third outer layer: Join blush pink at edge, *ch 6, skip next join, sc in next join; rep around to make 12 long loops (12 loops)
Petal Round E :
Into each ch-6 loop: sl st, ch 2, (4 dc, tr, 4 dc), ch 2, sl st; rep around (12 very full outer petals)
Info :
For a fuller peony add a fourth petal round by making larger chains and more dc clusters; you can also offset petals as you sew them together to increase depth. Make sure each layer is slightly larger than the previous to create a natural cup.
Finishing Petals :
Fasten off leaving long tail for sewing. Use long tail to stitch the petal layers to one another at a few strategic points to lock shape. Gently shape petals with fingers and block by pinning them into a round shape on cardboard if desired.
— Small Rose (Make 1) :
Round 1 :
Using deep rose, ch 30 (or adjust for desired size)
Round 2 :
Row 1 (on foundation chain): sc in 2nd ch from hook, hdc in next, (3 dc, ch1, sl st) in next st to create petal cluster; *skip two ch, sc in next ch, hdc in next, (3 dc, ch1, sl st) in next ch; rep across until last ch; finish and leave long tail for rolling
Round 3 :
Roll the strip from one end to center to form a rose. Use the long tail and yarn needle to tack the base at 6-8 points along the underside to secure the spiral. Adjust petals to sit open or tight as desired.
Info :
For a more compact rose make foundation chain shorter (20-24 ch). For a looser bloom make it longer. Use small stitches and keep the base neat to make sewing to the hat easy.
— Leaves (Make 6-8) :
Leaf Round 1 :
Using leaf green, ch 12, sc in 2nd ch from hook, hdc in next, (2 dc in next), (3 dc in next), (2 dc in next), hdc next, sc next, sl st to base — shape forms a pointed oval leaf (approx 11 sts per leaf)
Leaf Round 2 :
Return along other side of chain with mirrored stitches: sl st, sc, hdc, 2 dc, 3 dc, 2 dc, hdc, sc; fasten off leaving long tail (work leaves flat)
Info :
To create vein texture work BLO on the leaf body before finishing: after the first round, work 1 sc BLO along the edge for a ridge. Make 6-8 leaves of varying sizes to tuck behind the blooms.
— Ribbon Bow and Tails :
Bow Body Round 1 :
With blush pink, ch 60 (or adjust length for desired bow size). Row 1: hdc in 2nd ch from hook and across (59 hdc). Turn. Work subsequent rows in BLO to create ribbed texture.
Bow Body Row 2-10 :
Work 9 more rows of hdc in BLO (59 hdc each row). Fasten off leaving a long tail to gather and sew.
Info :
Fold the strip accordion style and wrap a short length of yarn around the middle to create a gathered bow shape. Sew the wrap in place and tack the bow to the brim where the flowers will sit.
Bow Tails (Make 2) :
Ch 40, hdc in 2nd ch and across to end (39 hdc), work 10 rows. Fasten off leaving long tails for sewing. Optionally taper ends by decreasing a stitch every other row on both sides for final 6 rows to create pointed tails.
Info :
Blocking the ribbon tails flat will make them look more fabric-like. Use a warm steam and pin into shape for a few minutes until cool.
— Small Decorative Buds (Make 2-3) :
Round 1 :
Using deep rose, 6 sc in mr (6)
Round 3 :
(1 sc, inc) x 6 (18) — fasten off leaving tail
Info :
Tuck these buds around the base of the large peony for a realistic cluster. Sew them down with long tails and conceal ends under petal layers.
— Assembly and Finishing Details :
Info :
Before sewing anything permanently, lay out the crown-on-brim and plan where the bouquet will sit. The hat pictured has the flowers offset slightly to the front-left when viewed head-on. Pin all pieces in place and adjust until balanced.
Step :
Sew the large peony to the brim at the seam where crown meets brim using the long tail and whip stitch. Secure with 8-12 stitches around the base and tug petals gently into position.
Step :
Sew the smaller rose slightly overlapping the large peony on its right side (as viewed) and tack 2-3 buds into the gaps. Add leaves behind and between blooms to create depth; tack leaves with invisible stitches.
Step :
Attach the bow so that its gathered center sits behind the large peony and the tails drape slightly over the ruffle. Sew through the bow center and the brim to secure; add a few reinforcing stitches to hold any heavy pieces.
Info :
Weave in all ends inside the brim or crown. If you used wire inside the spiral, ensure the wire ends are wrapped with yarn and buried well under stitches to avoid poking through. Trim excess yarn close to work.
Final Touch :
Gently steam-block the assembled hat if desired, pinning the brim ruffle out to create the scalloped edge shown. Allow to dry thoroughly. Add optional embellishments like beads or tiny sequins to flower centers if desired.
Info :
For a wearable hat, you can add a lightweight headband inside the crown sewn at the brim seam to help keep the hat positioned on the head. If the hat is purely decorative, consider attaching a loop to the inside top for hanging.
— Optional Reinforcement and Variations :
Info :
To make the brim stiffer, sew thin plastic boning or flexible hat stiffener between brim rounds before finishing the ruffle. For a softer, floppy brim keep it unreinforced and rely on cotton fabric body for drape.
Info :
To change scale: use fingering weight yarn with a 2.25mm hook for a smaller, more delicate hat, or use bulky yarn and a 5mm hook for a large costume statement—adjust counts proportionally to keep the shape.
This show-stopping hot pink spiral witch hat blends sculptural crochet shaping with romantic floral detailing for a truly unique accessory. Each stitch builds the tall cone, the curled top, and the flouncy ruffled brim, while layered peonies and a ribbon bow finish the look with elegance. It’s a delightful project that rewards patience with a dramatic and beautiful result. 🧶🌸 Display it proudly or wear it for whimsical flair — every stitch tells a story of handmade charm. 🎀