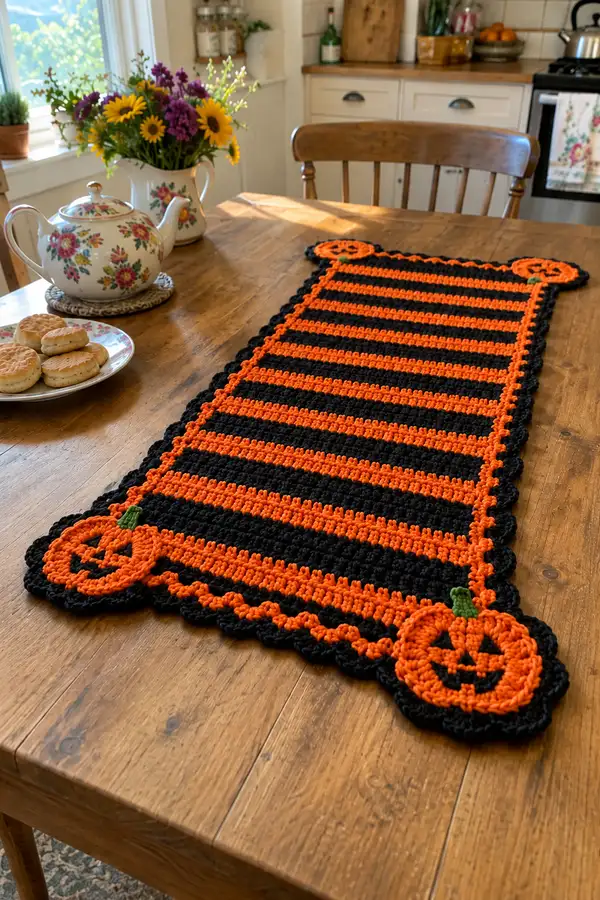
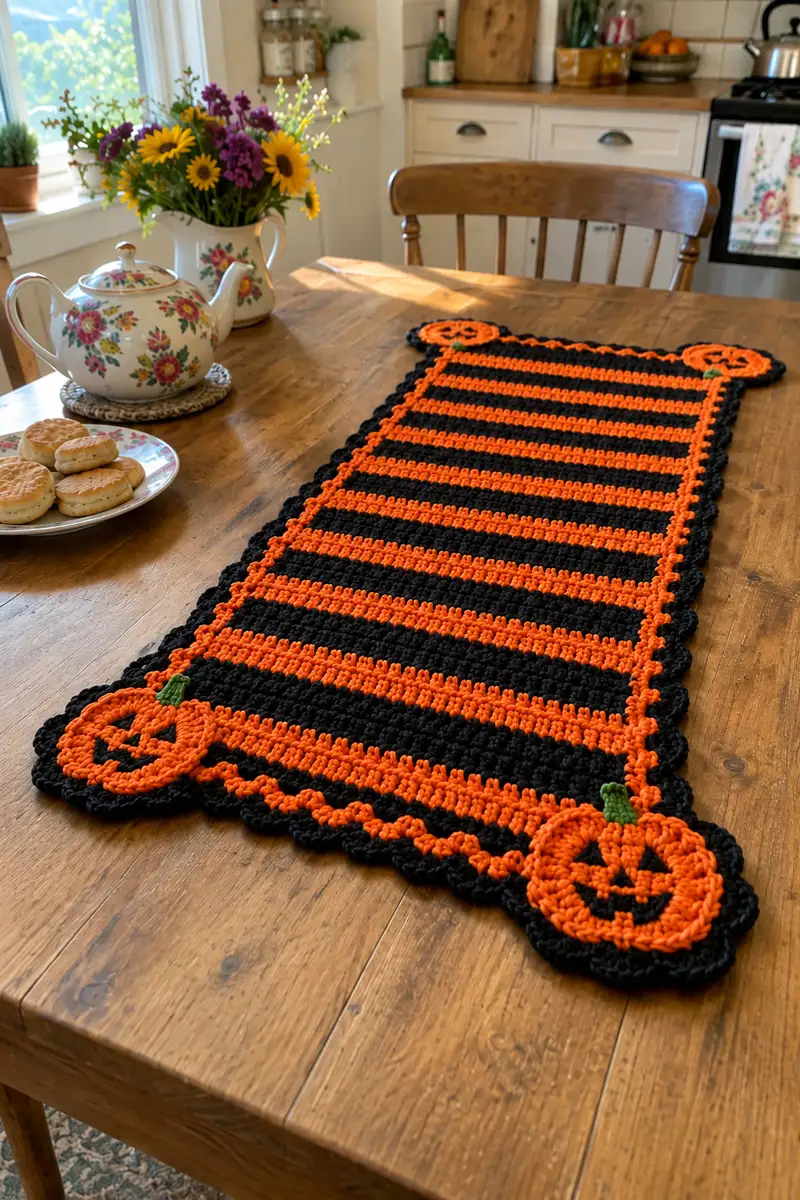
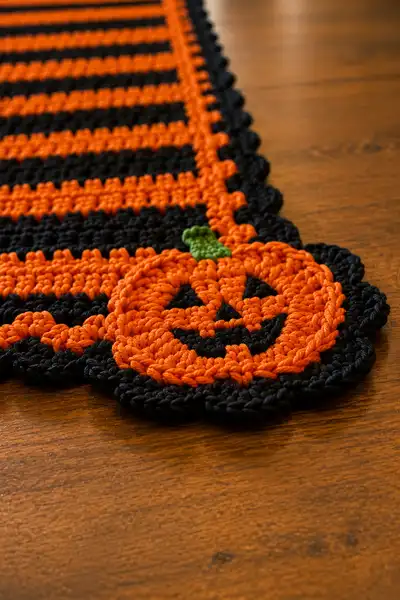
A festive Halloween table runner featuring bold black and orange stripes and four cheerful jack-o-lantern corners. This rectangular runner uses simple row construction with alternating color stripes, a textured scalloped black border, and appliqued pumpkin motifs with embroidered faces and green stems. The finished piece lays flat, giving a handmade seasonal accent perfect for dining tables, sideboards, or mantel displays.
Progress Tracker
0% Complete
— Notes & Gauge :
Info :
This runner is worked flat in rows for the main panel and then edged with a scalloped border and appliqued pumpkins. Gauge is not critical but will affect finished dimensions: approximately 16 sc x 18 rows = 4x4 inches in sc with a 5.0 mm hook and worsted weight cotton. The sample measures roughly 14 x 42 inches; adjust foundation chain to change width and length proportionally.
— Materials & Preparation :
Info :
Choose a smooth worsted cotton or cotton-blend for crisp color and a flat finished look. Prepare 2 yarn bobbins or separate small balls for black and orange to avoid long floats when changing colors each stripe. Keep a stitch marker for the first chain/stitch of each row.
— Foundation Chain & First Row :
Round 1 :
Ch 72 (this forms the width—change to any even number to alter width). Count the chains carefully (72).
Info :
Chain length can be adjusted in multiples of 2 to maintain stripe symmetry. If you want a wider runner, add 6 or 12 chains and remember to keep an even number for turning.
Round 2 :
Working in back bump or in 2nd ch from hook (your choice for a neater edge), 1 sc in each ch across. Turn. (72)
Info :
If you prefer a firmer edge, work the first row in BLO for a slight ridge; this is optional and will change the look of the edge slightly.
— Main Panel: Striped Rows (Rows 1-60) :
Round 3 :
Change to black yarn. Ch 1, 1 sc in each st across. Turn. (72)
Round 4 :
Continue in black: 1 sc in each st across. Turn. (72)
Info :
Start with two rows of black to create a framed stripe at the top; from here stripes alternate orange and black in blocks of two rows each for strong banding.
Round 5 :
Change to orange. Ch 1, 1 sc in each st across. Turn. (72)
Round 6 :
Orange: 1 sc in each st across. Turn. (72)
Round 7 :
Black: Ch 1, 1 sc in each st across. Turn. (72)
Round 8 :
Black: 1 sc in each st across. Turn. (72)
Info :
When you change colors, carry the unused color up the side loosely or weave in short tails as you go. Carrying across more than 6-8 sts can create tight floats—work with bobbins if needed.
Round 9-60 :
Continue alternating color blocks: 2 rows orange, 2 rows black, repeating until you have completed 60 rows total (including the initial rows). Each row: Ch 1, 1 sc in each st across, turn. (72 each row)
Info :
Row tracking tip: Use a row counter or mark every 10 rows with a removable stitch marker to avoid losing your place. The sample uses 60 rows for a balanced length; you can extend to your desired length by adding paired rows in the same stripe sequence.
— Texture Detail Option (Optional Rows within Main Panel) :
Round 61 :
Optional: If you want to add a subtle texture band, work 1 row in hdc across: ch 2 (counts as hdc), hdc in each st across, turn. (72)
Info :
This optional hdc row can be placed every 12 rows to create a faint ridge. Remove it if you prefer consistent sc rows throughout.
— Preparing for Border (Finish Main Panel) :
Round 62 :
Once the main striped panel is complete (60 rows preferred), work one neat finishing row in black for a stable edge: Ch 1, 1 sc evenly spaced across, working 2 sc in the corner stitch to begin turning the work for a single-row edging. (72 + corner increases counted in border steps)
Info :
Check your rectangle for flatness. If the panel cups, block lightly before adding the scalloped border. The border will adjust the edge slightly but blocking first will ensure the scallops sit evenly.
— Scalloped Edge Setup (Working Around Entire Panel) :
Round 63 :
With black yarn, work around the perimeter. Start at one short end corner: ch 1, 1 sc in each visible stitch along the side edge (work through both loops if desired), when you reach the corner, work 3 sc evenly into the corner to add space and rotate, continue along the long side across, 3 sc in next corner, along opposite short side, 3 sc in corner, and finish across final edge; join with sl st to first sc. Aim for roughly 72 sc per long side and an even count along short ends—adjust by adding or skipping 1-2 sc evenly so scallops will sit nicely. (Perimeter count varies)
Info :
This round is about preparing space at corners for scallops. Count stitches around to estimate spacing for scallops and mark quarter points with pins if needed to center pumpkin attachments later.
— Scallop Row (Repeat to Form Raised Scallop) :
Round 64 :
*Sk next 2 sc, 5 dc in next st, sk 2 sc, sl st in next sc*; rep from * to * across each long side. At corners work a scallop over 5 dc into the 3 sc corner base. On short sides do the same but reduce repeats so scallops remain evenly spaced. Join with sl st. This creates a raised scallop edge. (Scallops ≈ 1 per 6-8 sts depending on adjustment)
Info :
Scallops should be evenly spaced to give a consistent look. If your panel width changes, increase or decrease the number of stitches skipped between scallops to remain even. Pins are helpful to mark where scallops will fall before crocheting them.
Round 65 :
Work 1 sc in each st and in the back loop of each scallop base to tidy and slightly firm the edge; join with sl st. Fasten off black and weave ends. This gives a solid frame for pumpkin applique placement. (Perimeter count unchanged aside from corner shaping)
Info :
After this round, the work should feel stable. If you desire a thicker scallop, repeat the scallop round once more, then finish with a tidy sc round.
— Pumpkin Corner Motif (Make 4) :
Info :
Make 4 identical pumpkin discs to applique to the four corners. These are worked flat in joined rounds and then embroidered for the jack-o-lantern face. If you prefer a raised pumpkin, stuff lightly and stitch closed before attaching.
Round 1 :
With orange, make a magic ring, 6 sc in MR. (6)
Round 3 :
(1 sc, inc) x 6 (18)
Round 4 :
(2 sc, inc) x 6 (24)
Info :
Ensure rounds are worked in joined rounds (sl st join each round) to keep a flat face. If you prefer spiral, keep track of beginning with a marker but joined rounds make sewing and positioning easier.
Round 5 :
(3 sc, inc) x 6 (30)
Round 6 :
(4 sc, inc) x 6 (36)
Round 7 :
(5 sc, inc) x 6 (42)
Info :
At 42 sts you have a pumpkin approx 3.75-4 inches across depending on yarn/hook. If you want a slightly larger pumpkin, add one more increase round: (6 sc, inc) x 6 = 48 sts.
Round 8 :
1 sc in each st around for 2 rounds to build body: Round 8: 1 sc in each st (42), Round 9: 1 sc in each st (42)
Round 10 :
Optional: Work 1 round in BLO to create a slight groove for pumpkin ribbing: 1 sc in each st BLO (42)
Info :
To create segmented pumpkin ribs, you can work slip stitch surface lines or use back post stitches on later rounds. The BLO round gives a faint shadow line to accent ribs.
Round 11 :
Switch to a decorative slip stitch ridge to suggest pumpkin lobes: *sl st in next 3 sts, ch 1* repeat around, join with sl st. (12 ch-1 spaces)
Round 12 :
1 sc in each st across to tidy edge and firm shape (42)
Info :
If you prefer the pumpkin to be slightly raised, now is the time to stuff lightly through the back before finishing edge work. If not stuffing, keep work flat and tidy ends for applique.
Round 13 :
Fasten off orange leaving a 12-inch tail for sewing. Use black yarn to embroider eyes and mouth: With black, embroider two small triangles for eyes centered approximately on round 6-7 area and a wide smiling mouth with small teeth centered lower near round 8. Secure ends and weave in on back. (Decorative)
Info :
Use a yarn needle and surface embroidery (duplicate stitch or backstitch) to form triangular eyes and a curved smile. Place a small stitch of green at top for a stem area, or attach a separate green stem piece as described next.
Round 14 (Stem) :
With green, ch 4, sl st in 2nd ch from hook, 1 sc in next, 1 sc in last, sl st to base of pumpkin where stem sits; fasten off leaving tail to sew. Alternatively work a short 6-sc tube: ch 6, join to form loop and sc around 6 for 2 rounds, fasten off and sew closed to form a small stem.
Info :
Create the stem option you prefer: a flat leaf-like stem made of a few short sc or a small tube for a 3D stem. Secure firmly to the top center of the pumpkin disc with sturdy stitches.
— Pumpkin Ribbing (Optional Embellishment) :
Round 15 :
Using a length of darker orange or the same orange, make 6 evenly spaced running stitches from center top of pumpkin to the outer edge and back to create subtle ribs. Knot and weave ends through back of motif.
Info :
These ribs can be achieved with a yarn needle and a single length of yarn pulled snugly to the back and tied, then covered by the stem. This gives a classic segmented pumpkin look without complicated stitches.
— Pumpkin Finishing :
Round 16 :
Block or press pumpkin motifs gently (if yarn allows) to flatten and shape. Make 4 identical pumpkins following Rounds 1-15. Ensure embroidery and stems are placed similarly for a uniform look.
Info :
Place pumpkins on a flat surface and photograph or mark placement points (quarter points) on the runner edge to ensure consistent corner alignment when sewing them on.
— Attaching Pumpkins to Corners :
Round 17 :
With runner facing right side up, position first pumpkin so that its outer scalloped edge overlaps the runner's scallop by about 1/8-1/4 inch. Pin in place. Mark four pinned positions at each corner before sewing. Repeat for all four pumpkins. (Placement)
Round 18 :
Sew each pumpkin to the runner using a matching orange yarn and a whip stitch around the pumpkin base, catching only the edge scallop and a couple of stitches into the runner so the seam is subtle. Make small, evenly spaced stitches. Fasten off and weave in ends securely. (Attachment)
Info :
For a more secure attachment on a table that will see heavy use, sew through more of the scallop base into the runner body with extra stitches to reinforce. If storing the runner, consider using a few hidden tacking stitches only so pumpkins can be removed for washing.
— Final Border Reinforcement :
Round 19 :
Work one final round of single crochet in black around the entire piece, crocheting through both the runner edge and the base of any pumpkin motifs where they touch for extra security. Maintain neat tension and work 2 sc in any corner stitch to keep the perimeter flat. Join and fasten off. (Perimeter tidy)
Info :
This round locks everything in place. If your pumpkins hang slightly off, this final round will help anchor them and blend the join into the scalloped edge.
— Optional Decorative Surface Crochet (Face Outlining) :
Round 20 :
Embroider the jack-o-lantern faces with contrasting black yarn using backstitch or duplicate stitch to define eyes and mouth. Add small satin stitches for teeth or extra expression. Secure and weave ends to the back of each pumpkin. (Decorative)
Info :
If using cotton yarn, the embroidery will sit crisp and neat. For a softer look, use a heavier needle and pull the stitches snug but not so tight they warp the pumpkin shape.
— Finishing & Blocking :
Round 21 :
Weave in all ends using the yarn needle, trimming close. Lightly block the runner by wetting and pinning it flat on a blocking board or towel, shaping scallops and pumpkins to sit evenly. Allow to dry completely before use. (Finishing)
Info :
Blocking is important for a flat, professional-looking finish. Cotton fibers benefit from wet blocking; use gentle steam or dampening according to yarn manufacturer's care instructions.
— Alternative Assembly: Pumpkins Worked Directly On Runner :
Round 22 :
If you prefer to work pumpkins directly onto the runner edge instead of making appliques, hold the orange over the edge after finishing the scallop base and work the pumpkin increases into the scallop foundation stitches, increasing across the 6-8 stitches reserved for the corner. Follow Pumpkin Rounds 1-13 with careful adjustment of initial rounds so they spread over the corner area. (Alternate method)
Info :
This method is slightly more advanced because you must manage increases while curved around a corner; make a sample first to ensure the pumpkin sits well and doesn't distort the scalloped edge.
— Care Instructions :
Round 23 :
Machine wash on gentle cycle in cool water if yarn allows, or hand wash. Lay flat to dry to maintain shape. Re-block if necessary after washing. (Care)
Info :
If you plan to launder the runner often, consider sewing pumpkins on with removable tacking stitches or make them detachable by buttoning or using small snaps behind the pumpkins so you can remove them before washing.
— Troubleshooting & Tips :
Round 24 :
If your runner waves, block and press after completion. If stripes appear skewed, check turning chains and ensure you always work into the same loops (either both loops or back bump) consistently. (Tips)
Info :
To avoid side tension, when changing colors at the end of the row, cut yarn and join new color at the start of the next row, or carry the yarn up the side loosely and catch it every 4-6 rows. Use bobbins to help manage two colors while working stripes to avoid long floats.
— Variation Ideas :
Round 25 :
Try using a thicker hook (5.5–6.0 mm) for a chunkier runner or a lighter sport weight with a smaller hook for a slimmer runner. Swap pumpkin colors for pastel pumpkins for a softer look. (Variations)
Info :
To change runner length, add more pairs of stripes. To change width, alter the foundation chain in even increments. For multiple pumpkins along the length, space additional pumpkin motifs evenly between the corner pumpkins and sew similarly.
You've made a festive, bold Halloween runner that's sure to be a conversation starter! The alternating orange and black stripes create instant seasonal cheer while the sweet jack-o-lantern corners add personality and charm. This runner is both playful and practical — perfect for setting a Halloween table or brightening a sideboard. I hope you enjoyed the rhythm of the stripes and the satisfaction of adding the pumpkin appliques. 🧶🎃 Happy stitching and enjoy your seasonal centerpiece! 🍁