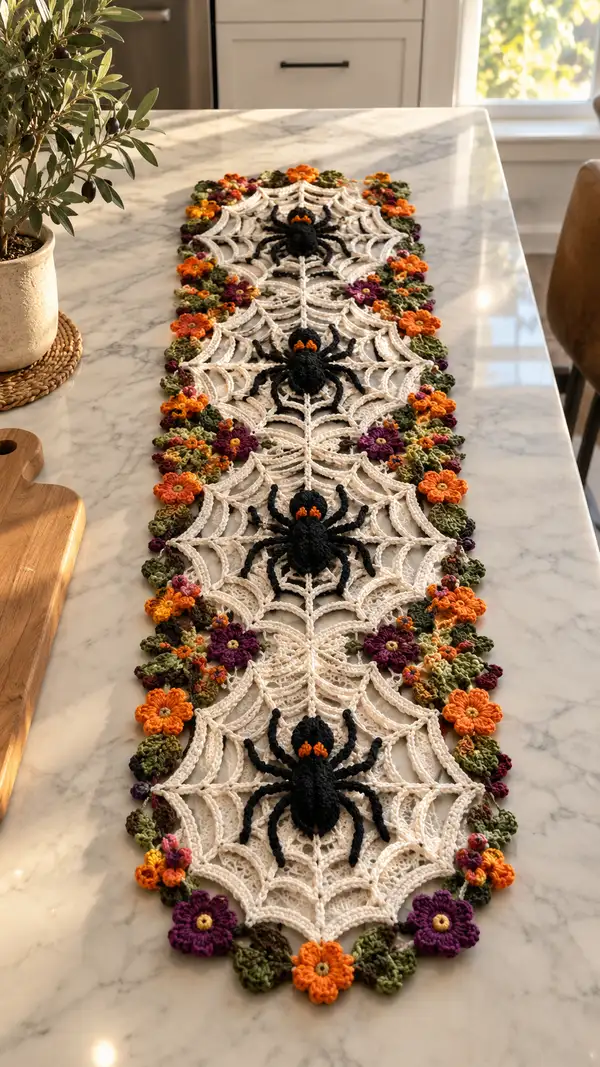
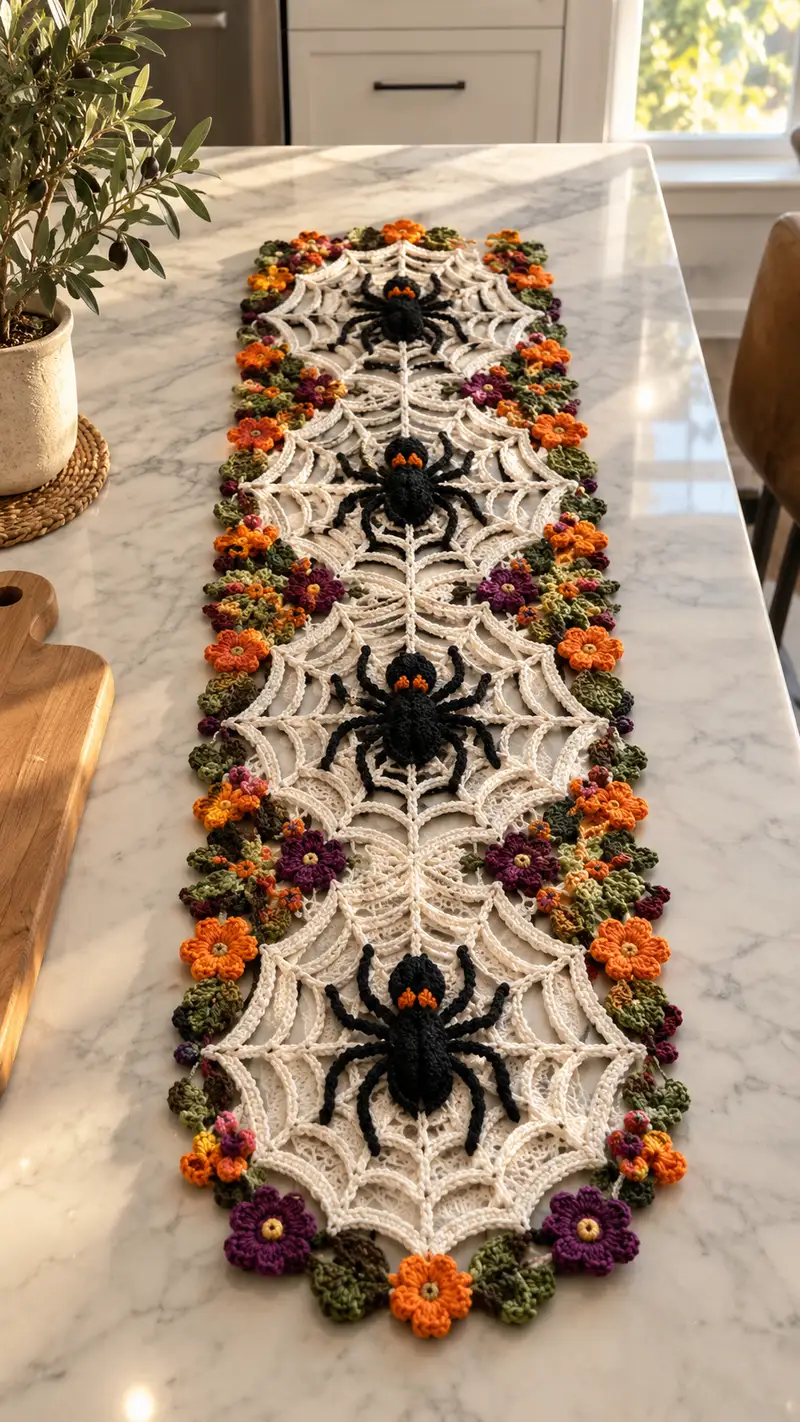
Create a dramatic Halloween-ready table runner featuring three cream spider-web medallions joined into a long runner, surrounded by a ring of tiny autumn flowers and olive leaves, and topped with raised black spider appliques with orange markings. This pattern breaks the runner into repeatable web motifs, floral edging, and raised spider appliques so you can make a runner to fit any table. Detailed stitch-by-stitch rounds, joining and finishing tips included for a polished, professional result.
Progress Tracker
0% Complete
— Overview :
Info :
This pattern is modular and consists of three identical web medallions (make 3), three raised spider appliques (make 3), a set of small and medium flower motifs and leaf clusters used to create the decorative edging, then a joining and border sequence to form the full runner. All rounds are written in US crochet terms. Use a consistent stitch marker at the start of each round and check counts frequently.
Info :
Gauge and size notes: Using worsted lace-weight yarn and a 3.5mm hook each full web medallion should measure approximately 10.5-11 inches across at the widest point. The finished runner with three medallions joined end-to-end and floral edging will measure roughly 36-42 inches long by 8-10 inches wide depending on blocking and tension. Adjust hook up or down to match measurement.
— Web Medallion (Make 3 identical) :
Round 1 :
Start with cream color: 8 sc in mr (8)
Round 2 :
Inc in each st around (16)
Round 3 :
(1 sc, inc) x 8 (24)
Round 4 :
(2 sc, inc) x 8 (32)
Round 5 :
(3 sc, inc) x 8 (40)
Info :
These first rounds form a small solid center to anchor the web. Work tightly so the medallion center is firm and not loose.
Round 6 :
Ch3 (counts as dc), *sk next 3 sts, dc in next st, ch4* repeat around to create foundation for arches. End with sl st to top of ch3. (10 dc arches and 10 ch4 spaces; final counts vary because of arch spacing, treat this as patterning round)
Round 7 :
Join in top of any dc, ch3, dc in same st, ch2, *dc in top of next dc, ch2* around to start forming spokes (10 spokes total). Sl st to join.
Round 8 :
Switch focus to chain arches: Attach yarn in a ch2 space, ch1, sc in same sp, ch6, sc in next ch2 space, repeat around to create longer arch loops between spokes (10 ch6 loops)
Round 9 :
In each ch6 loop work: (sc, hdc, 4 dc, hdc, sc) in same loop to create the first web ring (10 shell arches). Leave small gaps between shells for lace effect.
Info :
Adjust tension in the shell group so shells sit flat and do not cup. Blocking later will flatten further.
Round 10 :
Between each shell from previous round: ch4, sl st into top of next shell to create connecting arcs (10 connecting arcs)
Round 11 :
In each connecting ch4 arc: (sc,2hdc,4dc,2hdc,sc) to make the second outward shell; ends should sit slightly outside the first shells (10 shells)
Round 12 :
Ch5 between shells as small spoke connectors and sl st into base stitch between shells to anchor (10 connectors)
Round 13 :
Work into chain5 connectors: sc, (ch7, sc) across to make larger web arches. Each ch7 will become the next outer ring base (10 ch7 loops)
Info :
At this stage you have the internal radiating spokes and two rings of arches. Keep motif flat. Blocking after finishing the full medallion helps open the lacework evenly.
Round 14 :
In each ch7 loop work: sc, hdc, 6 dc, hdc, sc (10 large shells). These are the outermost shell elements that will form the main web edge.
Round 15 :
Ch3, sl st into space between large shells to create 10 small loop connectors around the perimeter.
Round 16 :
Into each small connector: (sc, ch9, sc) to start making the lace scalloped rim (10 ch9 loops)
Round 17 :
In each ch9 loop: (sc, hdc, 8 dc, hdc, sc) forming tall scallops that give the web its circular curve (10 tall scallops)
Round 18 :
Ch3 between scallops and sl st to previous stitch to anchor; create a crisp outer arc for the next round (10 anchors)
Round 19 :
Work one round of even sc around the scalloped rim: 1 sc in each stitch and 3 sc across each outer dc cluster to even counts (approx 160 sc around; exact count will vary by tension)
Info :
If your total stitch count varies +/- 8 stitches replace transforme counts by distributing extra sc evenly across the perimeter so the medallion remains flat.
Round 20 :
Create decorative arches for the join points. *Ch7, skip 6 sc, sl st into next sc* repeat around to create evenly spaced ch7 arch points (approx 20 arches)
Round 21 :
Into each ch7 arch: sl st, ch3, (2 dc, ch2, 3 dc) shell, sl st to base (small fan shells making defined web lobes) (20 shells)
Round 22 :
Ch2, sc between shells then ch8 to form long connecting loops that mimic web spokes at the outer area (20 ch8 loops)
Round 23 :
Work (sc, hdc, 6 dc, hdc, sc) into each ch8 loop, continuing to mirror the inner rings and build outward (20 large shells)
Info :
This web medallion uses alternating shell sizes and chain loops to create the layered, spider-web look. If you prefer a denser web reduce chain length in rounds 16 and 22 by 2 chains each.
Round 24 :
Round of even sc around the entire motif to tidy edges: 1 sc in each st and 3 sc across each large shell top—approx 220 sc (approximate and tension-dependent)
Round 25 :
Create outer points that will pick up flower clusters later: *ch5, sl st into 5th sc from previous shell center* repeating around to create small loop anchor spaces (40 ch5 anchor loops)
Round 26 :
Into every other ch5 anchor work a small 5-dc picot shell: (sc, ch3, 5 dc, ch3, sc) to create the scalloped points (20 tiny picot shells)
Round 27 :
Even round of sc around including working 2 sc in the base of each tiny picot shell to flatten and secure edge (approx 260 sc)
Round 28 :
Finish medallion with a final decorative rope of crossed chains: *ch2, skip 1 sc, sl st* around to even out edge. Fasten off and weave ends; block flat to a round shape.
Info :
Make three of these medallions. Block each medallion flat using pins on a blocking board. Accurate block size will make joining easier. Label each medallion A, B, C for joining sequence.
— Spider Applique (Make 3 - one per medallion) :
Round 1 :
Work with black on 3.25mm hook: 6 sc in mr (6) — this forms the base of the abdomen
Round 2 :
Inc in each st around (12)
Round 3 :
(1 sc, inc) x6 (18)
Round 4 :
(2 sc, inc) x6 (24)
Round 5 :
1 sc around (24) — even round shaping the abdomen
Round 6 :
(3 sc, inc) x6 (30)
Info :
These rounds form a slightly oval abdomen. To create an oval rather than a perfect sphere, you will elongate later with shaping rounds and a separate cephalothorax piece.
Round 7 :
(4 sc, inc) x6 (36)
Round 8 :
1 sc around (36)
Round 9 :
(4 sc, dec) x6 (30)
Round 10 :
(3 sc, dec) x6 (24)
Info :
Begin to stuff abdomen very slightly if you wish for raised dimension; spiders in the sample are slightly padded but not fully stuffed. Use a small amount of fiberfill pushed to create a low dome.
Round 11 :
(2 sc, dec) x6 (18)
Round 12 :
Fasten off leaving tail for sewing. Weave tail through remaining 18 sts and pull closed slightly, do not over-tighten as the spider should sit slightly domed (finishes abdomen)
Round 13 :
Cephalothorax: With black reattach at center base of abdomen, ch1, 6 sc in mr (6)
Round 14 :
Inc in each st around (12)
Round 15 :
(1 sc, inc) x6 (18)
Round 16 :
1 sc around (18). Fasten off leaving long tail for sewing the cephalothorax to a medallion; stuff minimally to form small domed head.
Info :
Sew cephalothorax to front portion of abdomen keeping a small gap so the two parts look distinct. Use ladder stitch and secure tightly to avoid rotation. Use a small dab of glue if needed for stability.
Round 17 :
Legs (Make 8 legs per spider): With 3.25mm hook and black, attach in a spaced loop along cephalothorax base and abdomen seam. Ch12 for leg base, sl st in 3rd ch from hook to create a little curl, sc back across chain to base (approx 10 sc) — this yields a slightly curved, corded leg. Make 4 legs on each side symmetrically.
Round 18 :
To thicken legs: Work a second pass around each leg cord attaching in between chain stitches with sc into each top chain stitch (10 sc along the cord) producing a rounded, sturdy leg. Fasten off, weave ends inside body.
Round 19 :
Optional: For a little bend, insert a short piece (approx 3 inches) of craft wire into the thin leg cord before the second sc pass and fold the ends inward to avoid sharp points. Wrap with yarn ends to conceal.
Round 20 :
Orange head markings: With bright orange, embroider two small triangular spots onto the top of the cephalothorax using duplicate stitch and short yarn ends, or crochet tiny surface triangles: ch3, 1 sc in 2nd ch from hook, 1 sc in last ch, fasten off; sew in place.
Info :
Make three spiders. Position them later in the center of each blocked medallion using the assembly steps. If you prefer flat spiders, omit stuffing and create body by working thinner rounds with a 3.25mm hook.
— Small Flower Motif (Make many for edging) :
Round 1 :
With orange (or chosen bloom color), 6 sc in mr (6)
Round 2 :
Work *ch2, 5 dc in same st, sl st into next st* around to form 6 petals (6 petals)
Round 3 :
Sl st to base of a petal, ch1, sc in base, fasten off leaving tail for sewing. Sew a small golden yellow knot in center as a French knot or tiny embroidery bobble.
Info :
Make multiple small flowers in orange and rust to dot the outer scalloped edge between larger flowers and leaves. These are quick and addictive to make.
— Medium Flower Motif (Make fewer - accent blooms) :
Round 1 :
With purple (or deep color), 8 sc in mr (8)
Round 2 :
(ch3, 1 dc, ch3, sl st) into same st to form a petal base, sl st into next st and repeat around to create 8 elongated petals (8 petals)
Round 3 :
Into each ch3 petal: sc, hdc, 5 dc, hdc, sc to form fuller, raised petals. Fasten off leaving tying tail for sewing.
Info :
Make slightly fewer medium flowers and arrange them approximately every two medallions or at the seams for visual balance. Use golden yellow or small embroidered French knots for centers.
— Leaf Cluster (Make many) :
Round 1 :
With moss green, ch5, turn, sc in 2nd ch from hook, hdc in next, 3 dc in next, hdc in next, sc in last ch. Fasten off to create single leaf. Make clusters of 2-3 leaves linked by small ch2 loops.
Round 2 :
Join leaves into clusters: ch2, sl st to base of next leaf, ch2, sl st — make clusters containing 2-4 leaves for natural density. Fasten off and weave tails.
Info :
Make lots of leaf clusters and small flowers. In the sample runner you will need approximately 30-40 small flowers, 10-12 medium flowers and 40+ leaf motifs to densely fill the edge area. Variation in placement gives a natural, organic look.
— Joining Medallions Into Runner :
Info :
Layout and blocking first: Block all medallions flat and pin to layout. Place medallions A, B, C in a straight line with about 1/4" overlap where scaffolding loops meet so the join is smooth. Pin floral elements around perimeter loosely so you can see how many flowers and leaves you need.
Round 1 :
Align two medallions A and B; using cream yarn and mattress stitch or whip stitch, join their outer radiating shell round at 10 evenly spaced points across the joining arc. Use long tails and sew through both motifs approximately 10-12 stitches along the seam to create a secure join. Repeat to join B to C.
Round 2 :
Once medallions are temporarily seamed together, crochet a joining chain-lace along the seam: pick up with cream yarn where the two medallions meet, ch6, sl st into next seam position, ch6, sl st repeat across seam to create a decorative bridge of ch6 arches. This creates a flexible seam and maintains web continuity.
Round 3 :
Into each ch6 seam arch: (sc, hdc, 4 dc, hdc, sc) to build the web continuation across the seam so the medallions read as one continuous pattern. Fasten off and weave ends.
Round 4 :
Along the long edges where medallions meet, tidy up with even sc around both top and bottom edges to make a clean canvas for attaching floral clusters: 1 sc in each open stitch, adding 2 sc in large shell tops as needed to keep flat. Expect to work approx 120-160 sc across each long edge (tension dependent).
Info :
Before securing spiders, pin them to the center of each medallion and check placement visually. They should sit centered inside the web circle. Sew spiders in place after the flower clusters are attached so threads don't show through web holes.
Round 5 :
Reinforce join with a final decorative seam: working with cream yarn, join at evenly spaced points alternating with ch3 picots to create a delicate scalloped seam that also reinforces the join. Work through both motifs chain spaces and the joining arches. Fasten off and weave.
Round 6 :
Edge tidy: Work 1 sc in each exposed stitch around entire runner perimeter including across seams—this evens the edge and creates uniform pick-up points for flowers and leaves (approx 420-500 sc around depending on tension and spacing).
Info :
Count and mark every 5th sc around with small pins to guide even flower placement. This ensures flowers appear evenly distributed along both long edges and both ends.
— Attaching Flower & Leaf Clusters :
Round 1 :
Using sewing tails from flower motifs or a small length of matching yarn, sew medium flowers at marked anchor points approximately every 6-7 scallops (approx 10-12 medium flowers). Use small whip stitches through the center and back of the edge sc to secure without distorting web.
Round 2 :
Sew small flowers into the gaps between medium flower placements using single stitches through their base and the perimeter sc. Cluster 2-3 small flowers with 1-2 leaf clusters between them to create visually pleasing groupings.
Round 3 :
Work tiny connecting chains to tuck leaves under rims: attach yarn in base sc, ch2, sl st into base of leaf cluster to tack it in place, then sl st back to base sc. This secures cluster horizontally and prevents flopping.
Info :
Place leaves so they peek under flowers and also fill any visible gaps between web scallops; aim for a natural, uneven distribution rather than rigid regularity. Secure each cluster with 2-3 small stitches through the runner edge to anchor firmly.
Round 4 :
Optional small filler: Add tiny 3dc picot buds between clusters by joining orange yarn and working (sc, ch3 picot, sc) in select sc positions to create tiny buds for extra texture.
Round 5 :
Once all flowers and leaves are sewn, weave in all tails and trim ends. Block the entire joined runner to make sure floral clusters and webs lie flat and are securely attached.
— Decorative Border and Final Edging :
Round 1 :
Using cream yarn and 3.5mm hook, join at any outer sc and ch1, *sc in next 3 sc, picot (ch3, sl st in first ch), sc in next 3 sc, sl st into base of nearby flower to link* repeat around to form an embellished picot-edge that interlinks with flowers and leaves. Fasten off and weave ends.
Round 2 :
Optional scalloped rope: With a contrasting cream or very light beige, beaded chain: *ch4, tr in 2nd ch from hook, ch2, sl st in base* along entire perimeter to give a rope-like effect and emphasize the runner outline.
Round 3 :
Final surface tidy: Use cream yarn to close any visible holes by weaving a running stitch through edge loops or using small sl sts to pull slightly closed. Trim and weave tails to finish professionally.
Info :
After the border and all attachments, press the runner lightly with a steam iron using a press cloth if needed to shape and ensure flowers have a slight three-dimensional lift. Avoid pressing the spiders too flat if you want them raised.
— Final Spider Attachment and Finishing Detail :
Round 1 :
Position each spider in the exact center of each blocked medallion. Using long tails from the spiders, sew through the medallion center with a sturdy whip stitch around the perimeter of the cephalothorax and abdomen joint (6-8 passes) to secure. Tie off on the underside and weave in ends.
Round 2 :
For additional security, tack down the base of each leg in two places using tiny stitches through the adjacent web loops so the legs appear to rest on the web naturally. Be careful to pick up tiny stitches that are hidden under the leg cords.
Round 3 :
Optional: Add a tiny dab of fabric glue under the leg base for long-term stability (especially if runner will be used in a high-traffic tabletop environment). Allow full dry time before handling.
Info :
Final inspection: Check for any loose motifs, gaps or uneven edges. Re-stitch any motifs as needed, re-block if necessary, and remove blocking pins after the runner is fully dry.
— Care Instructions :
Info :
Hand wash cold on gentle cycle or hand-wash only with mild detergent. Reshape while damp and lay flat to dry. Avoid wringing or direct heat to maintain motif shape and embroidered spider detail.
Finishing this runner feels like decorating with yarn and imagination — a seasonal showpiece that draws compliments every time. The layered lace webs, raised spiders and clusters of autumn flowers create a dramatic yet elegant centerpiece you can be proud of. Block carefully, sew securely, and this runner will be a treasured seasonal accent for years to come. 🧶🕸️🍂