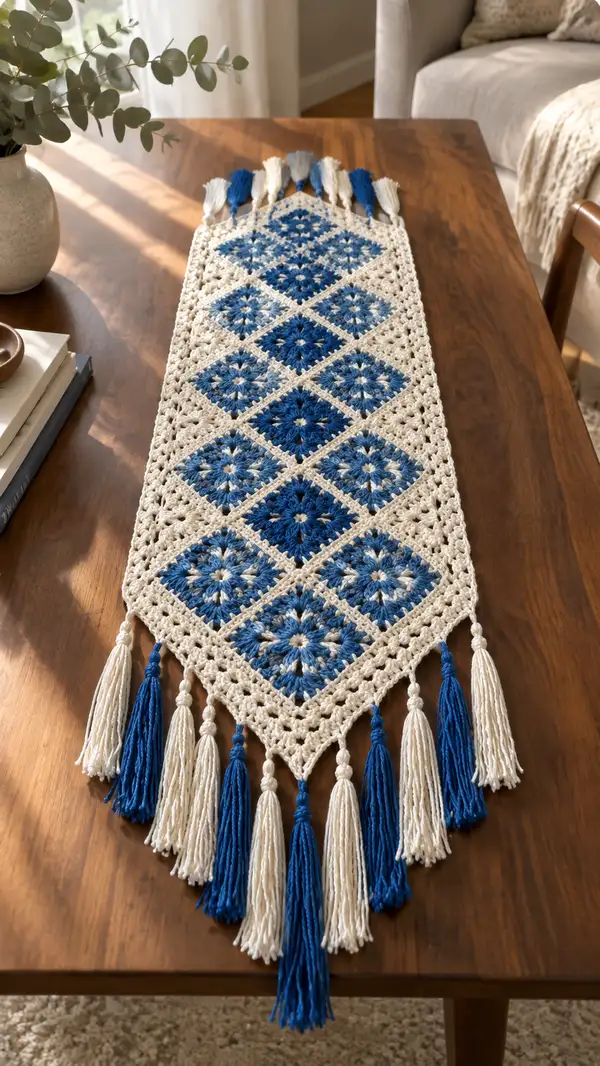
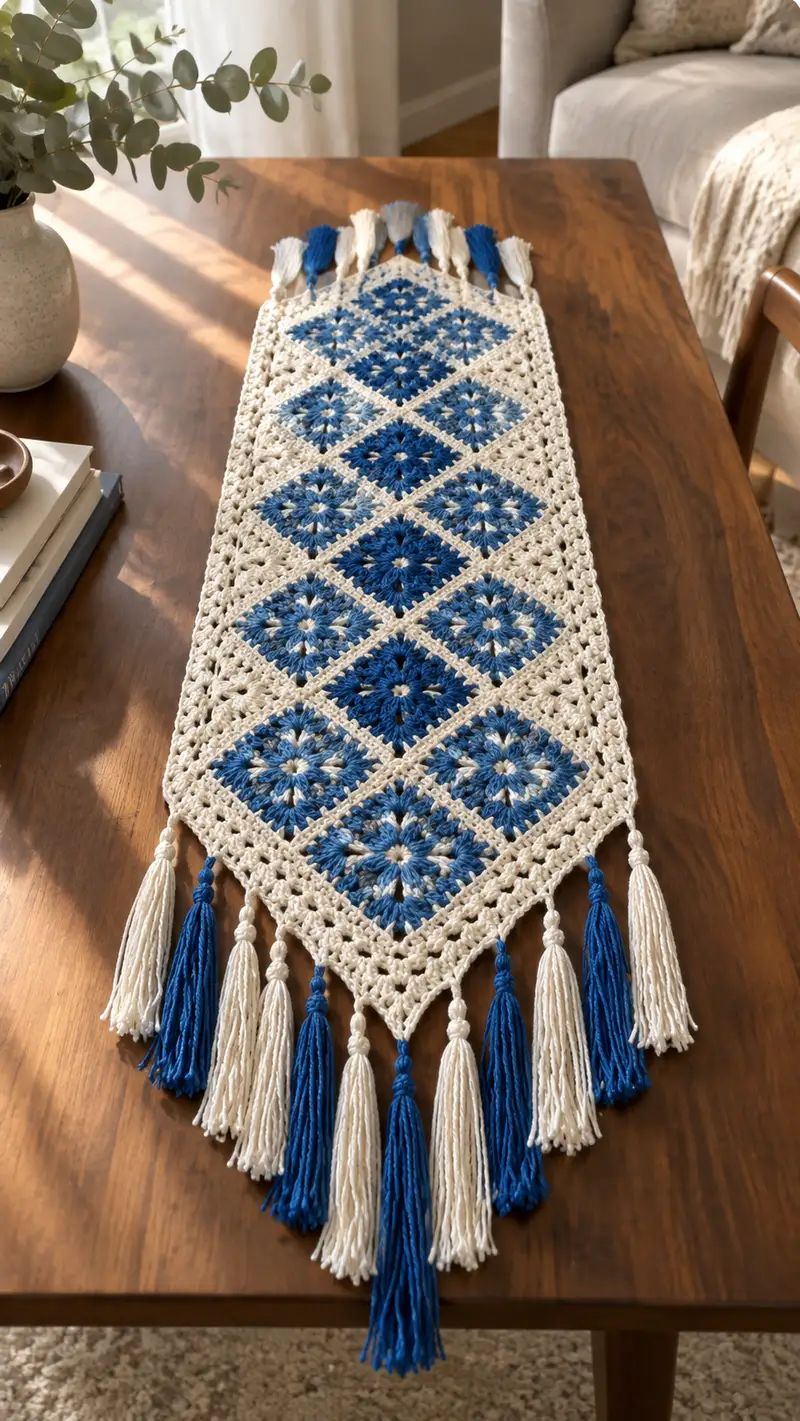
A long, elegant table runner made from diamond-oriented granny motifs in cream and two shades of blue, finished with knotted tassels at both ends. The design features starburst centers inside each diamond, a lacy neutral border, and alternating deep and light blue tassels to echo the motif colors. Perfect for a dining table, entry console, or as a layered decorative piece.
Progress Tracker
0% Complete
— Materials & Gauge :
Info :
Gauge is not critical for this decorative runner but to achieve a similar finished size use worsted weight cotton and a 4.0mm hook. Each diamond motif (unblocked) measures approximately 5.5" - 6" corner to corner. Finished runner in photo measures approximately 12" wide at widest point and 54" long including tassels.
— Motif (Starburst Granny Square) — Make 7 :
Motif 1 — Round 1 :
Using blue (either medium variegated or deep navy) — mr, ch3 (counts as dc), 2 dc in ring, ch2, *3 dc in ring, ch2; rep from * 6 more times (for total of 8 groups of 3 dc separated by ch2 corners), join with sl st to top of ch3. (24 dc, 8 ch-2 corners)
Motif 1 — Round 2 :
Change to same blue or a second blue shade if you want a two-tone center. Work in ch-2 corner of previous round: (3 dc, ch2, 3 dc) in each ch-2 space around. Join with sl st to first dc. (8 corners x 6 dc per corner = 48 dc; 8 ch-2 corner spaces)
Info :
Round 2 creates the first true square corners. Keep tension even so corners puff slightly and form a starburst center when turned on point later.
Motif 1 — Round 3 :
Switch to cream for the neutral rounds (or continue blue for a deeper center). In each side between corners: ch1, (3 dc) in the space between corner clusters; at corner continue (3 dc, ch2, 3 dc). Work evenly around and join with sl st. This round adds side clusters so your motif starts to square out. (Count for this round will be 8 corners x 6 dc = 48 dc plus 8 side clusters of 3 dc = 24 dc; total stitches worked this round = 72 dc)
Info :
If using two blues, this is a good place to change from darker to lighter blue. Fasten off blue and join cream with a standing dc to keep color join tidy.
Motif 1 — Round 4 :
With cream: ch3 (counts as dc), dc in next 2 dc, ch1, sk next dc cluster, *(3 dc, ch1) in the next side space; rep across until you reach a corner space; at corner work (3 dc, ch2, 3 dc). Continue around and join with sl st. This round makes a slightly lacy side with ch-1 spaces for a delicate edge. (Work approximately 8 corner clusters and 16 side clusters; count this round as 8 corners x 6 dc + 16 side clusters x 3 dc = 48 + 48 = 96 dc)
Info :
Keep ch-1 spacing even so motifs will sit flat when joined. Use a stitch marker at the first corner of each motif to remember orientation when turning the square as a diamond.
Motif 1 — Round 5 :
With cream: ch3, 2 dc in each ch-1 space across sides, at corner work (2 dc, ch2, 2 dc) to bulk out corners. Join with sl st. This gives a neater, even edge for joining. (Round stitch count ~ 8 corners x 4 dc = 32 dc + side spaces: 16 spaces x 2 dc = 32 dc; total ~64 dc)
Info :
This round is the final stabilizing round for the motif. If you plan to block, do so now — pin motif square, steam lightly or wet-block to set to a crisp diamond shape.
Motif 1 — Round 6 :
With cream: 1 sc into each st around working evenly to tidy the edge. When you reach corners, work (sc, ch2, sc) into the corner ch-2 to maintain the corner point. Join with sl st and fasten off leaving a 20" tail for joining. (Stitch count this round = approximately 64 sc)
Info :
Weave tail into corner as you join motifs to prevent visible knots. Make sure the motif looks square when turned on point; orientation matters for layout.
Motif 1 — Round 7 :
Optional decorative surface: Using the same blue as the center, you may embroider 8 small surface slip-stitches radiating from the center towards each corner to enhance the starburst. Work from center to outer rounds placing stitches evenly. No additional stitch count required.
Info :
Repeat this 7-round motif to make a total of 7 diamond motifs for a single-column runner. Place motifs on blocking mat in a straight column on-point to check alignment before joining.
— Motif 2 (Repeat Motif 1 instructions) — Make motif exactly as Motif 1 :
Motif 2 — Round 1 :
Follow Motif 1 Round 1 instructions using chosen blue for center. (24 dc, 8 ch-2 corners)
Motif 2 — Round 2 :
Follow Motif 1 Round 2 instructions. (48 dc)
Motif 2 — Round 3 :
Follow Motif 1 Round 3 instructions. (72 dc)
Info :
While making Motif 2, keep Motif 1 nearby to match color transitions and tension for a uniform finished runner. Use the same yarn lot if color matching matters.
Motif 2 — Round 4 :
Follow Motif 1 Round 4 instructions. (96 dc)
Motif 2 — Round 5 :
Follow Motif 1 Round 5 instructions. (~64 dc)
Motif 2 — Round 6 :
Follow Motif 1 Round 6 instructions; leave long tail for joining. (~64 sc)
Info :
Make Motif 2 and place immediately below Motif 1 to check angle and spacing; when both are blocked and matching, continue making Motifs 3-7.
— Motif 3 (Repeat Motif 1) :
Motif 3 — Round 1 :
Repeat the center rounds exactly as Motif 1. (24 dc, 8 ch-2)
Motif 3 — Round 2 :
Repeat round 2. (48 dc)
Motif 3 — Round 3 :
Repeat round 3. (72 dc)
Info :
At motif three, you will begin to get a sense of the runner rhythm — alternate deep and medium blue centers for a nice visual cadence similar to the photo: deep, medium, deep, medium, deep, medium, deep (7 motifs).
Motif 3 — Round 4 :
Repeat round 4. (96 dc)
Motif 3 — Round 5 :
Repeat round 5. (~64 dc)
Motif 3 — Round 6 :
Repeat round 6 and fasten off with long tail for joining. (~64 sc)
Info :
Make motifs 4, 5, 6 and 7 repeating the exact steps in Motif 1 and Motif 2 sets above until you have a total of 7 motifs blocked and ready. Ensure consistent orientation—each motif should be on point (diamond) before joining.
— Joining Motifs (Join-As-You-Go Column) :
Info :
We will join the 7 motifs into a single column using the join-as-you-go (JAYG) method so the seam is flat and invisible. Start with Motif 1 and Motif 2. You can also join after making all motifs using whip stitch if you prefer.
Join Step 1 — Prep :
Place Motif 1 and Motif 2 on point matching corner to corner so edges align. With right sides facing up and using the long tail left on the second motif, position Motif 2 below Motif 1 so the top corner of Motif 2 meets the bottom corner of Motif 1 (diamond orientation).
Join Round A :
Attach cream yarn at one corner of Motif 2 with a sl st. Work sc across the edge until you reach the corner meeting Motif 1. Instead of finishing the sc into empty space, insert hook into corresponding stitch on Motif 1 and sl st to join, then continue sc across Motif 2 edge, pairing stitches with Motif 1 as you go. At the top edge where motifs meet, work sc-join pairs in every stitch across the edge to create a flat seam. Join and fasten off when edge is complete.
Info :
Keep tension relaxed when joining; too tight a join will pull the motifs into a curve. Aim for flat seams and even spacing so diamonds read as a continuous pattern.
Join Round B :
Repeat the join described above for Motif 2 to Motif 3, Motif 3 to Motif 4, and so on until all 7 motifs are joined in a column. Use the long tail method or whip stitch to finish if you prefer a quicker approach.
Info :
If you prefer a more decorative join, you can use a crochet join such as single crochet through both motifs or a slip-stitch ridge — these are stylistic choices. The pictured runner uses a very flat cream join to let blue centers pop.
— Central Seam / Stabilizing Rounds :
Round JS1 :
With cream and working around the entire assembled column, attach yarn to a corner and ch1, work 1 sc in each stitch around the outer edge of the assembled motifs including along the outer sides where motifs meet. At internal joins where two motif edges meet, work sc in the join to stabilize. This round evens out the perimeter. Count will vary but expect approximately 420-480 sc around the whole column depending on exact motif tension.
Info :
This round smooths internal variations. Work slowly around corners to maintain symmetrical pointed ends at top and bottom.
Round JS2 :
With cream: ch3 (counts as dc), work 2 dc in next 2 sts, ch1, *sk 1, (3 dc, ch1) in next space or between 3-dc groups; rep around making sure to place (3 dc, ch2, 3 dc) into the corner points to keep the tip. Join with sl st. This creates a lacy frame that ties the motifs together. (Estimated stitches this round ~ 140-160 dc)
Info :
Use stitch markers at the four points (upper tip, lower tip, and two side middles) to keep track of where corners fall while you work the border rounds.
Round JS3 :
With cream: Work (ch1, sc) evenly in each stitch around to tidy and reduce the bulk before proceeding to decorative openwork rounds. Join and fasten off if desired. (Estimated sc this round ~ 320)
Info :
At this stage your runner should have a neat continuous cream border with the blue diamonds reading clearly. Double-check symmetry and evenness before beginning the more decorative open border rounds.
— Decorative Lacy Border (6 rounds) :
Border Round 1 :
With cream: Attach yarn at one side point. Ch3 (counts as dc), *skip 2 sts, (3 dc, ch2, 3 dc) in next ch-1 or space, sk 2 sts, 1 dc in next stitch; rep around creating a scalloped lacy look that frames each diamond. At sharp tips, work (3 dc, ch3, 3 dc) to accentuate the point. Join with sl st. (Stitch count varies by join placements; estimate ~140 clusters total across whole border)
Info :
Work careful counts across long straight sides to keep the lace even. Use pins if needed to block the border as you go.
Border Round 2 :
With cream: ch1, 1 sc in each stitch and in top of each 3-dc cluster, work (sc, ch3, sc) into each ch-2 space to create airy chain arches. Join and fasten off. (Estimated sc ~ 320 plus ch-arches)
Info :
This round forms the foundation for the final edging and tassel attachment points. Make sure chain arches line up at peaks where tassels will hang.
Border Round 3 :
With cream: Re-join yarn to any chain-3 arch and work: (sc, ch5, sc) into each arch to elongate loop, then 2 sc between arches. Continue around to form elongated loops. Join with sl st. (Number of loops equals number of original ch-3 arches)
Info :
These elongated loops are the locations we will base tassel ties from — keep them evenly spaced and tidy for a balanced final look.
Border Round 4 :
With cream: ch1, work 1 sc into each stitch around including into the top of each elongated loop (into the central ch of the loop) to flatten them slightly and create small secure anchor points for tassels. Join and fasten off. (Estimated stitches ~ 380)
Info :
At the pointed ends of the runner, make sure there is an anchor point in the exact center for a tassel. Place a stitch marker at this center for future tassel placement.
Border Round 5 :
Optional decorative round — With cream: work 1 hdc in each st around for a soft textured border. Join and fasten off. (Estimated hdc ~ 380)
Border Round 6 :
Final finishing round — With cream: 1 sc in each st BLO around to form a neat ridge. Fasten off and weave in ends. This makes the outer edge crisp and professional looking. (Estimated sc ~ 380)
Info :
Blocking at this stage will make the diamond points crisp and help the border lie flat. Pin to desired dimensions and steam lightly or wet-block.
— Tassels & End Finishing :
Tassel Step 1 :
Prepare tassels in two colors — cream and navy. Decide on alternation: the photo shows alternating cream and navy tassels at both ends. Each tassel here uses approximately 25-30 strands folded in half to create a full tassel ~6.5" length before knotting (final trimmed length ~6").
Tassel Step 2 :
Cut lengths of yarn ~13" long (double final desired length). For a full tassel use 25 strands. Fold in half and use a small loop at top to secure through the border anchor point by pulling folded loop through anchor and threading the tassel tail ends through the loop (lark's head knot). Pull tight to secure.
Info :
Alternate cream and navy tassels so the color matches the diamond centers below. Anchor tassels at each central chain-arch along the top and bottom tips; add extra tassels spaced evenly along the long edges if desired for fuller fringe.
Tassel Step 3 :
After attaching, create a decorative knot by wrapping a separate short piece of the same color around the top 1/2" of the tassel and knotting, then sewing the short tail ends into the tassel top for a neat finish. Trim tassels even and comb lightly to fluff.
Tassel Step 4 :
For the pointed ends, add a single central tassel at the tip plus two small knotted tassels on either side to mimic the photo. Ensure symmetry when viewing the runner laid flat.
Info :
For security, stitch through the tassel loop and the border stitch once more with the yarn needle and a short tail to permanently anchor tassels to the runner.
— Finishing & Weaving In Ends :
Finish Step 1 :
Weave in all ends with a yarn needle, running tails through several stitches of the same color. For tassel top knots, stitch through knot several times for security.
Finish Step 2 :
Block the entire runner to final dimensions, pinning lengths and points, steam lightly, and allow to dry completely. Trim tassels evenly once dry.
Info :
Final trimming and fluffing the tassels as a group ensures even lengths. Store the runner flat or rolled to avoid creases.
— Notes on Variation and Sizing :
Info :
To make a wider runner, create multiple columns and join side-by-side using the same join-as-you-go technique. To lengthen the runner, add more diamond motifs to the column in odd numbers so both ends remain pointed. Adjust tassel length and quantity proportionally.
Info :
If you prefer a denser runner use a 3.5mm hook and the same yarn; this will create a smaller, tighter fabric and require slightly more yarn overall.
This diamond granny table runner brings pattern and texture to any table with a handcrafted warmth that feels both timeless and modern. Every starburst center and lacy border stitch comes together to create a piece you’ll be proud to display. The alternating blue tassels give a playful rhythm and finish that makes the runner feel complete and intentional. 🧶✨ Enjoy the relaxing stitch rhythm as you make it and the compliments when you place it on your table. Happy stitching! 🌿